

Smartsheet is great for team collaboration and keeping everyone on the same page with real-time updates. But let’s be honest: when it comes to heavy number-crunching or running those old-school macros, Excel still reigns supreme. The challenge? Getting your data out of Smartsheet and into Excel without losing important details or spending hours cleaning it up.
In this guide, we’ll start with the easiest built-in way to get your Smartsheet data into Excel and review alternative options side-by-side for an honest comparison.
A step-by-step guide for Smartsheet data to Excel export with Coupler.io
Coupler.io is an all-in-one data integration platform that allows you to automatically export data from Smartsheet on a recurring schedule. It connects directly to Smartsheet and transfers your data to dashboards, data warehouses, AI tools, and spreadsheet apps such as Excel.
To create a data flow from Smartsheet to Excel right away, click Proceed in the form below. You’ll be offered to sign up for Coupler.io for free with no credit card required.

Follow the detailed guidelines below to set up automatic exports of your Smartsheet data on the schedule you need.
Step 1: Collect Smartsheet data
- Connect your Smartsheet account and specify the sheet ID.

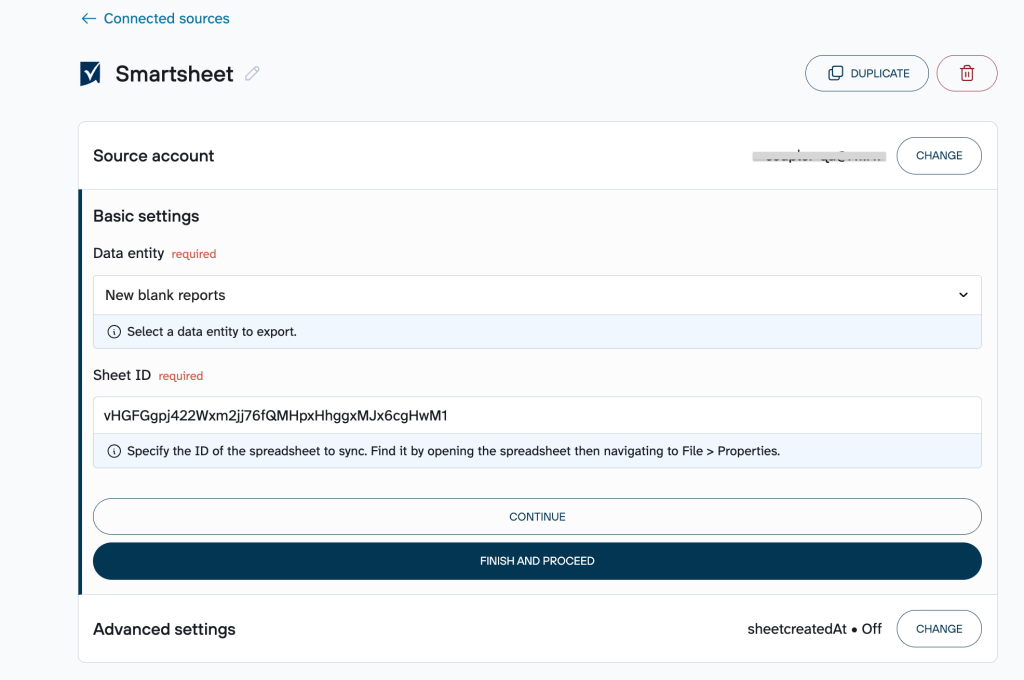
To find the sheet ID, go to your Smartsheet dashboard, right-click on the sheet, and select the Properties option from the dropdown menu. Now you can copy the sheet ID from the pop-up window.


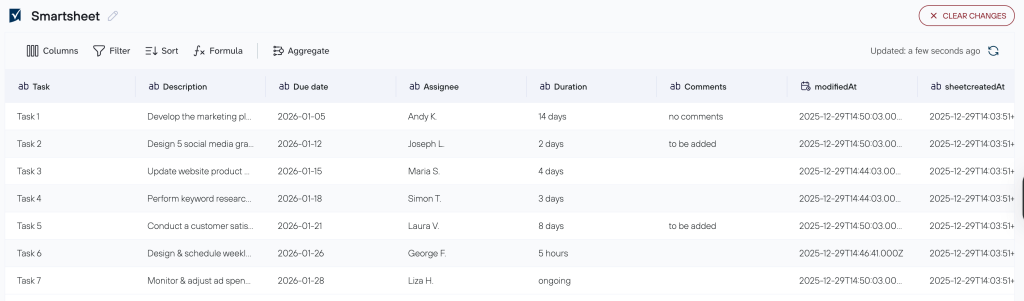
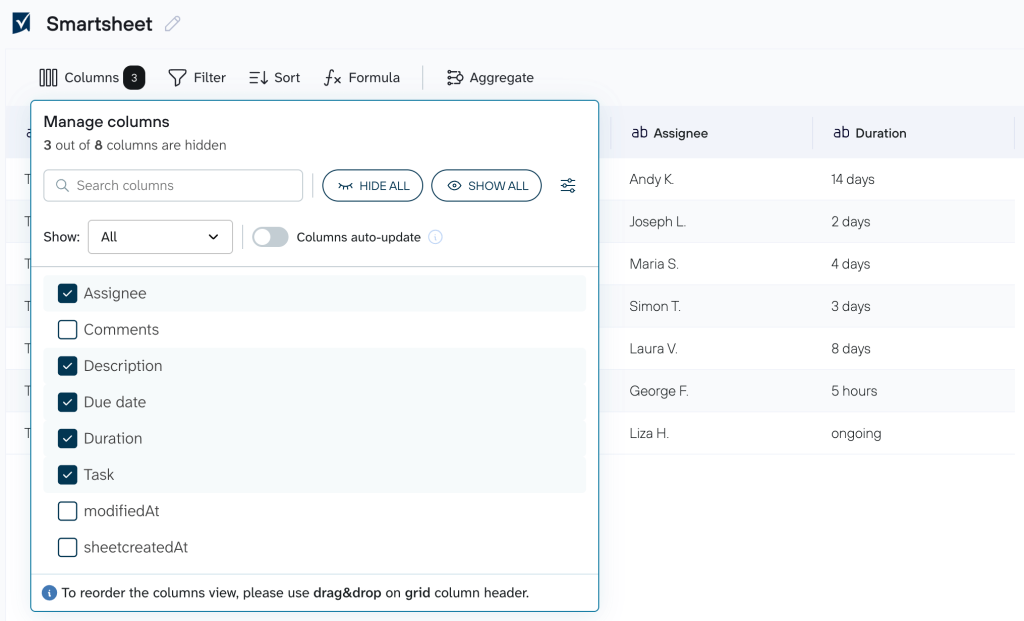
Step 2: Organize data sets
Go to the Data sets tab to prepare and structure the information prior to export. Here you’ll be able to:
- Manage your columns (renaming, hiding, reordering, etc.)
- Filter the data according to the rules you define
- Apply sorting to the rows
- Insert formula-based columns for on-the-fly calculations
When you see the imported table, you will discover two more columns that are not available in your Smartsheet: the dates for the sheet creation and row modification.

Additionally, the tab lets you blend data from multiple sheets of your Smartsheet or even combine Smartsheet data with information from other sources. More details on these capabilities later in this article.
Step 3: Connect the destination
Coupler.io provides two Excel destination options to export data: Excel Online and Excel Desktop. Their setup is slightly different, so let’s go over each option.
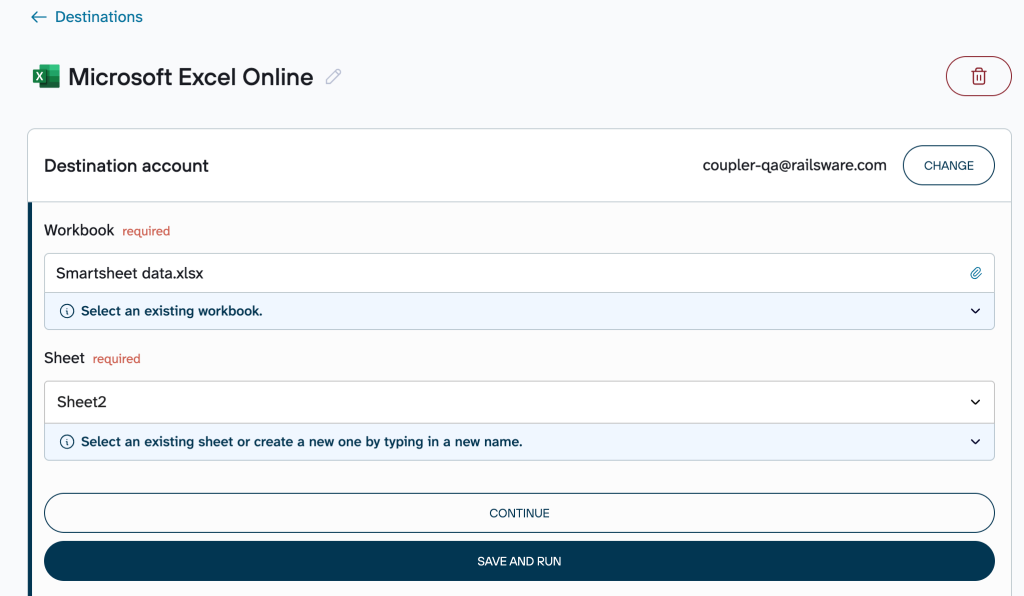
If you choose Microsoft Excel Online from the list of destinations, select the workbook from your OneDrive folder, and specify the sheet.

It’s necessary to check that your pop-ups are not blocked in your browser settings. Otherwise, you’ll get the following error:


Unblock the pop-ups, and then you’ll be able to select the workbook from your Smartsheet account.
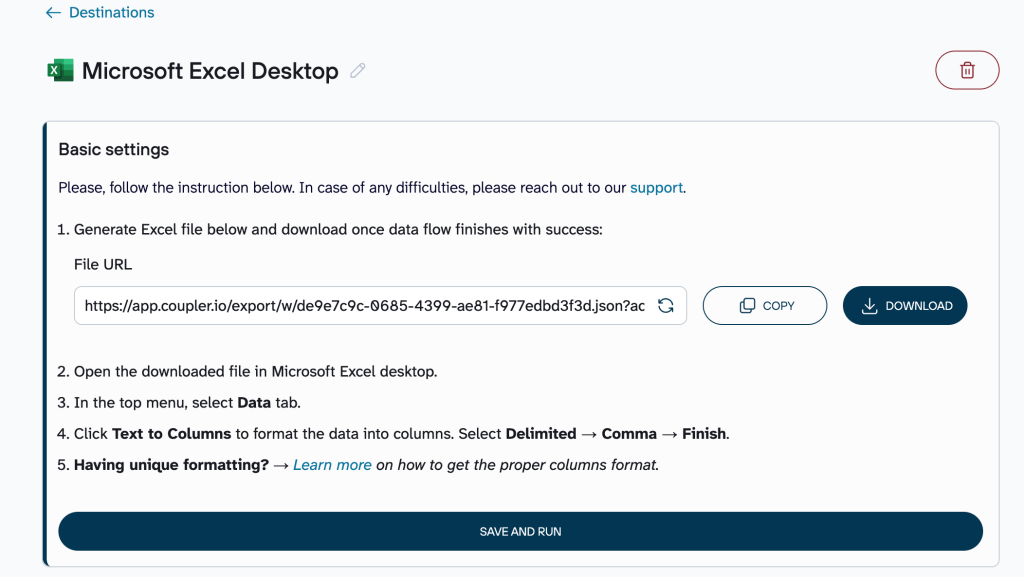
If you choose Microsoft Excel Desktop, generate the Excel file in the basic settings.
After that, you’ll be able to download your data as a CSV file and open it in Microsoft Excel desktop.

Step 4: Automate data refresh
The setup flow ends with the automation section. Enable the automatic data refresh and set your preferred schedule for pulling data into Excel.

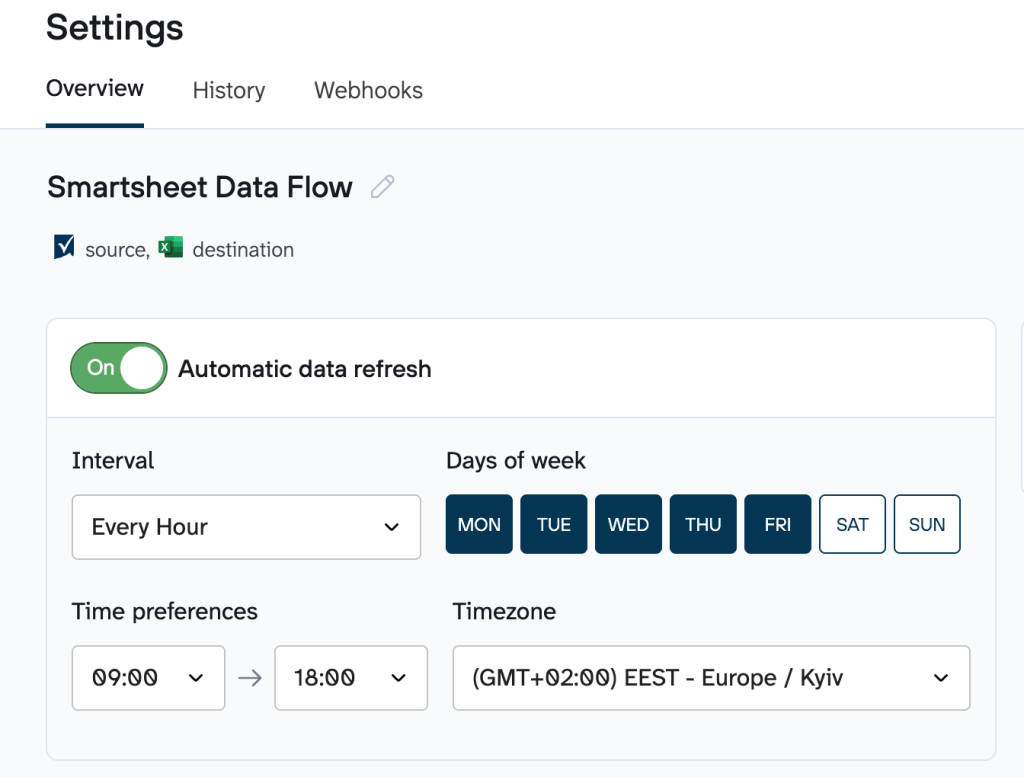
Once done, the data will automatically appear in the Excel sheet you’ve selected.


In addition to Microsoft Excel, Coupler.io allows you to export Shartsheet data to Google Sheets, BI tools, data warehouses, and even connect it to AI tools. Give it a try right away!
How you can organize your Smartsheet data with Coupler.io
Coupler.io lets you set up a simple data export from Smatsheet to Excel as is. At the same time, you can organize and modify your data before loading it into your workbook. Here are the data transformations available in Coupler.io.
Basic data optimization options
Adjust your Smartsheet info in Coupler.io before it goes to your Excel account. This way, you’ll skip the manual cleanup grind later. Handy options include:
- Column changes: Rename for readability (e.g., “Text1” to “Project name”), hide extras, or rearrange so key metrics pop.
- Filtering and sorting: Focus on active projects, team tasks, or last week’s changes; sort by date, task duration, assignee (alphabetical order), etc.
- Calculated columns: Create formulas to get instant calculation in a separate column (e.g., overdue days).

Advanced options: data blending and summarizing
When you want to go further, Coupler.io lets you combine Smartsheet data with other sources or summarize large datasets for an optimized view and analysis.


- Append stacks similar data vertically. It matches columns by name (e.g., “Status,” “Priority”) and adds rows from each source. Great for consolidating multiple project trackers into one unified report.
- Join connects datasets horizontally using a common field like date, project name, or ID. Your main Smartsheet stays intact, and matching info from the second source gets added. For example, link Smartsheet tasks with Jira tickets to see open bugs blocking progress.
- Aggregate condenses hundreds of rows (e.g., daily updates, comments, assignments) of your Smartsheet data. Group by fields and apply calculations like sum or averages. For example, roll up by month to track completion trends, by team to compare workload, or by status to see total effort on in-progress items.
Automate Smartsheet data export with Coupler.io
Get started for freeExport versatile data from Smartsheet using the REST API without coding
Coupler.io’s ready-to-use Smartsheet to Excel integration exports only the reports created within Smartsheet. If you need access to other types of data, such as raw sheet rows and columns, attachments, comments, metadata, cross-sheet references, etc., the built-in integration won’t be enough.
This is where Smartsheet’s REST API seems to be the most suitable option. However, it demands some programming know-how. Coupler.io steps in with its JSON importer to provide you with an easy, code-free way to use Smartsheet’s REST API and bring your data into Excel.
To start using the Smartsheet API, you’ll need to generate an API token.
Once your Smartsheet API token is ready, we’ll show you one more way to export your data to Excel using Coupler.io.
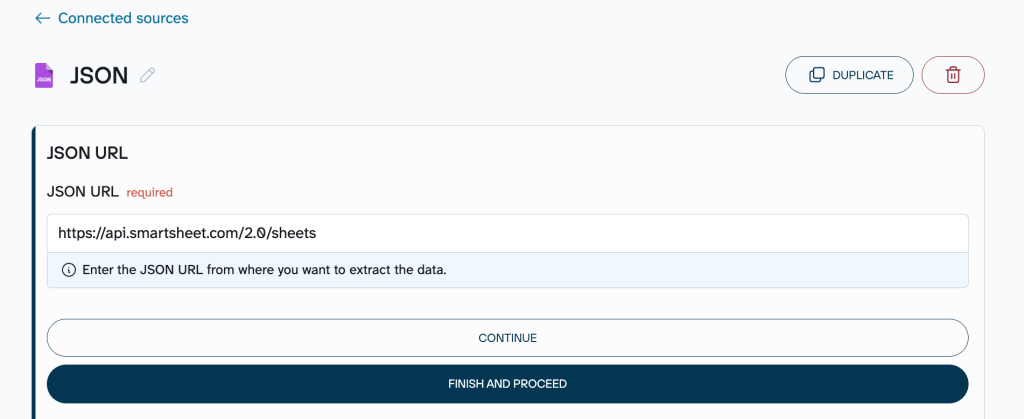
Step 1. Collect data from Smartsheet API
To simplify the process, here’s the pre-built form. Click Proceed in the form, and you’ll be offered to sign up for Coupler.io for free with no credit card required.
- Insert the URL of your Smartsheet endpoint. To select the endpoint, go to the Smartsheet’s Open API Reference, explore the complete list of available endpoints, and choose the one you need. In our example, we’re exporting information about all the sheets we have in Smartsheet.
https://api.smartsheet.com/2.0/sheets

- Select the GET request method.
- Specify the header parameters for your request:
Authorization Bearer {the api token you’ve generated earlier}

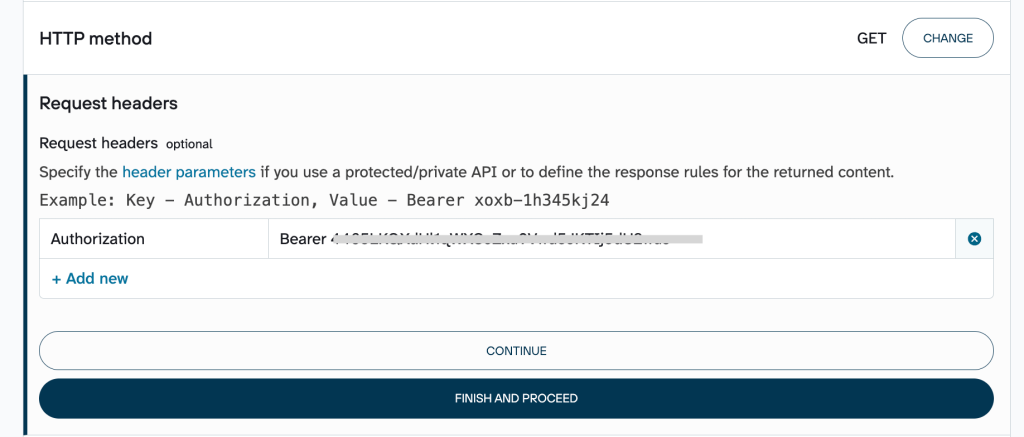
- If needed, specify the URL query parameters. Once done, click Finish and Proceed.
- Once the first step is completed, your data appears in Coupler.io.


Proceed to the next steps, which are the same as described above (select Microsoft Excel as the destination, set automatic data refresh, and run the data flow).
In a few seconds or minutes, you’ll get information about sheets in your Smartsheet account to the selected Excel workbook.


Alternative ways to export Smartsheet data to Excel
Coupler.io users can set up automatic data exports from Smartsheet to Excel for dynamic reporting or information sharing. At the same time, there are other options to export your data that will be suitable for other cases:
- Quick one-off export of the current view to instantly download the sheet or report exactly as displayed
- Export sheet comments or summary on a dedicated, separate tab
But keep in mind that they might either have limitations or require certain technical skills.
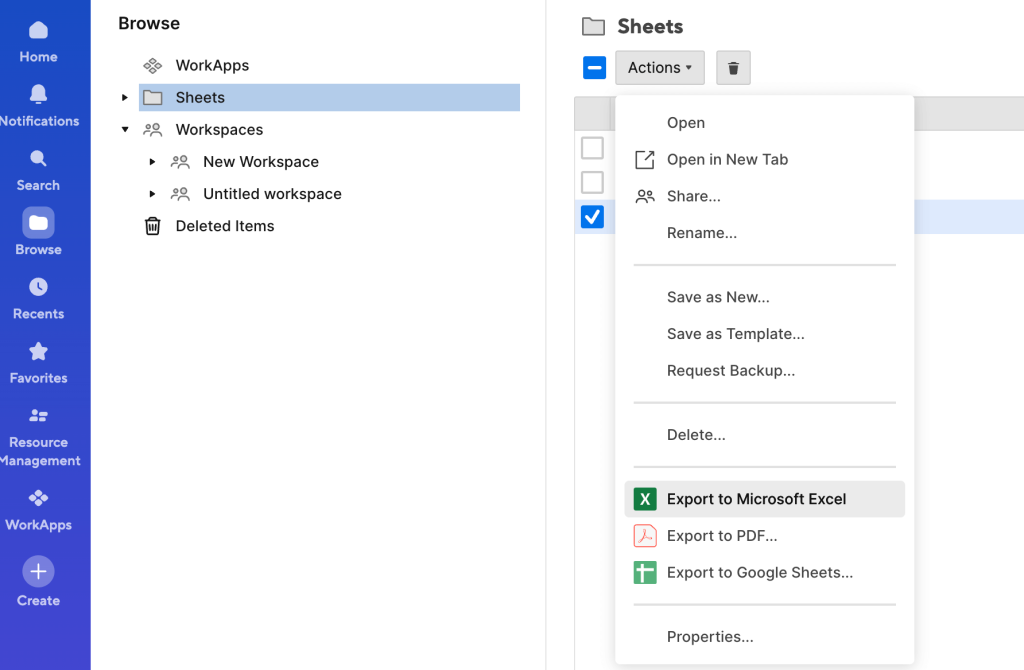
Direct data export through the Smartsheet UI
Open the left panel and click Browse to see your sheets and reports. Pick the one you want by clicking its name, then click Actions up top and choose Export to Microsoft Excel. The download starts immediately.

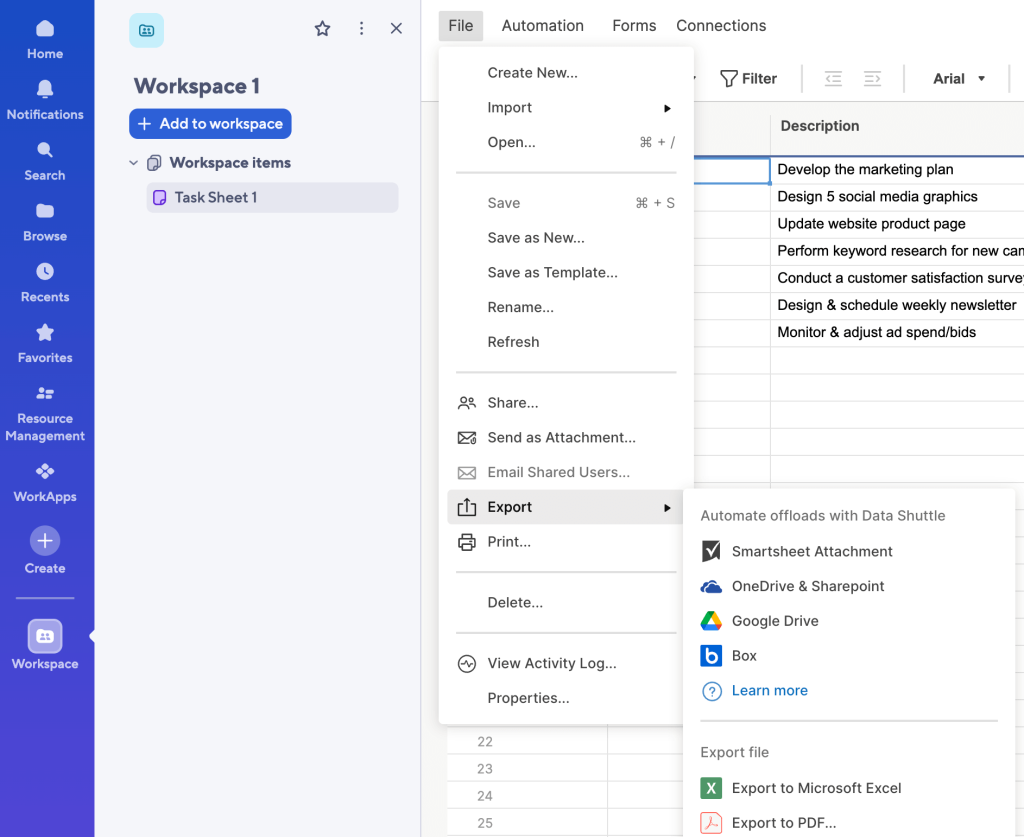
Alternatively, open the sheet or report directly, click File > Export > Export to Microsoft Excel.

Smartsheet auto export to Excel
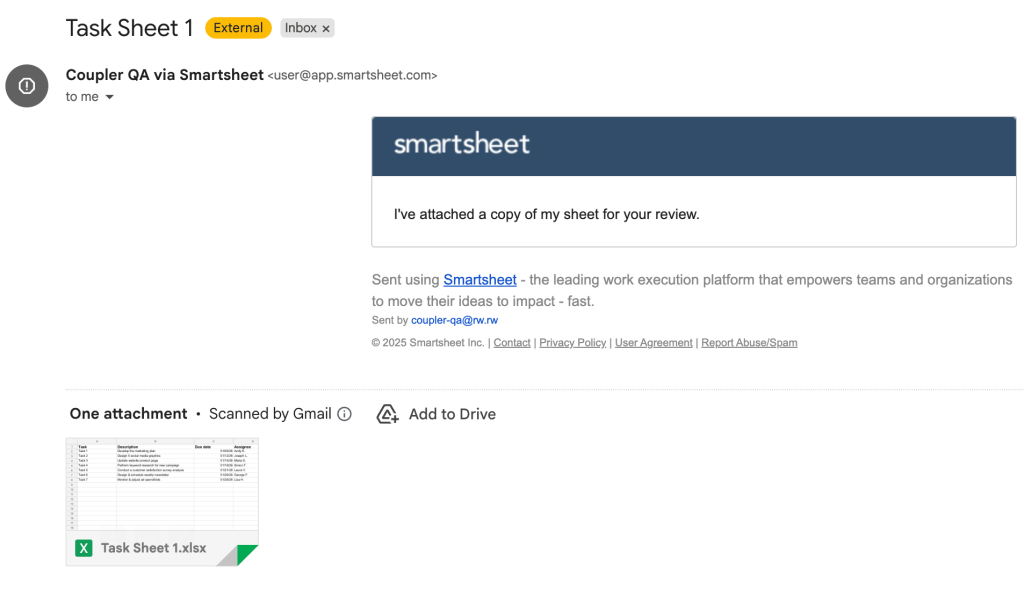
Smartsheet offers the opportunity to generate recurring exports. You can send the entire sheet through email as an Excel attachment or share a report as an attachment in an email.
This option allows you to automatically email a fresh Excel snapshot of your sheet or report on a schedule directly to people outside Smartsheet. It’s convenient for large teams because you can add multiple recipients. The email message customization option is also available here.
To do this:
- In the menu bar, select File and click Send as an attachment.

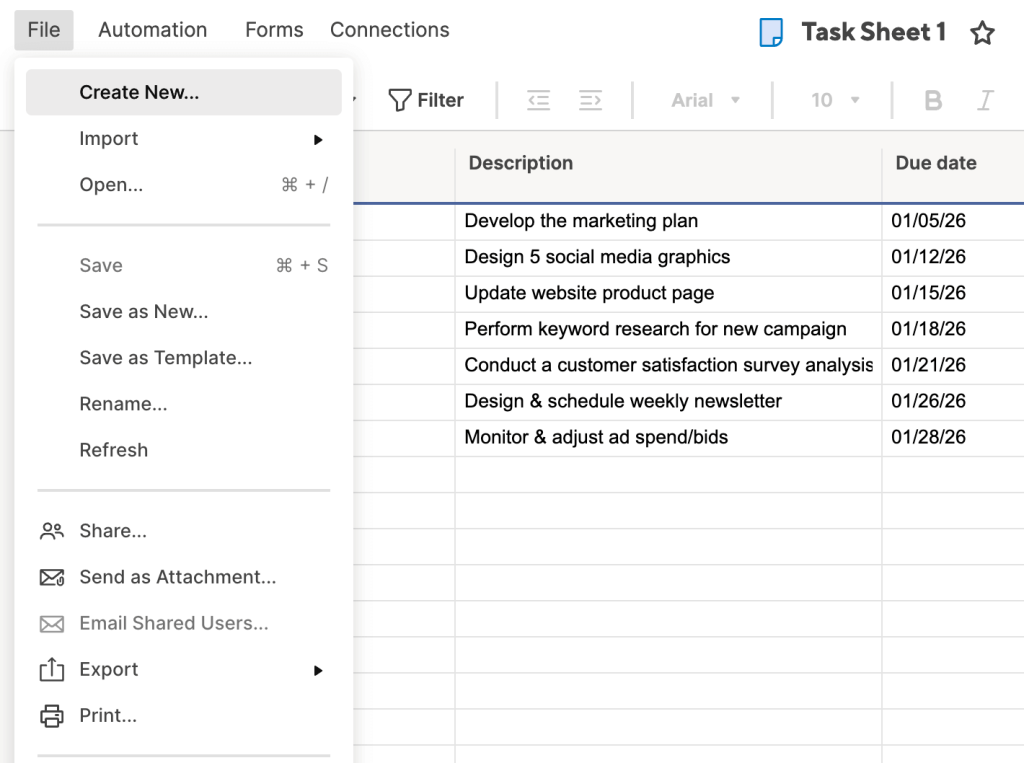
- Type the email addresses of the people who should receive the email. Separate multiple email addresses with a comma or a semicolon. To choose contacts from your Smartsheet Contact List who will receive the email, click Select Contacts. Users can select from other members of their team or groups created by their Group Admins. In the Attach as option, select Microsoft Excel.


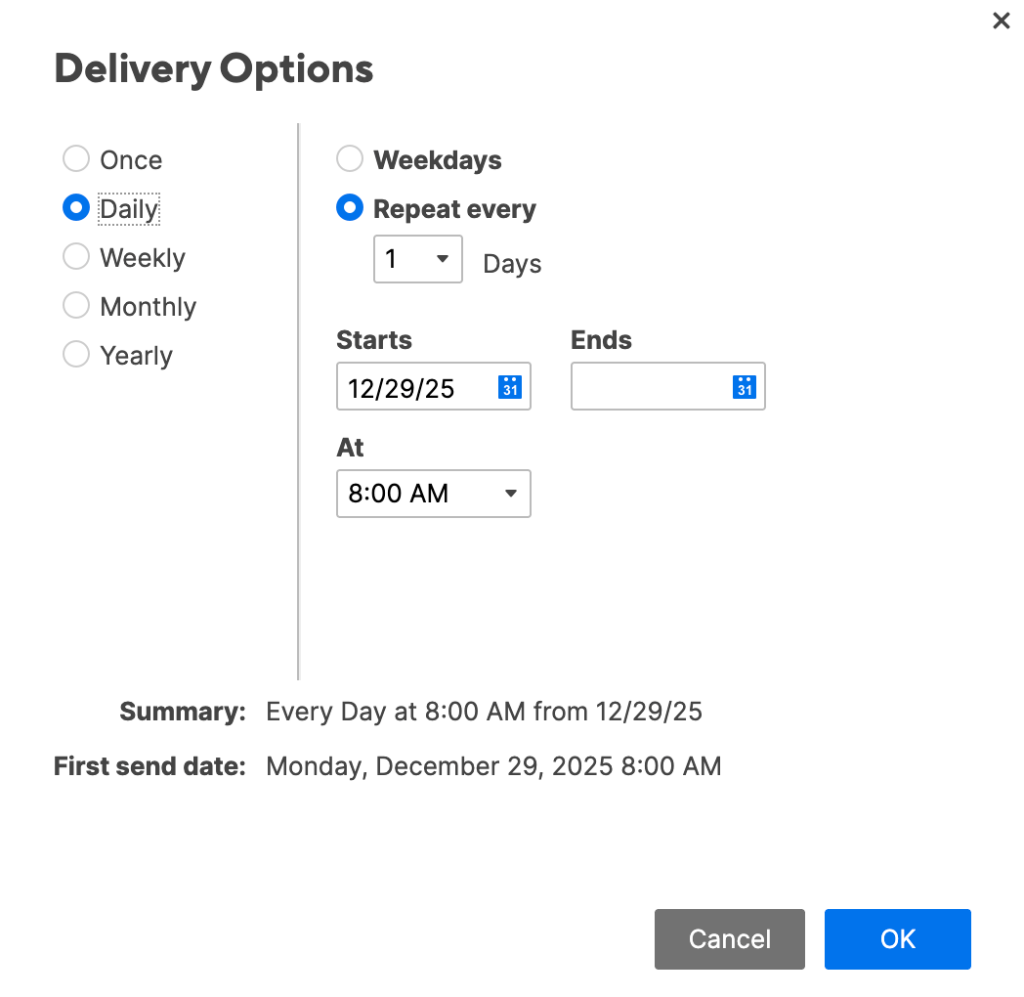
- In the window, next to Delivery, click on Schedule to send later or on a recurring basis.

- Once you send the attachment, this is what the received email will look like:

When to use manual export options and when it’s not the best choice
Smartsheet’s manual export to Excel is a quick, no-setup way to download a one-time snapshot of your sheet or report. It’s the best option in these simple scenarios:
- Occasional or one-off needs: You only need the data rarely (e.g., for a single report, backup, or quick sharing with someone who prefers Excel).
- Immediate snapshot of the current view: Capture exactly what’s on screen right now, including row hierarchy, visible columns, comments (on a separate tab), and sheet summaries (on their own tab).
- Ad-hoc archiving or offline work: Create a static file for records, offline editing, or basic analysis without any ongoing connection.
- No extra tools required: Everything is built in, perfect if you want to avoid third-party apps or configurations.
However, manual export isn’t a good fit in the following cases:
- Frequent or recurring exports → Doing it manually every time (daily/weekly) is time-consuming and error-prone.
- Need for always up-to-date data → The exported file is a static snapshot; it becomes outdated as soon as your Smartsheet changes.
- Large-scale or automated workflows → No scheduling; it’s fully manual, so it doesn’t scale for teams or ongoing reporting.
- Advanced data needs → Attachments aren’t included, formulas export as static values, not live, and special column types (like checkboxes or dropdowns) lose functionality (become plain text).
How to export Smartsheet report to Excel with all attachments and comments
Smartsheet allows you to attach files to your sheet either from your PC or cloud storage providers. However, these attachments are not exported in Excel when exporting your Smartsheet data. What’s more, comments appear on a separate tab in the exported Excel file.
At the same time, you can export all Smartsheet files – attachments – either through the platform or through the REST API. The latter is quite a complex method, while exporting files through the UI is available for every user.
Export all Smartsheet files to Excel through the UI
To include attachments, you have to create a backup of the sheet. This automatic backup includes a folder containing any attachments that were uploaded directly to your sheets from a computer or mobile device.
To request a one-time backup:
- Go to the Browse section on the navigation bar.
- Select the item and open the Action menu or right-click on the name of the sheet or report and choose Request Backup.

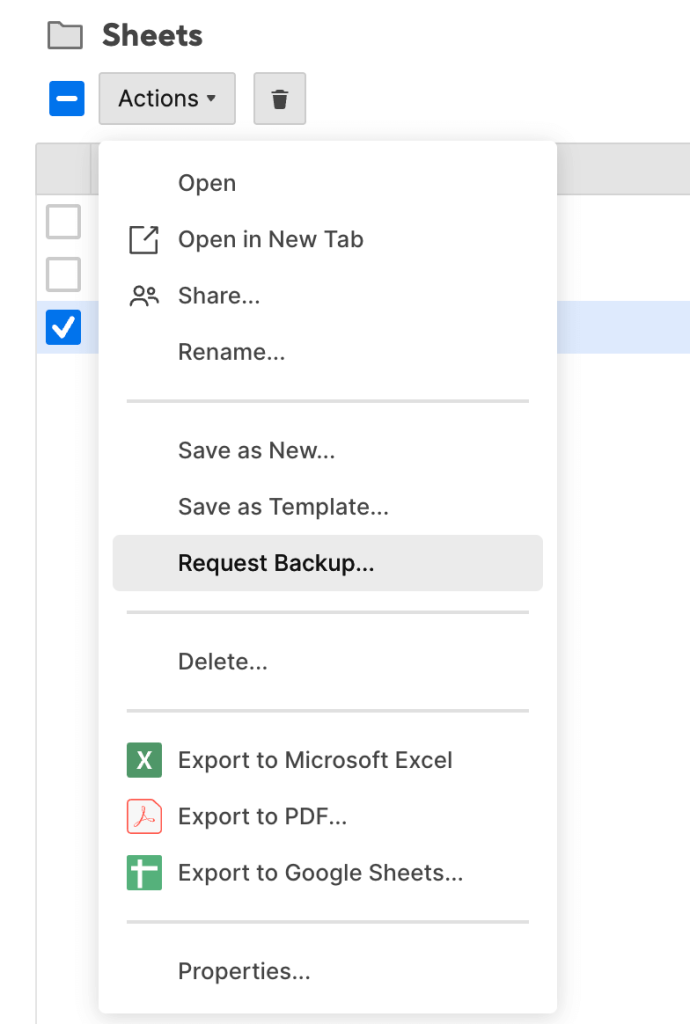
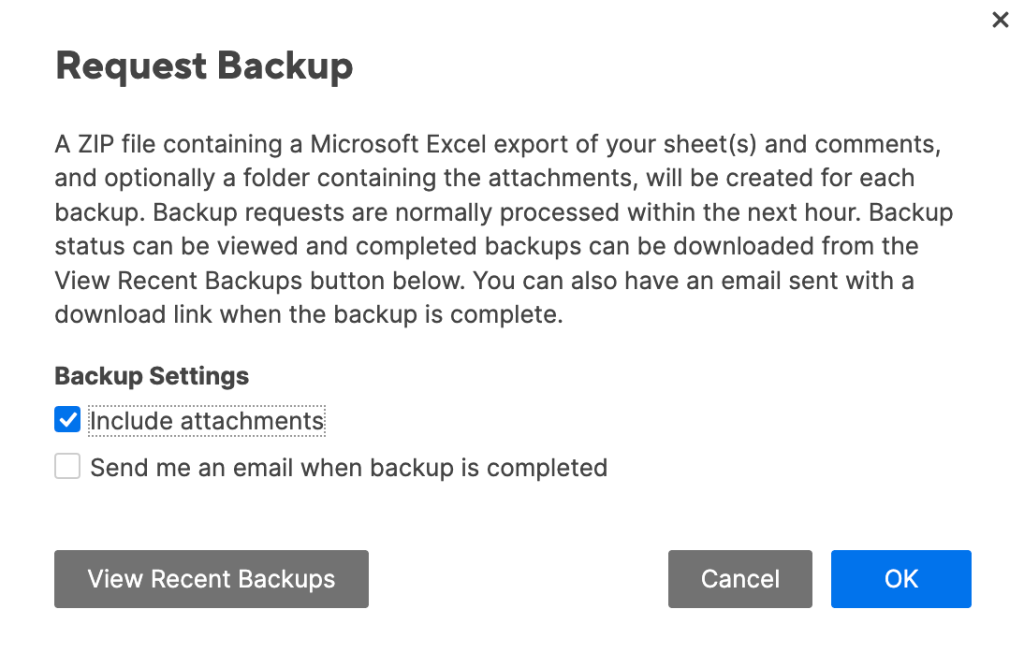
A pop-up window will appear. Follow the instructions and make sure you click on Include attachments.

If you want a backup copy of your data and you are on a Business or Enterprise plan, you can:
- Request a weekly recurring backup
- Request a sheet snapshot from a specific point in time from the sheet’s Activity Log.
FAQ on Smartsheet data export to Excel
How to export Smartsheet to Excel with formulas?
Smartsheet and Excel use different formula languages, so when you export, any formulas turn into static values (just the results, not the live calculations). Once the data is in Excel, you’ll need to rebuild the formulas using Excel’s syntax if you want them to update automatically. It’s a bit of extra work, but that’s the main limitation with the native export.
How to export Smartsheet Gantt chart to Excel?
Excel doesn’t support Smartsheet’s Gantt format. Exporting only brings over the task list (rows, dates, dependencies); the timeline visual stays behind. Workaround: Export the sheet to Excel, then build your own Gantt chart there using bar charts or conditional formatting. For ongoing updates, use Coupler.io to keep the data synced automatically.
Is there a way to keep my Smartsheet data automatically updated in Excel?
The built-in export only gives you a one-time snapshot. For automatic refreshes, you’ll need Coupler.io (or the Live Data Connector if your plan includes it). It can schedule regular pulls, so your Excel file stays current without manual re-exporting each time.
What are the limitations when exporting Smartsheet data through the UI?
Here are the key things that don’t transfer perfectly:
- Formulas become static: They export as fixed values or plain text, with no live calculations. You’ll need to recreate them in Excel if you want dynamic formulas.
- Comments and sheet summaries move to separate tabs: They appear on dedicated worksheets instead of staying next to the related rows or cells.
- Attachments are not included: Files, images, or links attached to rows remain in Smartsheet and must be downloaded separately.
- Special column types lose interactivity: Checkboxes, dropdowns, contact lists, and symbols turn into plain text.
- Reports capped at 20,000 rows: Anything larger gets cut off; you’ll need to apply filters and export in smaller chunks.
Smartsheet-specific features don’t carry over — Automated workflows (alerts, reminders, approvals, row locking, etc.) are lost entirely in Excel.