Copilot can write your emails, summarize a meeting, and draft a report in seconds. But ask it something that depends on your real business data, and it stalls.
Like any AI assistant, it can only work with data it’s been connected to, and it isn’t built to run reliable calculations across large datasets on its own.
That part isn’t unique to Copilot. Claude and ChatGPT have the same limits, but the path to fixing it looks different here: connecting Copilot to external data is largely admin-managed rather than self-serve, and most custom connections get built in Copilot Studio rather than in the chat window itself.
Here are different ways of integrating external data with Microsoft 365 Copilot and where each one fits.
| Connection method | Setup effort | Who does the math | Best for | Watch out for |
| Coupler.io | Low: create a data flow, connect it to an agent in Copilot Studio | Coupler.io’s Analytical Engine returns validated results | Accurate, scheduled analysis across 400+ data sources | Requires maker access in Copilot Studio to set up |
| Microsoft’s native connectors (synced and federated) | Low: admin enables from the Microsoft 365 admin center | Copilot. Can attempt calculations over retrieved data, but with no validation layer | Quick lookups and citing sources in supported apps | Built for search, not cross-source analysis; large sources may hit indexing limits |
| Custom federated connector (MCP) | Medium-high: developer builds an MCP server, admin registers it | The connected system itself; Copilot has no validation layer | Internal databases, proprietary APIs, tools with no built-in connector | Accuracy depends entirely on the source system returning correct results |
| Copilot Studio agents and the Graph connectors API | High: build tool-use or RAG-style pipelines from scratch | Your backend or connected system; Copilot only reasons and responds | Teams building their own Copilot-based agents or products | Most developer-heavy option; requires Copilot Studio access and dev resources |
| Direct file upload and Copilot Notebooks | Minimal: drag and drop into chat or add to a Notebook | Copilot. No validation layer, prone to calculation errors | One-off analysis or a persistent knowledge base from fixed files | Data goes stale the moment you upload it; prone to hallucinations |
Connect business data to Copilot using Coupler.io
If you want dependable, cross-source numbers you don’t have to double-check, Coupler.io is the most reliable option on this list.
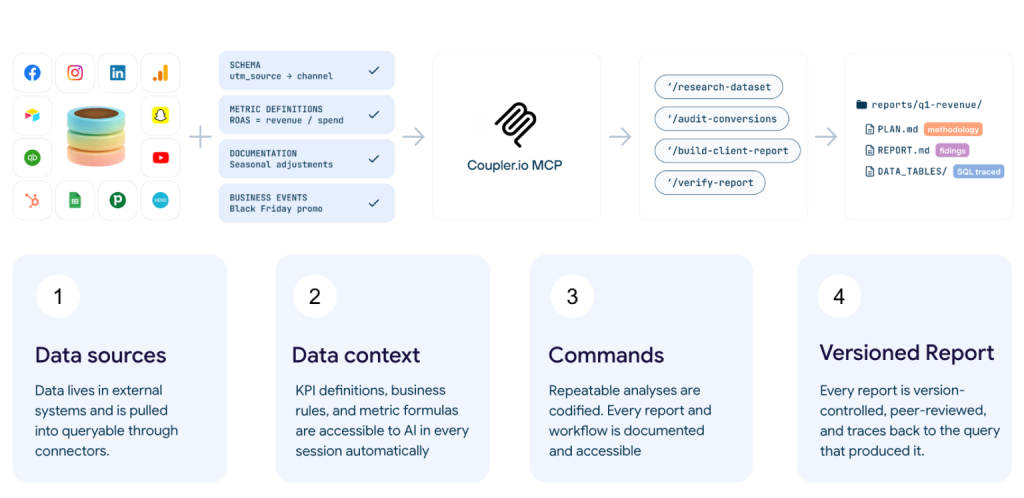
Coupler.io sits between your external data sources and Copilot, and its Copilot integrations let the Analytical Engine do the calculations instead of leaving them to the AI.
When you ask a question, Copilot sends the request to Coupler.io, which runs the actual query against your data, verifies the result, and hands back a number Copilot (and you) can trust.
Check out how Coupler.io works as a middle layer between your data and Copilot (or other data destinations):

⚠️Before we begin: this setup happens in Copilot Studio, which requires maker access, a role your organization’s admin provisions ahead of time. If you already have that access, you can follow these steps yourself. If you don’t, you’ll need someone with maker or admin permissions to do it for you.
Step 1: Create a data flow in Coupler.io
Sign up for Coupler.io, and a data flow will let you pull data from one or more of its 400+ data sources. From there, you can transform the data, combine it, blend it, or append it into exactly the shape you need. Then you send it wherever you work, whether it’s a dashboard tool, a warehouse, a spreadsheet, or an AI tool like Copilot. Everything refreshes on a schedule, so every destination is always working from up-to-date data.
For more personalized and accurate insights, you can add context to your data flow (definitions, exclusions, how you define a specific metric) so answers reflect how your business actually works, not just what the raw columns say. This option is available on the Data Sets screen.

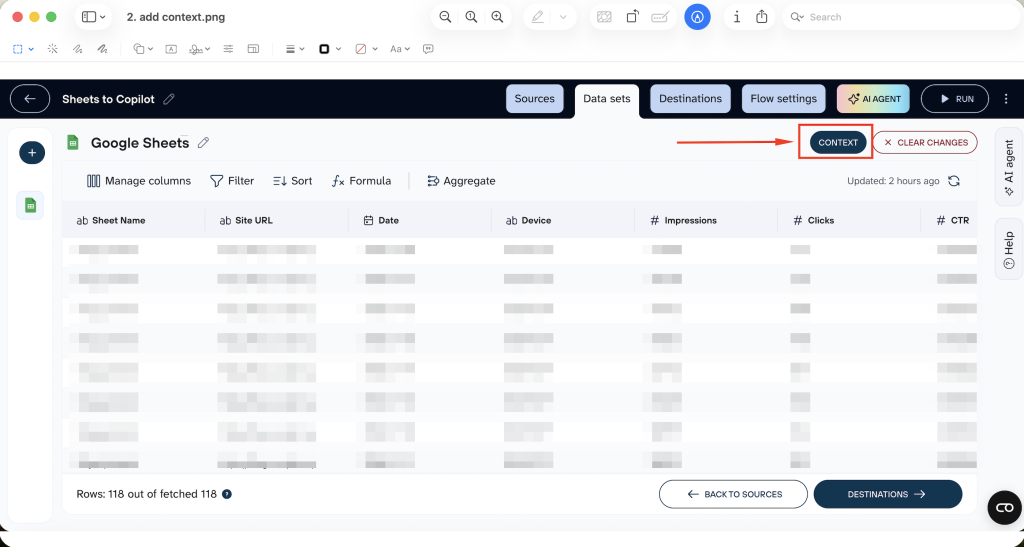
Once you’ve created a data flow, choose Microsoft Copilot Studio as your destination.
Try it right away for free with no credit card required. Select the source in the form below and click Proceed.

Step 2: Connect Microsoft Copilot Studio
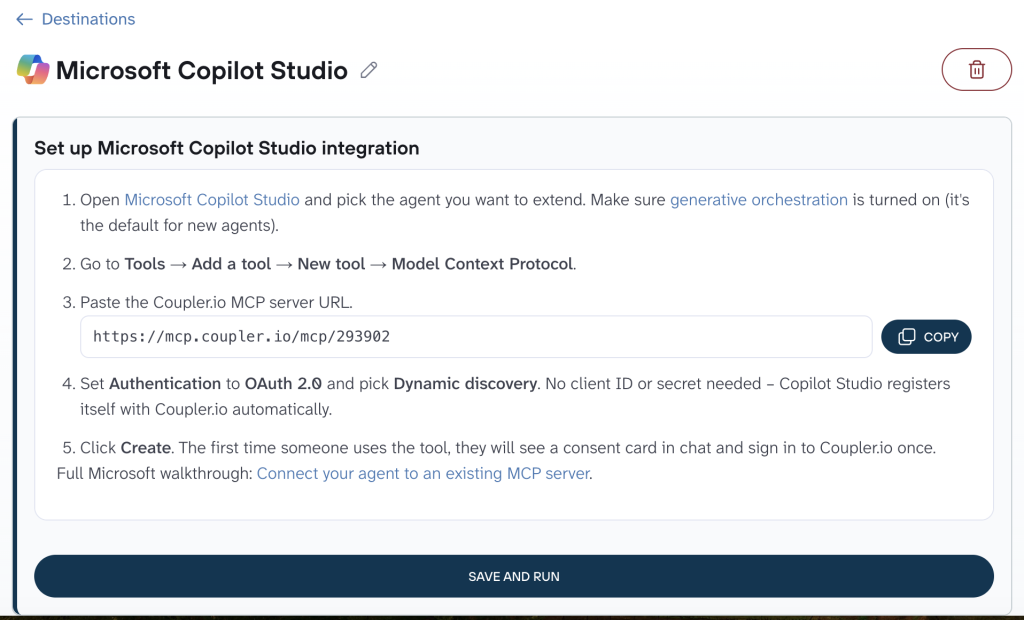
Follow the setup instructions you’ll see on a screen:

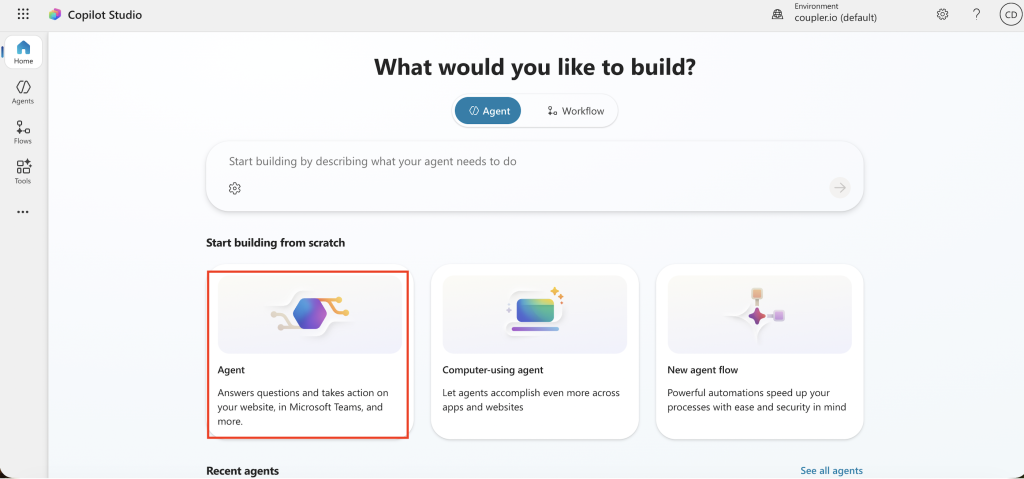
Now go to Copilot’s agent builder, click on Build an Agent or pick an existing Copilot agent in the menu on the left:

Add the Coupler.io MCP within that specific agent’s Tools, NOT in the main Tools menu on the Copilot homepage.

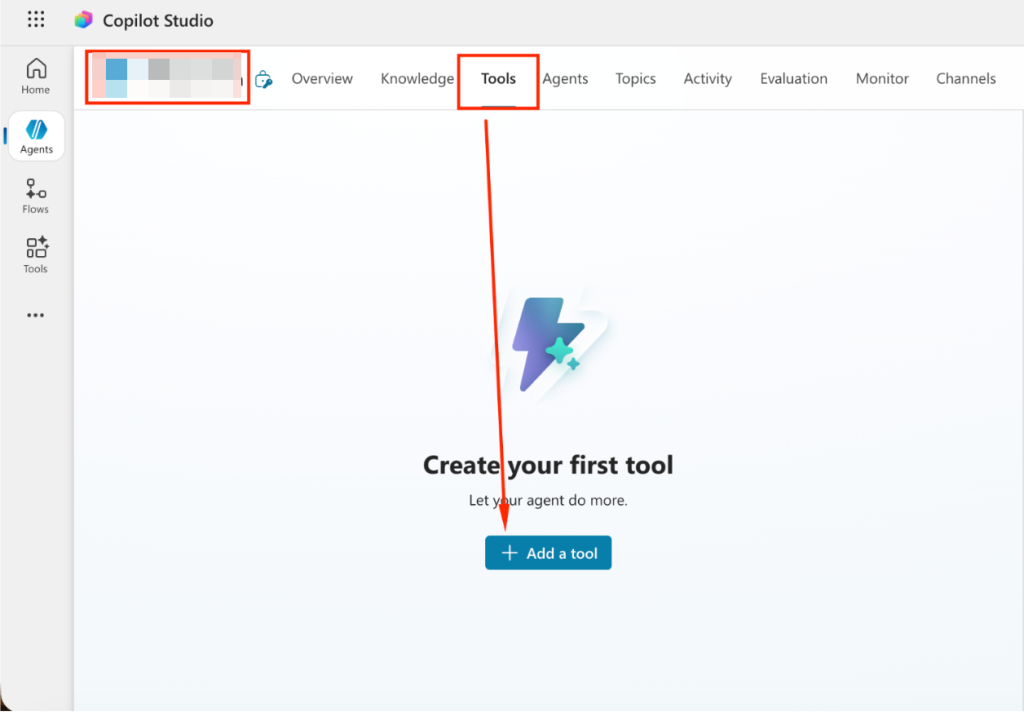
You’ll land on the Add a Model Context Protocol server screen where you’ll add server name, description, and paste the Server URL that Coupler.io provided (scroll up for the screenshot):

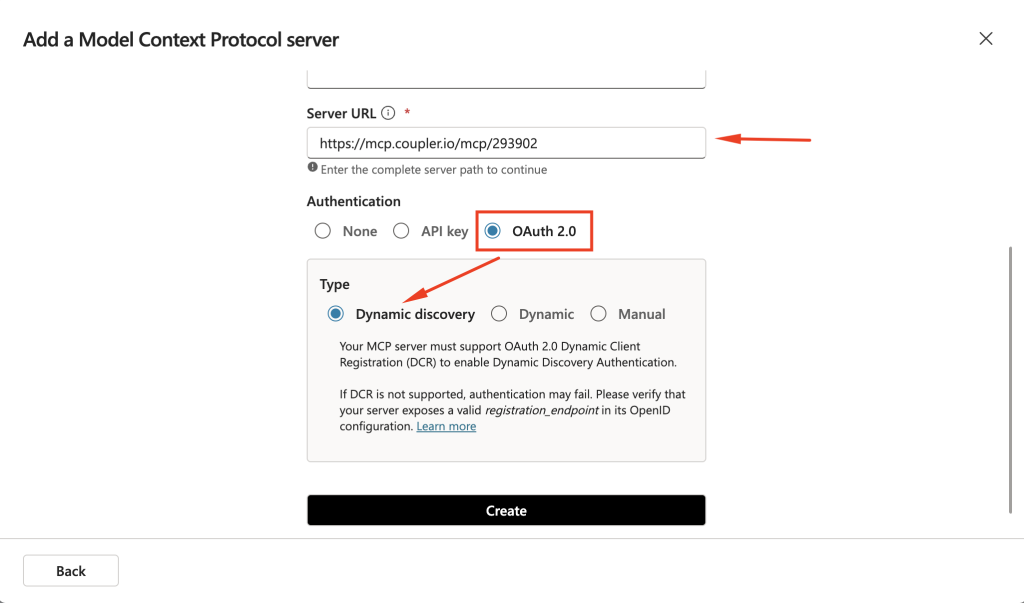
Then, click on Not connected > Create new connection.

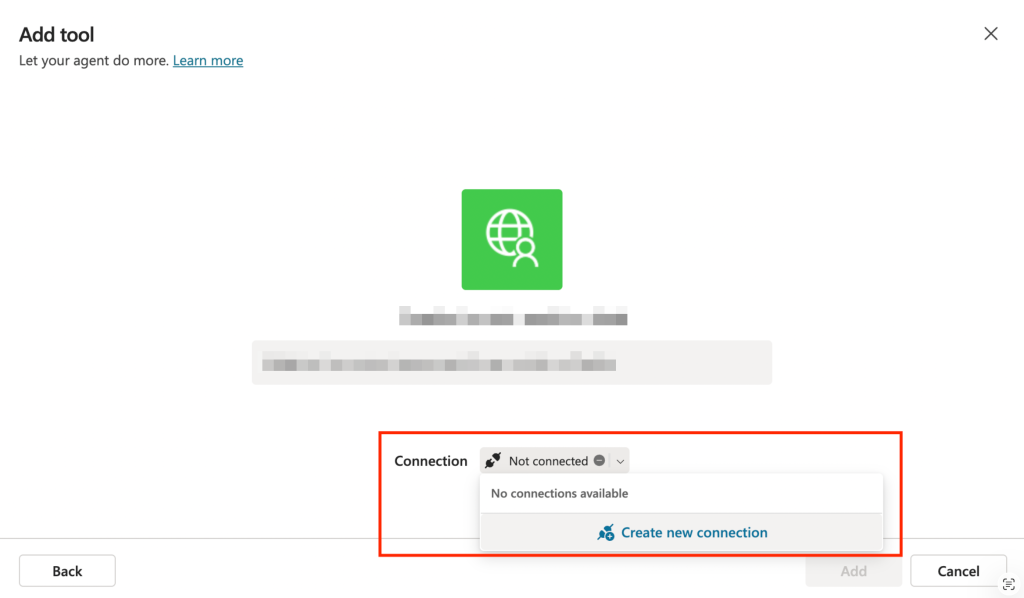
You’ll need to add a display name for the connection.
Click on Create and you’ll be asked to authorize the connection between Copilot and Coupler.io:

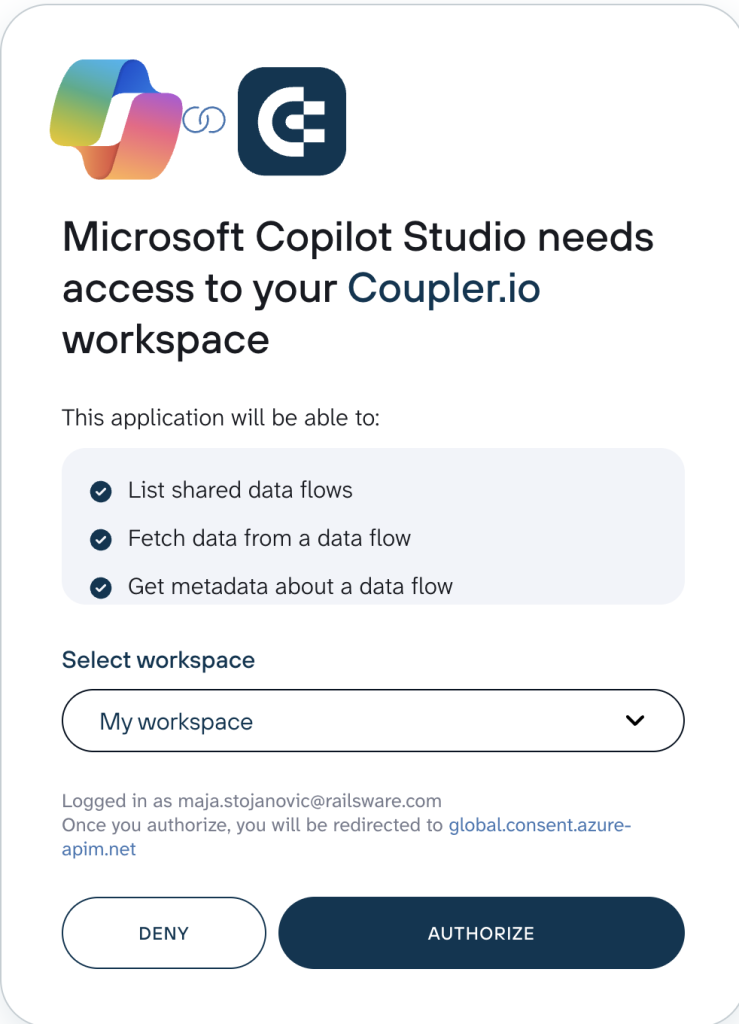
And that’s it! You successfully set up Copilot. Now go back to Coupler.io to save and run the data flow.
You’ll see a screen like this, which means you successfully set Copilot as your data destination:

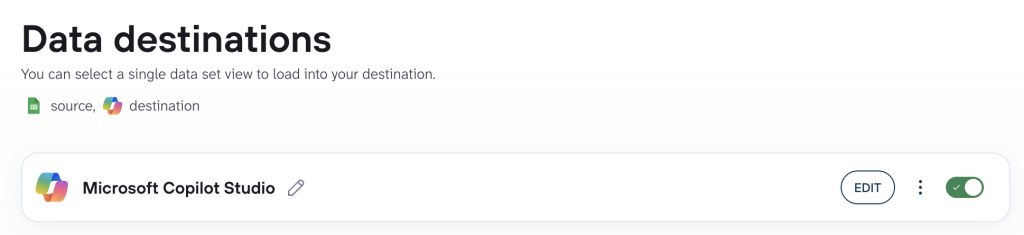
Once that’s done, go to Flow Settings and set up automatic data refresh. This means Copilot can always work with up-to-date data.

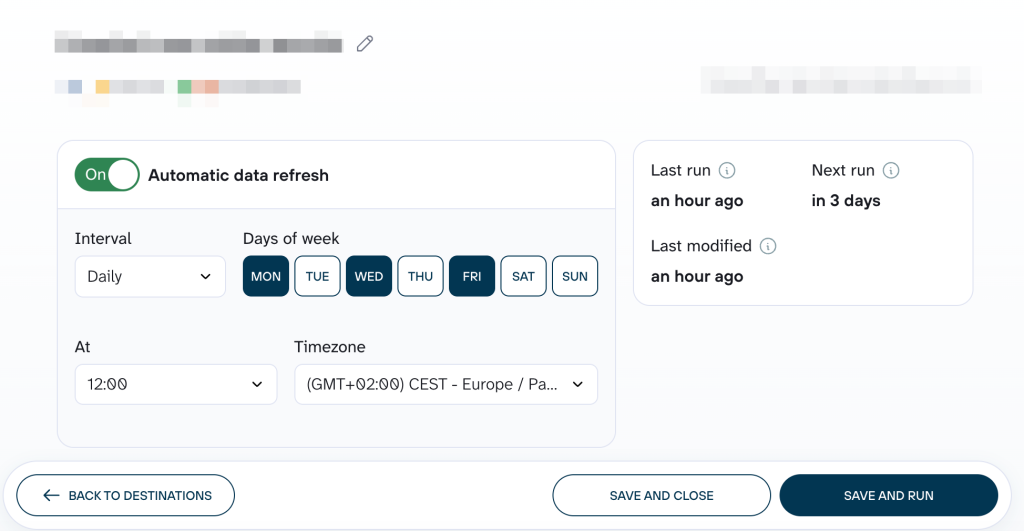
Step 3: Ask Copilot questions about your data
You can now start chatting about your data and ask for insights.
Go to Copilot and access the agent you connected to Coupler.io by clicking on Agents in the left-side menu.
In the chat box on the right, you can start prompting it. For example:

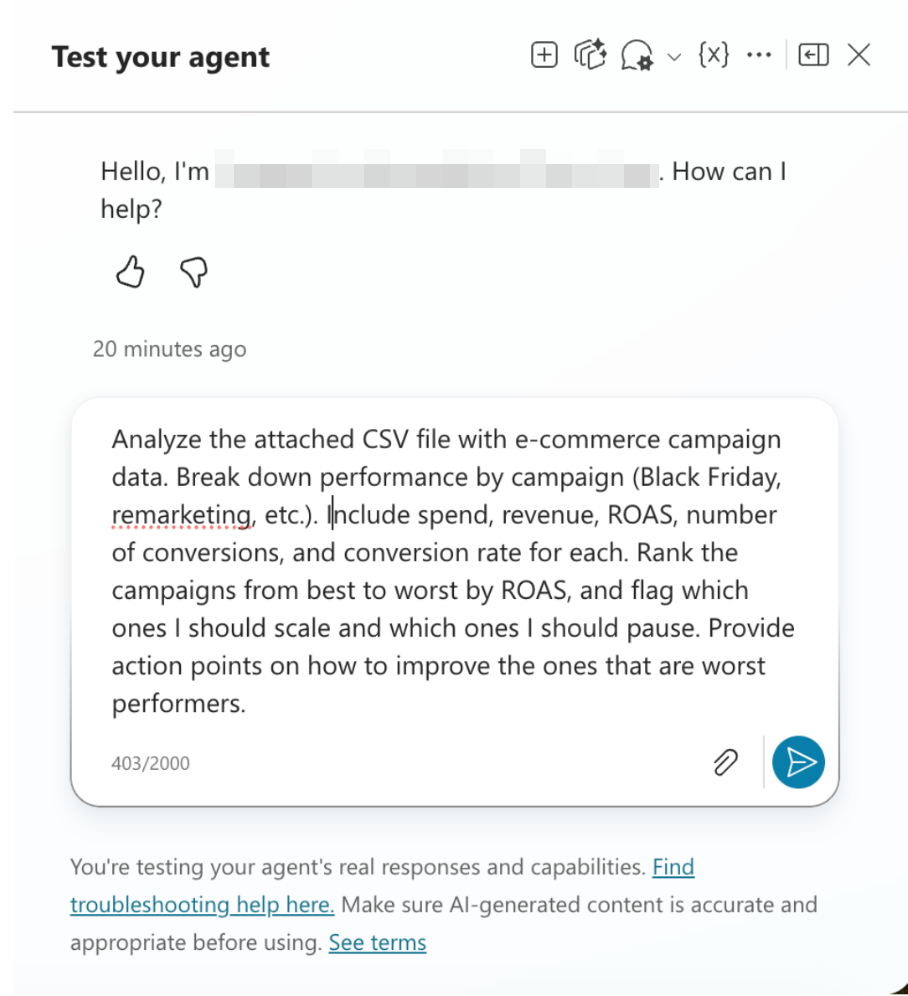
Don’t be confused if you first see a message like this, as you’ll be asked to approve the connection.

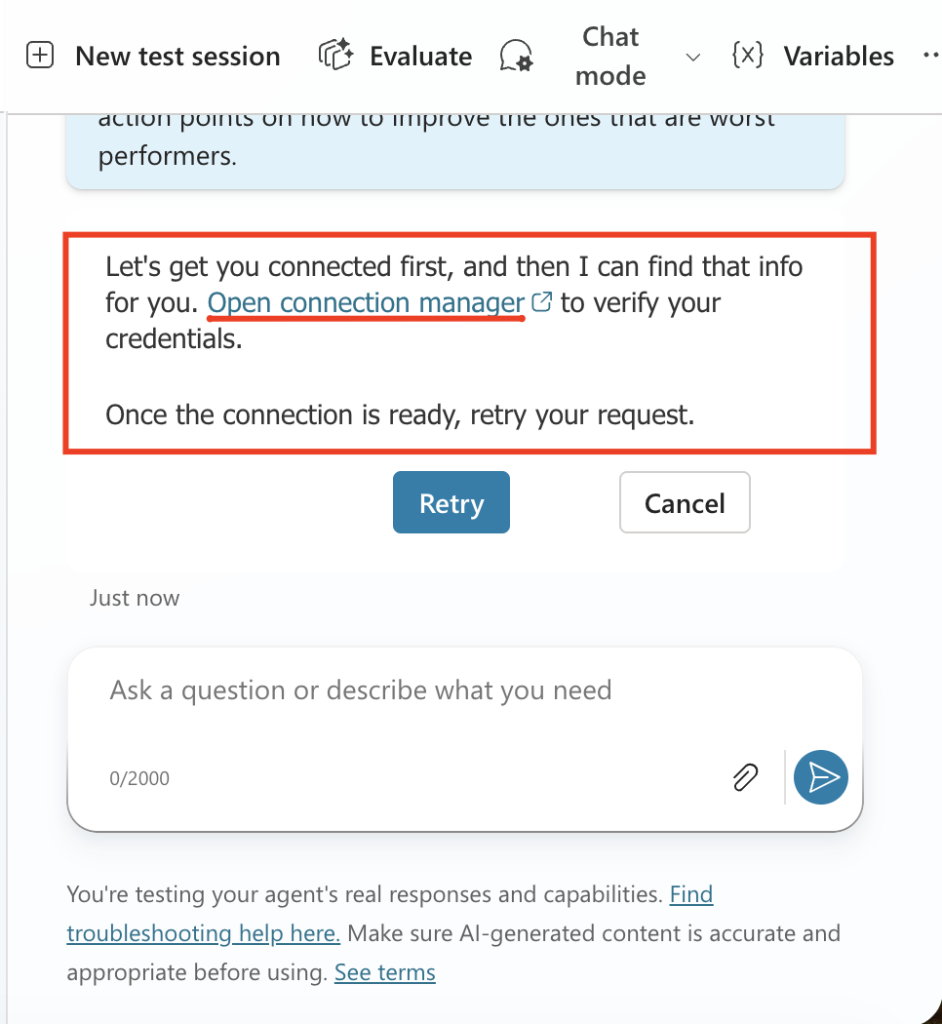
Open your Connection Manager, and click connect.


Your agent will then be able to chat with you about your data:

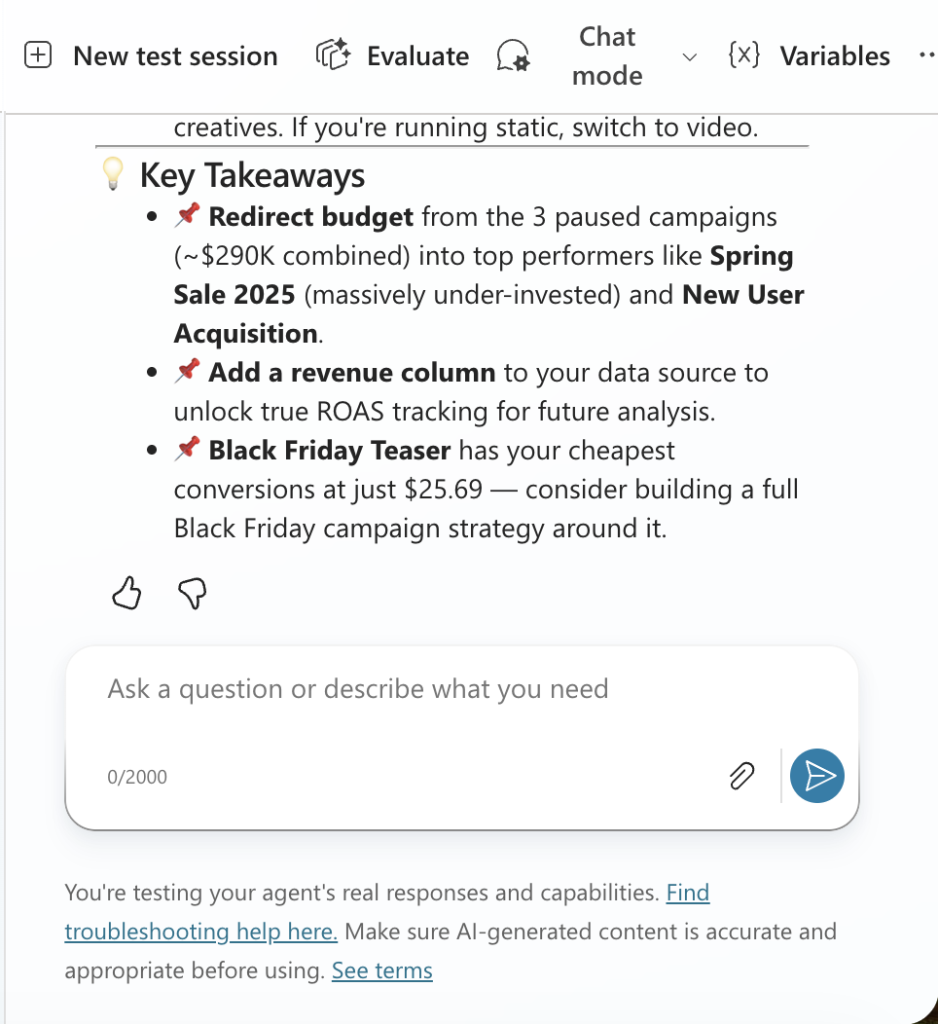
👉 The process is slightly different and more complex than setting up Claude integrations or ChatGPT integrations, but congrats! You made it and you can analyze your data without fear AI will hallucinate.
This is because every answer runs through Coupler.io’s Analytical Engine first, so Copilot isn’t estimating the numbers. Instead, it’s reporting numbers that were already calculated and verified.
💡You can also create new data flows in Coupler.io without leaving the chat window in Copilot! Just type the instructions and Copilot will create a data flow for you:

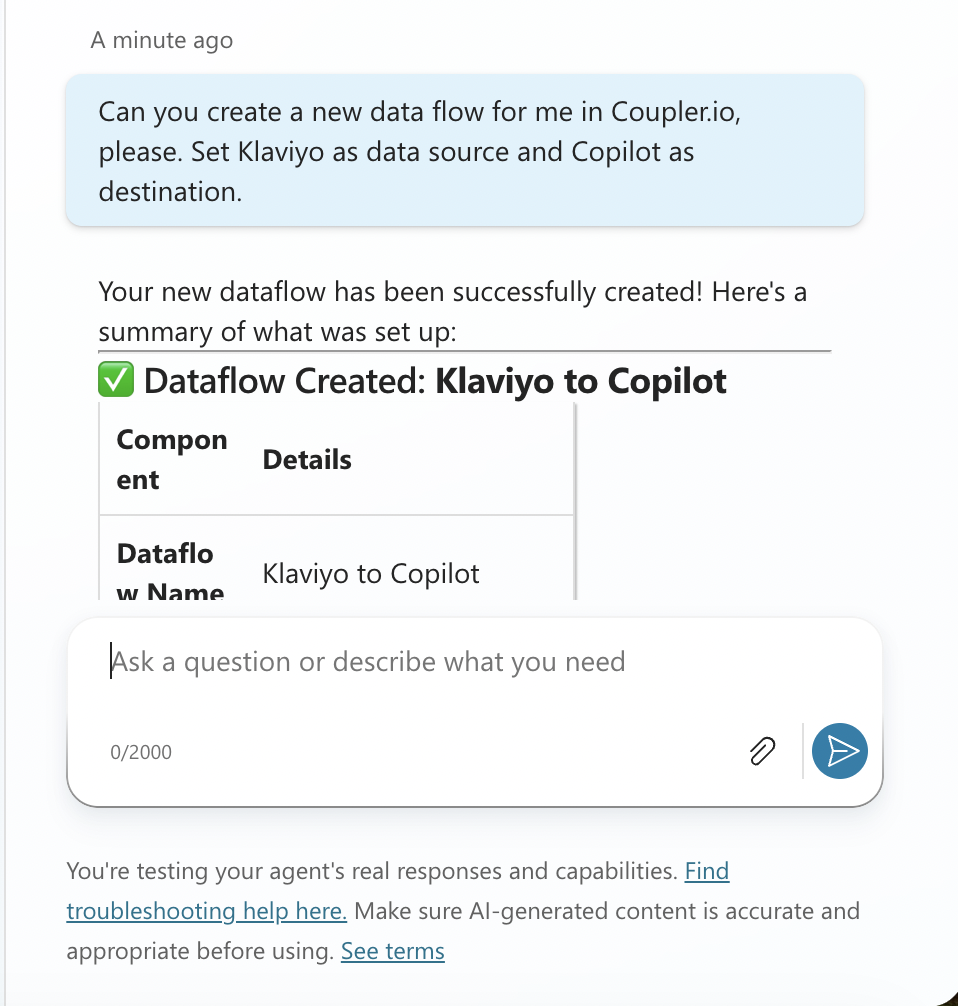
Beware that you’ll still need to do some things manually in Coupler.io, like providing context or organizing data in Data Sets section.


Connect Copilot to 400+ sources in one simple setup
Try Coupler.io for freeOther ways to connect external data to Copilot
Coupler.io covers what most teams really need: an easy, no-code way to connect everyday business data to destinations of their choice. The other ways to connect external data with Copilot fit narrower situations: a native connector for search inside Microsoft apps, a custom MCP build for an internal database, or a Copilot Studio agent if you’re building something of your own.
Before I cover other ways of connecting external data to Copilot, here’s what makes Copilot different from Claude or ChatGPT.
(These differences also affect how AI integrations are set up across the three platforms.)
- Copilot is admin-managed, not self-serve. With Claude or ChatGPT, you can open Settings, browse connectors, and click Connect, which makes it much easier to connect data to Claude or ChatGPT yourself. With Copilot, that decision usually sits with IT or a Microsoft 365 admin, rolled out at the tenant level, before anyone on your team sees an option to connect anything.
- Two native connector models, not one. Microsoft ties external data into Copilot in two ways. The first is synced connectors, which copy content into Microsoft’s search index so Copilot can find and cite it. The second is federated connectors, which pull live data on request without storing a copy.
- Copilot Studio does the heavy lifting. Custom connections, including Coupler.io, get built in Copilot Studio rather than inside Copilot chat itself. If you’re used to Claude’s self-serve settings menu, this is the biggest mental shift. Copilot chat is where you ask questions, Copilot Studio is where admins configure what can be accessed and where you can build out agents.
- Licensing matters more. Some of what I’ll cover requires a specific Microsoft 365 license, a Copilot Studio maker role, or admin permissions. Before you start building, it’s good to confirm what your plan covers.
None of this makes Copilot harder to get value from once it’s set up. It just means the setup involves more steps, and usually more than one person.
Use built-in Copilot connectors to connect data to Copilot for analysis
If you’re looking for a practical approach to Microsoft Copilot business data integration, the goal is the same regardless of the connection method: securely add data to Copilot AI so it can answer questions using your business information instead of relying only on its built-in knowledge.
Microsoft offers two native connector types, and the difference matters.
Your organization can either index external data using synced connectors or connect to data in real time using federated connectors.
One brings a copy of your data into Microsoft’s index. The other reaches out live, every time. Neither one calculates anything across that data; both are built for search and retrieval.
To simplify:
- Synced connectors are like making photocopies of your files and storing them in Microsoft’s library so searches run fast against those copies.
- Federated connectors are like sending a librarian to your original filing cabinet each time someone asks a question. The answer always reflects what’s in the cabinet right now, but nothing is ever copied or stored by Microsoft.
Synced connectors
Synced connectors work by making a copy. They crawl and index content from external sources into Microsoft Graph, which is Microsoft’s shared, searchable index that pulls together content across your organization’s Microsoft 365 apps.
Once something is indexed this way, it becomes discoverable in Copilot and Microsoft Search, and Copilot can reference it directly, citations included.
Microsoft and its partners offer more than 100 prebuilt synced connectors. They cover tools like:
- SharePoint-adjacent file storage
- Salesforce
- ServiceNow
- Confluence
- Dynamics 365
- and SAP, among others.
Setup happens at the organization level, with an admin configuring the connection in the Microsoft 365 admin center. The connector periodically checks the source for changes and updates the index accordingly.
⚠️ Keep in mind: because synced connectors copy and index data instead of reading it live, very large or fast‑changing sources can take longer to sync and may hit Microsoft’s documented indexing and throttling limits. For details on defaults and limits, see Microsoft’s Prerequisites for deploying connectors page.
Federated connectors
Federated connectors skip the copying step entirely. They use Model Context Protocol (MCP) to fetch data in real time, so Copilot can retrieve up-to-date information directly from the external system, without indexing any of it into Microsoft 365.
Nothing about your data sits in Microsoft’s index; Copilot asks the source directly.
Microsoft currently offers Microsoft-published federated connectors for tools like:
- Canva
- HubSpot
- Notion
- Moody’s
- and LSEG, alongside a few others.
This is real-time retrieval, not calculation. It’s the same principle as synced connectors, just without the copy. Copilot is grounding its answer in a live lookup, not running math across your numbers.
Federated connectors also respect who’s asking, not just what’s being asked. They access data using the querying user’s own identity and permissions. Access is enforced by the source system itself, so Copilot only ever returns what that specific user is already allowed to see there.
⚠️ Federated connectors don’t work in every Copilot surface yet. Currently they’re available in Microsoft 365 Copilot Chat, Copilot in Excel, and the Researcher agent.
Additional notes
- Turning on either connector type is typically an admin job. It means registering the connection, granting the right Microsoft Graph permissions, and rolling it out at the tenant level. It’s usually not something an individual user can set up on their own.
- Federated connectors are usually lighter to enable. Most available ones are Microsoft-published, but admins still control the rollout and can switch federated connectors on or off tenant-wide with a single toggle.
- Rollout doesn’t have to be all-or-nothing. Admins can limit a federated connector to specific Microsoft Entra ID groups through staged rollout, so IT can test with one team before opening it up company-wide.
To sum up: Built-in Copilot data connectors are genuinely useful for quick lookups and citing a source inside a supported app. What they’re not built for is recurring, cross-source analysis, the kind where you’re asking Copilot to combine and analyze numbers from three different systems and trust the math.
For that, you’re looking at a different kind of connection, which is where Coupler.io wins.
Connect data to Copilot using a custom federated connector (MCP)
If your business runs on an internal database or proprietary system, Microsoft also supports a custom federated connector built on your own MCP server. Microsoft says federated connectors use MCP to access data in real time, and custom connectors start with an MCP server that exposes read-only tools.
This is different from Microsoft-published federated connectors in the gallery, which Microsoft says can be published by Microsoft or submitted by partners and approved by Microsoft.
How it works
↪️ Step 1: A developer builds the MCP server. It needs to expose read-only tools, typically something like search, fetch, or query, that safely surface your internal data. This server becomes the bridge between Copilot and your system.
↪️ Step 2: Authentication is set up. Microsoft supports two methods here: Microsoft Entra SSO, if your MCP server already uses Entra ID for access control, or OAuth 2.0, if it authenticates through a different identity provider. Either way, this needs to be configured before the connector goes live.
↪️ Step 3: An admin registers the connector. Someone with a Global Administrator or AI Administrator role creates it in the Microsoft 365 admin center, under Copilot > Connectors > Gallery > “Created by your org,” and points it at your MCP server’s base URL.
↪️ Step 4: Rollout can be staged. Just like the built-in federated connectors, admins can deploy a custom one to a specific test group before releasing it tenant-wide.
Plan for logging and audit trails before you launch this, not after. Since federated connectors are read-only and can be audited through Microsoft Purview, it’s worth making sure your MCP server’s activity is actually visible there, so admins can track usage, spot failures, and see who’s accessing what.
❗One thing this path doesn’t give you is a calculation layer. Copilot reasons over whatever your MCP server hands back, and nothing more. If your internal system returns the right numbers, Copilot can work with them. If it returns something miscalculated, Copilot has no way to catch that. The accuracy burden sits entirely on the connected system itself, which is a meaningfully different setup than Coupler.io’s, where an Analytical Engine verifies the numbers before Copilot ever sees them.
Copilot Studio agents and the Graph connectors API
Everything covered so far was about connecting one specific data source to an agent, whether through a connector Microsoft already built, or by adding a single MCP tool.
Building a custom agent from scratch in Copilot Studio involves a broader decision: how should it access data in the first place? The answer depends on where that data actually lives.
This mirrors the tool-use versus RAG split we covered in the Claude API guide, just built on Microsoft’s own tooling rather than a raw API.
This section isn’t for everyday business users asking Copilot a question in chat. It’s for teams with the developer resources and Copilot Studio access to build and maintain an agent themselves.
Live systems via Copilot Studio agents
If your data lives in a database, a CRM, or an internal API, and you want your agent to query it live, you connect it as a tool. Copilot Studio supports this mainly through MCP: you add an existing MCP server to your agent using the built-in MCP onboarding wizard, pointing it to the server URL and setting up authentication.
Alternatively, agents can call the system through Power Platform connectors or REST API tools, which cover many enterprise services (SharePoint, Dataverse, Salesforce, ServiceNow, and others) without needing an MCP server at all.
Either way, the agent decides which tool to call, that tool queries the live system, and the agent reasons over whatever comes back.
Graph connectors API
If your data is closer to a document library than a live system, product guides, policies, internal wikis, contracts, the path is different.
Here, you use the Microsoft Graph connectors API to index that content into Microsoft Graph, the same mechanism behind synced connectors. Once indexed, that content becomes a knowledge source your Copilot Studio agent can ground its answers in, similar in spirit to how RAG pulls relevant document chunks into a Claude conversation.
The accuracy caveat carries over from the Claude API section too, and it’s worth being direct about: whichever path you take, the backend logic determines whether the answer is right.
Copilot Studio only reasons over what a tool or knowledge source hands it. If the connected system returns bad data, or the indexed document is out of date, the agent has no way to know that and will still answer with full confidence.
Direct file upload and Copilot Notebooks
Sometimes you don’t need an ongoing connection. You just need to feed company data into Copilot so it can glance at a file once and answer a question about it. Copilot Chat handles that the same way Claude does: drop in a spreadsheet, ask your question, get an answer.
The problem is what Copilot actually does with that file once it’s in the chat.
It doesn’t just retrieve numbers, it analyzes them, and analysis means calculations. That’s not what an LLM is built to do reliably.
Ask it to sum a column, calculate a weighted average, or compare totals across sheets, and there’s no guardrail checking its work. A wrong sum or a hallucinated total comes back looking just as confident as a correct one, and you have no way to tell the difference without redoing the math yourself.
On top of that, the file is frozen the moment it lands in the chat. Copilot has no way of knowing your numbers changed overnight, so a second question next week means re-uploading by hand, this time trusting the arithmetic all over again.
For anything you revisit often, Copilot Notebooks are a better fit, closer to what Claude Projects offer. Instead of starting from zero in every chat, you build a source of knowledge once, add references like Excel spreadsheets and other files, and Copilot answers questions grounded only in what’s actually in there, not the open web, not your inbox.
It doesn’t fix either underlying issue, though.
A spreadsheet sitting in a notebook is just as frozen as one dropped into chat, so you’re still re-adding it by hand whenever the source changes. And the calculation problem is still there: nothing in a notebook checks Copilot’s math before it hands you an answer.
Copilot is still just a generative AI doing analysis it wasn’t built to do, and the result can be wrong in a way that’s easy to miss.
Which method should you choose to connect data sources to Microsoft Copilot?
Let’s pick the best way to integrate business data with Copilot.
If a native Microsoft connector already covers your source, that’s the fastest route for search and citations inside supported apps, no build required.
For most teams, though, the real need is reliable, cross-source calculations without a dev team involved. That’s the gap Coupler.io fills. No coding, no maintenance, and the Analytical Engine handles the math instead of leaving it to Copilot.
Got an internal database or a proprietary system with no built-in connector? A custom federated connector gets you there, but it needs a developer to build and maintain the MCP server behind it.
Building your own Copilot-based agent or product is a different game entirely. Copilot Studio’s tool-use and Graph connector paths give you full control, at the cost of needing developer resources to run them.
And if you just need to check a file once, direct upload works fine. For anything you’ll revisit, a Notebook saves you from re-explaining context every time, though it won’t fix staleness or check the math.
Finally, you don’t have to pick just one. Plenty of teams use a native connector for quick lookups and Coupler.io for anything that actually needs to add up.
If there’s one thing worth remembering here, it’s this: the more your question depends on numbers being right, the less you want to leave that job to Copilot alone.
One data pipeline, verified numbers in Copilot
Get started for freeFAQ
Does Copilot need an admin to connect Coupler.io, or can I do it myself?
It depends on whether your organization has already set you up with maker access in Copilot Studio. If you have that role, you can add the Coupler.io MCP tool to an agent yourself, no ticket to IT required. If you don’t, someone with maker or admin permissions will need to do it. This isn’t a self-serve toggle in Copilot Chat the way it is in Claude’s settings menu.
Can Copilot analyze data the same way Claude or ChatGPT can with Coupler.io?
Yes. The underlying mechanism of adding data to Copilot AI is the same regardless of which AI tool you’re using. Coupler.io’s Analytical Engine runs the calculations and returns verified numbers. Copilot, Claude, and ChatGPT are all just interpreting results that were already checked, rather than doing the math themselves. What differs is the setup process, since Copilot requires Copilot Studio and maker access, while Claude and ChatGPT let individual users connect it directly.
Is Coupler.io’s Copilot connection safe?
Yes. Coupler.io is SOC 2 Type II certified and GDPR- and HIPAA-compliant. It sits between your business systems and Copilot as a secure middle layer, so your source data never connects directly to the AI. Authentication uses OAuth 2.0 with dynamic discovery, and you control exactly which data each connection can access.
Does the Coupler.io connection work with Copilot in Excel, or only Copilot Chat?
The Coupler.io MCP tool gets added to an agent you build in Copilot Studio, and where that agent actually shows up depends on which channels you publish it to. Copilot Chat is the most common target and the one most teams set up first. Whether the same agent also appears in Copilot in Excel depends on your Microsoft 365 setup and which channels you enable during publishing. Check your specific channel options rather than assuming Excel is covered automatically.