Most PostgreSQL tutorials start at the wrong place. They show you how to run a COPY command or configure a connection string, but skip the part that actually costs teams time: keeping the data current. A one-time import is easy. The tenth one, after schemas have changed, APIs have rate-limited, and someone has lost the original export script, is where things break down.
In this guide, I’ll cover every practical method for importing business data into PostgreSQL, from the COPY command and psql to no-code pipelines, Python scripts, and Foreign Data Wrappers. Each section includes honest guidance on where the method works and where it does not, so you can pick the right approach for your situation and stop rebuilding the same pipeline from scratch.
TL;DR: What’s the best way to import data into PostgreSQL?
The right method depends on where your data lives and how often it needs to change in the database. A one-time migration and a daily Shopify sync are different problems with different solutions.
| Method | Best for | Technical skill | Automation | Key limitation |
|---|---|---|---|---|
| Coupler.io | Business apps (Shopify, Salesforce, GA4, etc.) on a schedule | None | Yes, scheduled | Requires a Coupler.io account |
| COPY command | Bulk CSV on the PostgreSQL server | Medium | Manual or scriptable | File must be on the server; needs superuser access |
| \copy in psql | CSV from your local machine | Medium | Manual | One-time operation; no live source connection |
| pgAdmin | One-off imports with no command line | Low | No | Manual, file-by-file; no scheduling |
| INSERT statements | Row-level inserts, upsert logic | Low to Medium | Scriptable | Slow for large datasets compared to COPY |
| JSON import | API responses, MongoDB exports, nested data | Medium | Scriptable | Schema mapping and array unnesting done manually |
| psql / pg_restore | Database migrations, pg_dump backups | Medium | Manual | Built for migrations, not recurring business data imports |
| Foreign Data Wrappers | Live queries across external PostgreSQL, MySQL, CSV | Medium to High | Live queries | No connectors for SaaS business apps |
| Python (psycopg3) | Custom pipelines, API sources | High | Yes, scriptable | Ongoing maintenance: schema changes, token expiry, rate limits |
How to schedule recurring data loads into PostgreSQL with Coupler.io
Coupler.io is a no-code data integration platform that allows you to import business data into PostgreSQL. You can connect data from Google Ads, Meta Ads, Salesforce, HubSpot, Shopify, QuickBooks, Google Analytics 4, and other 400+ sources. It manages the entire pipeline from source to PostgreSQL, including transformations and scheduled refreshes.
Your data is shaped before it reaches PostgreSQL, so it arrives clean and ready to query. With scheduled refresh turned on, the table updates automatically on whatever frequency your reporting requires. It takes a couple of steps to load data to PostgreSQL with Coupler.io.
Step 1: Create a data flow
Create a new data flow in Coupler.io and choose the business app you want to connect. Or use the widget below, then click Proceed to sign up for Coupler.io for free.

Connect your source app account and choose the data you want to load into PostgreSQL. Depending on the app, this could include HubSpot channel performance, Salesforce opportunities, Shopify orders, QuickBooks reports, and Google Ads campaign data, etc.

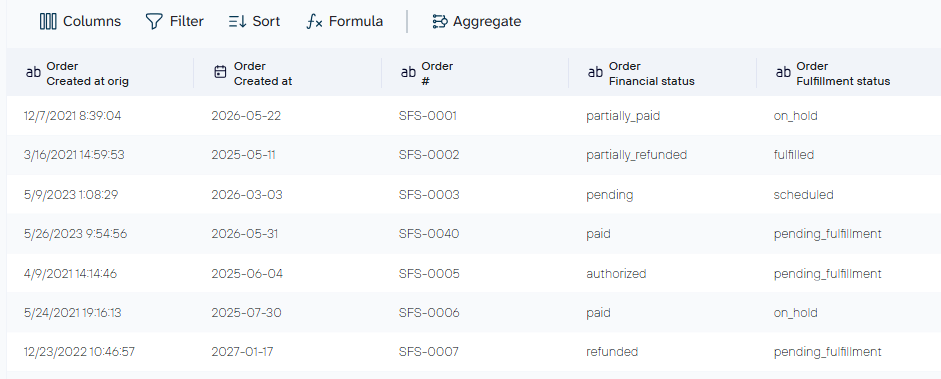
In PostgreSQL integrations, Coupler.io previews your data before loading, so you can make transformations first. Hide columns you do not need in PostgreSQL, filter records by date range or status, rename fields to match your existing schema, aggregate data, or combine multiple sources in one flow. For example, you can merge HubSpot lead data with Google Ads spend, or Salesforce pipeline data with QuickBooks revenue, so PostgreSQL receives a single joined dataset rather than isolated app exports.
Step 2: Load data to PostgreSQL
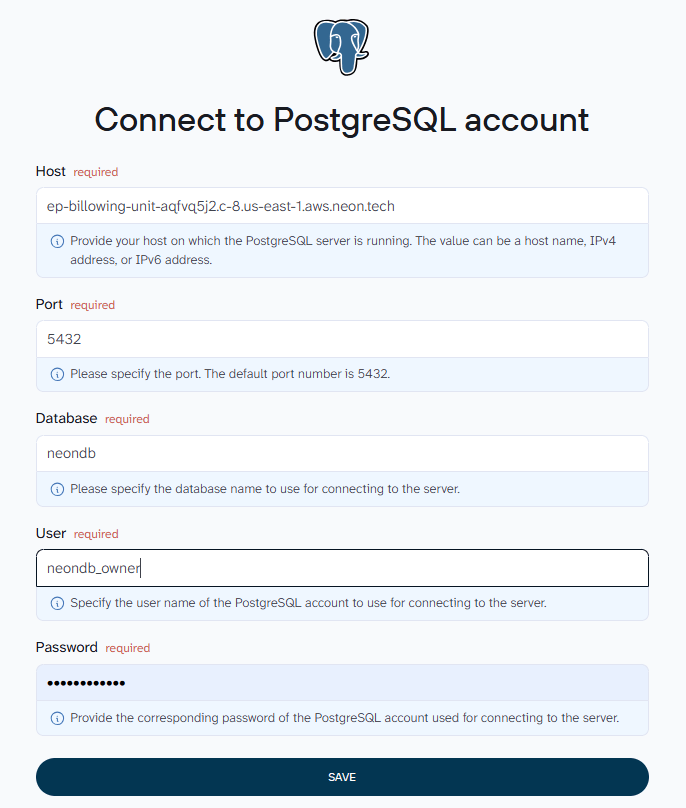
Once your dataset is ready, select PostgreSQL as the destination and fill in the connection details: host, port (default 5432), database name, user, and password.

Set the target table and schema, then choose your import mode. Replace overwrites the table on each run. Append adds new rows to existing data.

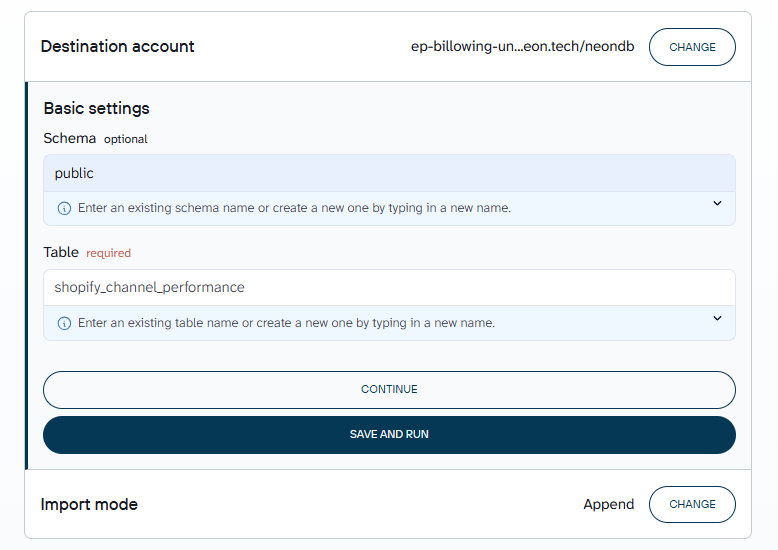
Click Save and Run to complete the connection and trigger the first load.
Step 3: Set a refresh schedule
Enable automatic data refresh in Coupler.io. Depending on your plan, this runs daily, hourly, or at higher-frequency intervals down to every 15 minutes.

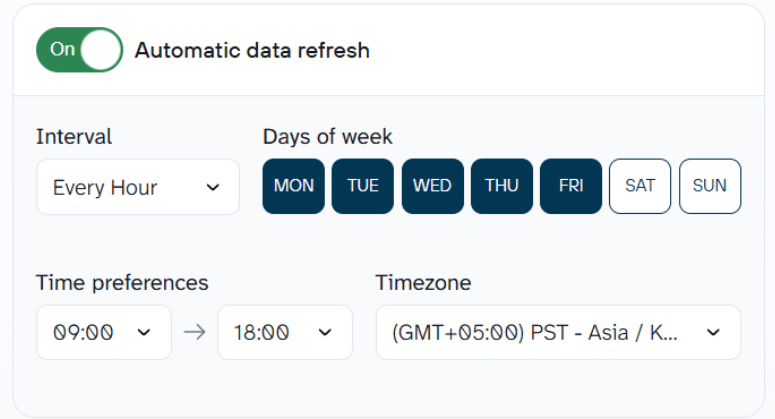
This keeps the PostgreSQL table up to date. You set Coupler.io up once, and the data stays fresh on its own. This way you can build a data warehouse with PostgreSQL for marketing analytics and reporting.


Import data from 400+ data sources to PostgreSQL with Coupler.io
Get started for freeWhat you can do with business data in PostgreSQL
Once you import business data into PostgreSQL on a schedule, it becomes queryable in ways the source app does not support natively, from custom SQL to plain-language analysis after you learn how to connect AI to PostgreSQL. The following examples use Shopify order data, but the same patterns apply to any source you connect through Coupler.io, whether that is Salesforce, HubSpot, QuickBooks, or Google Ads.
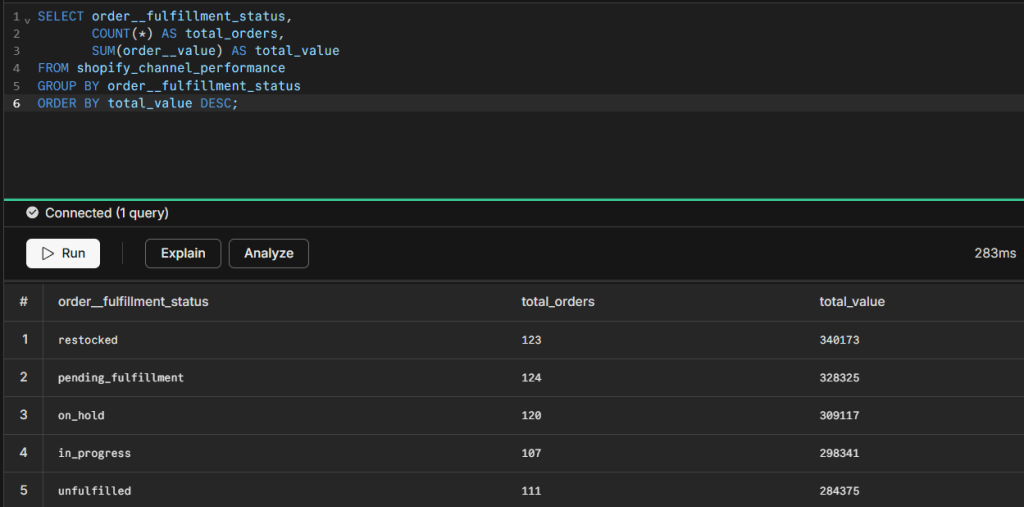
Track revenue by fulfillment status
See how much order value sits in each fulfillment stage at any point in time:
SELECT order__fulfillment_status,
       COUNT(*) AS total_orders,
       SUM(order__value) AS total_value
FROM shopify_channel_performance
GROUP BY order__fulfillment_status
ORDER BY total_value DESC;

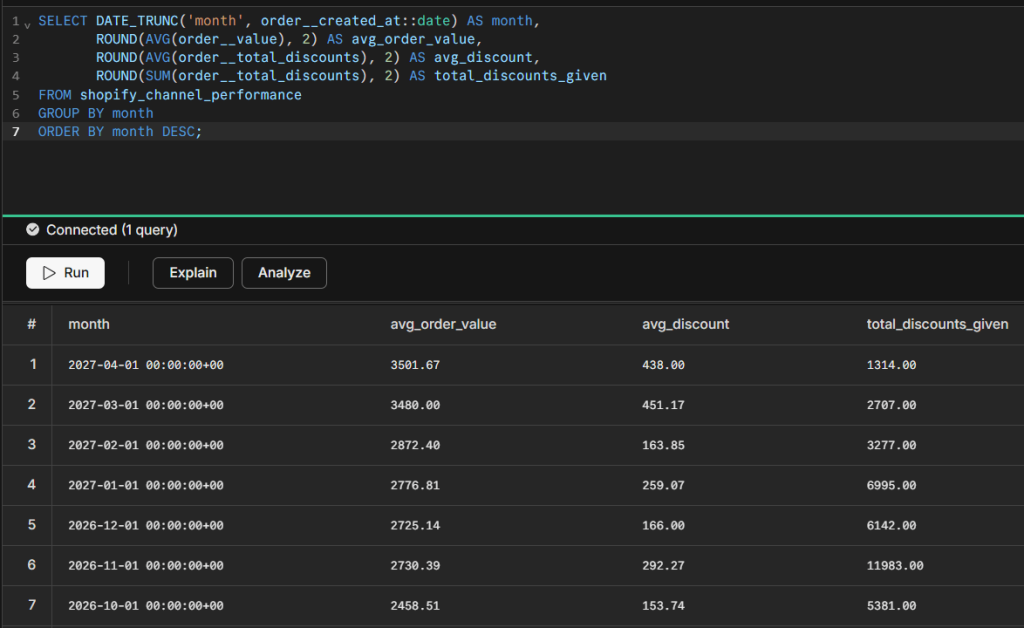
Measure the impact of discounts on revenue
Compare average order value against discounts applied each month to understand how promotions affect margins:
SELECT DATE_TRUNC('month', order__created_at::date) AS month,
       ROUND(AVG(order__value), 2) AS avg_order_value,
       ROUND(AVG(order__total_discounts), 2) AS avg_discount,
       ROUND(SUM(order__total_discounts), 2) AS total_discounts_given
FROM shopify_channel_performance
GROUP BY month
ORDER BY month DESC;

Connect to a BI tool for live dashboards
PostgreSQL works as a live data source for Looker Studio, Power BI, Tableau, and Metabase. Connect using the same port, host, database name, and credentials from your PostgreSQL setup. Because Coupler.io refreshes the table on a schedule, your dashboards stay updated automatically.
Import a CSV file into PostgreSQL using the COPY command
COPY is the native PostgreSQL bulk import method. The PostgreSQL server reads the CSV file directly from its own filesystem, which makes it the fastest option available. Benchmarks put it at hundreds of thousands of rows per second for large datasets.
Two things are required before running it: superuser access or the pg_read_server_files privilege, and a target table that already exists in the postgres database. PostgreSQL does not create new tables automatically during a COPY import.
Prerequisites
- PostgreSQL server running with superuser or
pg_read_server_filesaccess - Existing table with matching column names and data types
- CSV file located on the server’s filesystem with an absolute file path
Step 1: Create your target table
Define the table schema with column names and data types matching the CSV structure. Common data types used here: VARCHAR for text fields, INTEGER or NUMERIC for numbers, DATE or TIMESTAMP for dates, and BOOLEAN for true/false fields. If the data types do not match the CSV data, the import fails on the first mismatched row.
Example for a Shopify orders export:
CREATE TABLE shopify_orders (
    order_id      INTEGER,
    customer_name VARCHAR(100),
    order_date    DATE,
    total_price   NUMERIC(10,2),
    status        VARCHAR(20)
);
Step 2: Run the COPY command
Use the absolute file path to the CSV file, not a relative path. Set FORMAT to csv, HEADER to true if the file includes a header row, DELIMITER to match the separator character used in the file (comma by default, semicolon for European-format CSVs), and ENCODING to UTF8 to handle non-ASCII characters without errors.
COPY shopify_orders
FROM '/var/data/shopify_orders.csv'
WITH (
    FORMAT csv,
    HEADER true,
    DELIMITER ',',
    ENCODING 'UTF8'
);
To import specific columns rather than the entire file, list them after the table_name:
COPY shopify_orders (order_id, order_date, total_price)
FROM '/var/data/shopify_orders.csv'
WITH (FORMAT csv, HEADER true);
Step 3: Verify
Run a row count query to confirm the expected number of rows loaded, then preview a few rows:
SELECT COUNT(*) FROM shopify_orders;
SELECT * FROM shopify_orders LIMIT 10;
COPY is the right tool when you have large files sitting on the server and need to load them fast. If the file is on your local machine, or you are on a managed database like Amazon RDS, Google Cloud SQL, or Supabase, use \copy instead. Those environments block server-side file access entirely.
The bigger limitation shows up with recurring imports. COPY has no connection to live data sources. When the data originates in Shopify, Salesforce, or any other business app, someone has to export it, move it to the server, and run the command again every time it needs updating. That process works once. As a weekly routine, it becomes the job nobody wants to own, and in my experience, it usually gets abandoned by week three. If that is the use case, I would skip COPY entirely and set up a Coupler.io pipeline instead. It runs the extraction, delivery, and scheduling automatically so the table stays fresh without anyone touching it.
Automate data load to PostgreSQL with Coupler.io
Get started for freeImport a local CSV file using \copy in psql
When the CSV file sits on your local machine rather than the PostgreSQL server, COPY will not work. \copy is the psql client-side equivalent. It reads from your local machine and streams data to the server. No superuser access required, and it works on managed databases where server-side file access is restricted.
Step 1: Connect to your database via psql
Open a terminal and connect to the postgres database using your connection details:
psql -h your-host -p 5432 -U your-username -d your-database
For managed databases (Amazon RDS, Google Cloud SQL, Supabase), use the connection endpoint your provider supplies in place of your-host.
Step 2: Run the \copy command
The syntax mirrors the COPY command, but the file path points to a location on your local machine:
\copy shopify_orders (order_id, customer_name, order_date, total_price, status)
FROM '/Users/yourname/Downloads/shopify_orders.csv'
WITH DELIMITER ',' CSV HEADER;
To import all columns in the order they appear in the existing table:
\copy shopify_orders FROM '/Users/yourname/Downloads/shopify_orders.csv'
WITH DELIMITER ',' CSV HEADER;
Step 3: Verify
Run a row count to confirm the data arrived:
SELECT COUNT(*) FROM shopify_orders;
COPY vs \copy
| COPY | \copy | |
| File location | Server filesystem | Local machine |
| Permissions | Superuser or pg_read_server_files | Regular user |
| Works on managed databases | No | Yes |
| Speed | Faster | Slightly slower |
\copy works well for local CSV files, managed PostgreSQL instances like RDS or Supabase, and any account without superuser access.
The limitation is the same as COPY: it is a one-time operation. Every time the source data changes, you need a new export and another command. For a table that tracks live Shopify orders or Salesforce pipeline data, that cycle has no natural end point. And the longer it runs manually, the more inconsistent the data gets. Different exports, different date ranges, columns renamed mid-way because someone changed the filter. By month three, the table has three different schemas in it. A scheduled pipeline through Coupler.io solves the consistency problem as much as the manual work problem.
How to import data into PostgreSQL using INSERT statements
INSERT is a row-level SQL command to insert data in PostgreSQL to an existing table. It is slower than COPY for large volumes but gives precise control over individual rows, conflict handling, and upsert logic.
Basic INSERT
Single row insertion with explicit column names and values. The column list does not have to match the full table schema as long as any omitted columns have default values or allow NULL.
INSERT INTO shopify_orders (order_id, customer_name, order_date, total_price, status)
VALUES (10001, 'Jane Smith', '2026-04-15', 149.99, 'fulfilled');
Multi-row INSERT
Multiple rows in a single statement. Faster than running one INSERT per row and reduces round trips to the PostgreSQL server.
INSERT INTO shopify_orders (order_id, customer_name, order_date, total_price, status)
VALUES
    (10002, 'Alex Brown', '2026-04-16', 89.00, 'fulfilled'),
    (10003, 'Maria Garcia', '2026-04-16', 210.50, 'pending'),
    (10004, 'Tom Lee', '2026-04-17', 55.00, 'cancelled');
INSERT with ON CONFLICT (upsert)
The standard upsert pattern in PostgreSQL. Inserts a row if it does not exist; updates it if the conflict column already has that value. This avoids duplicates when syncing data from a changing source over time.
INSERT INTO shopify_orders (order_id, customer_name, order_date, total_price, status)
VALUES (10001, 'Jane Smith', '2026-04-15', 149.99, 'refunded')
ON CONFLICT (order_id)
DO UPDATE SET
    status = EXCLUDED.status,
    total_price = EXCLUDED.total_price;
INSERT fits row-level operations from application code, upsert logic, and small batches where COPY is not an option.
Performance is the honest limitation. At a few hundred rows it is fine. At tens of thousands, the gap between INSERT and COPY becomes noticeable. For bulk loads from a business app export, COPY is the faster path. I would only reach for INSERT when upsert logic is the actual requirement, not just because it feels simpler to write. And if the goal is keeping a PostgreSQL table in sync with a live source on a schedule, neither INSERT nor COPY solves that problem. That is a pipeline problem, and it needs a pipeline solution like Coupler.io.
Synchronize source data with PostgreSQL using Coupler.io
Get started for freeImport JSON data into PostgreSQL
PostgreSQL supports JSON natively through two data types. json stores data as plain text and validates it on input. jsonb converts it to binary format on storage, which makes indexing and querying faster. For most practical use cases, jsonb is the better choice.
Perfect for teams importing API responses, migrating records from MongoDB, or working with data sources that export in JSON rather than CSV format.
Storing raw JSON in a jsonb column
Insert JSON as a string value into a jsonb column. PostgreSQL validates the JSON on input and stores it in binary format. No pre-processing required for simple documents.
CREATE TABLE api_responses (
    id      SERIAL PRIMARY KEY,
    payload JSONB,
    loaded_at TIMESTAMP DEFAULT NOW()
);

INSERT INTO api_responses (payload)
VALUES ('{"order_id": 10001, "status": "fulfilled", "total": 149.99}');
Loading a JSON file via \copy
Load a JSON file into a staging table as raw text, then parse the values into structured columns using PostgreSQL’s JSON operators (-> for objects, ->> for text values).
-- Staging table to hold raw JSON
CREATE TABLE json_staging (raw_data TEXT);

\copy json_staging FROM '/path/to/data.json' CSV QUOTE e'\x01' DELIMITER e'\x02';

-- Parse into structured table
INSERT INTO shopify_orders (order_id, customer_name, total_price)
SELECT
    (raw_data::jsonb->>'order_id')::INTEGER,
    raw_data::jsonb->>'customer_name',
    (raw_data::jsonb->>'total_price')::NUMERIC
FROM json_staging;
Unnesting JSON arrays
When the JSON file contains an array of records, use jsonb_array_elements to extract individual objects into rows.
-- Staging table holds the full JSON array
CREATE TABLE orders_staging (data JSONB);

-- After loading the file, unnest the array
INSERT INTO shopify_orders (order_id, customer_name, total_price, status)
SELECT
    (elem->>'order_id')::INTEGER,
    elem->>'customer_name',
    (elem->>'total_price')::NUMERIC,
    elem->>'status'
FROM orders_staging,
     jsonb_array_elements(data) AS elem;
Indexing jsonb columns
Add a GIN index on jsonb columns after import to speed up queries against the imported data:
CREATE INDEX idx_api_responses_payload ON api_responses USING GIN (payload);
json vs jsonb
| json | jsonb | |
|---|---|---|
| Storage format | Plain text | Binary |
| Input speed | Faster | Slightly slower |
| Query speed | Slower | Faster |
| Indexing | Limited | Full GIN support |
| Recommended for | Archiving raw input | Most use cases |
JSON import makes sense for API responses, document store migrations, and semi-structured data that does not fit neatly into a relational schema.
The manual work is the real cost. Schema mapping, array unnesting, and normalization all land on you. For a one-time migration that is manageable. For teams pulling JSON from business APIs on a recurring schedule, that work repeats every time the data changes. What starts as a two-hour task becomes a standing item on someone’s calendar. I have seen data engineers spend more time maintaining JSON import scripts than actually analyzing the data those scripts bring in. If that ratio sounds familiar, the import method is the problem, not the data.
Import data into PostgreSQL using pgAdmin
pgAdmin is PostgreSQL’s official GUI management tool. It includes a visual Import/Export wizard that requires no command line access. The right choice for occasional imports where you want to confirm settings visually before loading.
Prerequisites
pgAdmin 4 installed and connected to your PostgreSQL server. The target table must already exist in the postgres database before starting the import.
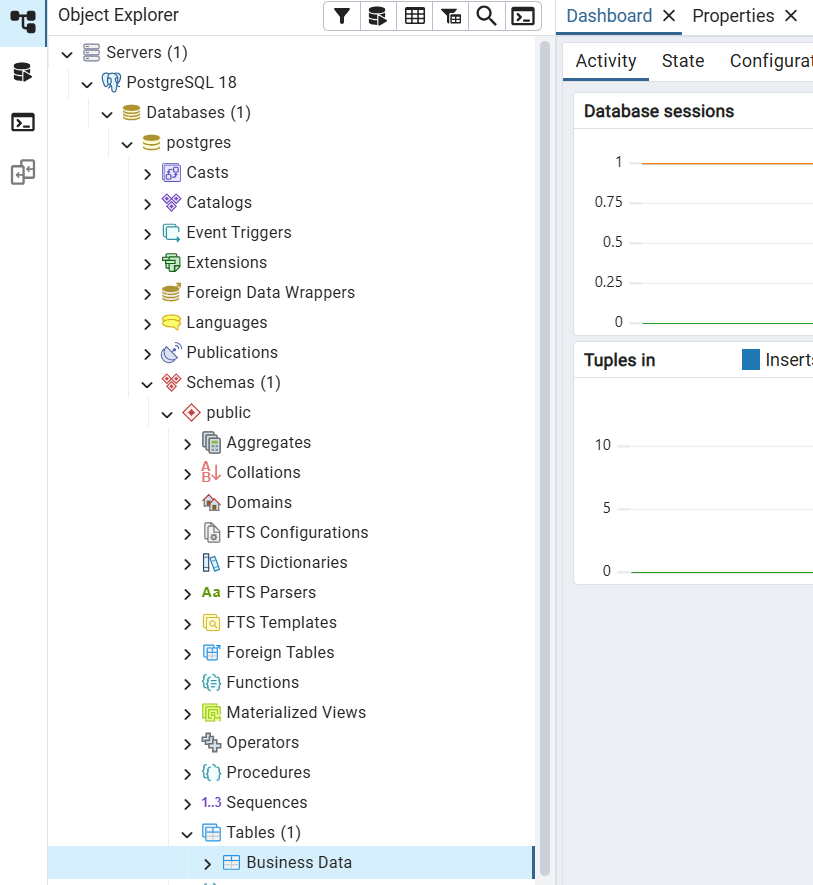
Step 1: Navigate to your target table
In the pgAdmin Browser panel on the left, expand: Servers, then your server name, then Databases, then your database name, then Schemas, then public, then Tables. Locate the postgres table you want to import into.

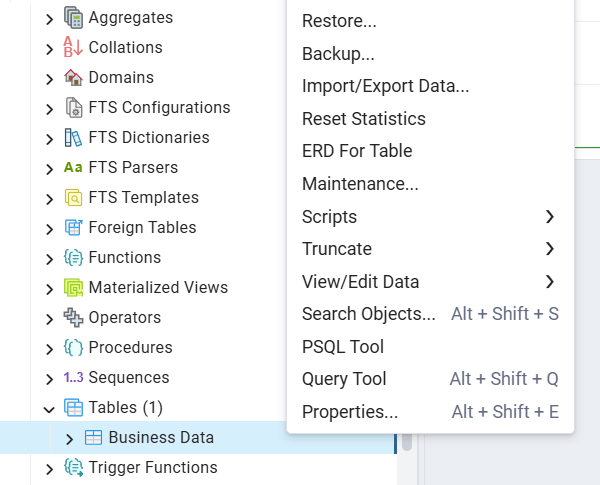
Step 2: Open the Import/Export wizard
Right-click the table name and select Import/Export Data from the context menu.

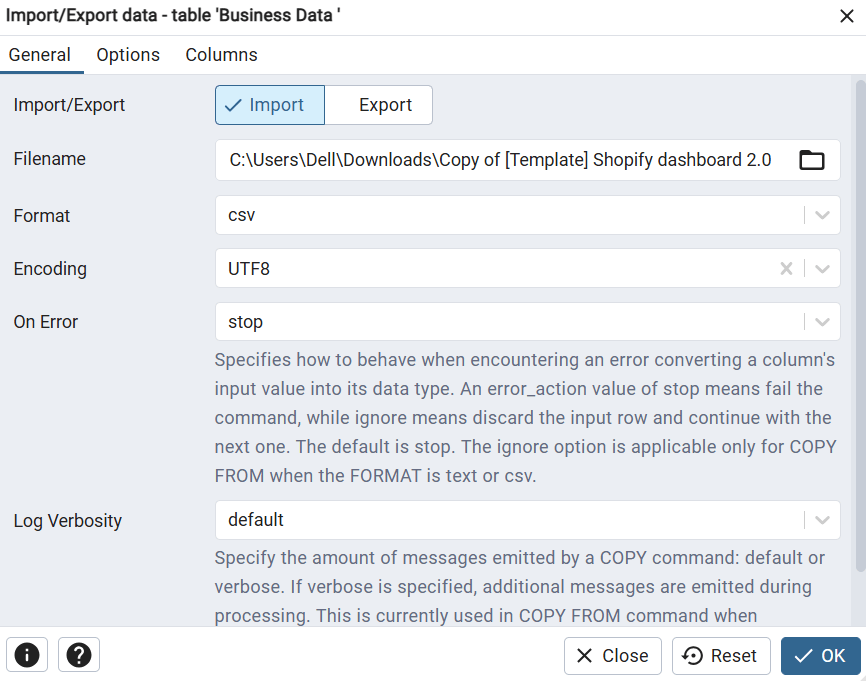
Step 3: Configure the import settings
In the dialog:
- Set the toggle at the top to Import
- Click the folder icon next to Filename and browse to your CSV file
- Set Format to csv
- Set Encoding to UTF8
- Toggle Header to Yes if your CSV file includes a header row with column names
- Confirm the Delimiter matches the separator character in your file (comma for standard CSV format, semicolon for European-format files)

Step 4: Map columns
Switch to the Columns tab. If the column order in the CSV does not match the postgresql table, or if you want to exclude specific columns from the import, map them here. Uncheck any columns you do not want to load.
Step 5: Run and verify
Click OK to start the import. pgAdmin shows a progress notification. When it completes, right-click the table and select View/Edit Data > All Rows to confirm the rows loaded correctly and the data types are as expected.
pgAdmin is the right choice for one-off imports, teams without terminal access, or anyone who wants to see exactly how columns map before committing to a load.
The tradeoff is that every import is a manual action. There is no scheduling, no connection to a live data source, and no way to set it and forget it. If the same data needs to come in weekly, someone has to repeat the process each time. I have watched teams start with pgAdmin imports fully intending to automate later, and six months in they are still dragging CSVs into the wizard every Monday morning. Coupler.io removes that loop entirely: connect the source once, set the schedule, and the table stays updated on its own.
Schedule data load to PostgreSQL from over 400 data soruces
Try Coupler.io for freeRestore a PostgreSQL database from a SQL dump or backup file
For database migrations, moving between environments, and restoring backups created with pg_dump. Two tools handle this depending on the file format: psql for plain-text .sql files, and pg_restore for custom-format .dump or .tar files.
Importing a plain-text .sql file with psql
First, create the target database if it does not already exist:
createdb -U postgres -T template0 mydb
Then restore using the psql command with the dump file path:
psql -U postgres -d mydb -f /path/to/dump.sql
For production restores, add the --set ON_ERROR_STOP=on flag to halt on the first error rather than continuing into a partial import:
psql -U postgres --set ON_ERROR_STOP=on -d mydb -f /path/to/dump.sql
Restoring a custom-format .dump file with pg_restore
Used when the backup was created with pg_dump -Fc. The -j flag runs parallel restore jobs across multiple CPU cores, which cuts restore time significantly on large databases:
pg_restore -U postgres -d mydb -j 4 --verbose /path/to/dump.dump
After the restore completes, run ANALYZE to update the query planner’s statistics:
ANALYZE;
Format reference
| pg_dump format | Flag | Restore with | Supports parallel |
|---|---|---|---|
| Plain text (.sql) | -Fp, default | psql | No |
| Custom, compressed | -Fc | pg_restore | No |
| Directory | -Fd | pg_restore | Yes, with -j |
| Tar | -Ft | pg_restore | No |
pg_dump and pg_restore are the right tools for database migrations, environment promotions, and scheduled backup restores.
They are not built for ongoing business data imports. A pg_dump workflow has no concept of pulling live Shopify orders or refreshing a Salesforce opportunities table on a schedule. That is a different problem, and Coupler.io is the better fit for it.
Access external data using PostgreSQL Foreign Data Wrappers
Foreign Data Wrappers are a native PostgreSQL feature that lets you query data from external sources as regular local table queries, without physically moving the data first. They implement the SQL/MED standard (Management of External Data) and are included with PostgreSQL.
The most commonly used wrappers:
postgres_fdw: Connects to another PostgreSQL database. Included with standard PostgreSQL, no separate installation needed.
file_fdw: Reads CSV and flat files on the server as if they were tables. Useful for querying files without a COPY import.
mysql_fdw: Connects to MySQL or MariaDB databases. Requires separate installation.
oracle_fdw: Connects to Oracle databases. Third-party package, requires installation and Oracle client libraries.
mongo_fdw: Connects to MongoDB collections. Third-party package.
The following steps use postgres_fdw as the example. The same pattern applies to other wrappers with source-specific syntax differences.
Step 1: Install the extension
CREATE EXTENSION IF NOT EXISTS postgres_fdw;
Step 2: Define the remote server
CREATE SERVER remote_server
FOREIGN DATA WRAPPER postgres_fdw
OPTIONS (host 'remote-db.example.com', port '5432', dbname 'source_database');
Step 3: Create a user mapping
This links your local PostgreSQL user to the credentials on the remote server, keeping authentication separate from the table definition:
CREATE USER MAPPING FOR local_user
SERVER remote_server
OPTIONS (user 'remote_user', password 'remote_password');
Step 4: Create a foreign table
Define the structure of the external data in your local database. Column names and data types must match the remote table:
CREATE FOREIGN TABLE remote_orders (
    order_id      INTEGER,
    customer_name VARCHAR(100),
    order_date    DATE,
    total_price   NUMERIC(10,2)
)
SERVER remote_server
OPTIONS (schema_name 'public', table_name 'orders');
To import an entire schema automatically rather than defining tables one by one:
IMPORT FOREIGN SCHEMA public
FROM SERVER remote_server
INTO local_schema;
Step 5: Query or migrate the data
Query the foreign table directly with a standard SELECT:
SELECT * FROM remote_orders WHERE order_date >= '2026-01-01';
To bring data into a local table permanently, use INSERT INTO … SELECT:
INSERT INTO local_orders
SELECT * FROM remote_orders
WHERE order_date > (SELECT MAX(order_date) FROM local_orders);
Additional patterns
Materialized views let you cache foreign data locally and refresh on a schedule, which improves query performance for frequently accessed remote data:
CREATE MATERIALIZED VIEW cached_remote_orders AS
SELECT * FROM remote_orders
WHERE order_date >= CURRENT_DATE - INTERVAL '30 days';

-- Refresh on a schedule
REFRESH MATERIALIZED VIEW CONCURRENTLY cached_remote_orders;
Foreign Data Wrappers work well for cross-database reporting, gradual migrations from legacy systems, federating queries across multiple PostgreSQL instances, and querying server-side CSV files without running a COPY import.
Performance is the first limitation to understand. FDW queries the remote source in real time, so response speed depends entirely on that source. The harder constraint is scope: FDW connects to databases and file systems. It has no connectors for Salesforce, Shopify, HubSpot, or any other SaaS business app. If your data lives in a spreadsheet or another database, FDW is a genuinely elegant solution. If it lives in a CRM or an ad platform, you are looking at a different problem that FDW was never designed to solve.
Automate data import to PostgreSQL with Python
For teams looking to automate data import to PostgreSQL from APIs or custom data sources without a pre-built connector, Python gives you full control over what gets pulled, how it gets transformed, and when it loads into PostgreSQL.
psycopg2 or psycopg3?
psycopg2 has been the standard PostgreSQL adapter for Python for nearly two decades and remains widely used in existing codebases. psycopg3, installed as the psycopg package, is now the recommended choice for new projects. It supports async operations natively, uses the PostgreSQL binary protocol for faster data transfer, and delivers roughly three times better query throughput in benchmarks. The official PyPI package page states: “If you are developing something new, Psycopg 3 is the most current implementation of the adapter.”
Maintain existing psycopg2 codebases as they are. Start new projects on psycopg3.
Step 1: Install dependencies
For new projects using psycopg3:
pip install "psycopg[binary,pool]" pandas requests
For existing psycopg2 codebases:
pip install psycopg2-binary pandas requests
Step 2: Connect to PostgreSQL
Store credentials in environment variables, not in the script itself.
import psycopg
import os

conn = psycopg.connect(
    host=os.environ["PG_HOST"],
    port=5432,
    dbname=os.environ["PG_DATABASE"],
    user=os.environ["PG_USER"],
    password=os.environ["PG_PASSWORD"]
)
Step 3: Fetch data from your source
Example pulling recent orders from the Shopify Admin API:
import requests
import pandas as pd

def fetch_shopify_orders():
    url = f"https://your-store.myshopify.com/admin/api/2025-01/orders.json"
    headers = {"X-Shopify-Access-Token": os.environ["SHOPIFY_TOKEN"]}
    params = {"status": "any", "limit": 250, "created_at_min": "2026-04-01T00:00:00Z"}

    response = requests.get(url, headers=headers, params=params)
    orders = response.json()["orders"]

    return pd.DataFrame([{
        "order_id": o["id"],
        "customer_name": o.get("email", ""),
        "order_date": o["created_at"][:10],
        "total_price": float(o["total_price"]),
        "status": o["financial_status"]
    } for o in orders])
Step 4: Load into PostgreSQL
For bulk loads, use COPY FROM STDIN. It is significantly faster than INSERT at volume:
from io import StringIO

def load_to_postgres(df, conn, table_name):
    buffer = StringIO()
    df.to_csv(buffer, index=False, header=False)
    buffer.seek(0)

    with conn.cursor() as cur:
        cur.copy(
            f"COPY {table_name} (order_id, customer_name, order_date, total_price, status) FROM STDIN WITH CSV",
            buffer
        )
    conn.commit()
For upsert logic where records should update on conflict:
with conn.cursor() as cur:
    cur.execute("""
        INSERT INTO shopify_orders (order_id, customer_name, order_date, total_price, status)
        VALUES (%s, %s, %s, %s, %s)
        ON CONFLICT (order_id) DO UPDATE SET
            status = EXCLUDED.status,
            total_price = EXCLUDED.total_price
    """, (row.order_id, row.customer_name, row.order_date, row.total_price, row.status))
conn.commit()
Step 5: Schedule
On Linux:
# Run every morning at 6am
0 6 * * * /usr/bin/python3 /path/to/import_script.py >> /var/log/pg_import.log 2>&1
On Windows, use Task Scheduler. For cloud environments, Google Cloud Scheduler, AWS EventBridge, and GitHub Actions are all reliable options depending on your existing infrastructure.
Python is the right choice for custom data sources without pre-built connectors, APIs with non-standard authentication or pagination, and pipelines that need transformation logic before the data reaches PostgreSQL.
The maintenance cost is real. Pipelines that work today stop working when an API updates its schema, or a token expires silently. Without someone actively monitoring the jobs, failures go unnoticed until a stakeholder asks why the data is stale. I would only go this route if the data source genuinely has no pre-built connector and the team has an engineer who can own it long term. Otherwise, the pipeline becomes a liability faster than it becomes an asset.
Full refresh vs. incremental loading in PostgreSQL: What to use and when
When importing data on a schedule, how each update loads matters as much as how often it runs. Two approaches exist: full refresh and incremental loading.
A full refresh replaces the entire PostgreSQL table on every run. Simple to configure, but the cost grows with the dataset. Reloading millions of rows every hour means longer sync times, heavier API usage, and a higher chance of hitting rate limits before the job finishes.
Incremental loading fetches only records that are new or changed since the last run, typically 5 to 20% of the total dataset. Sync times stay short regardless of how large the table grows.
Comparison
| Full refresh | Incremental loading | |
|---|---|---|
| What gets loaded | Entire dataset every run | New or changed records only |
| Sync speed | Slower as data grows | Stays consistent |
| API consumption | High | Low |
| Rate limit risk | Higher | Lower |
| Best for | Small datasets, infrequent runs | Large datasets, frequent schedules |
Coupler.io uses incremental fetching automatically. The first run loads the full dataset. Every subsequent run pulls only what changed. No configuration needed; it is active for all users on all plans.
For sources where data cannot be filtered by date (account-level performance totals, for example), Coupler.io falls back to a full refresh with enhanced error handling. If one source connection fails mid-sync, the rest of the pipeline continues and the failed source is flagged rather than silently skipped.
Import your business data into PostgreSQL with Coupler.io
Get started for freeIncremental fetching is active for Google Analytics 4, Google Search Console, Facebook Ads, LinkedIn Ads, TikTok Ads, Microsoft Ads, YouTube Analytics, and others, with more sources added regularly.
One practical side effect: platforms like Facebook Ads retain data for 36 months and Google Ads for 24 months. Records pulled into PostgreSQL during those retention windows stay in the database after the platform deletes them from its own storage.
Full refresh still makes sense for sources that cannot be sliced by date, small datasets where the processing time difference is negligible, and initial setup runs where a complete baseline is needed.
Frequently asked questions
What is the fastest way to import large amounts of data into PostgreSQL?
For a one-time bulk load, the COPY command is the fastest native option. It reads directly from the server’s filesystem and processes hundreds of thousands of rows per second. For ongoing imports from business apps, combining Coupler.io’s scheduled pipelines with incremental fetching keeps data fresh without reloading the full dataset on every run.
How to query large amounts of data in PostgreSQL?
Import structure affects query performance directly. Tables loaded with correct column data types, appropriate indexes, and normalized schemas run faster queries than tables built from unprocessed exports. Specific techniques that help at scale: GIN indexes for jsonb columns, B-tree indexes on frequently filtered columns, partitioning large tables by date range, and running ANALYZE after large imports to give the query planner accurate statistics. Incremental loading also helps by keeping tables from accumulating duplicate or outdated rows over time.
What is the difference between COPY and \copy in PostgreSQL?
COPY runs server-side and reads from the PostgreSQL server’s filesystem. It requires superuser or pg_read_server_files access and does not work on managed databases where server file access is restricted. \copy runs client-side through the psql command line, reads from your local machine, and works with regular user permissions. For local development and managed database setups like Amazon RDS or Supabase, \copy is the practical choice.
Can I automate data imports into PostgreSQL without writing code?
Yes, with the PostgreSQL ETL tools. Coupler.io connects 400+ business apps to PostgreSQL on a schedule you set. No SQL or scripts are involved. Connect the source app, configure the PostgreSQL destination with host, port, and database name, set the refresh interval, and click Save and Run.