Quick CSV upload or a full-blown Snowpipe pipeline? The method to load data into Snowflake determines your setup time, scalability, and how much maintenance you’ll deal with down the road.
This guide covers six ways to get data into Snowflake, from automated ETL with Coupler.io to advanced technical approaches.
Method 1: Load data to Snowflake with Coupler.io
For recurring data imports, the objective is to maintain consistently updated data without manual effort or complex custom pipelines. Coupler.io is a no-code data integration platform that connects to over 400 data sources and automates scheduled data transfers to Snowflake and other destinations.
You can set up the Snowflake integration in minutes wth no SQL or scripting required. Try it out right away for free using the form below. Just select the needed data source and click Proceed to sign up for Coupler.io for free and create your data flow to Snowflake.

Step 1: Connect sources and collect data
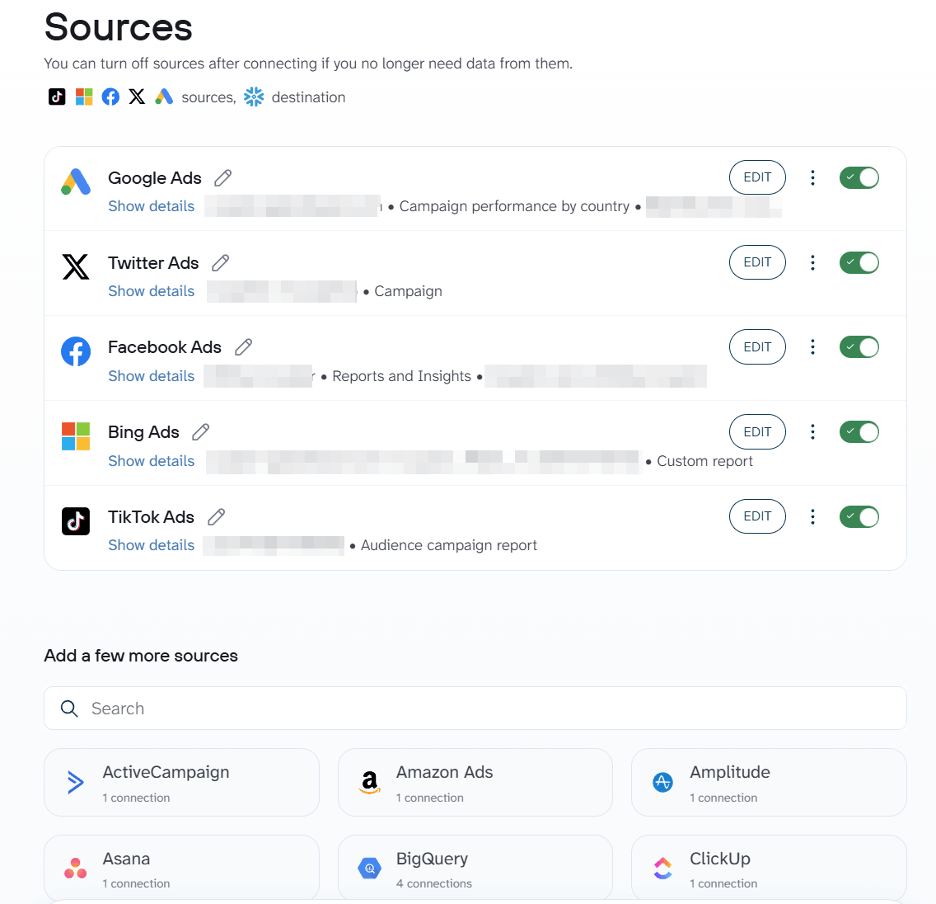
Start by connecting the data source to integrate with Snowflake. Choose what data to import. Depending on the data source, you’ll need to choose data entities, reports, metrics&dimensions, spreadsheets, database tables, and so on.
Coupler.io allows you to add multiple data sources within a single flow. So, you can combine data from different accounts or platforms at the same time.

Step 2: Preview, transform, and organize your data
This optional step is where the data gets shaped before it reaches Snowflake. You can rename, reorder, filter, or merge columns so the dataset arrives in a clean, analysis-ready structure. Calculated fields, sorting, and cross-app merges are all available within the same workflow.


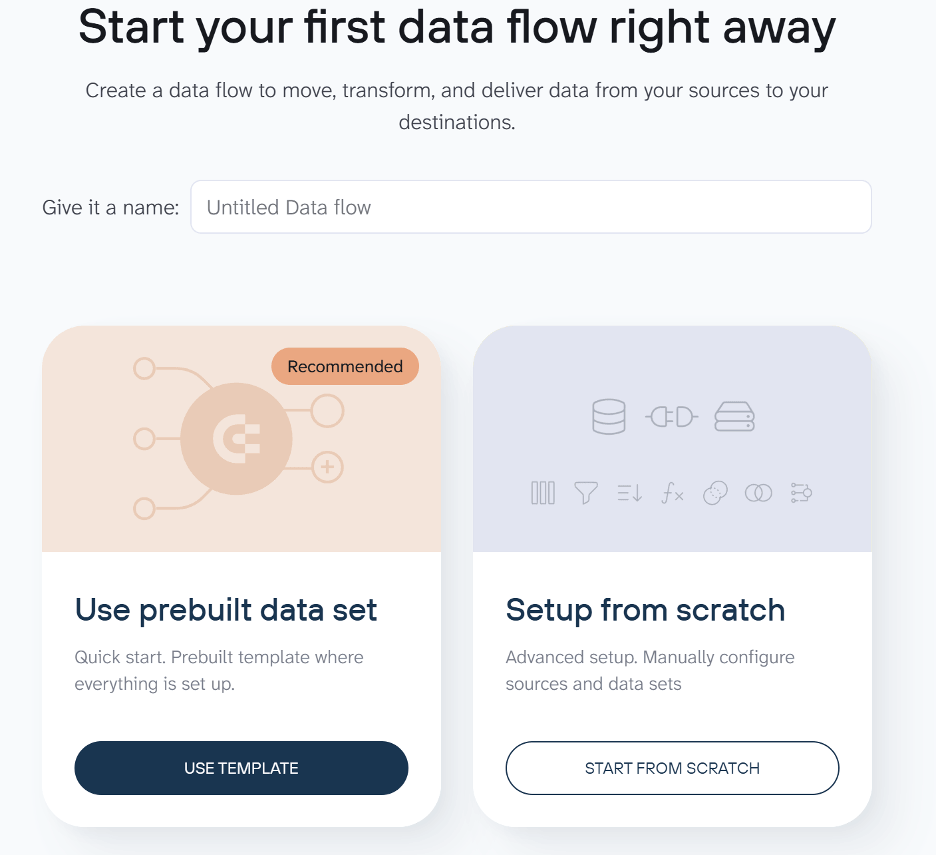
In addition to the available data transformations, Coupler.io provides data set templates for some data sources or combinations of them. These are re-built configurations that combine the right sources, transformations, and key metrics out of the box. Instead of manually deciding which columns to keep, what to aggregate, or how to blend cross-channel data, you pick a template and get an analysis-ready dataset with no extra setup.
You can choose the option of creating a data set from a template once you create a new data flow.

Step 3: Load the data into Snowflake
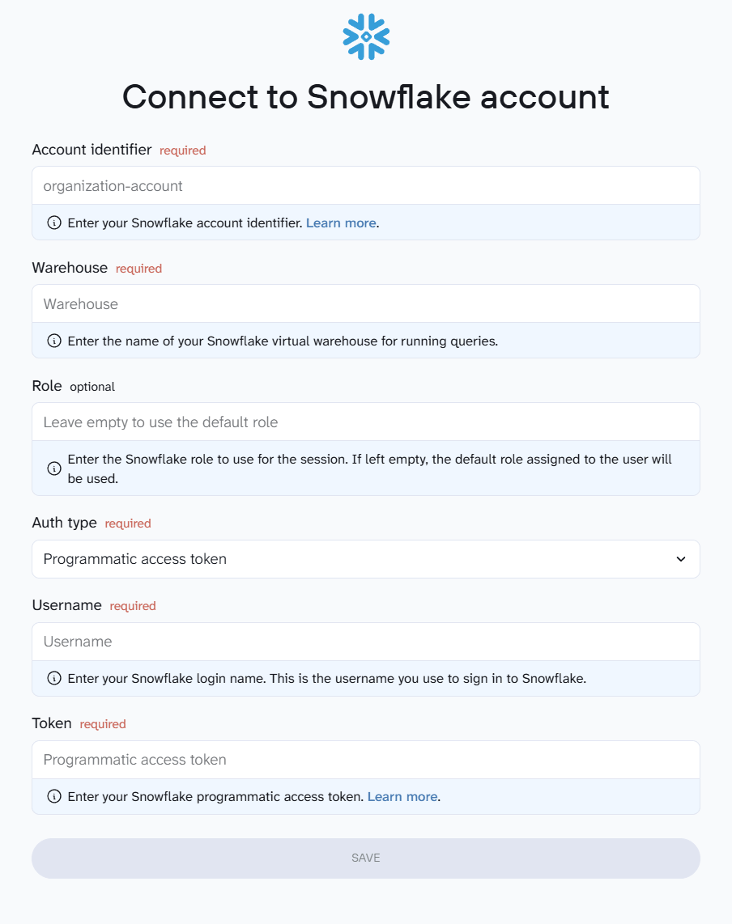
Next, connect your Snowflake account. You’ll need to provide your account identifier, username, and authentication details. Coupler.io uses these credentials to establish a secure connection to your Snowflake environment.

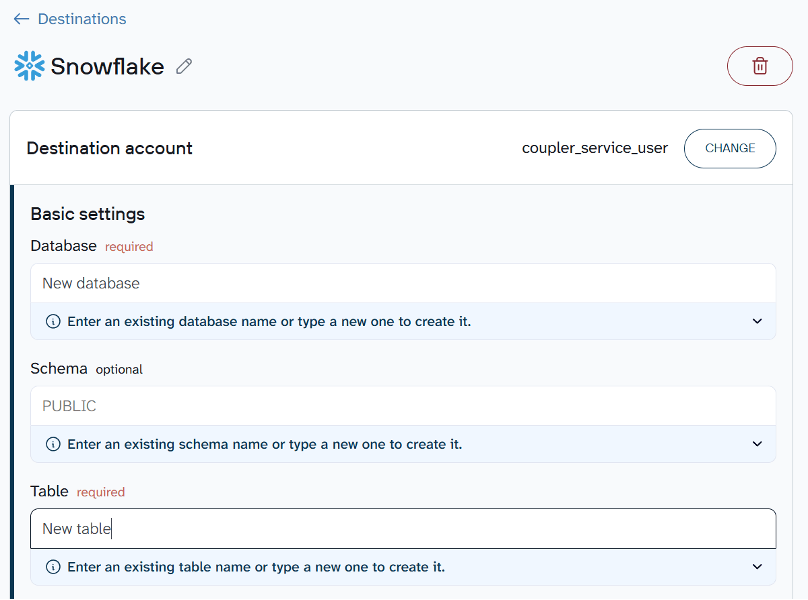
Once connected, specify where the data should land. Enter the name of an existing database and table, or type new names to create them automatically. You can also provide a schema if needed.

By default, each import replaces the previous dataset. If you’d rather keep existing records and add new ones on top, switch the import mode from Replace to Append.


Save and run to import data to Snowflake. In a few minutes, your data will be loaded and ready for analysis.
Step 4: Schedule automatic data refreshes
A one-time load is just the starting point. To keep your Snowflake tables up to date, set up a sync schedule in Coupler.io. You can configure data flows to run automatically at intervals from every day to every 15 minutes. Fresh data will be loaded to Snowflake without anyone triggering it manually.
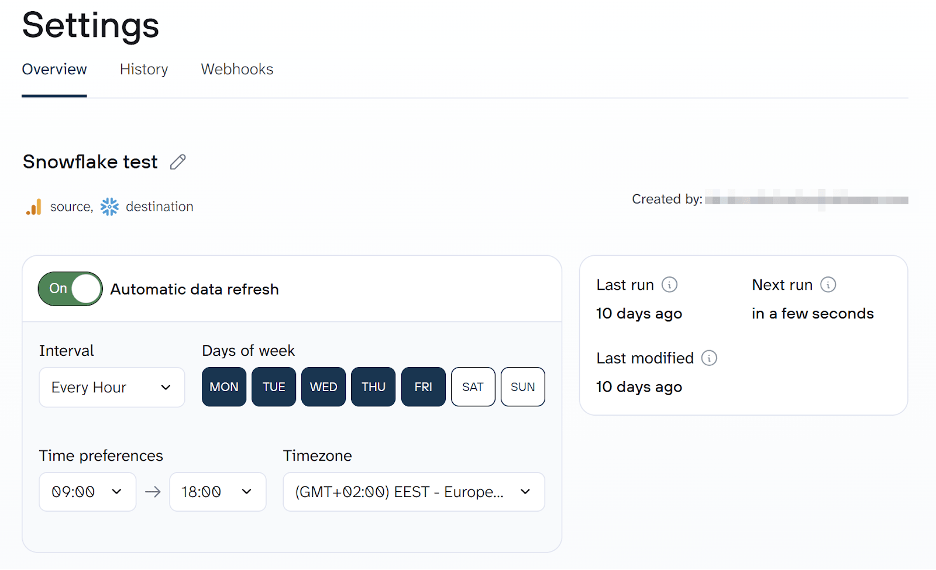
Speaking of triggers, Coupler.io also supports incoming and outgoing webhooks to enhance your data automation capabilities.
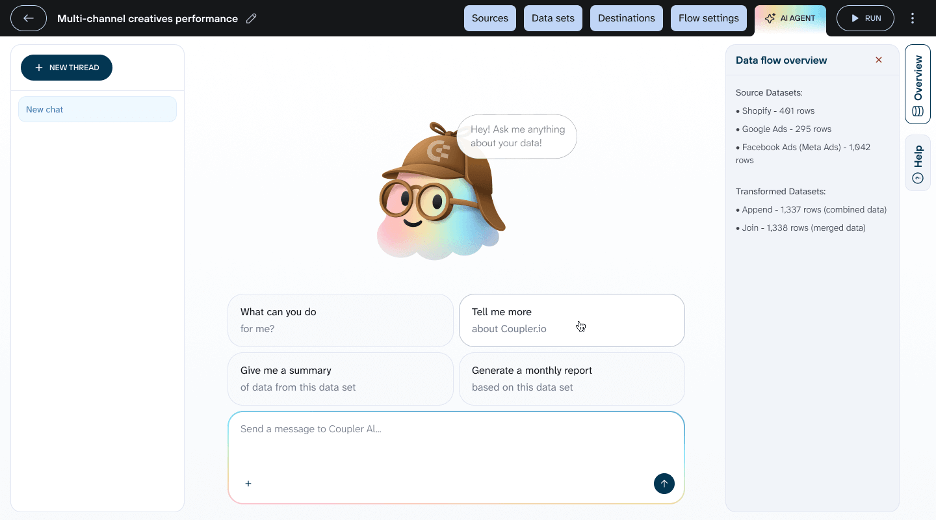
Bonus: Analyze your data with Coupler.io’s AI Agent
You don’t have to wait until data reaches Snowflake to start analyzing it. Coupler.io includes a built-in AI Agent that lets you query your synced data in plain language directly inside the platform. Open the AI Agent tab inside any data flow and ask your question. The AI Agent translates your question into a query, runs it against your dataset, and returns structured results. This works with any data flowing through Coupler.io, whether it’s headed to Snowflake or another destination.

Coupler.io simplifies loading data from multiple SaaS applications and databases into Snowflake. Instead of writing ingestion scripts or managing infrastructure, you can configure the pipeline through a visual interface and schedule it to run automatically.
Automate data load from 400+ sources to Snowflake with Coupler.io
Get started for freeMethod 2: Upload Data to Snowflake via Web UI
The simplest way to upload data to Snowflake for quick one-time imports is through Snowsight, Snowflake’s web interface. You can upload structured files such as CSV or TSV, as well as semi-structured formats including JSON, Avro, ORC, Parquet, and XML. This method works well for small, one-off uploads but isn’t suited for large datasets or recurring pipelines. The limits are 250 files per batch, with each file capped at 250 MB.
Load CSV data into Snowflake using Snowsight
You can load CSV data into Snowflake to a new table or an existing one as follows:
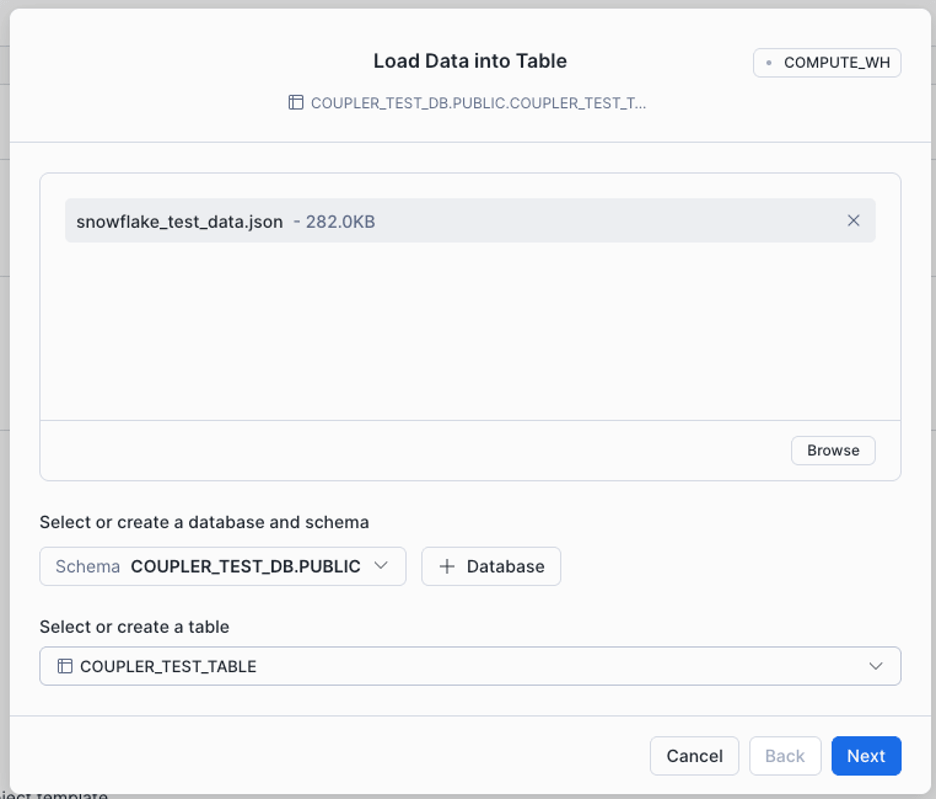
- Sign in to Snowsight and select + from the top left of the navigation menu → Table → From File. The Load Data into Table dialog will open.

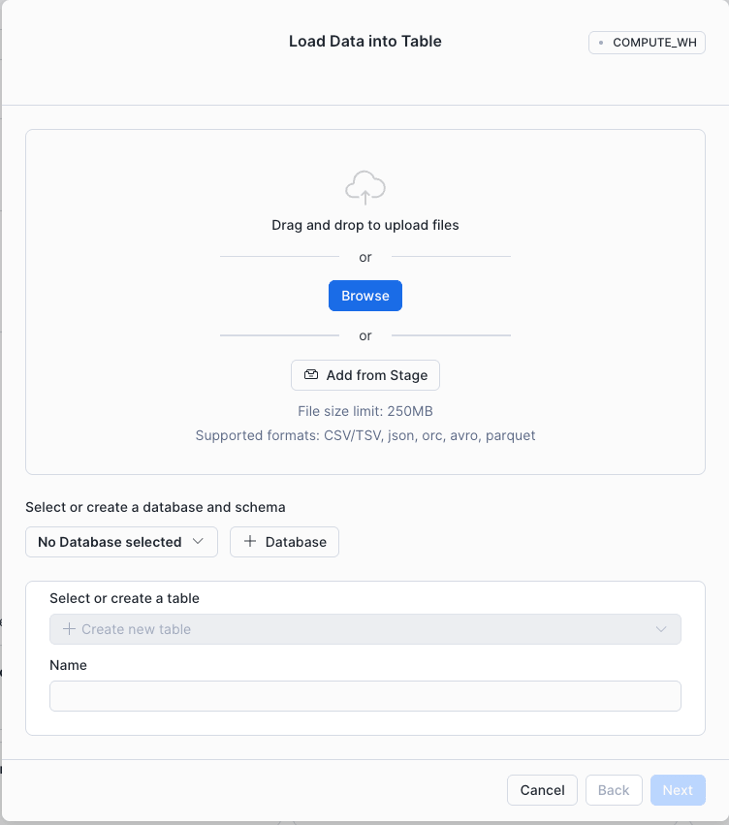
- Choose the files to upload:
- Drag and drop files directly from your local machine.
- Click to browse and select files from your system.
- Create a new database and table (or select an existing one), then click Next. The Table Schema dialog will appear.

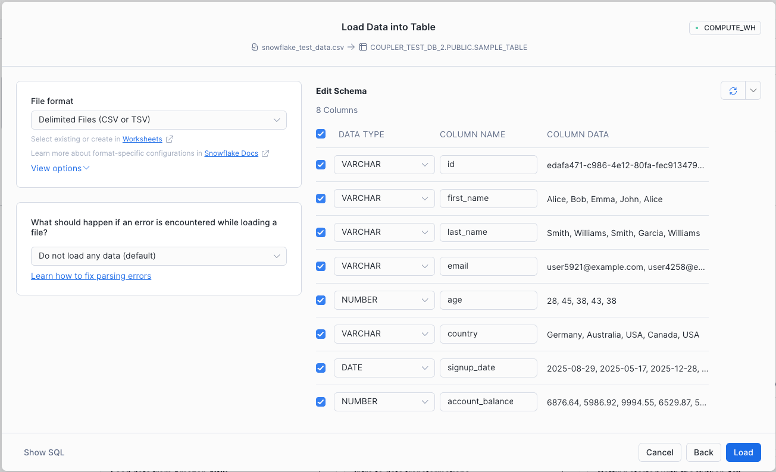
- Review the detected file format, column names, data types, and sample rows before starting the import. Confirm that everything is correct, then click Load to import the data.
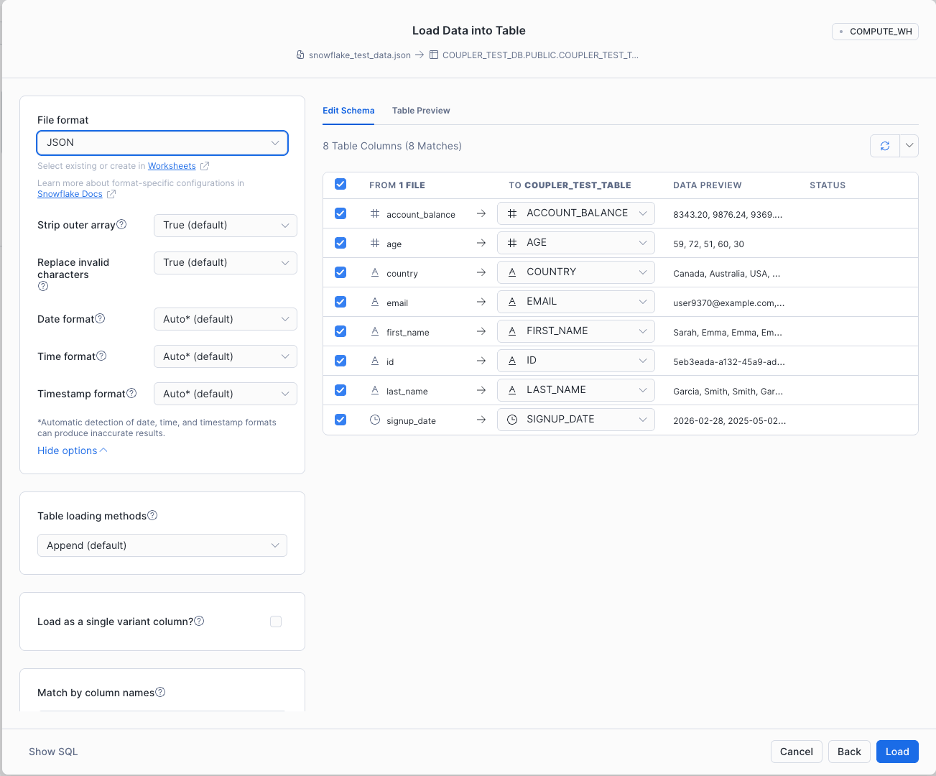
Load JSON data into Snowflake using Snowsight
Now let’s load JSON data to Snowflake. Instead of creating a new table, the data will be loaded into an existing one.
- In the navigation menu, select Ingestion → Add Data.
- Select Load Data into Table and choose the JSON file to upload.
- Select the database and table, and click Next to open the Edit Schema page.

- Set the file format to JSON, then click Load.

Using Snowsight to upload data to Snowflake is the quickest option suitable for small datasets or one-time imports. However, this method is manual and doesn’t scale. For more control over batch loading and automation, SnowSQL and internal stages provide a better path.
Method 3: Import data to Snowflake using SnowSQL
SnowSQL is Snowflake’s command-line interface (CLI). This is the tool to import data to Snowflake with full control over every step, including loading, running queries, modifying records, and managing objects.
Step 1: Download the SnowSQL installer
SnowSQL runs on Linux, Windows, and macOS. The simplest way to install it is to download the installer from Snowflake’s official page. Select your OS, download the file, and walk through the setup wizard.
Step 2: Sign in from the Terminal
Open your terminal and connect to Snowflake (replace <account-name> and <username>):
snowsql -a <account-name> -u <username>
The -a flag specifies your Snowflake account identifier, and -u specifies your username. To find these details, sign in to your Snowflake account, click your profile icon in the bottom-left corner, and go to Account → View account details. Copy the Account Identifier and Login Name from there.
Step 3: Create a database and schema
Create (or replace) a database named coupler_demo_db:
CREATE OR REPLACE DATABASE coupler_demo_db;
If a database with that name already exists, it will be replaced along with all its objects—use with caution. The command also generates a default PUBLIC schema and sets the new database as active for your current session.
Step 4: Create a table
CREATE OR REPLACE TABLE customer_details (

    id STRING,

    first_name STRING,

    last_name STRING,

    email STRING,

    age STRING,

    country STRING,

    sign_up_date DATE,

    account_balance NUMBER

);
This creates the customer_details table with columns matching the sample CSV file.
Step 5: Create a virtual warehouse
CREATE OR REPLACE WAREHOUSE coupler_demo_wh

WITH

    WAREHOUSE_SIZE = 'X-SMALL'

    AUTO_SUSPEND = 180

    AUTO_RESUME = TRUE

    INITIALLY_SUSPENDED = TRUE;
Once created, this warehouse becomes the active warehouse for your session.
Step 6: Stage files
A Snowflake stage is a storage location used to load and unload data. Snowflake supports two types:
Internal stages store files within Snowflake. Each user and table automatically gets one.
External stages reference files stored outside Snowflake—in Amazon S3, Google Cloud Storage, or Microsoft Azure.
In this example, we upload the sample CSV (downloaded in Method 2) to the internal stage for the customer_details table using the PUT command:
PUT file://<file-path>[/]snowflake_test_data*.csv @coupler_demo_db.public.%customer_details;
The file path specifies the local location of the CSV files (wildcards are supported). The @<namespace>.%<table_name> syntax tells Snowflake to use the table’s internal stage.
The command returns a result confirming the upload.
Step 7: Copy staged data into the target table
Load the staged files into the table using COPY INTO:
COPY INTO customer_details

FROM @%customer_details

FILE_FORMAT = (TYPE = CSV FIELD_OPTIONALLY_ENCLOSED_BY='"')

PATTERN = '.*snowflake_test_data.csv.gz'

ON_ERROR = 'skip_file';
Here’s what each parameter does:
FROM @%customer_details— reads from the table’s internal stage.FILE_FORMAT— specifies CSV format with optional double-quote enclosure.PATTERN— loads only files matching this pattern.ON_ERROR = 'skip_file'— skips problematic files instead of failing the entire load.
SnowSQL and internal stages give you significantly more control than manual uploads. This approach suits batch ingestion workflows where files are staged and processed via SQL. However, many production pipelines store data in cloud platforms like Amazon S3. The next method covers loading from an external stage.
Method 4: Bulk loading from cloud storage
Bulk loading is the most efficient method for importing large datasets or historical data into Snowflake. Instead of uploading files through the UI, you store them in cloud storage (such as Amazon S3) and load them into Snowflake using a stage and the COPY INTO command. This approach works best for large datasets, batch ingestion pipelines, and data warehouse migrations.
Step 1: Prepare and upload data
Format your files (e.g., CSV) and upload them to your cloud storage bucket:
aws s3 cp ./data/ s3://my-bucket/customer-data/ --recursive
This uploads all files from the local data folder to the S3 bucket.
Step 2: Create a storage integration
A storage integration lets Snowflake securely access the S3 bucket using an IAM role rather than embedding credentials in SQL commands.
CREATE STORAGE INTEGRATION my_s3_integration

    TYPE = EXTERNAL_STAGE

    STORAGE_PROVIDER = 'S3'

    STORAGE_AWS_ROLE_ARN = 'arn:aws:iam::123456789012:role/snowflake-s3-role'

    ENABLED = TRUE

    STORAGE_ALLOWED_LOCATIONS = ('s3://my-bucket/customer-data/');
This configuration allows Snowflake to authenticate via an AWS IAM role while restricting access to the specified bucket path. After creating the integration, configure the AWS IAM role trust relationship so Snowflake can assume the role.
Step 3: Create an external stage
Create a stage that points to the S3 location:
CREATE OR REPLACE STAGE customer_stage

    URL = 's3://my-bucket/customer-data/'

    STORAGE_INTEGRATION = my_s3_integration

    FILE_FORMAT = (TYPE = CSV FIELD_OPTIONALLY_ENCLOSED_BY='"');
The stage acts as a reference to the storage location, allowing Snowflake to read files directly from S3.
Step 4: Load data into the table
With the stage configured, load the files:
COPY INTO customer_details

FROM @customer_stage

FILE_FORMAT = (TYPE = CSV FIELD_OPTIONALLY_ENCLOSED_BY='"')

ON_ERROR = 'CONTINUE';
Step 5: Verify the data load
Confirm that the records were inserted:
SELECT COUNT(*) FROM customer_details;

SELECT * FROM customer_details LIMIT 10;
External stages let Snowflake access files directly from cloud storage, which is standard practice in modern data architectures. This separates storage from compute and supports large-scale batch ingestion. For pipelines that require continuous or near real-time loading, Snowpipe builds on this approach by automating the process.
Method 5: Snowflake data ingestion using Snowpipe
When data files arrive continuously in cloud storage, running manual loads becomes impractical. Snowpipe solves this by automatically ingesting new files as soon as they appear in a stage. Instead of running COPY INTO commands yourself, Snowpipe listens for file events and loads the data in near real time. This is ideal for continuous ingestion, event-driven pipelines, and analytics workflows that depend on fresh data.
Step 1: Create a file format
Define the structure Snowflake should expect from incoming files:
CREATE OR REPLACE FILE FORMAT customer_csv_format

    TYPE = CSV

    FIELD_OPTIONALLY_ENCLOSED_BY = '"';
Step 2: Create an external stage
Create a stage pointing to the S3 location where new files will arrive:
CREATE OR REPLACE STAGE customer_pipe_stage

    URL = 's3://my-bucket/customer-incoming/'

    STORAGE_INTEGRATION = my_s3_integration

    FILE_FORMAT = customer_csv_format;
Step 3: Create the Snowpipe
Create a pipe that automatically loads files from the stage into the target table:
CREATE OR REPLACE PIPE customer_pipe

    AUTO_INGEST = TRUE

AS

COPY INTO customer_details

FROM @customer_pipe_stage

FILE_FORMAT = (FORMAT_NAME = customer_csv_format);
This tells Snowflake to run COPY INTO whenever new files appear in the stage.
Step 4: Configure Amazon S3 event notifications
For auto-ingest to work, S3 must notify Snowflake when a new file is uploaded. In the AWS Management Console:
- Open the S3 bucket used in the stage.
- Navigate to Properties → Event Notifications.
- Create a notification for the event s3:ObjectCreated:*.
- Route the notification to an SNS topic or SQS queue connected to Snowpipe.
Step 5: Test the pipeline
Upload a test file to the S3 bucket:
aws s3 cp ./customer_data.csv s3://my-bucket/customer-incoming/
Once uploaded, Snowpipe automatically picks up and loads the file.
Step 6: Monitor Snowpipe activity
Check whether the data was loaded successfully:
SELECT *

FROM TABLE(INFORMATION_SCHEMA.LOAD_HISTORY_BY_PIPE(

    PIPE_NAME => 'CUSTOMER_PIPE'

));
This returns the ingestion history, such as loaded files, timestamps, and any errors.
Snowpipe automates near real-time ingestion by loading new files as they arrive in cloud storage. Combined with external stages, it keeps Snowflake data up-to-date without manual intervention. It’s a well-suited method for event-driven pipelines and streaming datasets.
Method 6: Load data from API to Snowflake
You can also load data from API to Snowflake using the External Access Integration feature. It enables secure outbound connections from Snowflake to approved external network locations. To configure this, follow these steps:
Step 1: Create a network rule
Define which external host Snowflake is allowed to contact. In this example, I permit requests to the VAT Comply API:
CREATE OR REPLACE NETWORK RULE coupler_demo_network_rule

    MODE = EGRESS

    TYPE = HOST_PORT

    VALUE_LIST = ('api.vatcomply.com');
Without a network rule, Snowflake cannot communicate with external APIs.
Step 2: Create an external access integration
Group the approved network rules into an integration that functions and procedures can reference:
CREATE OR REPLACE EXTERNAL ACCESS INTEGRATION coupler_demo_api

    ALLOWED_NETWORK_RULES = (coupler_demo_network_rule)

    ENABLED = TRUE;
Step 3: Create a Python UDF
With the integration in place, create a Python UDF that calls the API and returns structured results:
CREATE OR REPLACE FUNCTION vat_rates()

RETURNS TABLE (

    country_code STRING,

    country_name STRING,

    standard_rate NUMBER(5,2),

    reduced_rates ARRAY,

    super_reduced_rate NUMBER(5,2),

    parking_rate NUMBER(5,2),

    currency STRING,

    member_state BOOLEAN

)

LANGUAGE PYTHON

RUNTIME_VERSION = 3.10

HANDLER = 'ApiData.process'

EXTERNAL_ACCESS_INTEGRATIONS = (coupler_demo_api)

PACKAGES = ('requests')

AS

$$

import requests

class ApiData:

    def process(self):

        response = requests.get("https://api.vatcomply.com/currencies")

        data = response.json()

        for country_code, details in data.items():

            yield (

                country_code,

                details.get("name"),

                details.get("standard_rate"),

                details.get("reduced_rates"),

                details.get("super_reduced_rate"),

                details.get("parking_rate"),

                details.get("currency"),

                details.get("member_state")

            )

$$;
The function sends a request to the VAT Comply API, parses the JSON response, and returns each record as a row.
Step 4: Query the function
SELECT * FROM TABLE(vat_rates());
Snowflake calls the external API, processes the response through the Python handler, and returns the results as a queryable table.
External Access Integrations extend Snowflake beyond file-based ingestion by allowing secure API calls directly from the platform. By combining network rules, integrations, and Python UDFs, you can pull data from external services without relying on separate orchestration tools. This method is useful for integrating operational data, third-party services, or real-time API feeds into your analytics workflows.
Which method do you choose?
The right way to load data to Snowflake depends on your data source, volume, frequency, and technical expertise. Here’s a quick decision guide.
Coupler.io: automation without engineering effort
Best for teams importing data from SaaS apps (Google Sheets, HubSpot, Shopify, Airtable) on a recurring basis. No code, no infrastructure, no maintenance—just scheduled imports with ready-made connectors.
Coupler.io handles extraction and loading automatically, reducing manual work and maintenance.
Snowflake web UI: quick, manual uploads
Works well for one-time imports of small CSV or JSON files, prototyping, or non-technical users. However, it’s not designed for automation or large-scale production workloads.
SnowSQL: scripting and command-line control
A strong option for engineers who prefer the terminal and need automation via scripts, CI/CD workflows, or repeatable processes.
This gives you more flexibility but requires technical expertise.
Bulk loading: large datasets
The most efficient path for high-volume data, such as millions/billions of rows, historical migrations, or large files from S3 or Azure Blob.
Bulk loading is highly performant and cost-efficient for large batches but requires staging and configuration.
Snowpipe: continuous, near real-time ingestion
Automatically loads new files as they arrive in cloud storage. Ideal for event-driven pipelines and analytics that depend on fresh data.
Snowpipe minimizes latency without requiring manual intervention.
API-based loading: custom integrations
Best when your data comes from external APIs and you need custom transformation or authentication logic. Flexible but requires development effort.
For teams working with SaaS tools and business data, ETL platforms such as Coupler.io can handle recurring imports by managing authentication, extraction, and scheduling automatically. For data engineering pipelines at scale, Snowpipe or bulk loading will likely be more appropriate.
Your decision should come down to data volume, update frequency, available technical resources, infrastructure complexity, and budget.