

The native dashboard and reporting features of Jira offer a complete overview of the project’s progress. However, there are limitations when it comes to customizing the report’s functionality. Therefore, project managers often face the need to create custom reports. For this, they export Jira to Excel.
This tutorial covers all the different methods you can use to export from Jira to Excel, including JQL queries and data entities. You’ll also learn an efficient approach to automate the Jira to Excel export on a schedule without any coding.
How to export from Jira to Excel – 4 methods
You can export Jira to Excel in four ways:
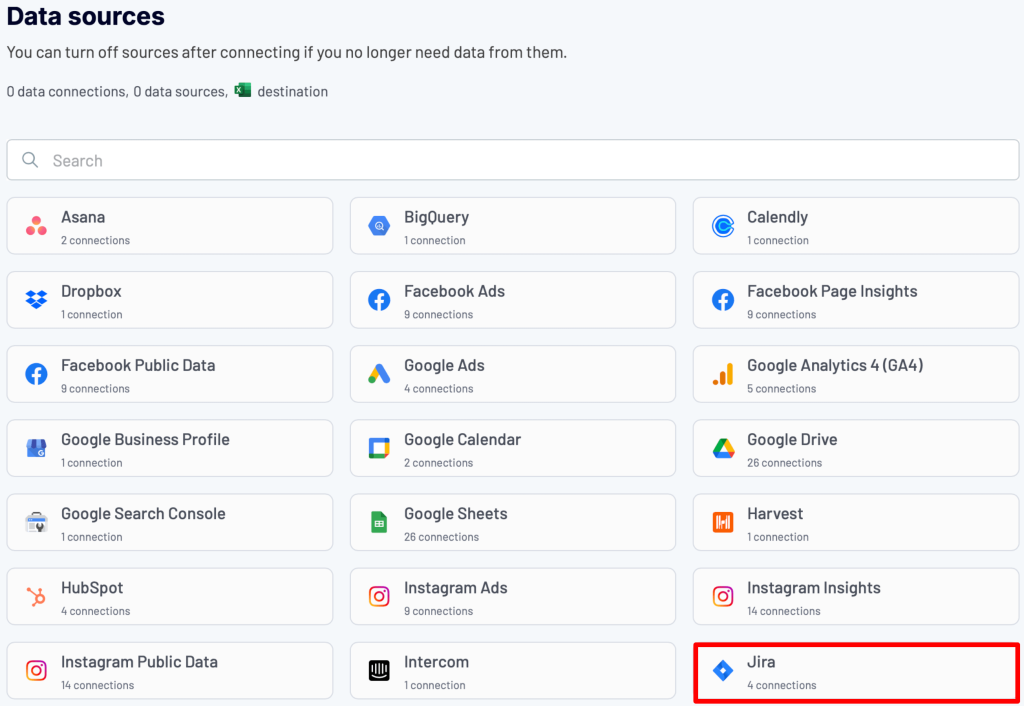
- Coupler.io – a data integration platform that lets you easily export data from Jira to Excel on schedule. It requires no technical proficiency and supports over 400 other sources. Coupler.io enables you to export two types of data from Jira: issues (through JQL queries) and data entities like Boards, Groups, Filters, Issues fields, etc. In addition to Excel, you can automate data load to Google Sheets, BI tools like Power BI, data warehouses like BigQuery, and AI tools like Claude. The latter is possible via the Coupler.io MCP server.
- Excel plugins (add-ins) – official add-ins, such as those by Jira Cloud or Coupler.io, that you can install to connect Jira to Excel. This method supports auto-exporting but has a platform dependency.
- Manual export – the built-in feature in Jira software to export data into a CSV file and use it with Excel.
- API – the Jira REST API, which you can call in Excel to fetch the required data. It requires high technical proficiency and knowledge of APIs.
Let’s explore each of the methods to export Jira to Excel.
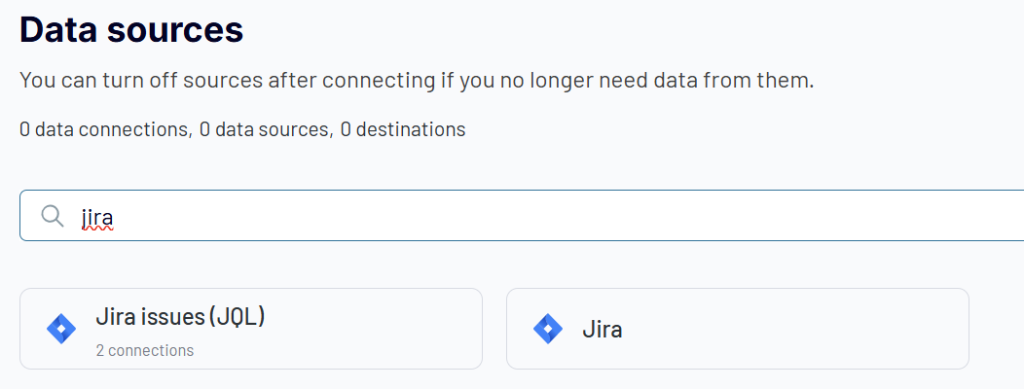
Jira export to Excel automatically using Coupler.io
Coupler.io’s Jira to Excel connector allows you to build a custom report based on data from Jira, combine it with records from other sources on the go, and load it into Excel. Additionally, your report will be refreshed on the chosen schedule to reflect the latest changes to the source. In Coupler.io, there are two Jira sources to export data from:
- Jira issues – to export custom JQL queries
- Jira – to export data entities

Let’s review each option separately.
Connect Jira to Excel to export issues via JQL
It only takes three simple steps to connect Jira to Excel using the Coupler.io data integration platform:
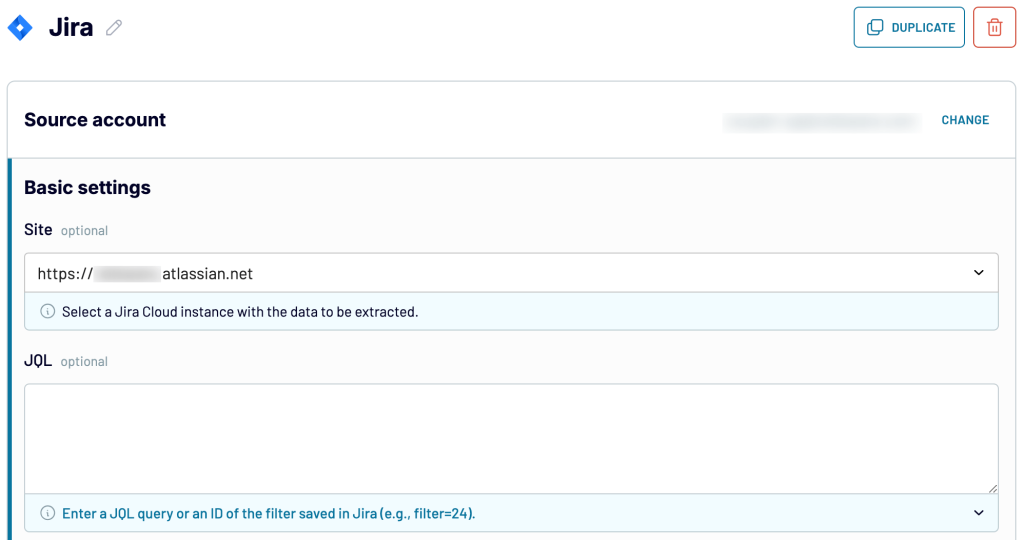
Step 1: Collect your Jira data
Start by clicking Proceed in the form below. The form is preset for the export to Excel Online – an Excel file stored in your OneDrive or OneDrive for Business account. At the same time, Coupler.io enables you to export data to an Excel file (CSV), which automatically downloads to your device. For this, change the destination to Excel Desktop using the drop-down list.

Sign up for Coupler.io at no cost and connect your Jira account. Next, enter the address of your Jira project in the Site field (e.g., yourprojecturl.atlassian.net). You can optionally enter a specific JQL to get desired data from Jira. If you leave this field empty, Coupler.io will load all issues.

Choose the data export format:
- Jira CSV export – to collect data in the default Jira format used for its own CSV export.
- Detailed data – to pull all data as is, including IDs, URLs, and other metadata to be placed in separate columns.
Proceed, and if you need to fetch data from multiple projects, simply add Jira as an extra source and follow the steps outlined above. A similar process applies if you need to collect data from other sources. Once you’ve configured your source settings, move on to the next step.
Step 2: Organize and transform your data
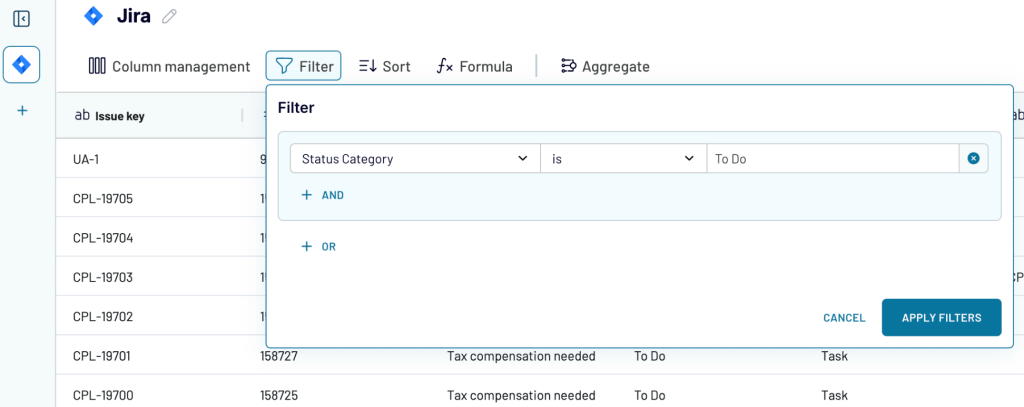
At this step, you can preview the data to be extracted from Jira and apply transformations, including:
- Rename, rearrange, or hide columns.
- Sort data in ascending or descending order.
- Filter data based on the required criteria. For example, you can narrow your Jira issues to a specific status category, as shown below:

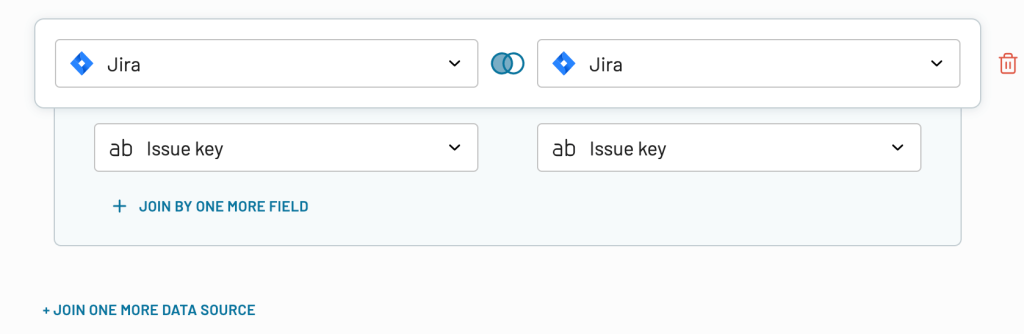
- If you’ve previously connected several sources, blend data in the chosen manner:
- Append – merge datasets with similar structures and columns matched by name.
- Join – combine datasets with different structures and at least one matched column.

Once the dataset is ready, proceed to export it to Excel.
Step 3: Load data and schedule refresh
Connect the Microsoft account associated with the workbook where you will load data. Then, select the workbook and a sheet. You can create a new sheet by typing a new name.


Optionally, specify the cell address for the exported data range. You can choose the import mode from the following:
- Replace – every time, the old data will be replaced by the fresh one.
- Append – on each import, the old data will remain. The fresh data will be added to the sheet.
You can also set Coupler.io to add a column for the date and time of each refresh and skip data refresh in case there is no change.
If you want to export your Jira data as an Excel file, then use Excel Desktop. It allows you to download a CSV file to your device and open it in the Excel desktop app.


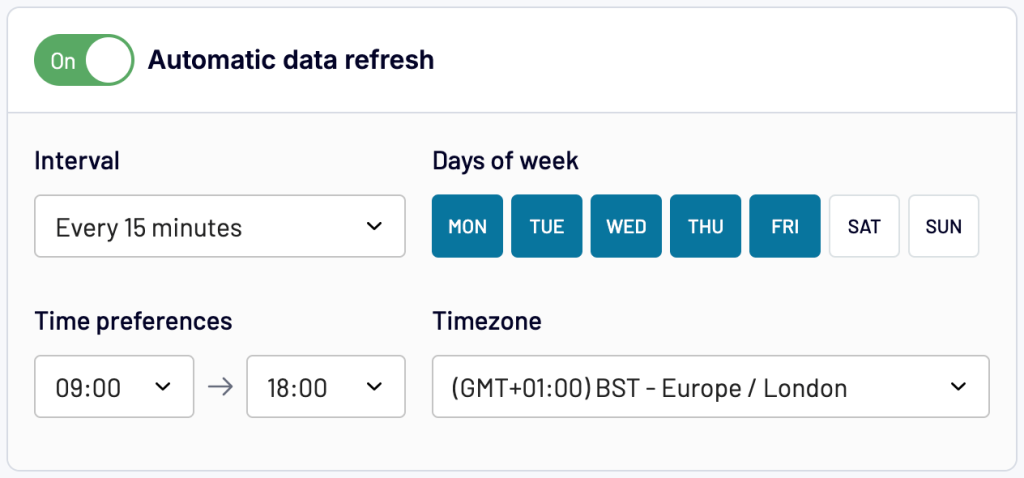
Next, save and run the data export. Then, you can toggle on the Automatic data refresh and schedule your exports. The available update intervals range from every month to every 15 minutes (that will make your report live).

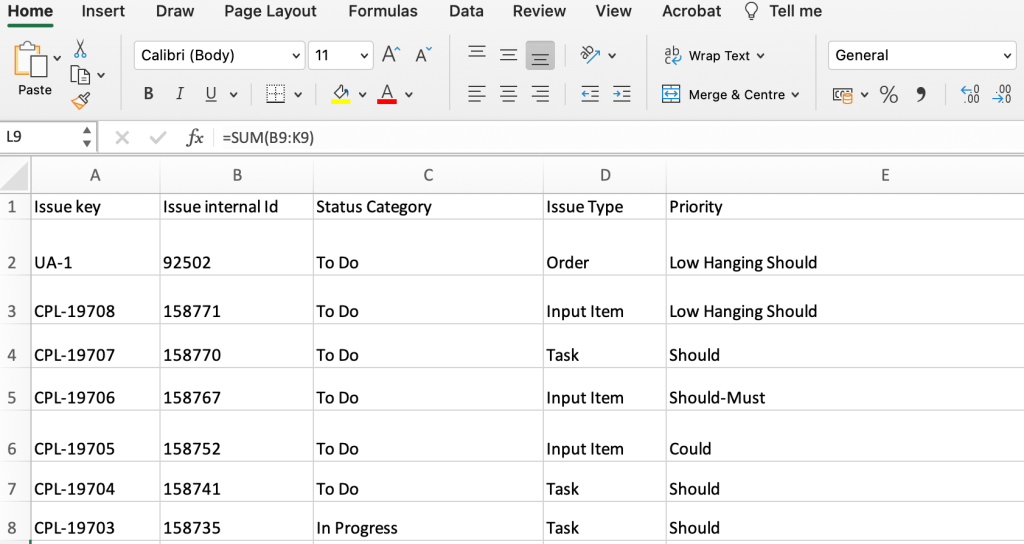
Finally, you can see the data exported into Excel.

Coupler.io will run the Jira to Excel export as per the schedule and keep the sheet synced with the latest data. Now, that’s a lot of time saved!
Export data entities from Jira to Excel using Coupler.io
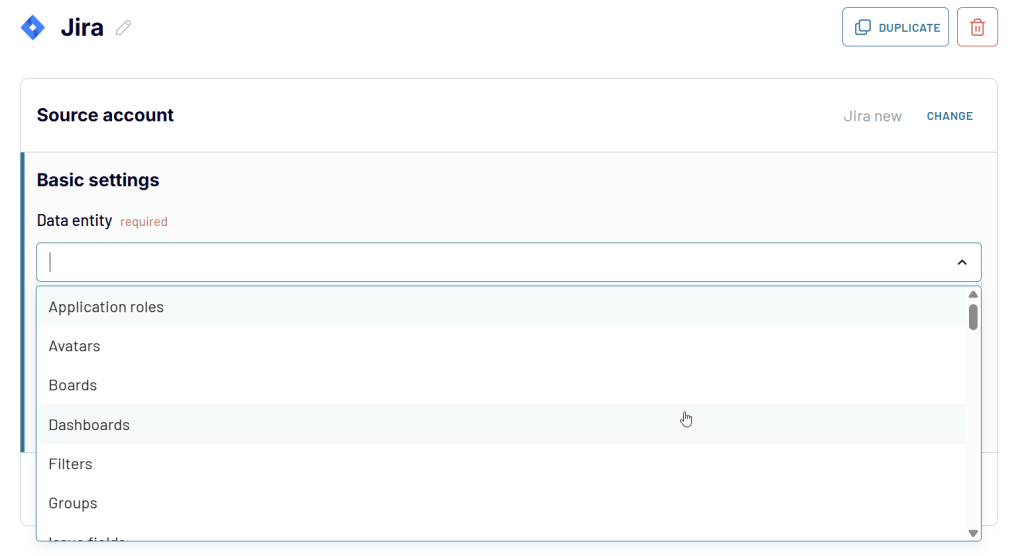
Now, check out the second option for exporting data from Jira. It allows you to pull over 50 data entities to Excel, including Boards, Board Issues, Groups, and so on.
To get this data from Jira to Excel with Coupler.io, use the preset form below:
Sign up for Coupler.io at no cost and connect your Jira account. However, the Jira account connection is different this time. You need to create an API access token first.
Step 1. Create a Jira API key
To generate the Jira API key, go to Atlassian API Tokens and click Create API token.

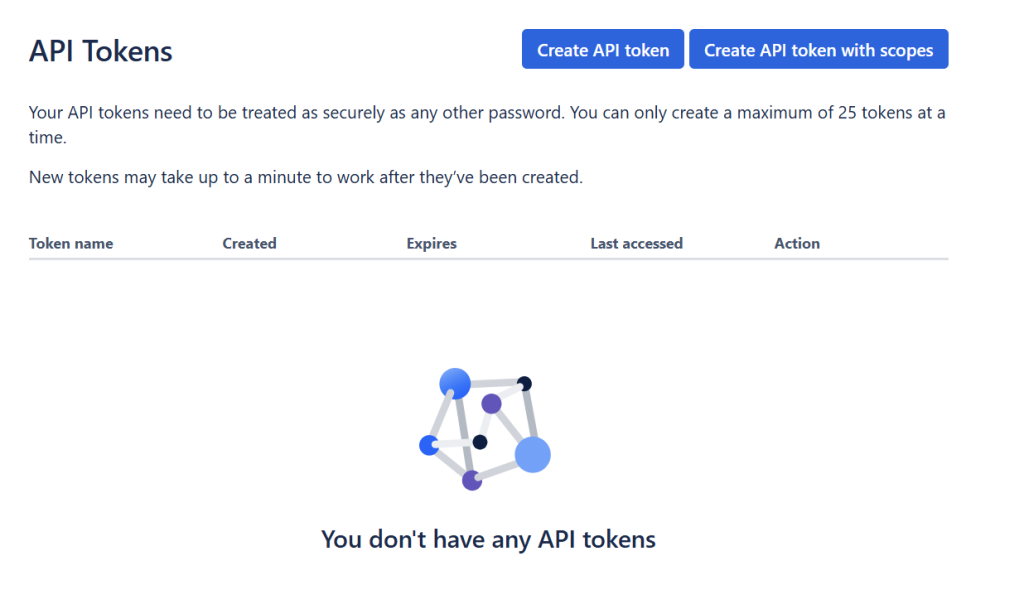
Now, enter a name and specify the expiration date for the API token, then click Create. You can name it anything; it is just for your reference.


Now, the generated API token will appear in the pop-up. Copy and save it safely.


Once you have the API key ready, you can use it to connect your Jira account to Coupler.io.
- Specify the domain for your Jira account in one of these formats:
<your-domain>.atlassian.net,<your-domain>.jira.com, orjira.<your-domain>.com - Enter the email address you used to log in to Jira and generate the API token. Here is what the connection may look like:


Step 2. Set up the Jira to Excel data flow
Once connected, select the needed data entity and proceed to the Transformations and Destinations steps as we’ve described above for exporting Jira issues via JQL.

This way, you can automate exports of data from Jira to Excel without any coding. Coupler.io enables you to organize your data before loading it into Excel, as well as change the destination easily. For example, you can copy the data flow and load Jira to Power BI for data visualization.
Explore more options that Coupler.io offers for reporting automation.
Export Jira issues to Excel using the add-in
Add-ins in Excel are tiny software that add new features to the spreadsheet tool. Jira offers an official Excel add-in, which you can use to export the required data.
BTW, Coupler.io is available as an Excel add-in as well.
Jira Cloud add-in
You can follow the steps below to export Jira data to Excel using the Jira Cloud add-in.
Install Jira Cloud for Excel
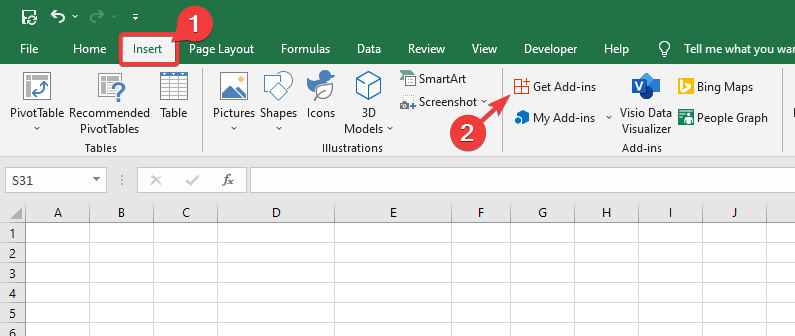
- In Excel, go to the Insert tab and go to Get Add-ins.

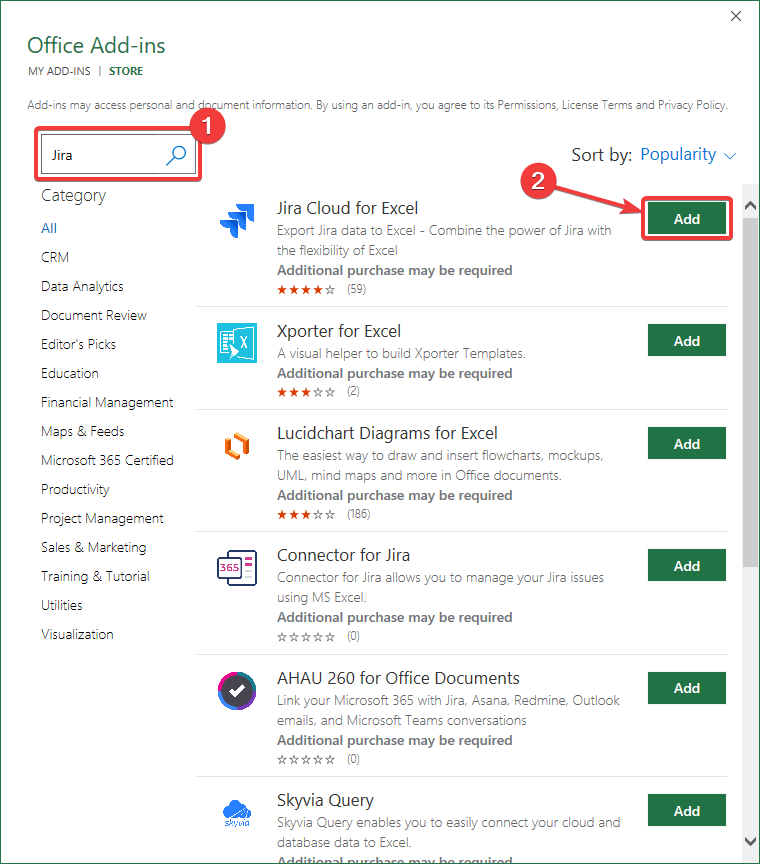
- Now, in the Office Add-ins window, search for Jira and click the Add button against the Jira Cloud for Excel add-in.

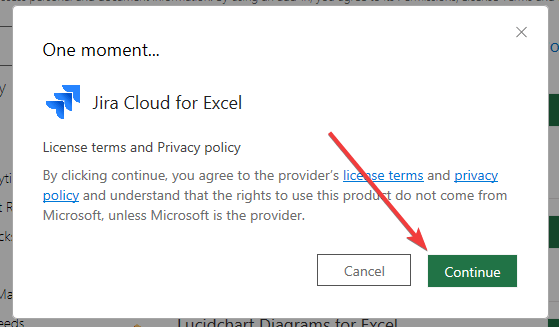
- Now, the license terms and privacy policy pop-up will appear, as shown below. Click Continue to install the Jira Excel add-in.

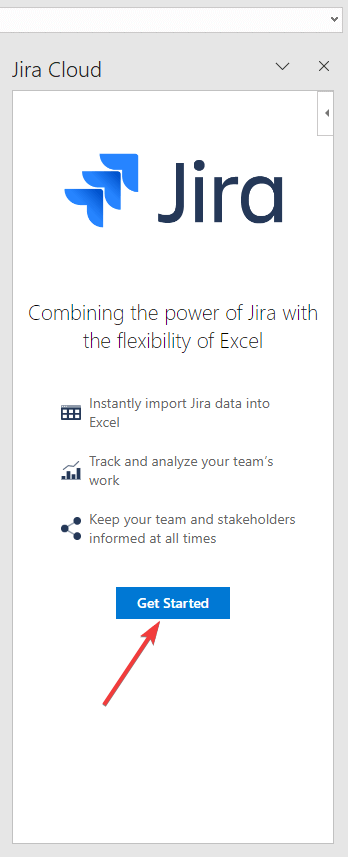
Once the Jira Cloud for Excel add-in has been successfully installed, you need to connect your Jira account to it.
Connect Jira Account:
- In the Jira Cloud add-in, click Get Started to set up the connection.

- Now, a Jira login window will open in a browser, and the add-in will display a login code. Copy the code and switch to the browser.

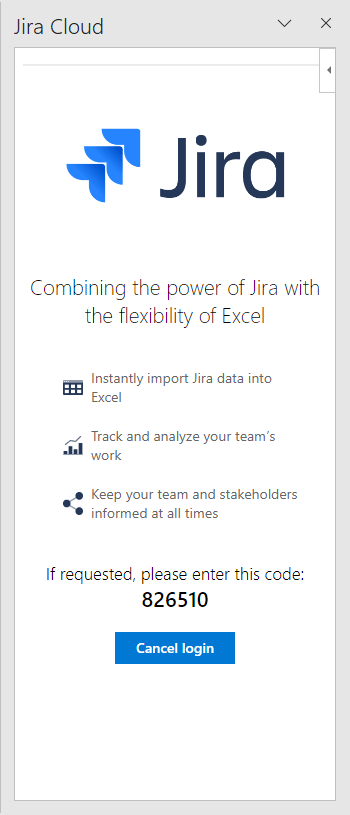
- In the browser, paste the code you copied previously.


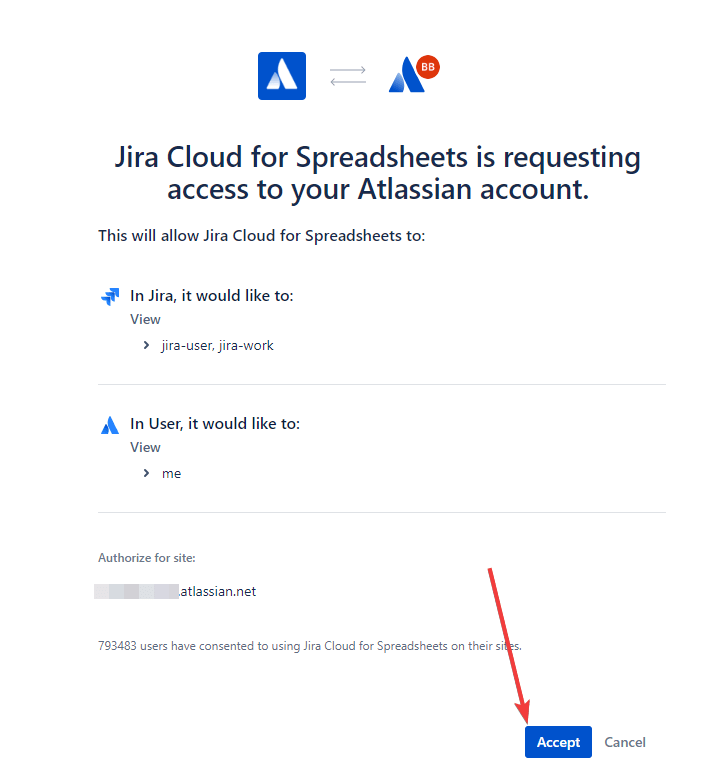
- You’ll be asked to grant permissions to the Atlassian account. Click Accept to proceed further.

- Now, you’ve successfully connected your Jira account to the add-in. Switch back to Excel to start importing data.
Once you’ve connected your Jira account, you can use the Jira Cloud plugin to import the required data into Excel.
Import data from Jira
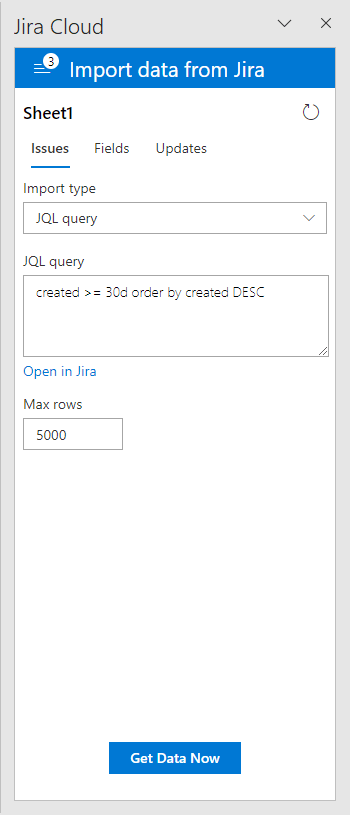
- In the add-in, choose the preferred Import type, let’s say JQL query, and enter the query to get specific data. Enter the maximum number of rows you want to import in the Max rows field and click Get Data Now.
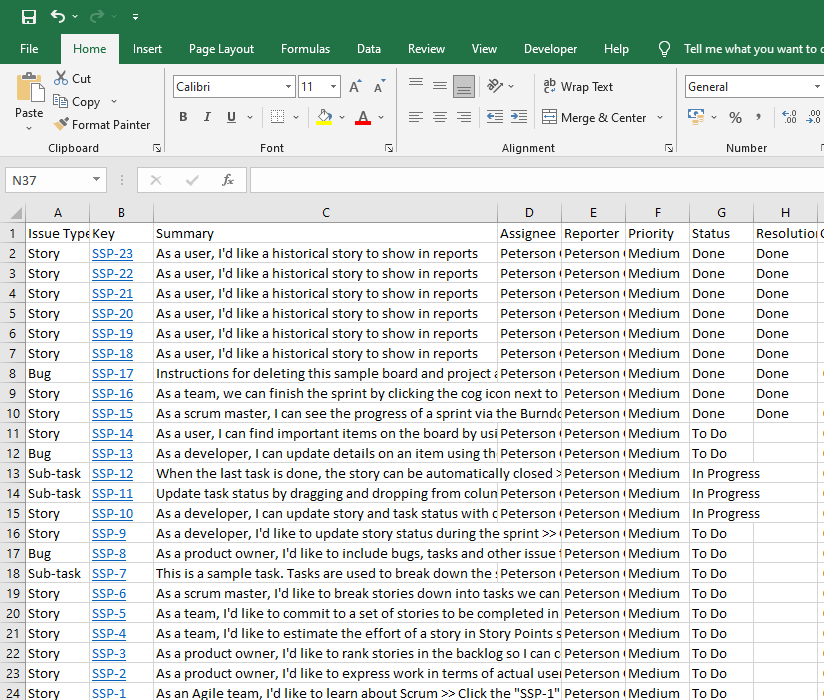
- As you can see, the issues matching the entered JQL query are imported to Excel.

Importing data through the Jira Cloud add-in will replace all the existing data in the sheet.
You can also configure the Jira Cloud add-in to import only specific columns; follow these steps to do that:
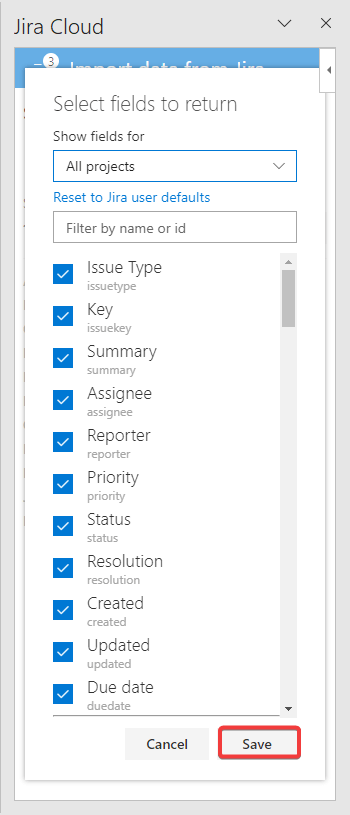
- In the Jira Cloud add-in, go to the Fields column and click Edit.
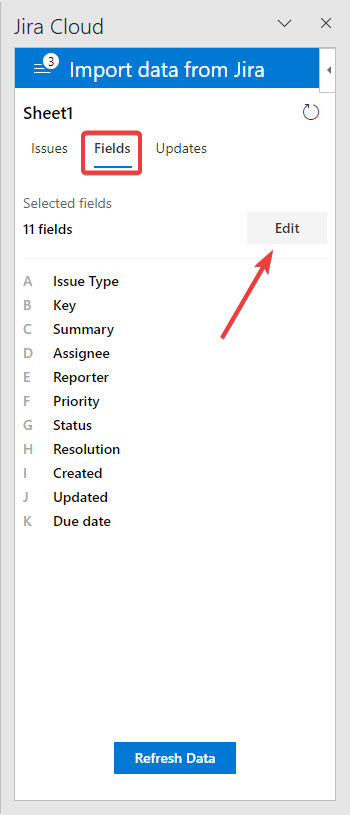
- Now, select the respective project, choose the fields you want to import, and click Save.
On the next refresh, the add-in will only import the selected columns from Jira. You can manually refresh the data by clicking the Refresh Data button. You can also set up automatic data refresh by using these steps:
- In the add-in, go to the Updates tab.
- Choose Re-run my query each time I open workbook and click Save.

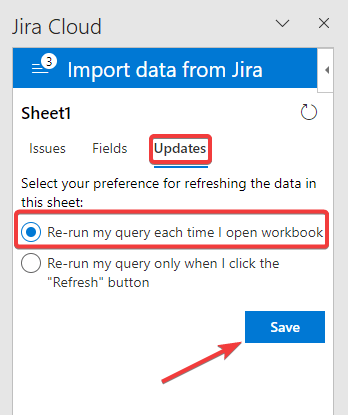
The data will be refreshed every time you open the Excel spreadsheet. Thus, you’ll always have the latest data to work on!
Next, let’s explore how to import Jira data into Excel using the add-in by Coupler.io.
Coupler.io add-in
For the Coupler.io add-in, follow the same steps as you did for the previous plugin to search for and add it to Excel. Alternatively, you can set it by following this link to Coupler.io’s Excel add-in.


After signing in to Coupler.io, click the Add new button to create a data flow.

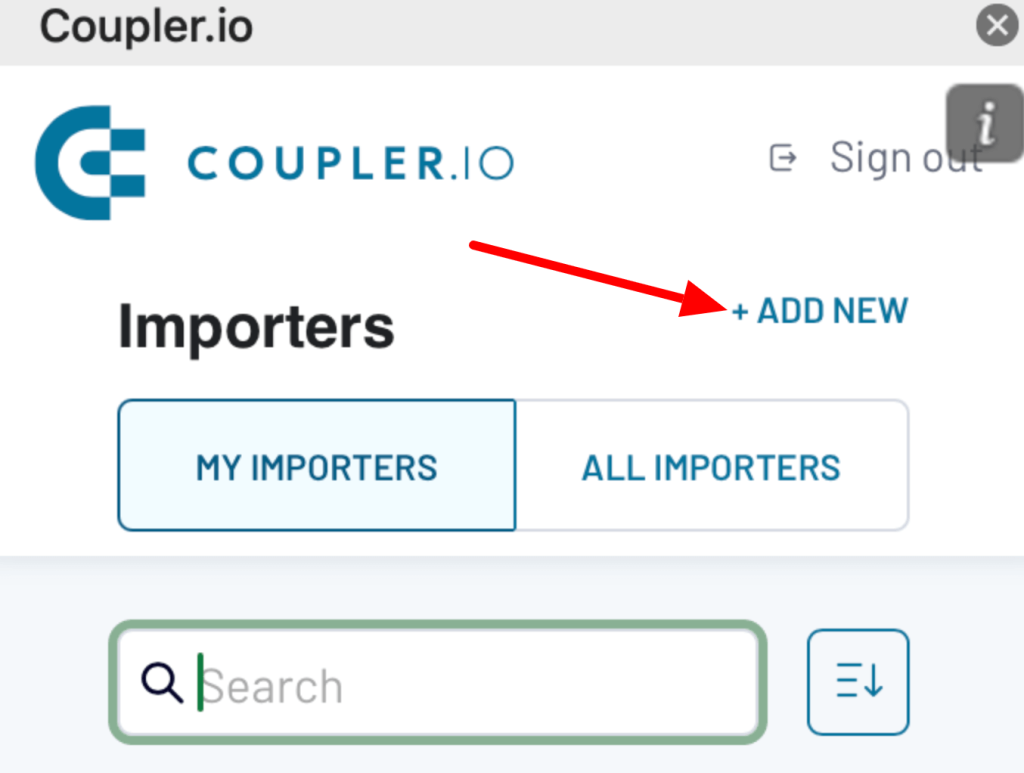
Choose Jira as the data source.

Set up and schedule the data import from Jira to Excel just as you did with the Coupler.io web app, as shown in the section above.
Manually export from Jira to Excel
The most basic way to export from Jira to Excel is by using the native option in Jira. It allows you to export users, groups, and issues to CSV files, which you can open easily in Excel. It is the most straightforward method when you want to just click on an export button to get your Jira data downloaded as an Excel file.
Let’s see how to export issues from Jira to Excel.
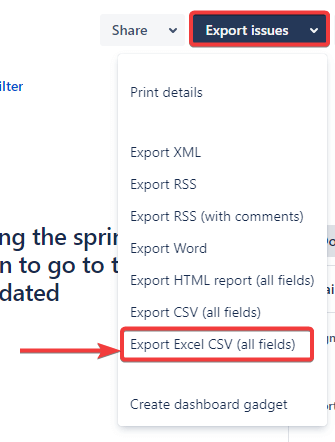
In the Jira dashboard, go to Issues and expand the Export Issues button on the top-right of the screen. Click Export Excel CSV (all fields) to download all issues.

Now, open the downloaded CSV file in Excel.

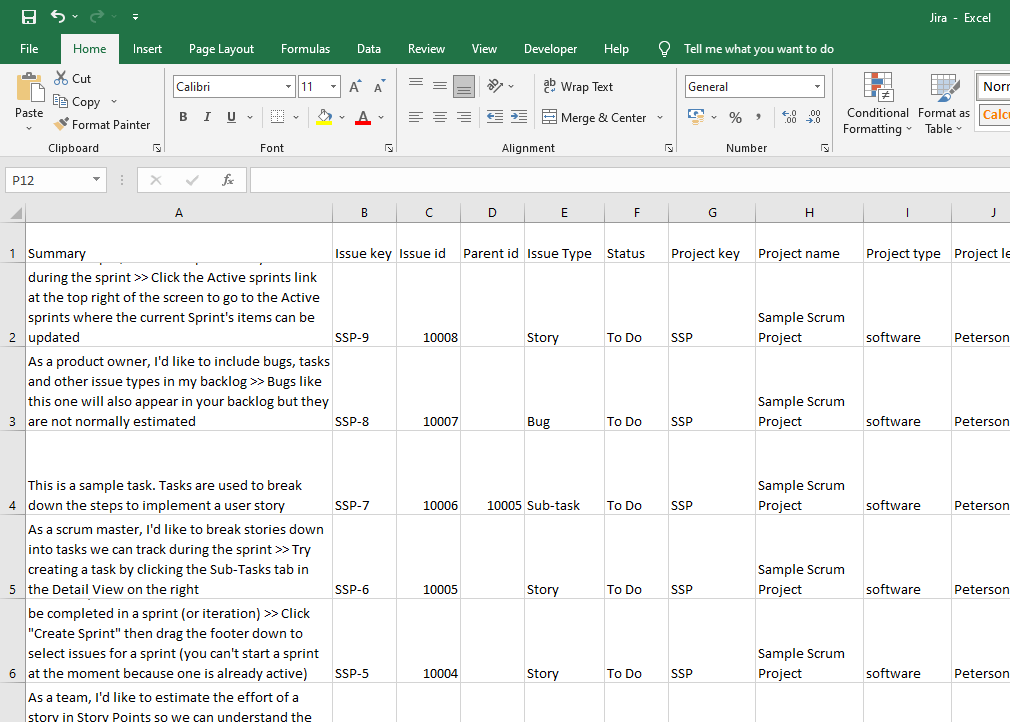
Ta-daa! You’ve completed a manual Jira to Excel export.
Import Jira API results to Excel
Application Programming Interface (API) is a language of information exchange between software applications. Currently, there are two Jira API names used for data import purposes:
- Agile API – for agile boards and sprints.
- Classic API – for everything else, including issues and projects.
For more information, read Jira REST API documentation.
You can use Power Query to load data from the Jira API to Excel. Power Query is a tool that lets you connect to multiple types of data sources, including APIs. Since the 2016 version, it has been included in Excel.
In our example, we’ll import data from Classic API. To do this, you first need to generate an API key for authentication. We’ve already covered this part above.
Once you have the API key ready, you can use it in Excel to make API requests and import the desired data from your Jira account.
How to use Power Query to export Jira to Excel?
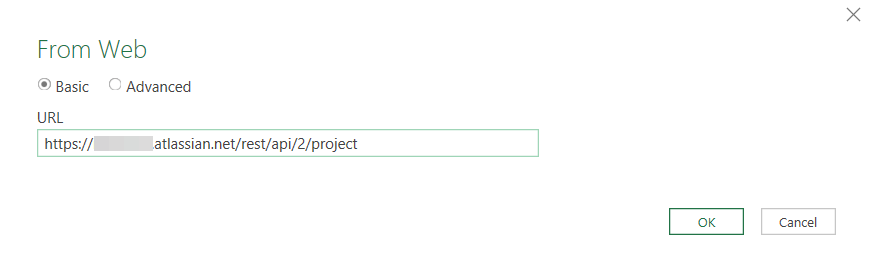
Open an Excel worksheet where you want to import data from Jira. Navigate to New Query > From Other Sources > From Web.


Now, a pop-up will appear on the screen. Select the Basic option and enter the Jira API URL you want to call. For example:
https://yoursite.atlassian.net/rest/api/2/project

Read Jira REST API documentation to know more about the data you can pull.Here is the full list of exportable Jira data entities.
Click OK to proceed.
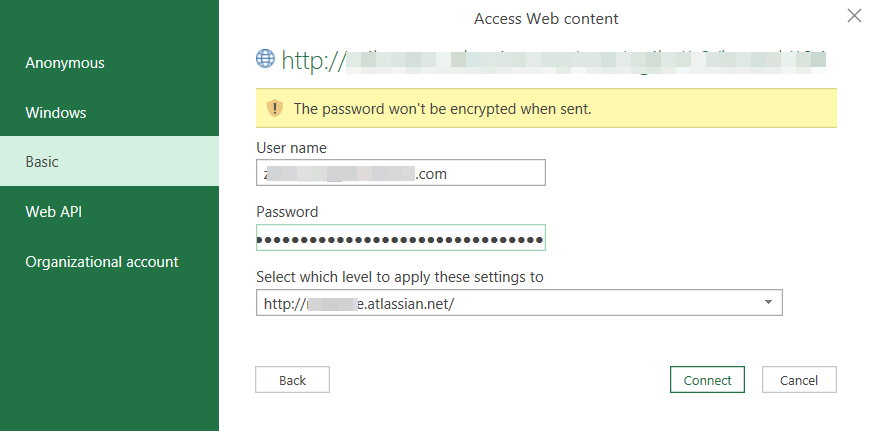
Now, an authentication window will appear to access web content. Choose the Basic option.
You’ll be asked to provide the following details:
- User name – Enter the email address associated with your Jira account.
- Password – Paste the Jira API key that we copied earlier.
Click Save.

Now, on successful authentication, the response will be displayed in the Power Query Editor.


This is a list of all visible projects. To see details, click on the record, and it will expand them.


Navigate to the data you want to import and click Into Table in the top-left corner.


Now, the selected data will be converted to a table. Click the Close & Load button to import the data into the Excel sheet.

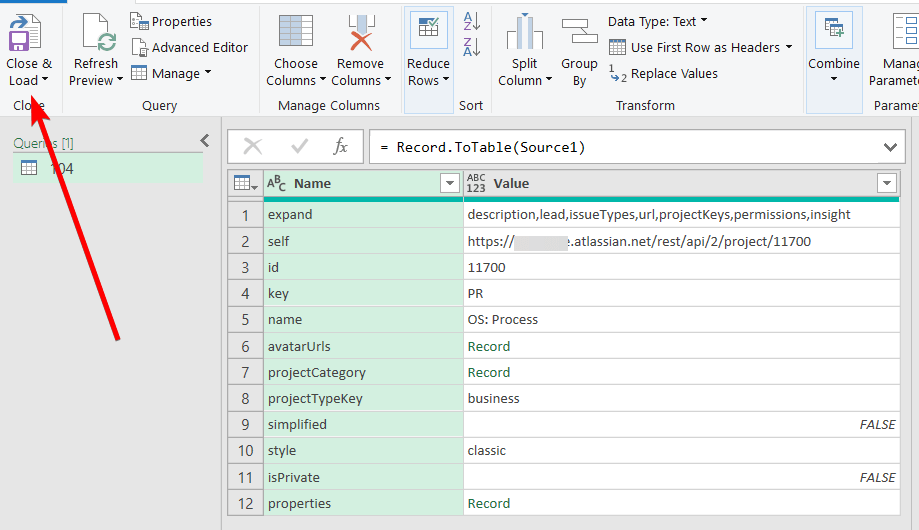
You can see the requested data has been successfully imported to Excel from Jira via API.


You can use various REST API endpoints to get different metrics from Jira into Excel via API. This is tedious and requires solid technical knowledge. It is not a recommended method to import Jira data to Excel unless you’re technically proficient.
Bonus: Import issues from Jira Server to Excel
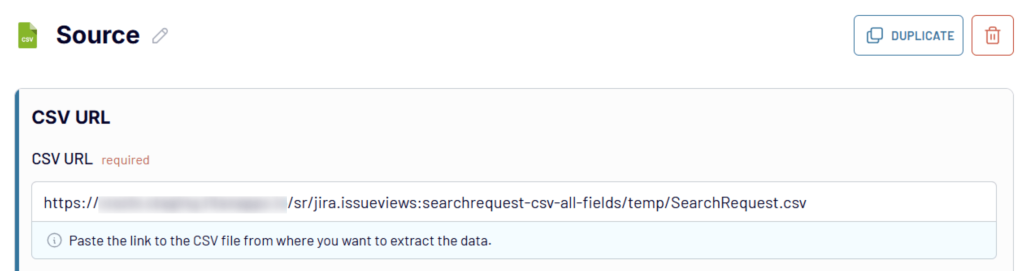
You can import data from the Jira Server instance using a CSV URL. To do this, turn to Coupler.io’s CSV to Excel integration:
Insert the following CSV URL:
https://{your-jira-instance}/sr/jira.issueviews:searchrequest-csv-all-fields/temp/SearchRequest.csv

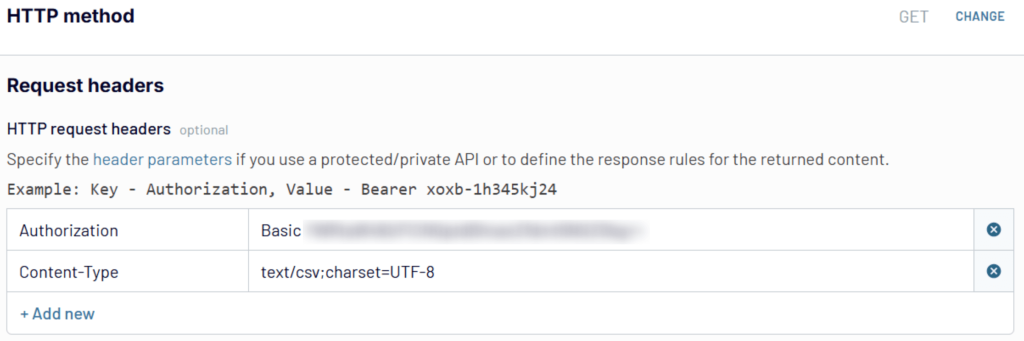
Make sure the HTTP method is set as GET. Next, insert the following HTTP headers:
Authorization: Basic {encoded-string}
Content-Type: "text/csv;charset=UTF-8"
– where {encoded-string} is a base64-encoded string of {your-username}:{your-password}. For encoding, you can use a dedicated service, such as base64encode.net

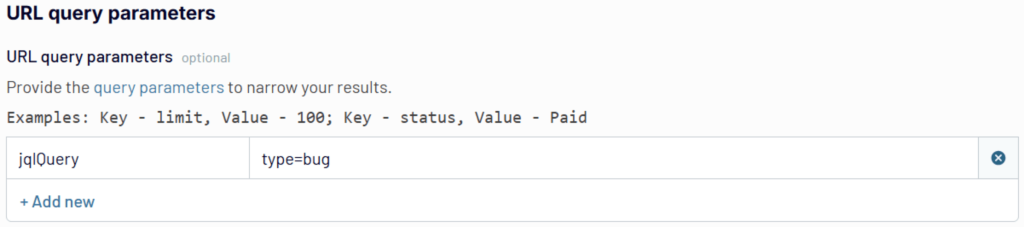
You can also filter issues from your Jira Server using the URL query string, for example:

The next steps are the same as those described earlier for Coupler.io’s Jira to Excel data flow.
Why do you need to export Jira to Excel?
Exporting Jira to Excel can make reporting easier, as it is a familiar spreadsheet tool. Besides this, creating Jira reports in Excel serves many benefits, such as:
- Easy collaboration – Share the Excel reports with stakeholders.
- Better customization – Use Excel’s powerful features to transform the raw data into custom reports.
- Data visualization – Create visual reports through diagrams, graphs, and pivot tables in Excel to get more insights from the data.
- Project backup – Rely on Excel data as a backup of your Jira instance, just in case.
In short, Jira export to Excel makes reporting clear even for those who are not used to the Jira dashboards.
What is the best method to connect Jira to Excel?
Exporting Jira data to workbooks unlocks new opportunities for project reporting and analytics. In this post, we discussed four different ways to export Jira to Excel. Each of these methods has its pros and cons.
- Manual Jira export to Excel may seem an easy option, but it can be tedious if you want the fresh data regularly. Also, you can export only 1,000 per CSV file, which may not be efficient for large-scale projects.
- The Jira-Excel connection using the official Jira Cloud or Coupler.io add-in is a platform-dependent option. You’ll need to open the Excel file to get the fresh data.
- Exporting Jira to Excel via API demands a high level of REST API knowledge. Also, you may need to configure an individual data source for each metric you want to import.
On balance, Coupler.io is the best method to connect Jira to Excel. This data integration platform requires no technical skills and can be set up using a few easy steps. It also supports automatic refreshes at regular intervals, custom report creation, and other powerful data analytics features.
Automate Jira export to Excel with Coupler.io
Get started for free