How to Connect Mailchimp to Google Data Studio (Looker Studio)

To ensure that your email marketing campaigns are performing as expected, you need to monitor various KPIs. A custom report in Looker Studio, formerly known as Google Data Studio, is a great way to organize your information, share it with stakeholders, and create reports. Let’s explore how you can connect Mailchimp to Google Data Studio (formerly Looker Studio) and turn your data into meaningful insights.
What are the ways to connect Mailchimp to Google Data Studio (Looker Studio)?
If you are wondering whether you can connect Mailchimp to Looker Studio using a native connector – unfortunately, there’s no such option. As an alternative, you can export your Mailchimp data manually in the CSV format and then manually import it into Looker Studio. However, this option doesn’t really allow you to connect the two apps, and you will need to update your dataset manually every time something changes.
Here are two main ways in which you can connect Mailchimp and Looker Studio and get your data flowing automatically:
- Using a partner connector by Coupler.io
There are many different Looker Studio connectors, many of which have a simple and intuitive interface, and you don’t need any tech knowledge to use them. In particular, the connector by Coupler.io, the no-code data integration platform, allows you to export your data automatically on a schedule and blend it with data from other marketing apps. Moreover, it not only connects Mailchimp to Looker Studio but also provides a ready-to-use Mailchimp dashboard template.
- Using Mailchimp’s API
Setting up an integration via Mailchimp API allows developers to create an automated integration and extract Mailchimp data for use in other applications. However, this method is unsuitable for business users, such as marketing professionals, as it requires extensive technical expertise. For this reason, we won’t be covering this method.
How to connect Mailchimp to Looker Studio with Coupler.io
Coupler.io is a data integration platform for businesses that turns raw data into simple reports. You can connect Mailchimp to Power BI, Looker Studio, BigQuery, Google Sheets, Excel, and other destinations. It also supports 400+ data sources, so you can create cross-app reports by blending data from different apps and platforms.
To directly link Mailchimp to Looker Studio with Coupler.io, click Proceed in the form below. You will need to sign up for your Coupler.io for free with no credit card required.
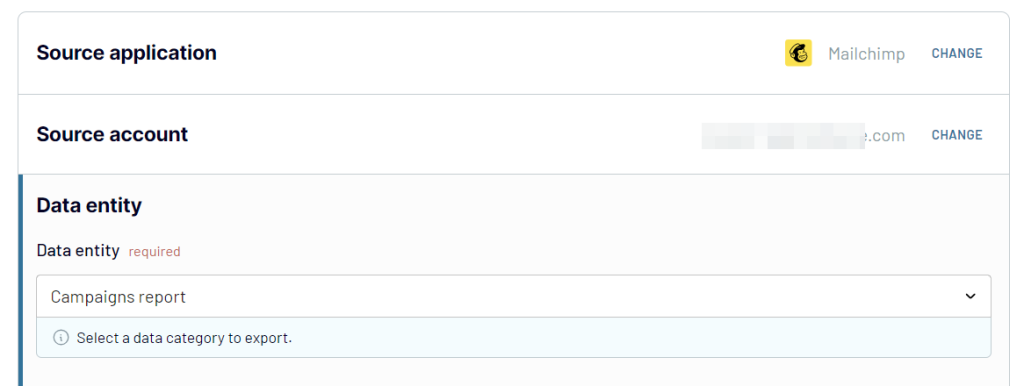
Step 1. Extract your Mailchimp data
Connect your Mailchimp account and select a data entity to export. From the drop-down menu, you can select from a large variety of entities, including audiences, campaigns, automations, and audience locations.
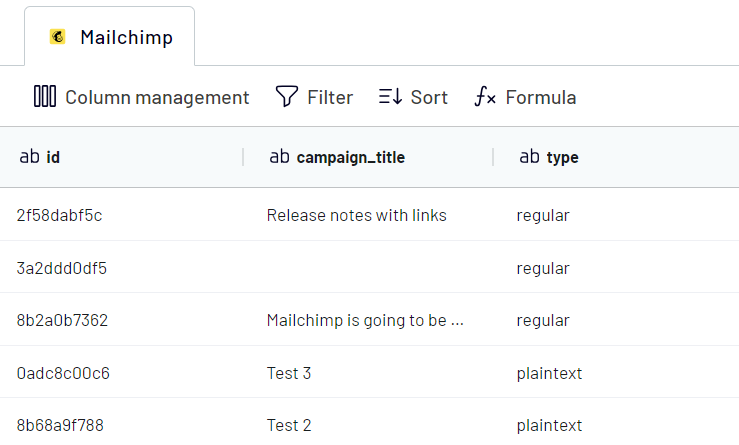
Step 2. Preview and transform your data
In the next step, you can transform your data before loading it to Looker Studio. Coupler.io allows you to:
- Hide unnecessary columns
- Filter and sort data
- Edit existing columns and add new ones
- Blend data if you’ve connected more than one data source, be it another Mailchimp account or application.
Step 3. Load data and schedule refresh
Now, follow the in-app instructions to load data to Looker Studio. You’ll need to authorize the connector; after that, Coupler.io will create a new data source in Looker Studio. The final click should be on Create report.
Go back to Coupler.io and schedule future exports. You will need to select the interval of the automatic data refresh. Also, select the days of the week, time preference, and time zone to schedule the automatic exports.
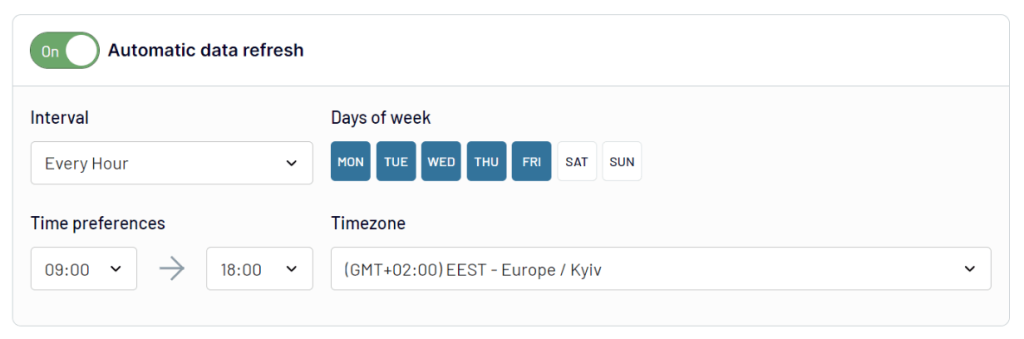
Click on Save and Run to complete the process. After this, your data is going to be extracted from Mailchimp and transferred directly to Looker Studio.
What other destinations you can connect Mailchimp to with Coupler.io
If you don’t need fancy data visualizations for your Mailchimp report, it makes sense to use spreadsheets as the destination. For example, you can set up a Mailchimp – Google Sheets Integration. The setup flow is mostly the same except for the destination part, where you need to select a spreadsheet and a sheet to load your data.
Alternatively, you can use Coupler.io to connect Mailchimp to BigQuery or other data warehouses to easily manipulate huge datasets. In this case, the flow will be mostly the same as for Google Sheets, but you will need to select another destination when setting the importer.
Of course, Looker Studio is not the only supported BI tool. Coupler.io also lets you export Mailchimp to Power BI, Tableau, and Qlik.
Create a Mailchimp dashboard in Looker Studio using white-label templates
Looking for inspiration to get started with your Mailchimp reporting? We’ve prepared an in-depth DIY tutorial for you – check out our Looker Studio Tutorial: Dashboard for Beginners. There, you will find valuable information that will help you make your own dashboard.
Also, Coupler.io provides Looker Studio report templates that can be used to track metrics and highlight the performance of your email marketing campaigns. Let’s have a look at them.
Mailchimp analytics dashboard
Using this dashboard, you can monitor the performance funnel of your emails sent, track subscribers’ engagement, and more. In addition, get subscriber analytics showing subscription changes over time, top sources, and audience by country.
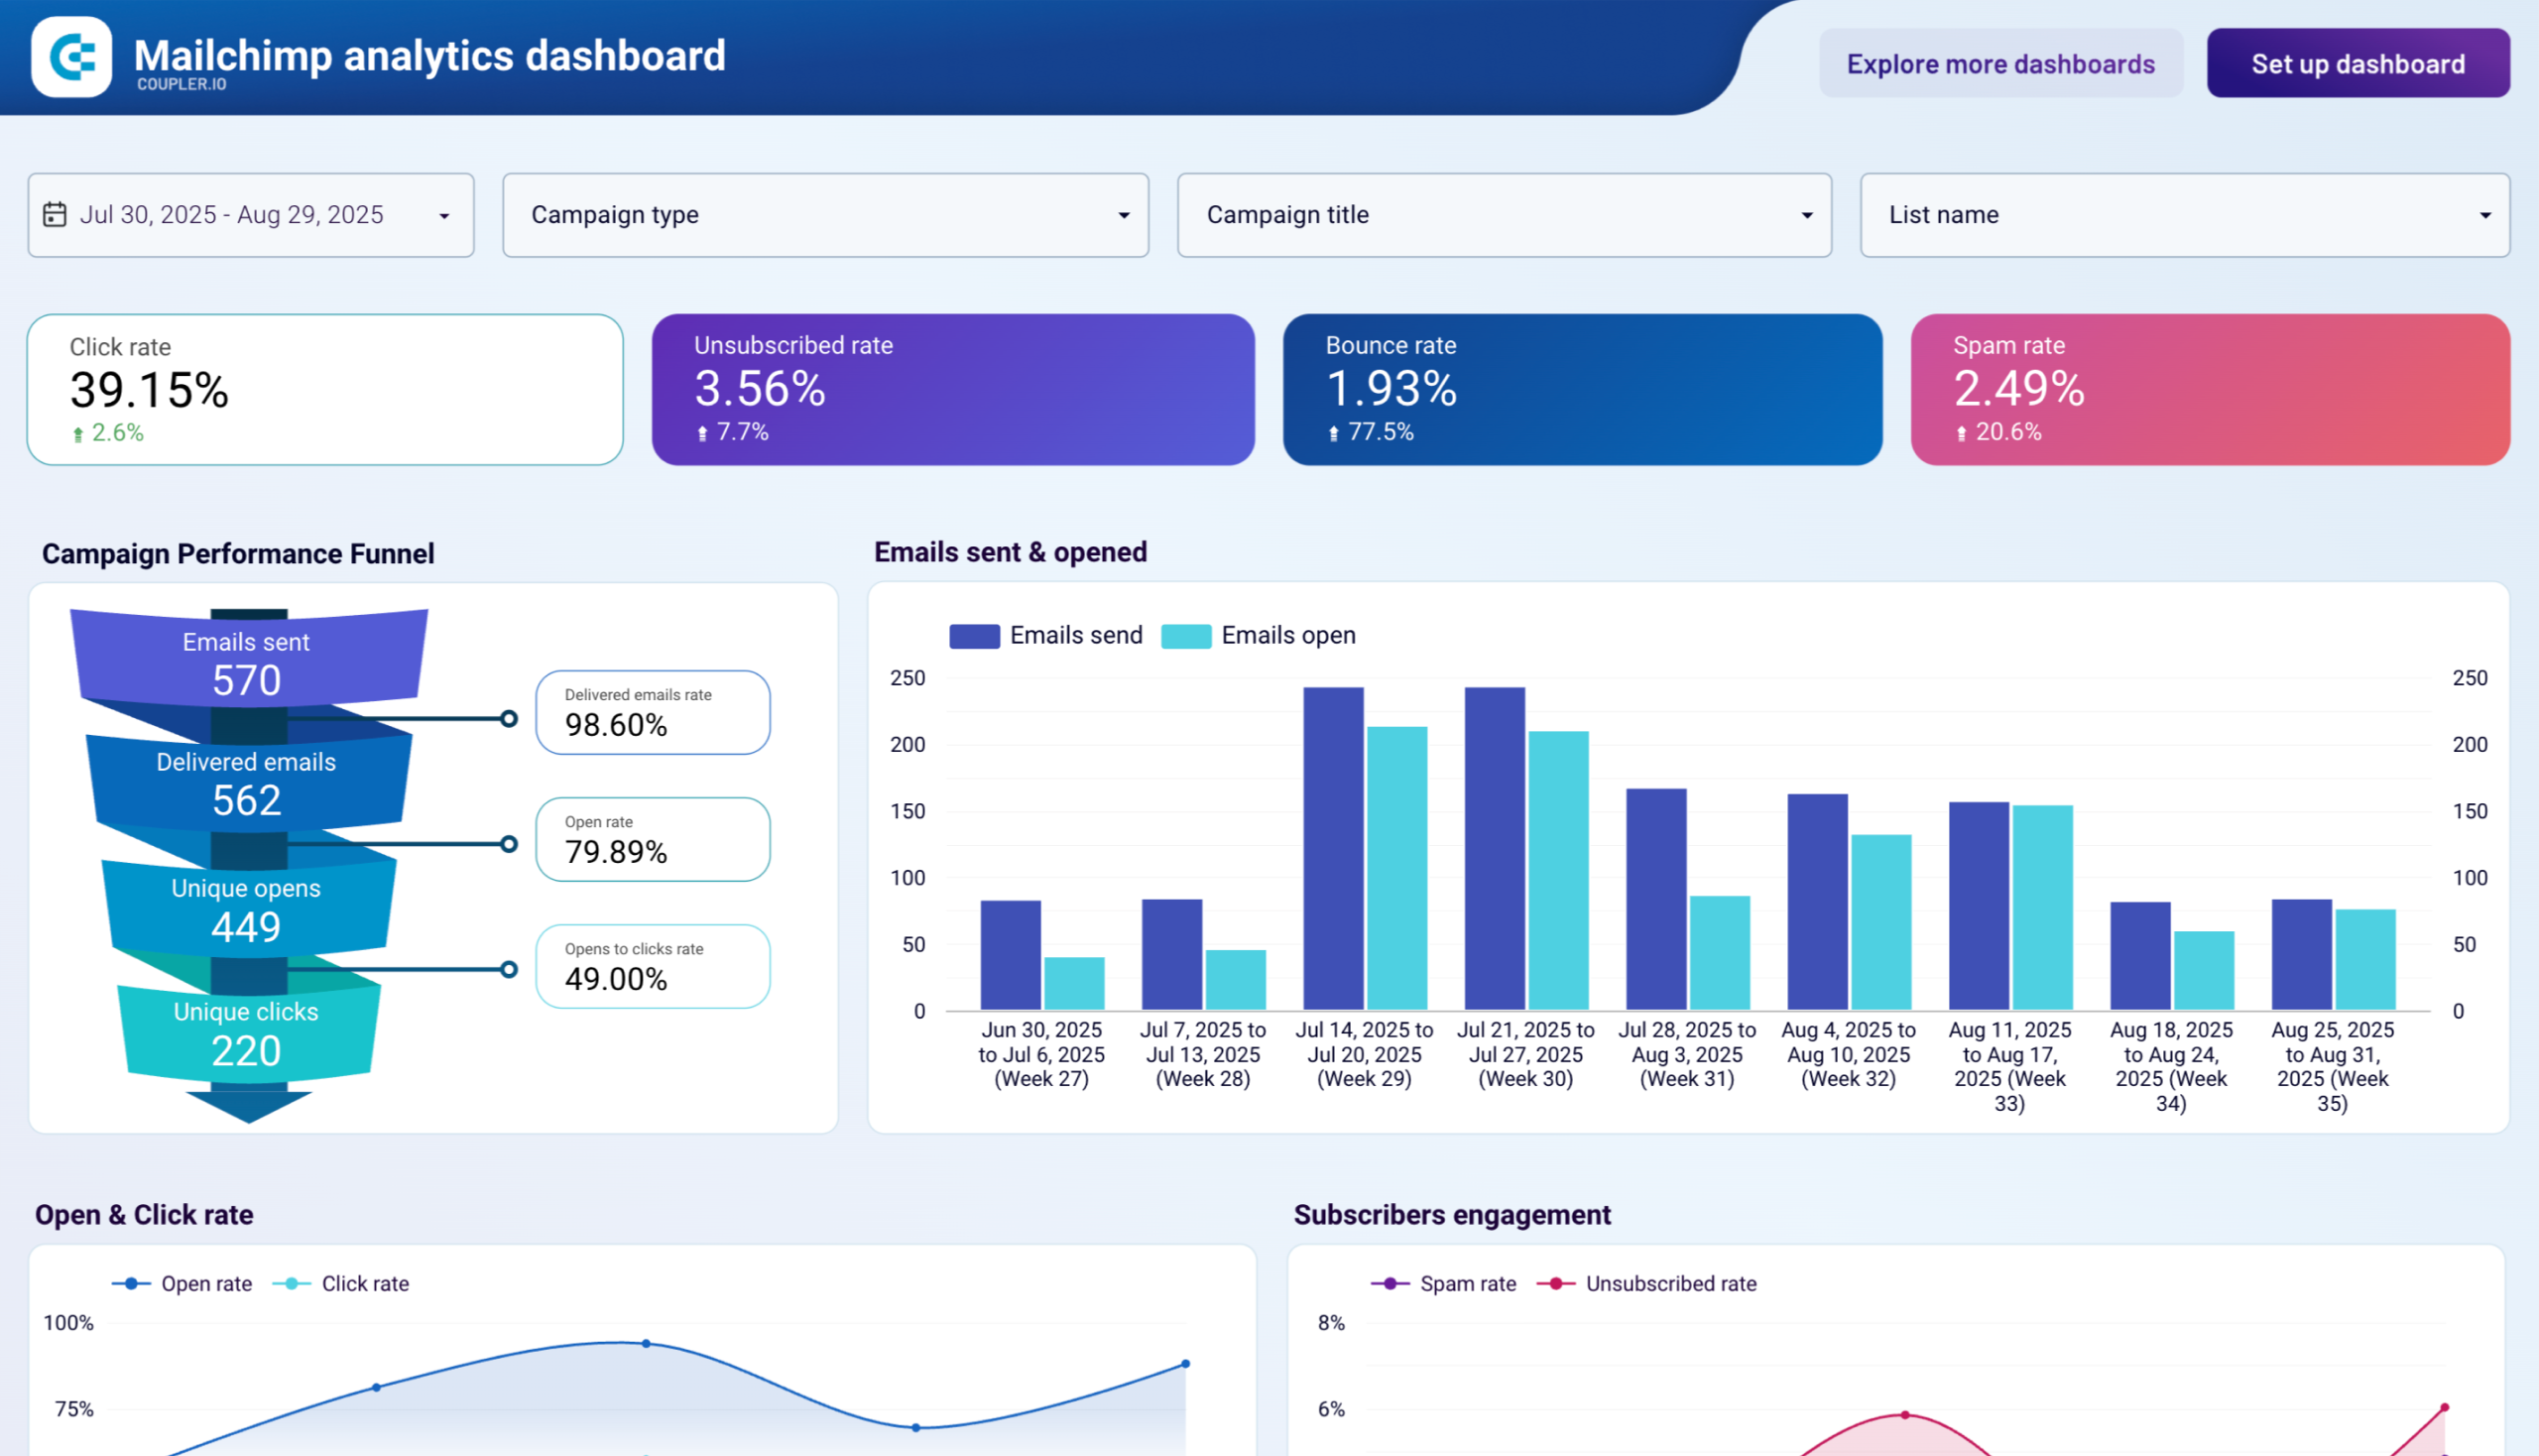
The Mailchimp analytics dashboard template is free and white-label, which means that you can easily customize it for your branding. To start using the template, you only need to connect your Mailchimp account and Coupler.io will populate the dashboard with your data.
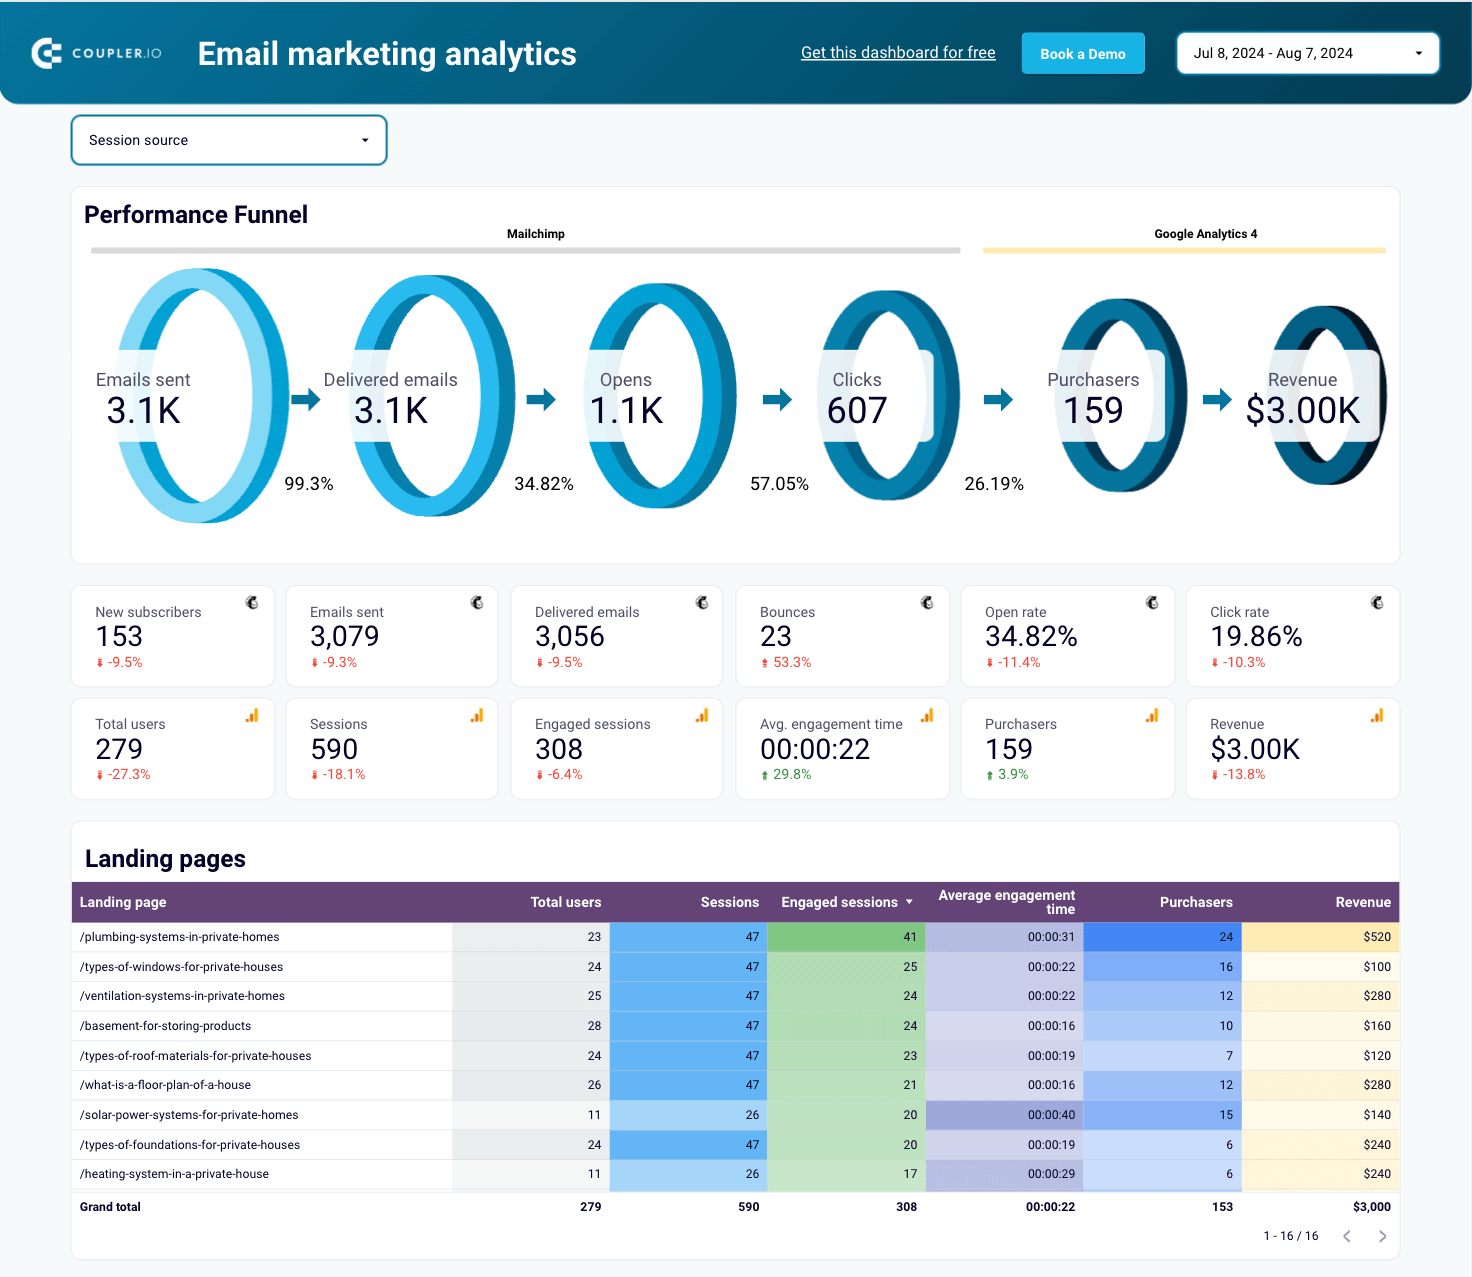
Email marketing analytics dashboard
This dashboard template lets you monitor user interactions with your email campaigns and their revenue performance. It combines Mailchimp data with GA4 records.
Mailchimp email marketing analytics dashboard
 Preview dashboard
Mailchimp email marketing analytics dashboard
Preview dashboardYou can visualize your email performance funnel and critical metrics. Additionally, discover which landing pages generate the most traffic, engagement, purchases, and revenue. The Mailchimp reporting dashboard also reveals how many users were acquired and engaged, along with the revenue from your campaigns.
Follow the instructions inside the template to connect your Mailchimp and GA4 accounts and turn raw data into actionable insights!
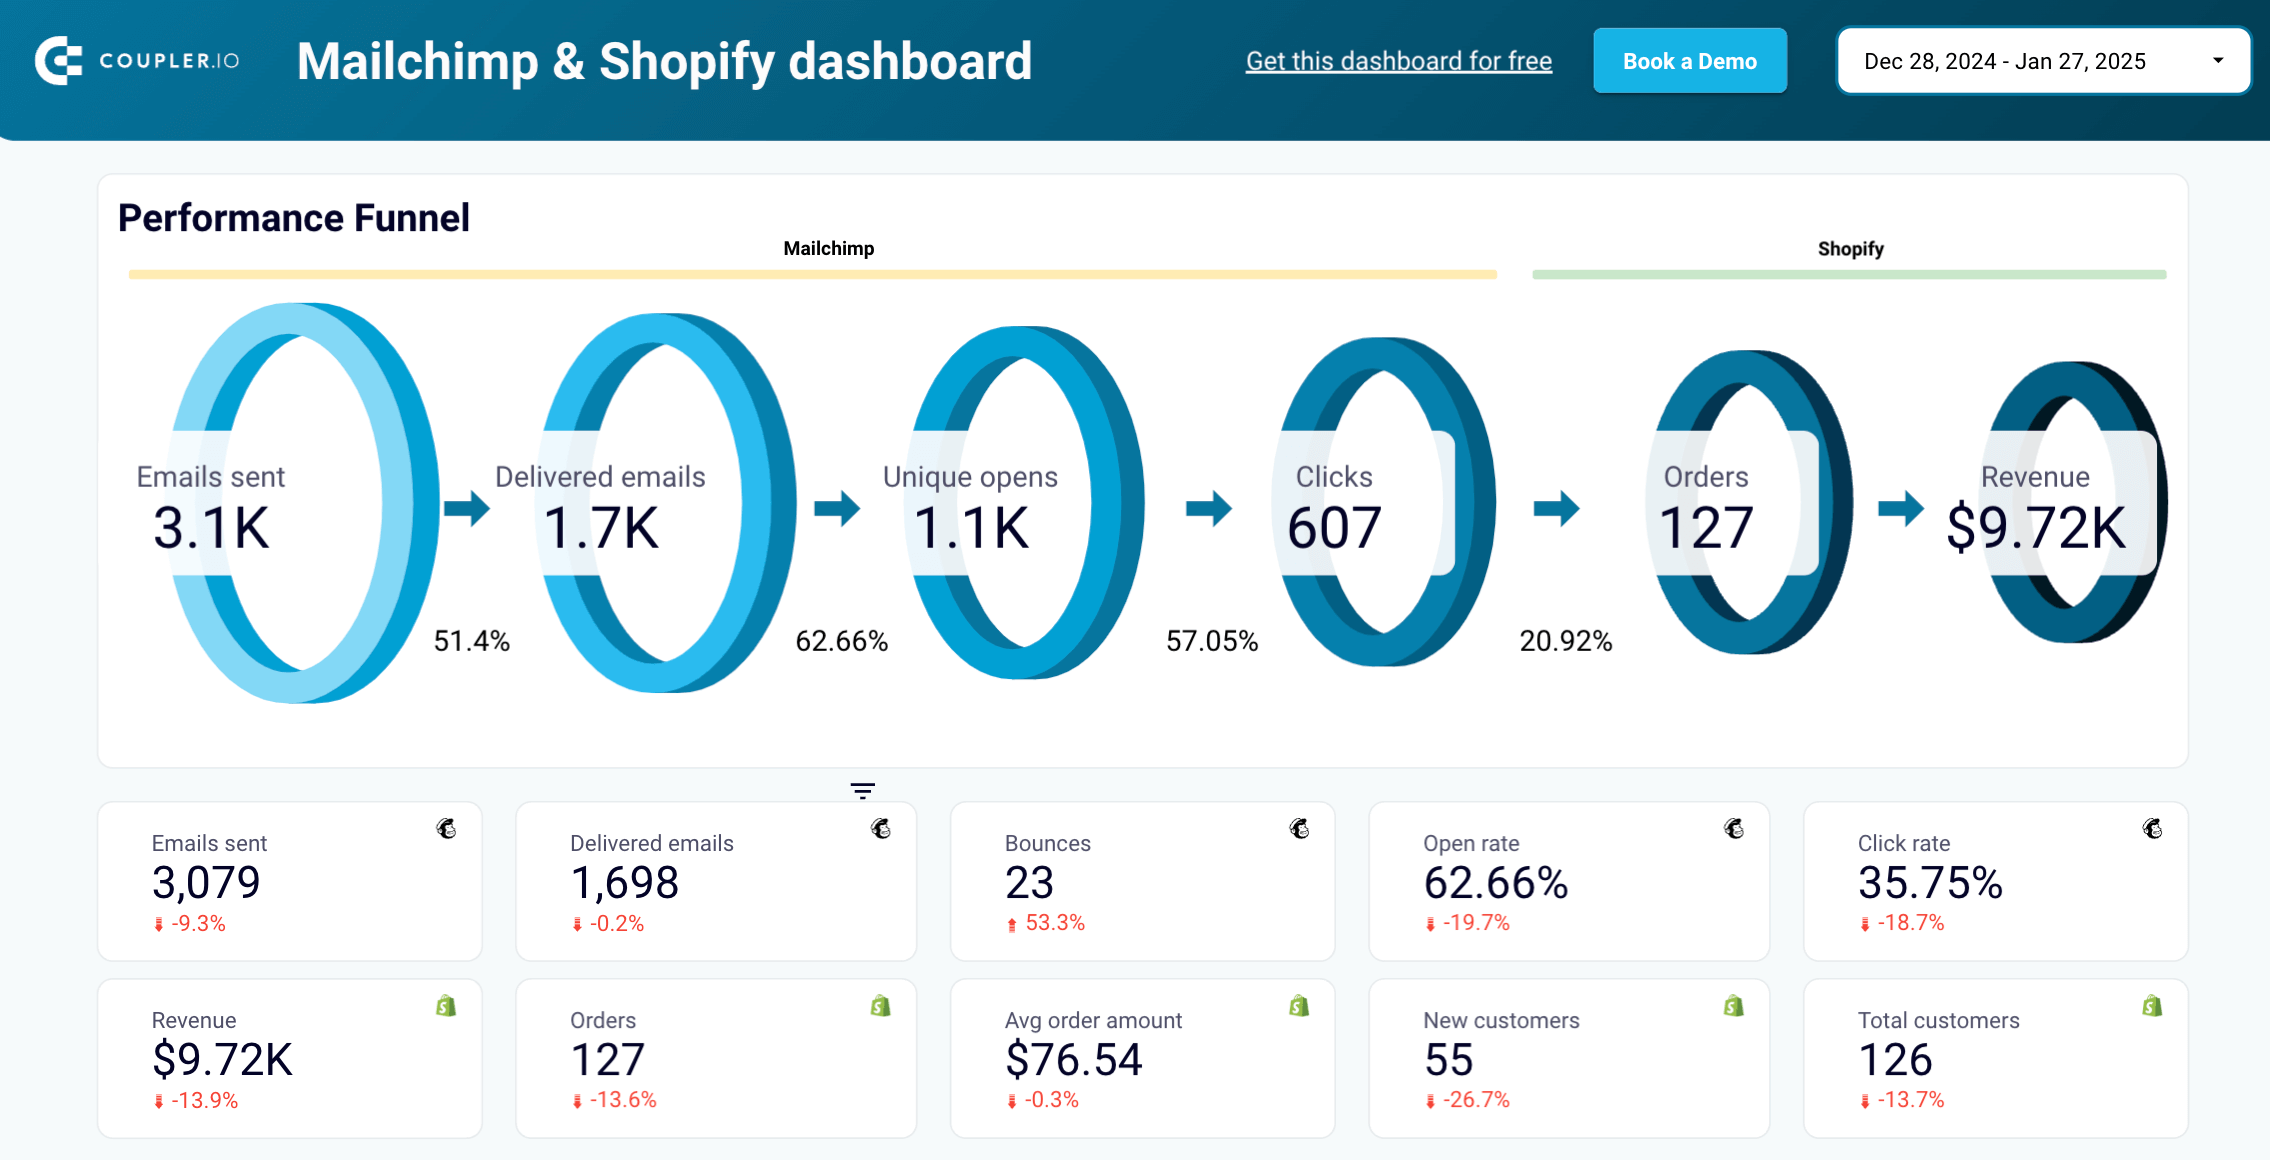
Mailchimp & Shopify dashboard
This dashboard template integrates data from Mailchimp and Shopify to provide a complete view of your email marketing and e-commerce performance. It allows you to track your email performance funnel, analyze product sales, and monitor customer acquisition and retention metrics.
Mailchimp email campaign performance dashboard for Shopify store
 Preview dashboard
Mailchimp email campaign performance dashboard for Shopify store
Preview dashboardYou can also compare key metrics like clicks vs. revenue and orders vs. average order value to uncover trends and optimize your campaigns. Additionally, identify top-selling products and adjust your marketing and inventory strategies accordingly.
To start using the template, simply connect your Mailchimp and Shopify accounts with the Coupler.io connector. The dashboard will automatically populate with your data, keeping your insights up-to-date.
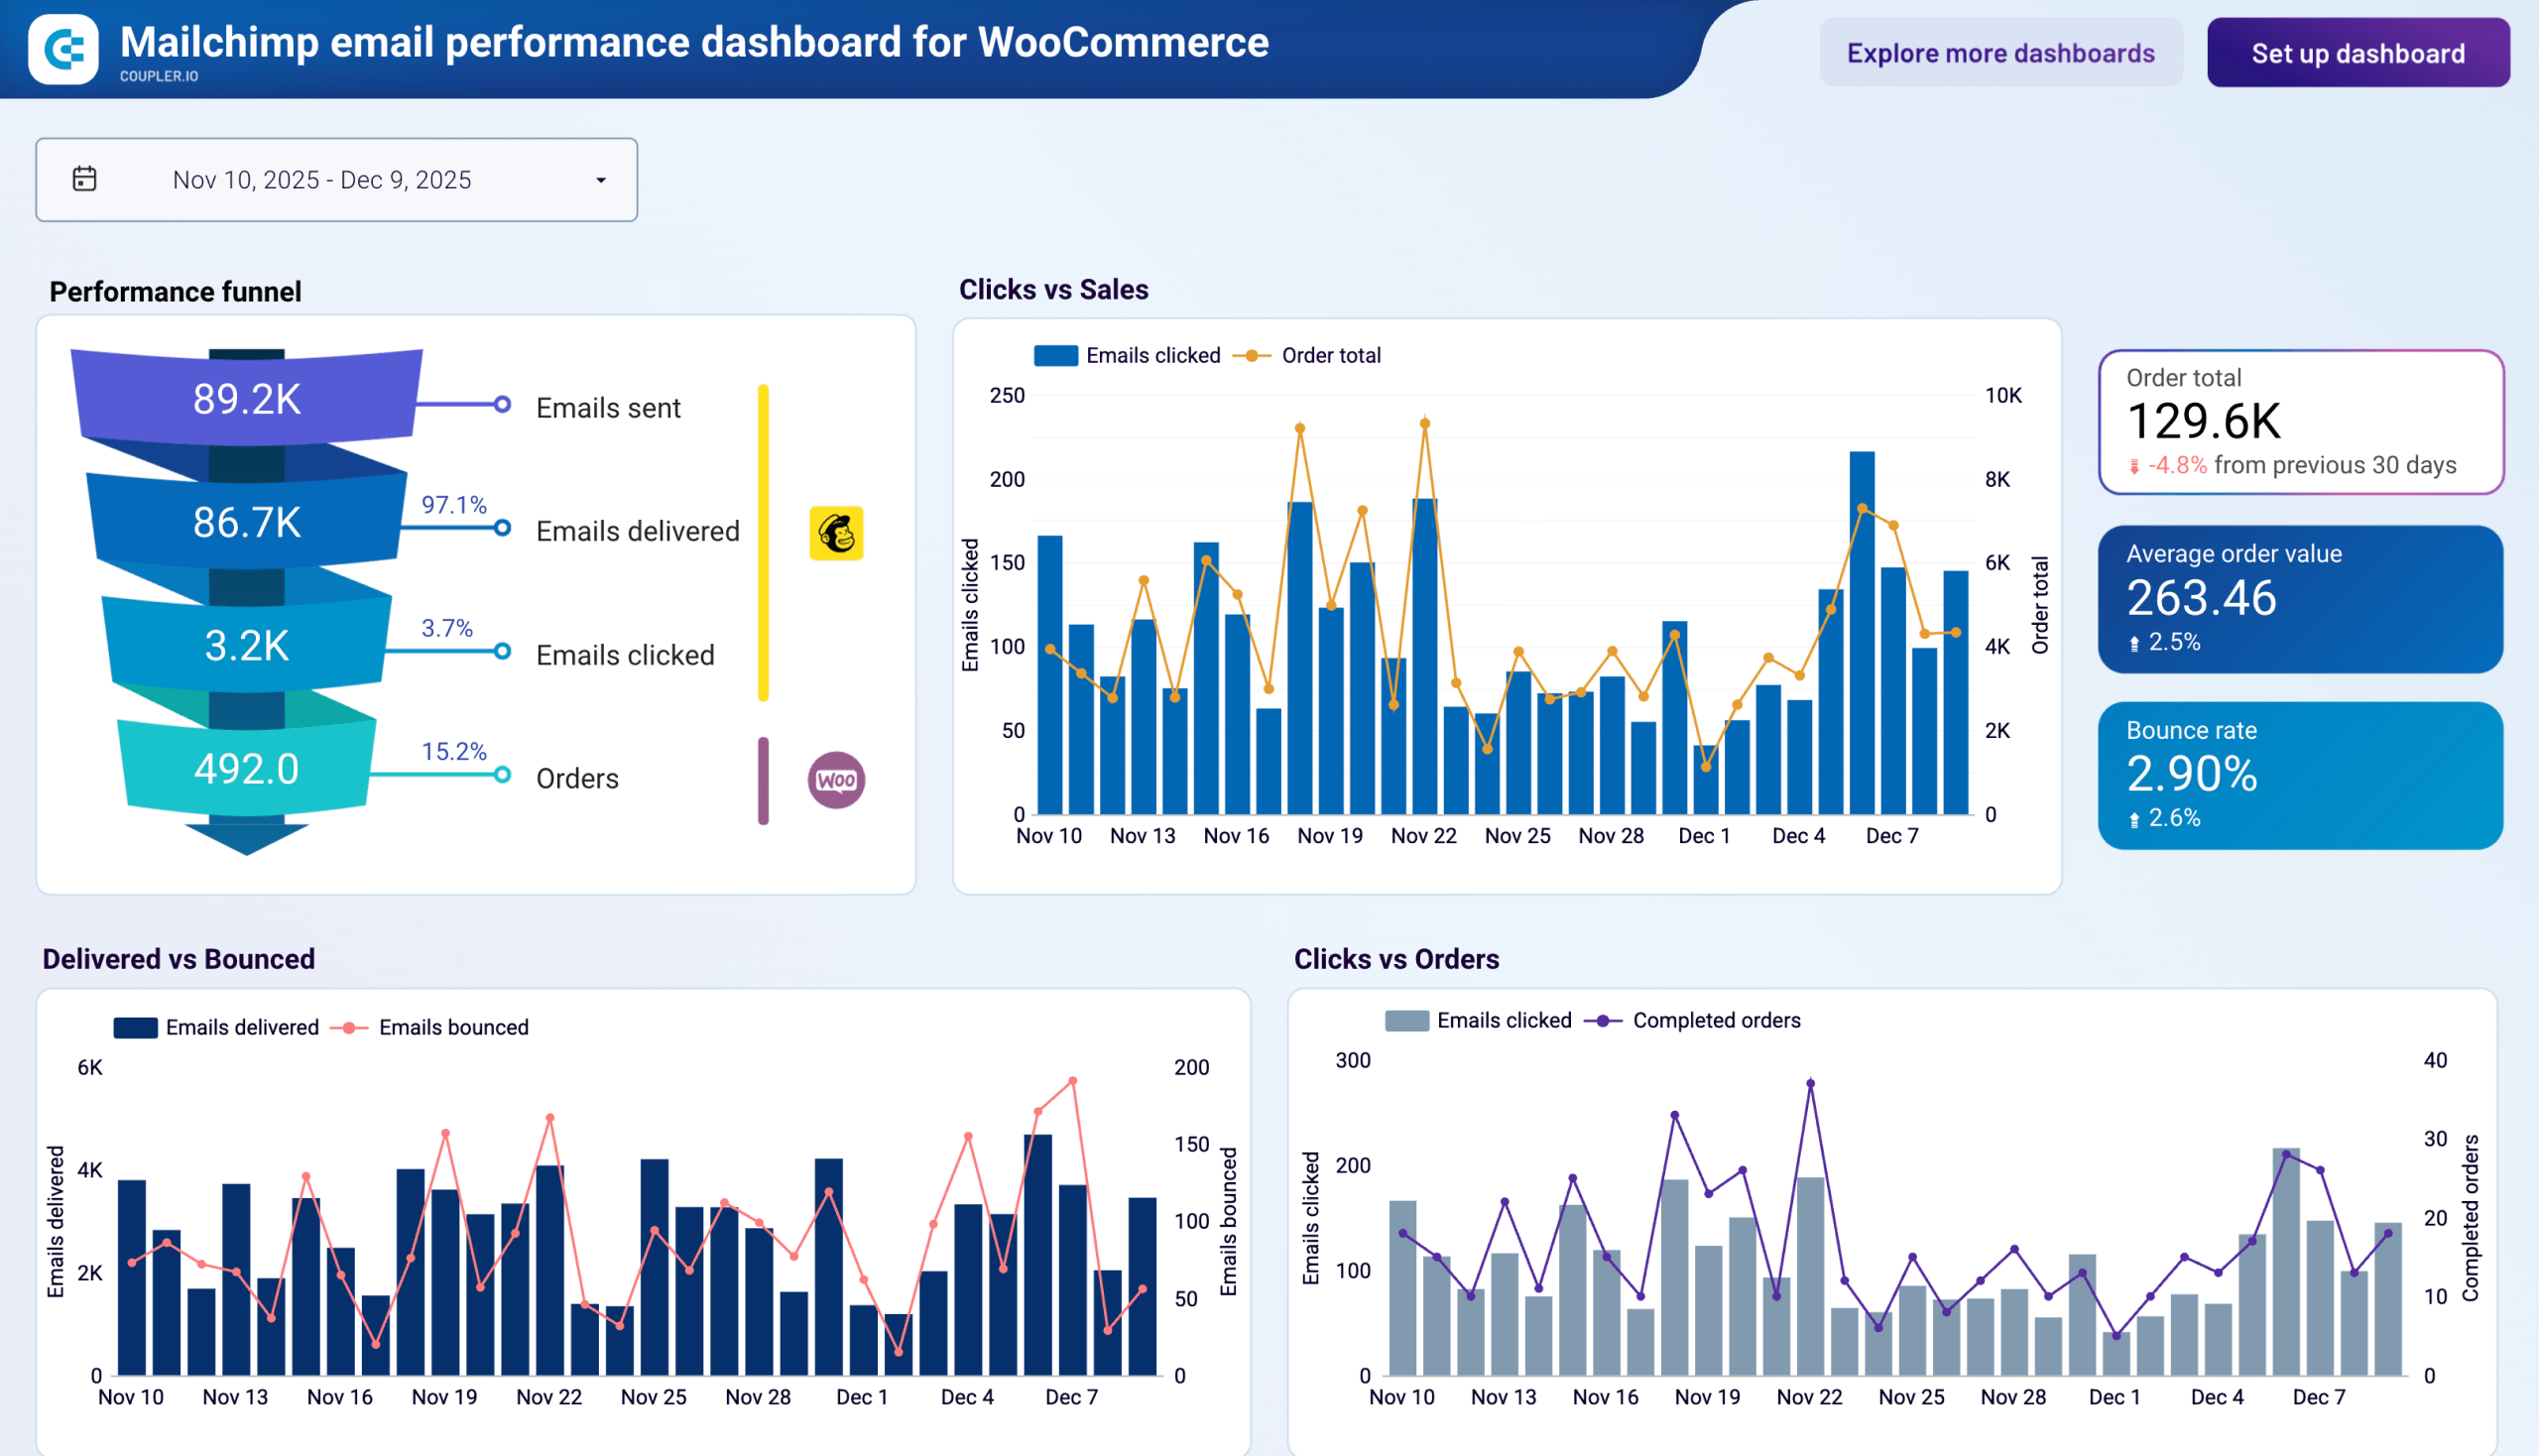
Mailchimp email performance dashboard for WooCommerce
WooCommerce store operators who send campaigns through Mailchimp can use this dashboard to see how email activity maps to actual store orders. Coupler.io connects both platforms and builds a funnel from delivery through clicks to completed purchases.
Mailchimp email performance dashboard for WooCommerce
 Preview dashboard
Mailchimp email performance dashboard for WooCommerce
Preview dashboardBeyond the funnel, you can compare daily click volume against order totals to detect revenue lag, monitor bounce trends before they affect deliverability, and find which days of the week produce the highest click-to-purchase conversion rate. Connect your Mailchimp and WooCommerce accounts through the built-in Coupler.io connector to populate the dashboard with your data.
Get Mailchimp data into Looker Studio for better visualization
When you link Mailchimp to Looker Studio, you can access a comprehensive view of your email marketing analytics. Also, Looker allows you to create real-time reports and dashboards that give you up-to-date information.
Since there’s no native way in which you can get Mailchimp data into Looker Studio, you can link the two via API or with the partner Looker Studio connector by Coupler.io. The latter ensures that your data is always protected and up to date. Try it yourself right away!

Automate Mailchimp reporting with Coupler.io
Get started for free