Synergy is the interaction of two or more assets to produce a combined effect greater than the sum of their separate effects. When you connect Mailchimp to Power BI, you get the synergy for analytics and reporting. How so?
You load different email marketing performance data from Mailchimp to Power BI where you can build interactive reports. The extracted data can be presented in different ways and formats like charts, scorecards, tables, etc. Not to speak of the transformation of this data into custom campaign performance metrics and calculations. All you have to do is connect both apps, and I’ll show you different ways to go about this.
In this tutorial, we explain all the possible ways to do this without much hassle.
What are the methods to connect Mailchimp to Power BI
Let’s clarify one thing first – Power BI does NOT provide a Mailchimp integration. I know that you may find some references to Microsoft documentation that contradict my statement. However, they are obsolete. There was a Mailchimp connector some time ago, but now it’s deprecated. So, to connect Mailchimp to Power BI, you have the following options:
- Third-party connector. Many ETL software provides solutions for integrating Mailchimp and Power BI. In this article, we’ll see how you can do this using the Mailchimp Power BI integration by Coupler.io.
- Mailchimp API. This method requires you to learn the Mailchimp API and write a custom query in Power Query to connect Mailchimp to Power BI.
- ODBC connector. This method is similar to using a third-party connector. However, you can make the connection right from the Power BI by installing an ODBC driver for Mailchimp.
Naturally, I’m going to guide you through each of these methods. Let’s start with the one that allows you to automate data exports from Mailchimp to Power BI on a schedule – Coupler.io.
How to connect Mailchimp to Power BI using Coupler.io connector
Coupler.io is a reporting automation platform. It provides solutions to turn complex data into simple reports and optimize your data analytics experience.
Coupler.io not only allows you to integrate Mailchimp and Power BI but also automates the data flow on a close to real-time schedule. This is essential if you want to make your reports and dashboard self-updating. The main value of this automation is the reduction of manual tasks which results in up to 60% saved time on reporting.
Note: Power BI is not the only BI destination supported by Coupler.io. Alternatively, you can load data to Looker Studio, Tableau, and Qlik.
Time efficiency is not the only benefit since you also get a data flow from Mailchimp to Power BI free of human errors. And the best part is that it only takes a few minutes and three main steps to set up this integration. Here is what the setup flow looks like.
Click Proceed in the form below where we’ve preselected Mailchimp as a source and Power BI as a destination. Create a Coupler.io account for free and connect the apps.
One importer is meant to load data to only one destination. Meanwhile, you can add multiple sources, the data from which will be combined in the chosen destination. So, you can merge different data entities from the same or different Mailchimp accounts or even combine Mailchimp with other apps supported by Coupler.io. For example, you can combine contacts from Mailchimp and HubSpot.
Step 1: Extract data from Mailchimp
Connect your Mailchimp account to Coupler.io. Then choose a data category to export for your report. Coupler.io supports 10 Mailchimp data entities such as Audience (list of contacts), Automations, Campaigns report, and others.
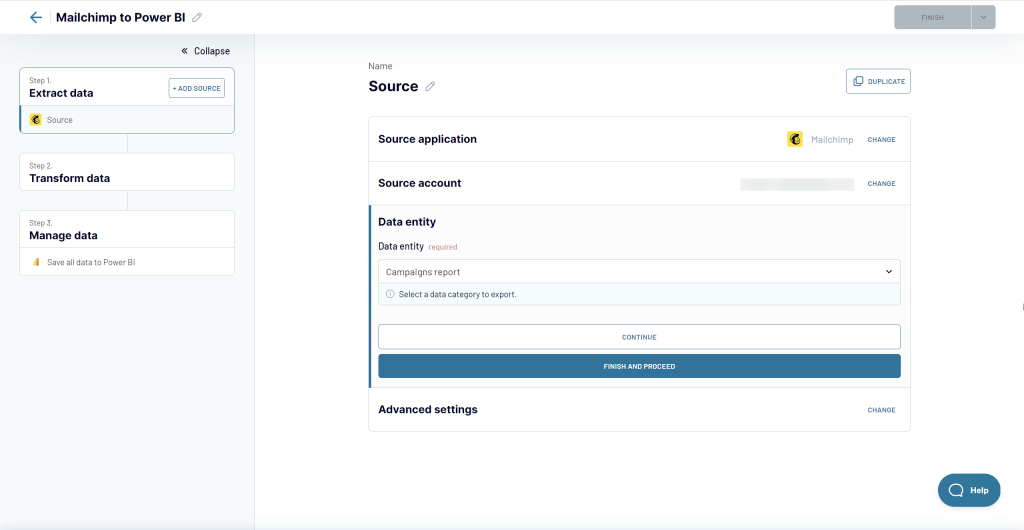
You can add multiple data sources to your importer, be it different Mailchimp data entities or even other marketing and business apps. To do this, click the Add one more source button and configure the newly added source accordingly.
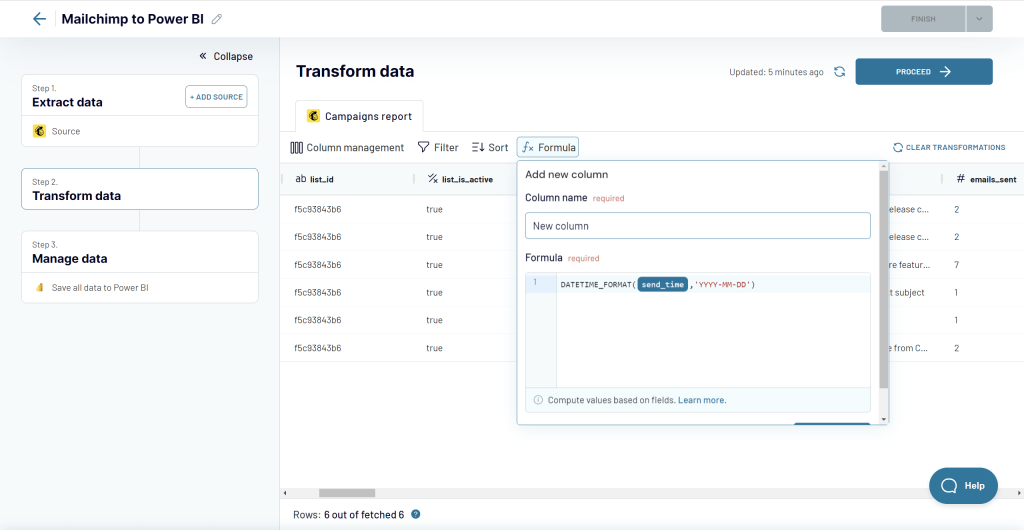
Step 2: Transform data from Mailchimp before loading it to Power BI
Before the Mailchimp data is loaded to Power BI, you can preview and even transform it. The transformations supported include:
- Columns management – you can hide, rename, and reorder columns, and change their data type.
- Calculable columns – you can add new columns using supported calculation formulas.
- Data filtering – you can filter data based on the selected criteria and specified values.
Step 3: Manage data to load to Power BI
Once the data is ready, you can load it to Power BI. For this, you need to follow the instructions on the wizard that explain how you can connect Coupler.io to Power BI.

You need to
- Save and Run the importer.
Coupler.io generates a URL to a JSON file with all data that you then load to PowerBI.
- Copy the Power BI integration URL.
- Open Power BI desktop. Select Get data => from Web and insert the integration URL. You can learn more about importing data in our Power BI tutorial.
In a few moments, your Mailchimp data will open in the Power Query Editor.
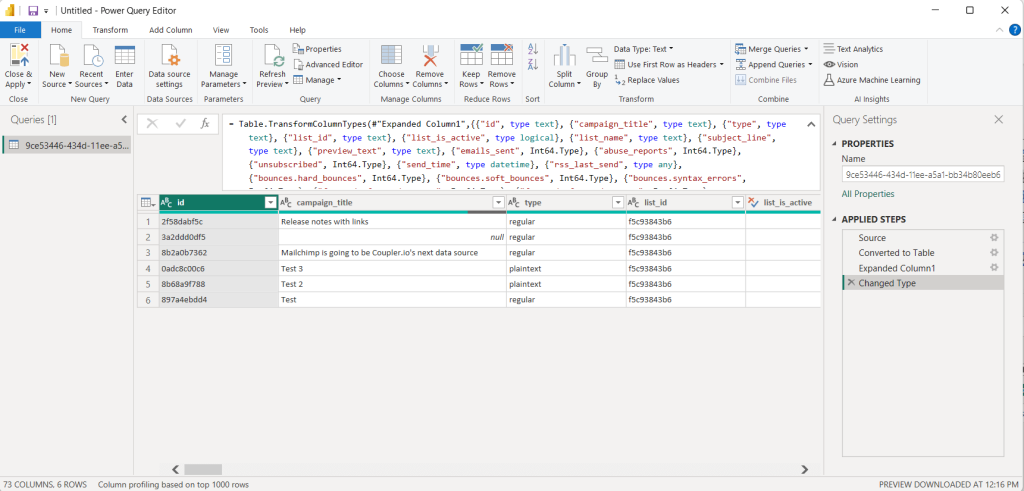
Here you can transform data on the Power BI side. After that click Close & Apply to load your dataset to Power BI.
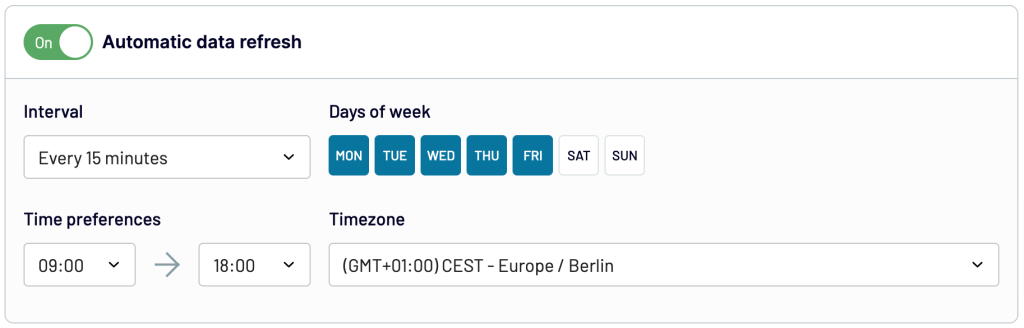
Bonus: Enable the Automatic data refresh on a schedule
Once the data is loaded to Power BI, you can automate the integration to always have up-to-date records. For this, you need to toggle on the Automatic data refresh and specify the desired schedule either during the importer setup or at any time later.
It takes around 2 minutes to connect Mailchimp to Power BI and automate data refresh. You see that the setup flow is quite simple and does not require any technical expertise. So, the solution is a great fit for all categories of users.
With your Mailchimp data loaded to Power BI, you can build your interactive report using all the fancy features provided by this data visualization app. With Coupler.io, you can be sure that your data in the report will always be up to date.
Connect Mailchimp to Power BI via the API
I promised to describe all the possible methods to connect Mailchimp to Power BI, so let’s move on. This time, let’s see how you can do this via the Mailchimp API.
Warning: this method requires some technical background and is a good fit for tech-savvy users.
To connect Mailchimp to Power BI via the Mailchimp API, you’ll need to complete two high-level steps:
- Create an API key from inside your Mailchimp account.
- Call the API from Power BI using the Power Query Editor.
Step 1. Create a Mailchimp API key
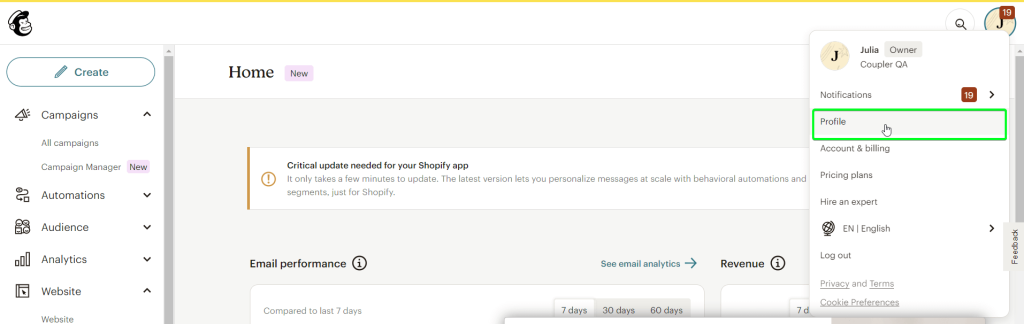
- In your Mailchimp account, go to the Profile.
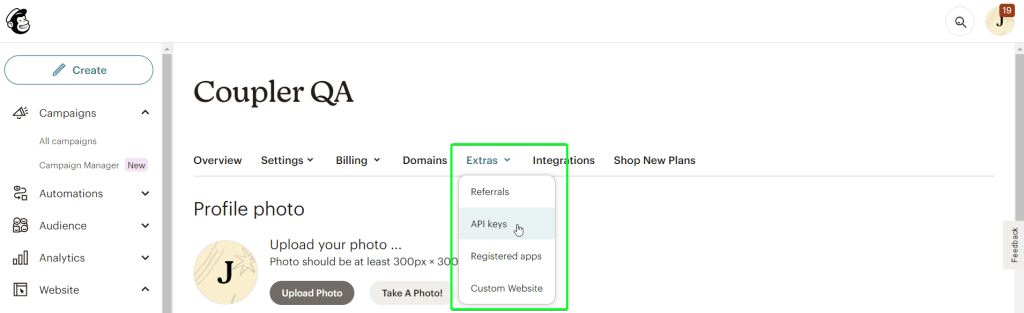
- Go to Extras => API Keys
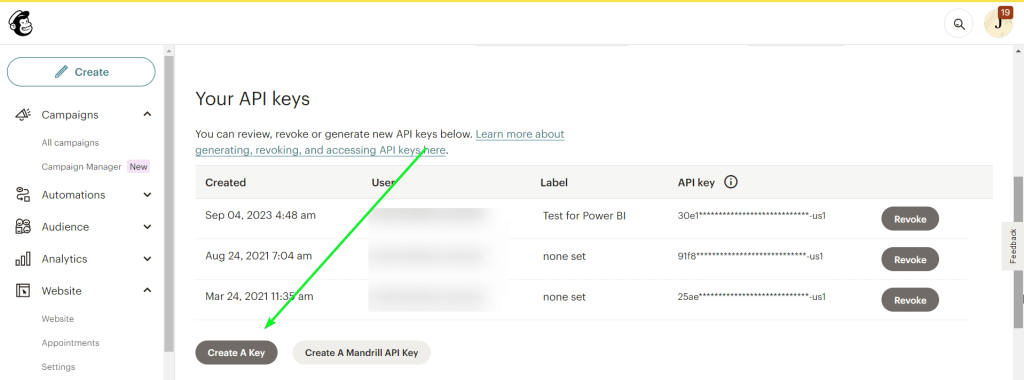
- Create an API key and save it in a password manager or in a textual file since we’re going to use it later.
Step 2. Call the API from Power BI using the Power Query Editor
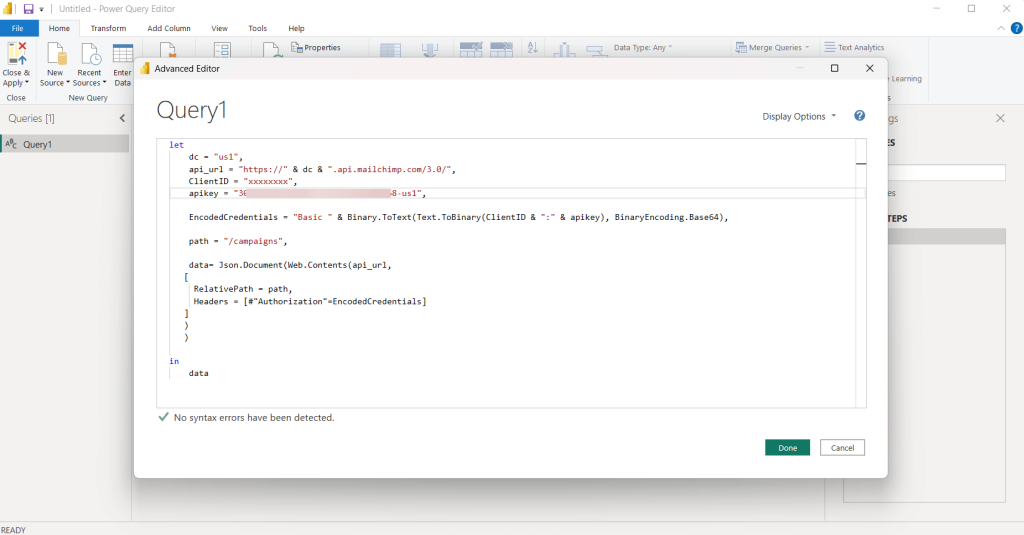
To call a Mailchimp API from Power BI, you need to write a query using Data Analysis Expressions (DAX). Here is an example of a query to return information about Mailchimp campaigns:
let
    dc = "us1",
    api_url = "https://" & dc & ".api.mailchimp.com/3.0/",
    ClientID = "xxxxxxxx",
    apikey = "30****************************68-us1",

    EncodedCredentials = "Basic " & Binary.ToText(Text.ToBinary(ClientID & ":" & apikey), BinaryEncoding.Base64),

    path = "/campaigns",

    data= Json.Document(Web.Contents(api_url,
   [
     RelativePath = path,
     Headers = [#"Authorization"=EncodedCredentials]
   ]
   )
   )

in
    data
To call a query, do the following:
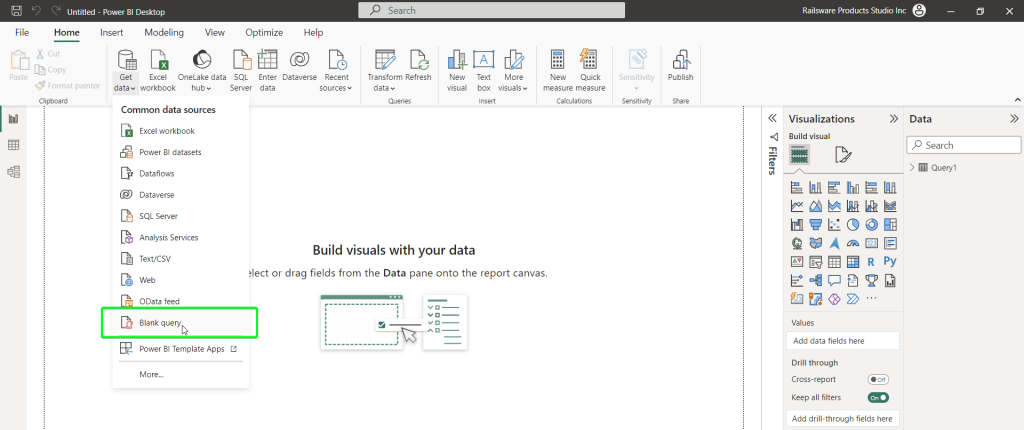
- Go to Get data => Blank query
- The Power Query Editor will open where you’ll need to click Advanced Editor.
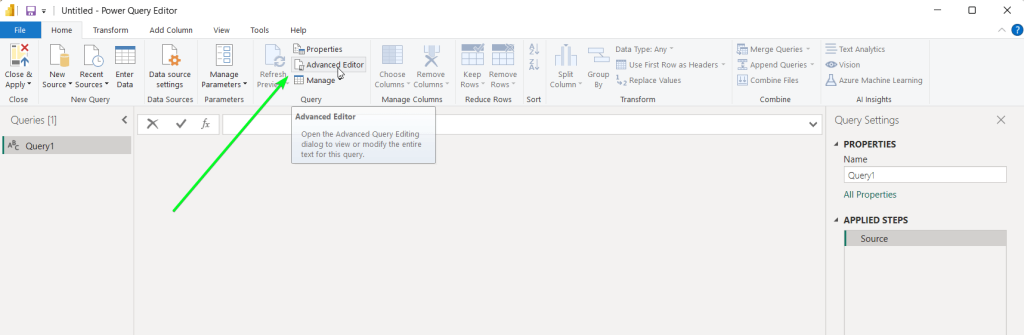
- In the open window, insert your query. Do not forget to use your Mailchimp API key. As for the Client ID, the value for it is irrelevant – it can be any string. Mailchimp authentication rests on the API key.
- Click Done and you’ll get the following information that can be drilled down.
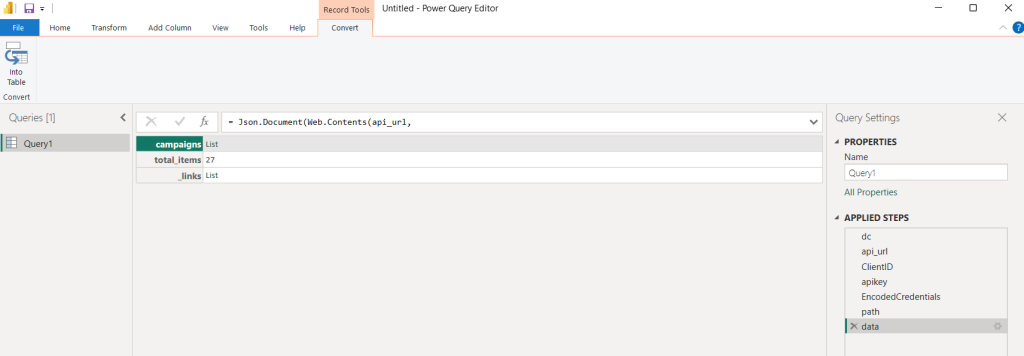
Then you can proceed with the data load to Power BI.
This is just a plain example of an authenticated request to the Mailchimp API. For more information on this, please refer to their API documentation.
The experience of pulling data from Mailchimp using the Power Query Editor via the API differs from using third-party connectors. You will like it if you’re quite technically savvy and enjoy playing around with the Mailchimp API. However, users without a technical background may find it rather sophisticated.
How to set up a Mailchimp Power BI integration using the ODBC connector
ODBC stands for Open Database Connectivity. It is a standard API for accessing database management systems. Microsoft products including Excel, Power BI, and others can use ODBC drivers to pull raw data from various sources including Mailchimp. To make this happen, you need to download and install a Mailchimp ODBC driver, for example, this one by CData.
I downloaded and installed this driver. It took around 2 minutes… and the software asked me to restart my computer! For the time I spent on the installation, I would have been already making my Power BI report based on the data imported with Coupler.io 🙂 But ok. Let’s try to load data from Mailchimp using this method.
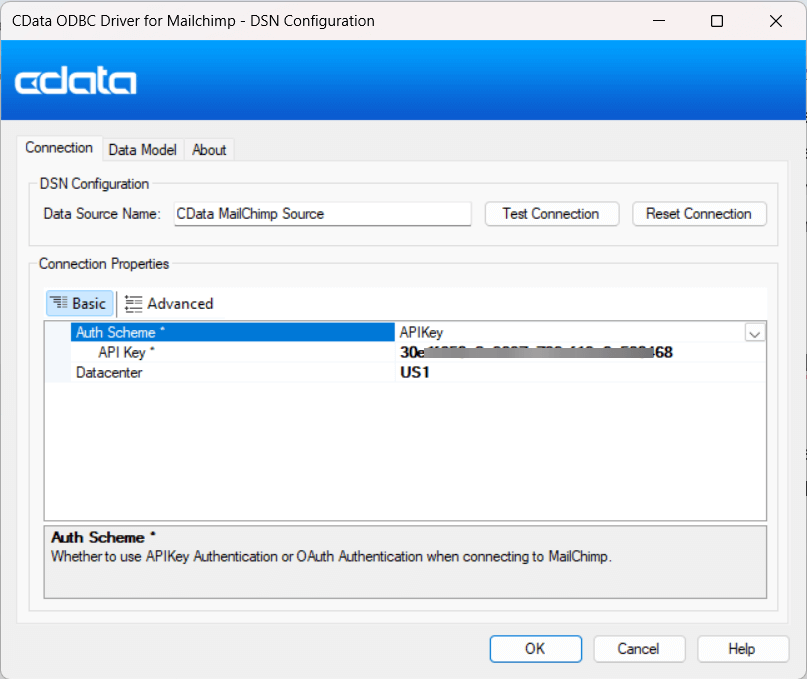
Step 1: Specify the Mailchimp API key and data center in the DSN configuration
Once you have installed the ODBC driver, open its folder and find the ConfigureODBC.exe file. Open it and enter the connection properties: API key and datacenter. We wrote about getting the Mailchimp API key above.
This step is crucial. Without it, you won’t be able to preview and load data from Mailchimp API. I missed this step during the initial setup and got the following error later.
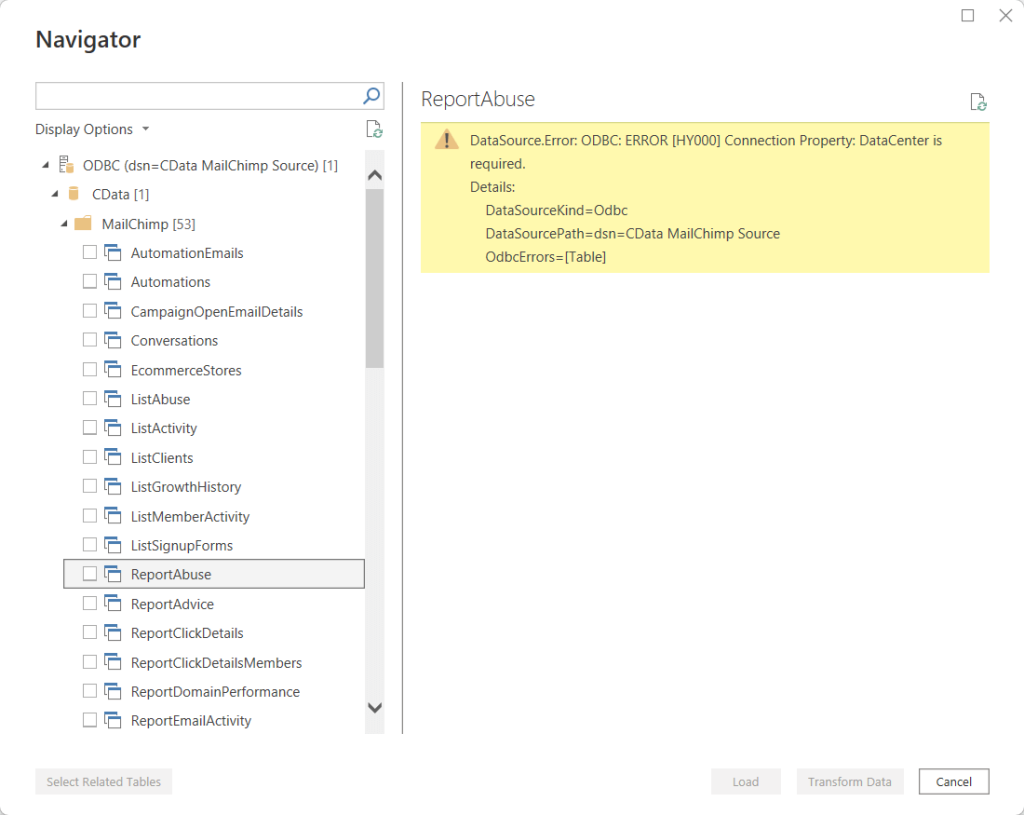
Do not make my mistake 🙂
Step 2. Connect Mailchimp to Power BI
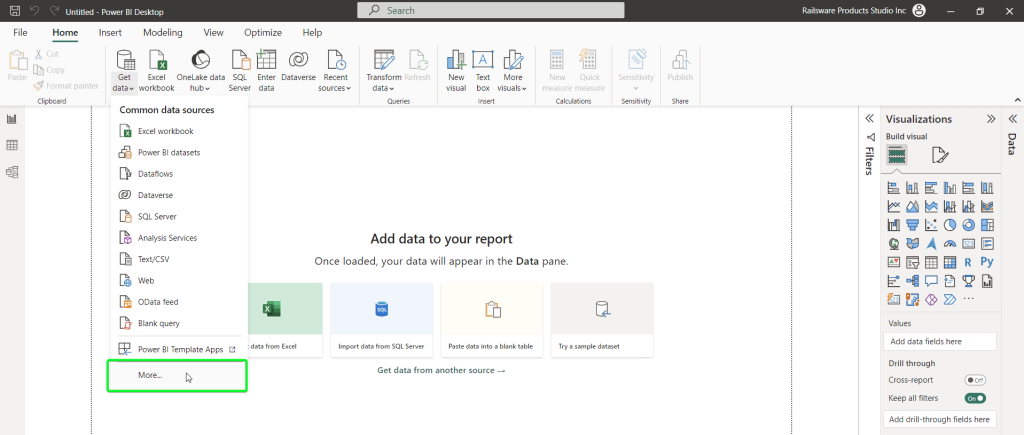
- In Power BI, go to Get data => More…
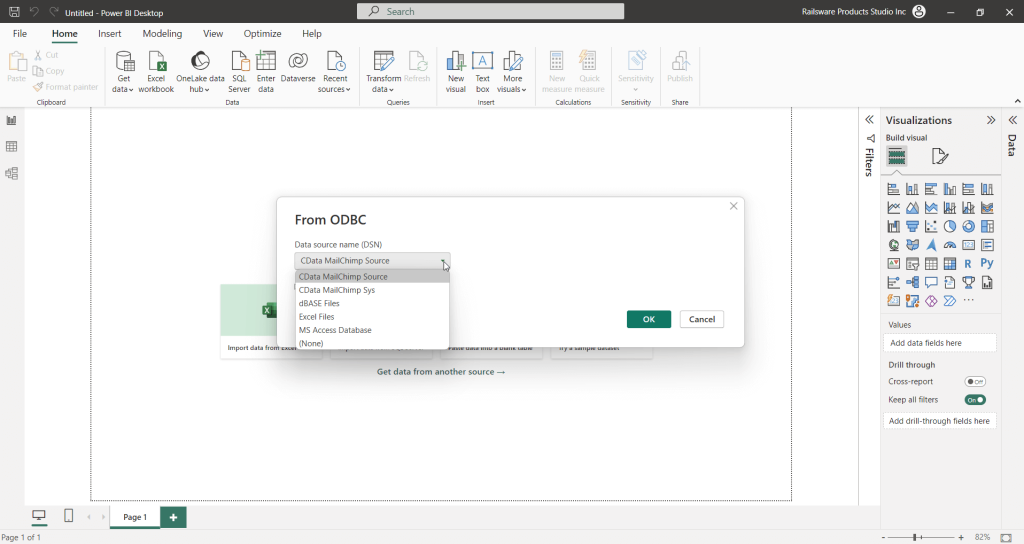
- Type ODBC in the search bar and select it. You will see a list of sources that you can connect to using ODBC. The fresh new Mailchimp source is there:
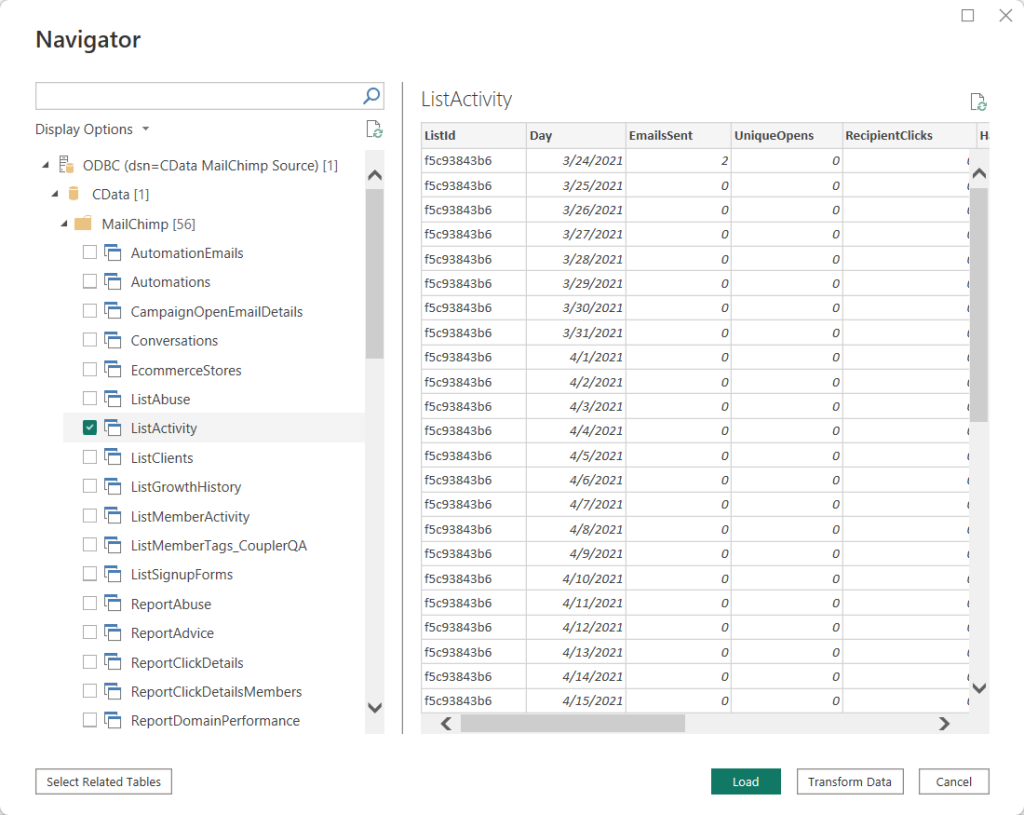
- Next, specify how to connect to Mailchimp. You can either use a username/password to access Mailchimp or use your Windows credentials (hey to all Windows users👋). I went with the latter option and got to the Navigator right away. In the Navigator, you’ll see an associated schema folder and tables. Select the desired table/tables, and you will see the data preview. After that, proceed to the query editor to query results before loading the data.
The rest of the flow you already know.
Did you enjoy this method of connecting Power BI to Mailchimp? It’s much more convenient than composing queries to the Mailchimp API but still not as user-friendly as Coupler.io. Moreover, if you want to get data from not only Mailchimp but other sources, you’ll need to get ODBC drivers for each of them.
Which method is the best to integrate Mailchimp and Power BI?
Let’s sum up. The best method is the one that meets all your requirements and allows you to get the job done. My rating is as follows:
- Using Power Query to pull data from the Mailchimp API is a good choice for anyone seeking flexibility in terms of data integration. You’re only limited to what the Mailchimp API can offer. However, be prepared to delve into the API documentation and master DAX to query the data you need.
- ODBC drivers seem to do their job but your setup flow is rather extended: find a driver, download and install it, configure the DNS, and then you can get your data.
- Coupler.io is the best option for many reasons. It’s powerful, supports multiple sources and destinations, and provides a bunch of automation features to give you peace of mind. You can combine your Mailchimp data with the records from LinkedIn Ads, Google Analytics 4, and others. Moreover, if you want to replace Power BI with another business intelligence (Tableau) or spreadsheet (Excel) destination, you won’t have any issues.
Make your choice and let it be wise. Good luck!
Automate data export with Coupler.io
Get started for free


