QuickBooks Backup Tutorial – Native and Third-Party Options to Automatically Back Up Your Data

Data backup is a must-have feature that will save you from unexpected loss of your accounting data. Ideally, you should have a scheduled backup process, which will create a copy of your data every day. Can this be done for QuickBooks? In this blog, we’ll look at all the backup QuickBooks options available for both QuickBooks Online and Desktop.
How do I back up QuickBooks?
QuickBooks does not provide a single backup solution for both online and desktop software. So, first, make sure that you know which QuickBooks product or plan you have.
Back up QuickBooks Online
QuickBooks Online plans, except for Advanced, do not provide data backup from the user perspective. This means you won’t have a QuickBooks backup for audit purposes and also won’t be able to roll back to an old copy if needed. To get the job done, you will have to opt for third-party solutions.
QuickBooks Online Advanced is the only plan that provides QuickBooks cloud backup and restore capability. Moreover, you can set up automatic data backup, or restore to a specific time and date. The tricky part is that QuickBooks Online Advanced is only available for the US region.
Back up QuickBooks Desktop
If you’re a happy user of a QuickBooks Desktop product, you can create a backup company file (for example, .qbb or .dmg), schedule automatic backups, and even save your backup copy either locally or online. No additional software is required.
Now, let’s check out the steps to make a backup of your QuickBooks data.
Methods for QuickBooks online backup
Although there is no native backup feature for QuickBooks Online plans other than Advanced, there is a method that you may benefit from – data export. This will let you create a backup copy of your data in spreadsheets like Google Sheets or Excel, or a data warehouse.
QuickBooks data export can be done either manually or automated with Coupler.io.
How to back up QuickBooks Online data with Coupler.io
Coupler.io is a reporting automation solution that lets you export many data entities from QuickBooks Online on a custom schedule. As a destination for your QuickBooks data, you can choose from spreadsheet apps, data warehouses, and even BI tools. We’ll be using the QuickBooks data connector as the backup software for QuickBooks Online. Here is a list of data you can export from QBO with Coupler.io:
Select the desired destination in the form below and click Proceed. For example, you can choose to load data from QuickBooks to BigQuery. You’ll be offered to create a Coupler.io account for free.
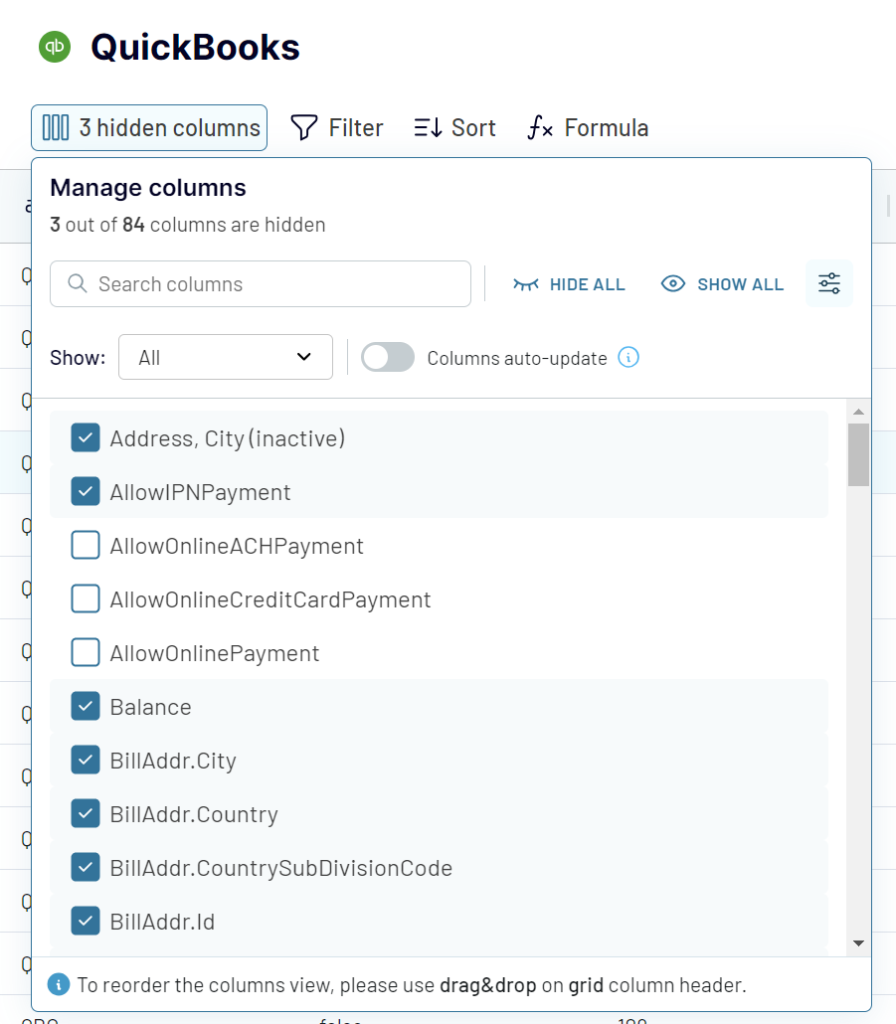
- In the next step, you’ll need to connect your QuickBooks Online account and select a data category to export.

- Then you can organize your data as follows:
- Filter and sort records
- Hide, rename, edit, reorder columns
- Add custom columns using formulas
- Blend data from multiple data entities, QuickBooks accounts or even other apps.
- After that, connect the destination app account and specify where exactly you want to import your QuickBooks data.
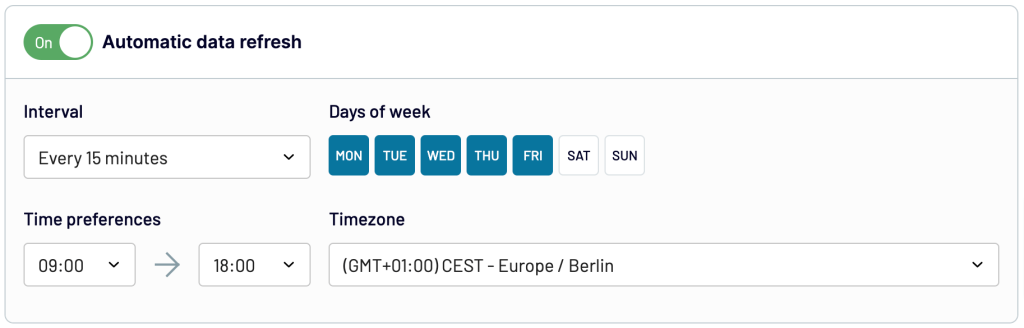
Schedule QuickBooks automatic backup
The last step is to enable the Automatic data refresh that will automate exports of QuickBooks data. Configure the schedule to your liking and run the importer to activate your automatic backup.
Other QuickBooks Online backup software
Coupler.io will help you back up your history log data for audit. However, you won’t be able to roll back your QuickBooks company data to an earlier copy in the case of an error. Still, you can search among QuickBooks Apps to get this job done. Here are the options you can consider:
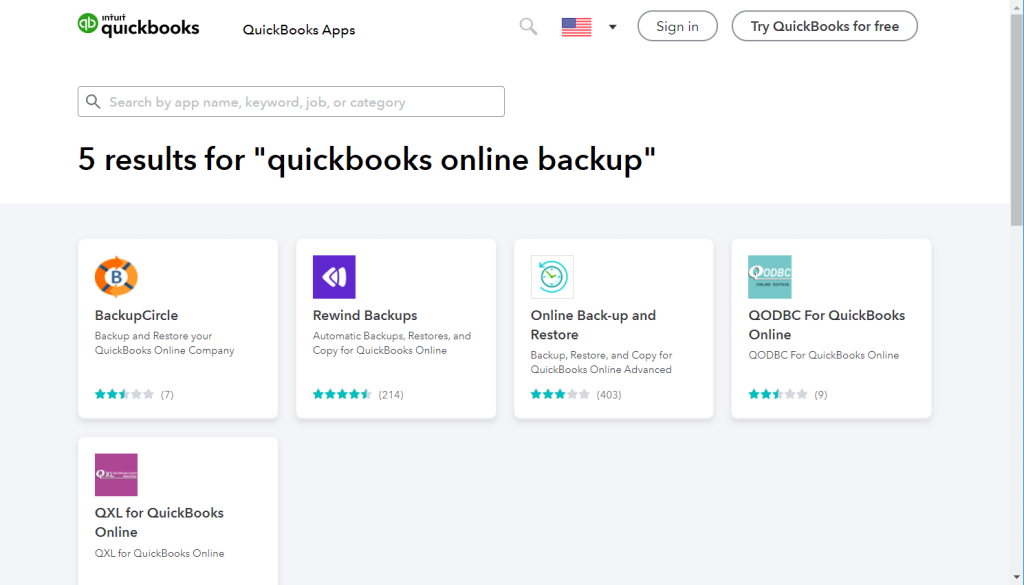
- Rewind Backups
- BackupCircle
- QODBC For QuickBooks Online
- QXL For QuickBooks Online
Online Back-up and Restore is only available for QuickBooks Online Advanced
QuickBooks online backup cost
Since there is no native feature for backing up QuickBooks Online, you’ll have to pay for the third-party options.
The cost for Coupler.io will depend on the data volume and the frequency of automated data backups. If you’re interested in learning more, then check out the available Coupler.io pricing plans. And you can always get started for free.
The QuickBooks apps that we mentioned above do not provide any free tiers. For example, Rewind will cost you a minimum of $14 per month for the daily backup of one file. The more files you want to back up, the more you’ll have to pay.
QuickBooks Cloud backup via manual data export
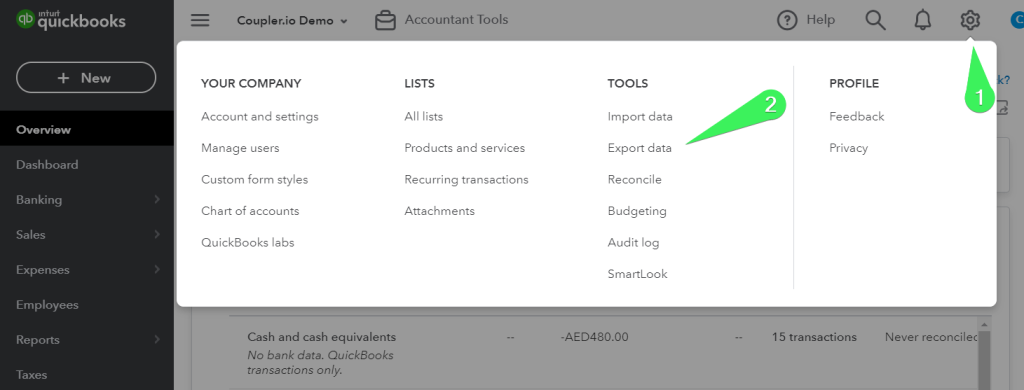
You can export data from QuickBooks natively if you go to Settings => Export data.
Read more about how to export QuickBooks data.
You can select the Reports and Lists to be included in an archive file that will be downloaded to your device. The archive file will contain Excel files for each data entity selected for export.
The flaws of this method include:
- Data is exported manually, without any automatic scheduling
- Limited data entities are available for export
- Only export from QuickBooks to Excel is available
Let’s now have a look at a solution that is free of all these flaws.
How to back up QuickBooks Desktop Pro, Premium, or Enterprise
Users of QuickBooks Desktop products have no worries about backups since this is an out-of-the-box feature. It allows you to create local and online backups manually or automatically. Let’s review the flow in the example of QuickBooks Plus 2022 for Mac.
Create a QuickBooks backup file
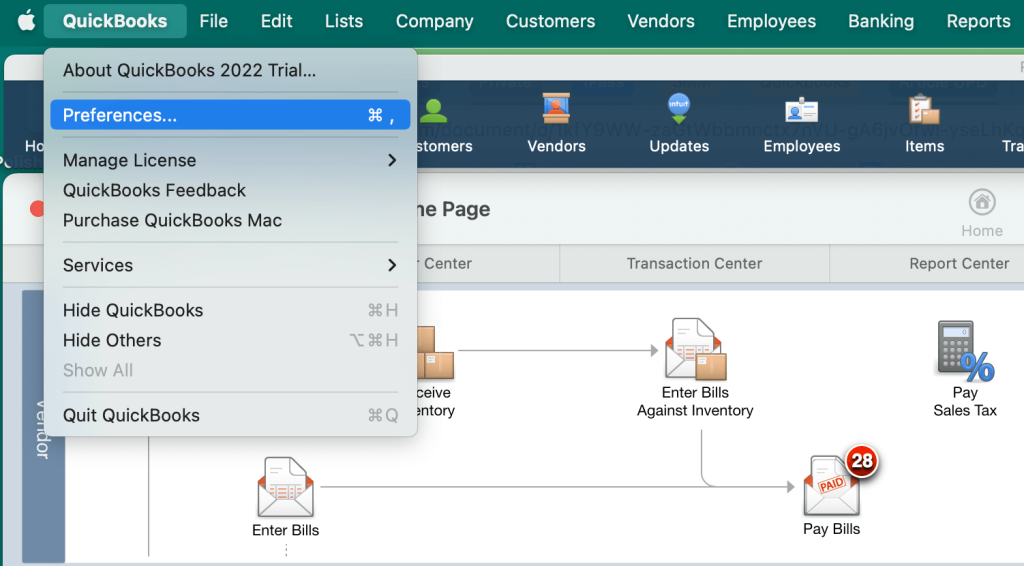
- Go to QuickBooks in the main menu and select Preferences.
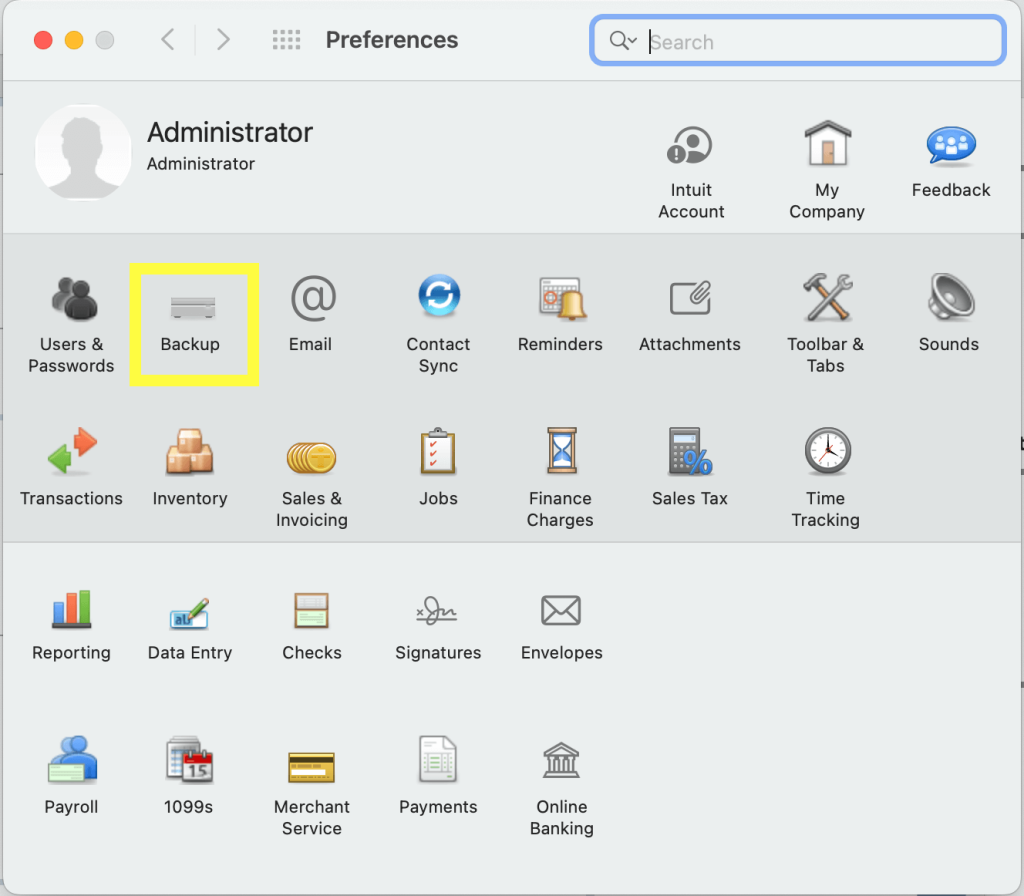
- Then, select Backup.
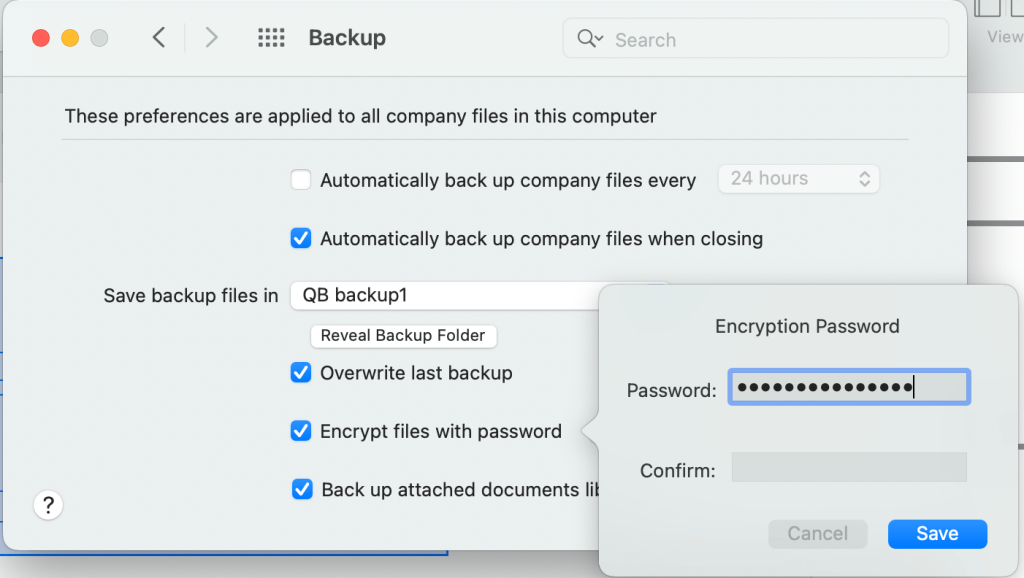
- In the next step, specify your preferences. For example, you can select to overwrite old backup information by replacing it with the new one or keep every new backup as a separate file. You can also protect your backup copy with a password and select whether you want to back up attached documents as well (recommended). These preferences will affect all company files you work with in your QuickBooks Desktop account.
- You’ll also need to select where to save the backup file. Make sure you specify a local folder on your computer. If you select a folder on an external hard drive or flash drive, or a location for which you don’t have access rights, the backup process won’t be completed successfully.
- Tick the Automatically back up company files when closing.
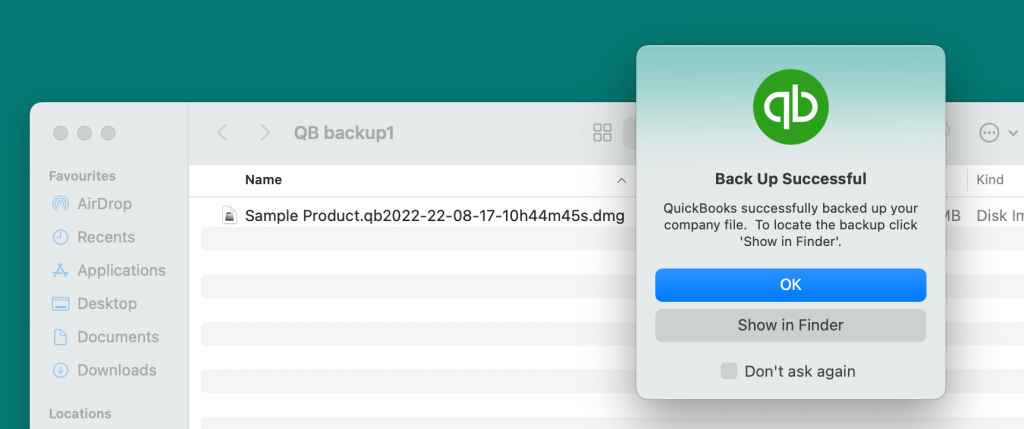
- Once everything is ready, open the company file you want to backup. Then, you can simply close it, and the backup file will be saved in the specified folder, since we’ve already selected automatic backup at closing in the previous step.
- QuickBooks will display a message saying that the backup process is in progress. That’s it! The backup file is in the specified location.
- There is an alternative way to create a backup without specifying the settings for all company files. Go to File in the main menu and select Back up. You will be redirected to Finder where you can select the company file you want to back up on your computer. Then, click the Start backup button. Unlike the previous method, this will be a one-time action that won’t affect the backup settings for other files. However, with this method you won’t be able to use any additional settings, such as password protection.
QuickBooks scheduled backup
If you want to schedule your QuickBooks backups, you’ll need to select a respective option when creating a backup file.
- Go to QuickBooks in the main menu -> Preferences -> Back up.
- Thick Automatically back up company files every… and select the update interval. You can update the backup file at intervals varying from 1 hour to 24 hours.
In our example, we’ve also selected the Overwrite last backup option, so we’ll only have one backup file that is always up to date. You can untick this feature if you want to be able to track changes or restore your data to one of the previous versions. In such a case, you will have a separate file for every backup session.

- If you want to enhance data protection, it’s also a good idea to tick the Automatically back up company files when closing option.
Now you know how to set up a QuickBooks scheduled backup.
Set up Online Backup for QuickBooks Desktop
In addition to backing up your QuickBooks locally, you can create a backup copy that will be stored in the cloud. This is possible with the Intuit Data Protect service, which is included in all QuickBooks Desktop Pro Plus, Premier Plus and QuickBooks Desktop Enterprise subscriptions. If you use one of these versions of QuickBooks Desktop, you will need to contact QuickBooks Customer support for the set up. Please note that only the account administrator has the rights to enable Data Protect. If you are responsible for managing data backups but don’t have administrator rights, you’ll need to ask your QuickBooks account administrator to contact the Customer support team for you.
If you use the simple QuickBooks Desktop Pro software like we do, this service comes at an additional cost:
- Monthly Plan for an entire PC – $9.95 per month
- Annual Plan for an entire PC – $99.95 per year
You can purchase this service on the Intuit Data Protect page. You’ll need to have an Intuit account for this, and once you’ve paid for Data Protect, the Customer support team will help you activate it.
When you have access to the service, you can create a backup copy of your data. Find the Intuit Data Protect icon in the menu and select Open Intuit Data Protect. Then, click Back up now, choose the files to back up, and press Continue-> Back up now. The online backup copy is ready.
In general, this feature is very useful for protecting your data. The official QuickBooks recommendation is to keep one backup copy outside of your company premises. This will ensure data safety in case of unexpected events or natural disasters – for example, a fire or theft. Storing a backup copy in the cloud is a great way to do this.
How to restore QuickBooks backup from a local file
The process to restore a QuickBooks backup is quite simple.
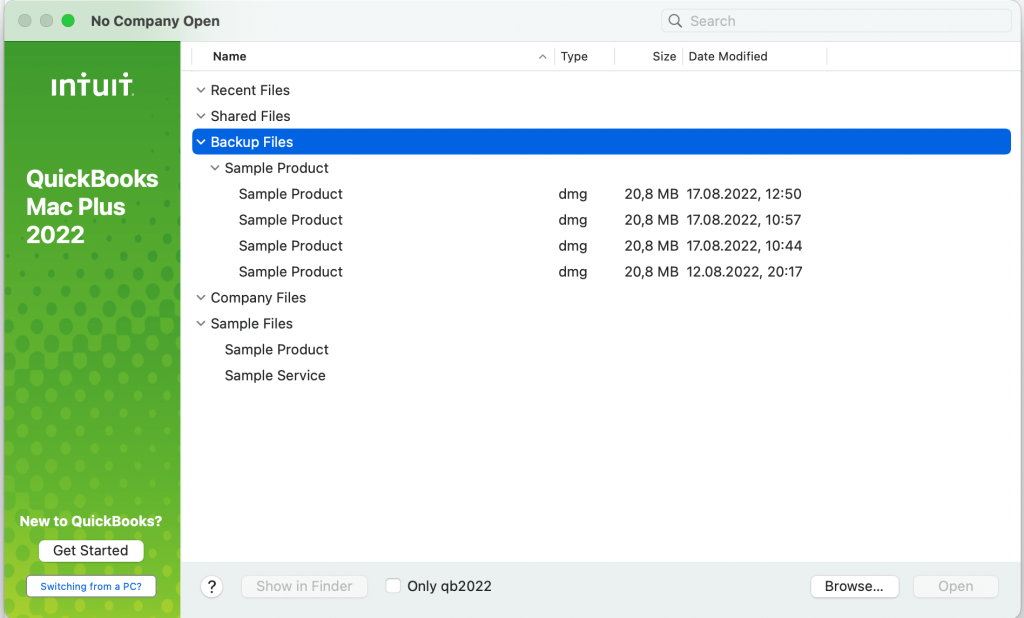
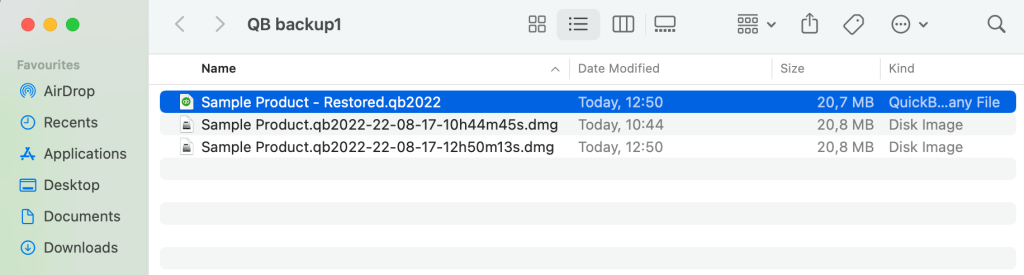
- Launch QuickBooks Desktop 2022. In the No Company Open window, click Backup files. You’ll see a list of the available backup files for each company file you have.
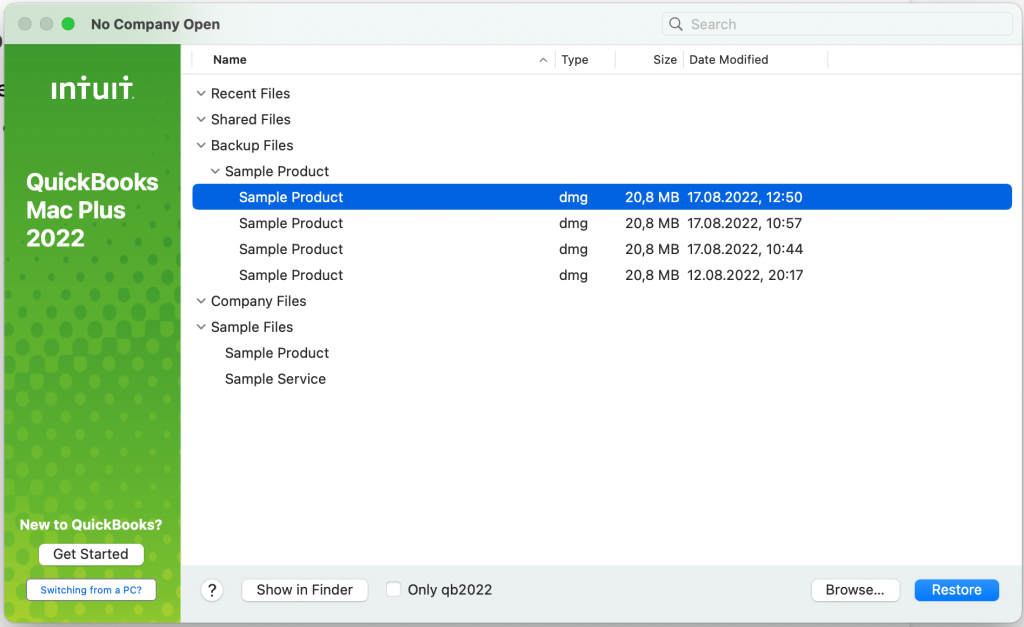
- Select the backup version you need. In our case, it’s the latest file. Then, press the Restore button.
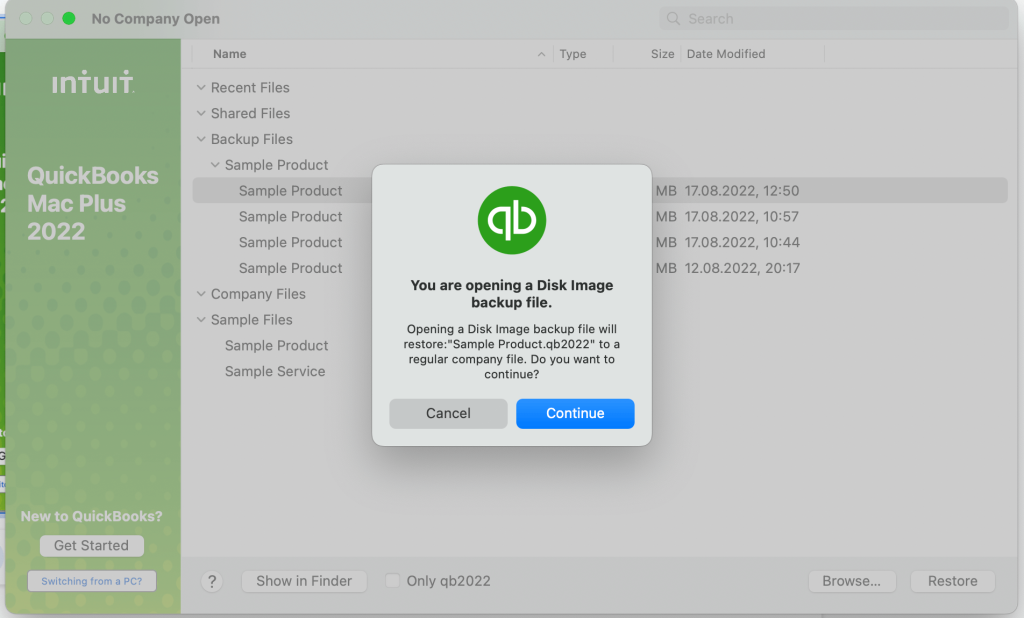
- In the next step, check that everything is correct and press Continue.
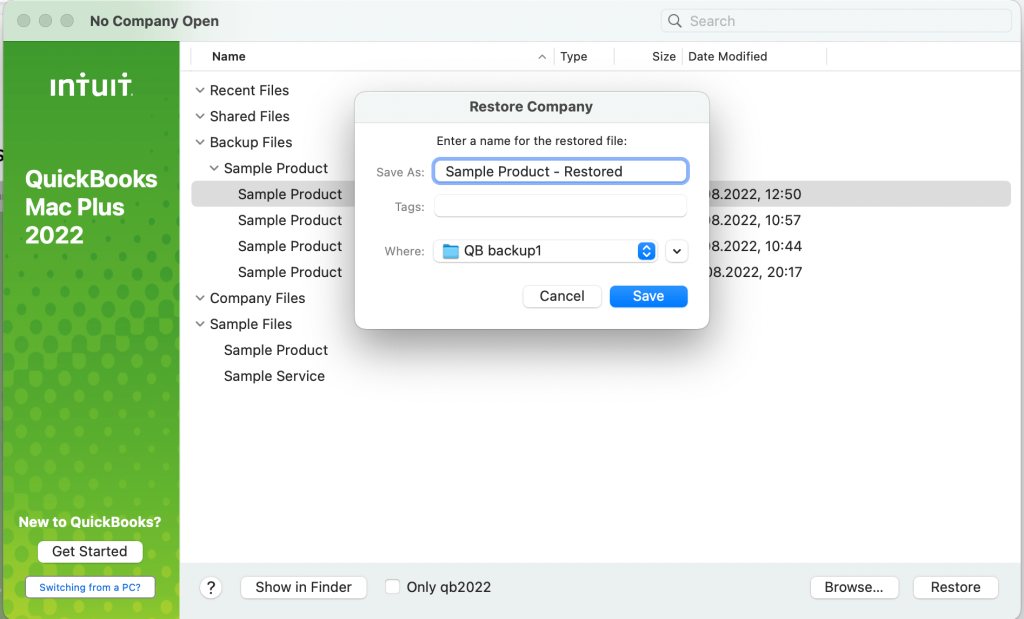
- Enter the name for the restored version, choose where you want to save the restored company file, and press Save.
- The file has been restored from the .dmg format, so now it’s a regular company file.
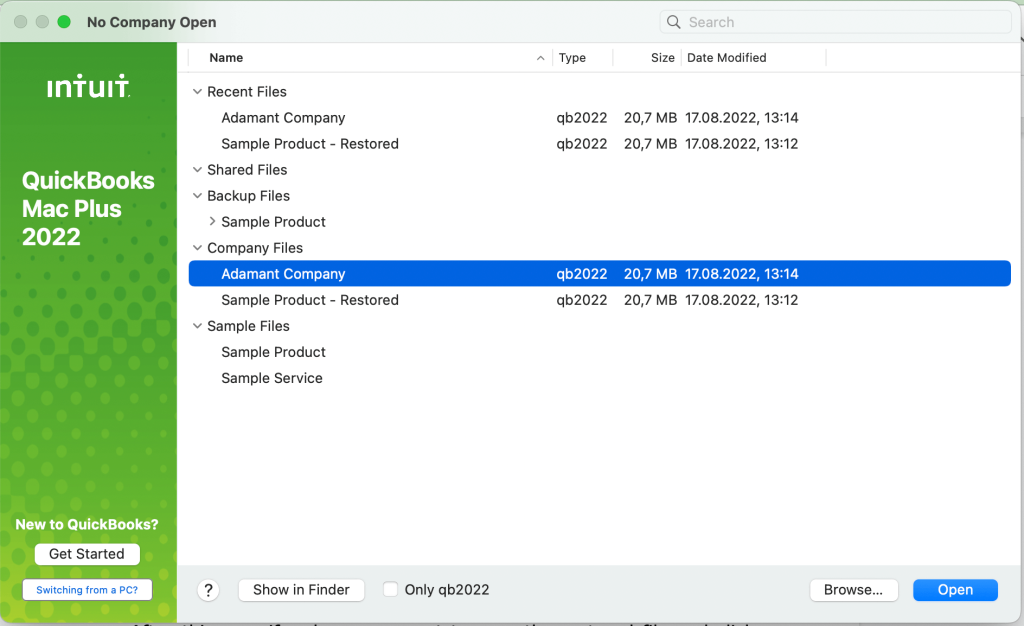
- Now it has appeared in the list of the available company files.
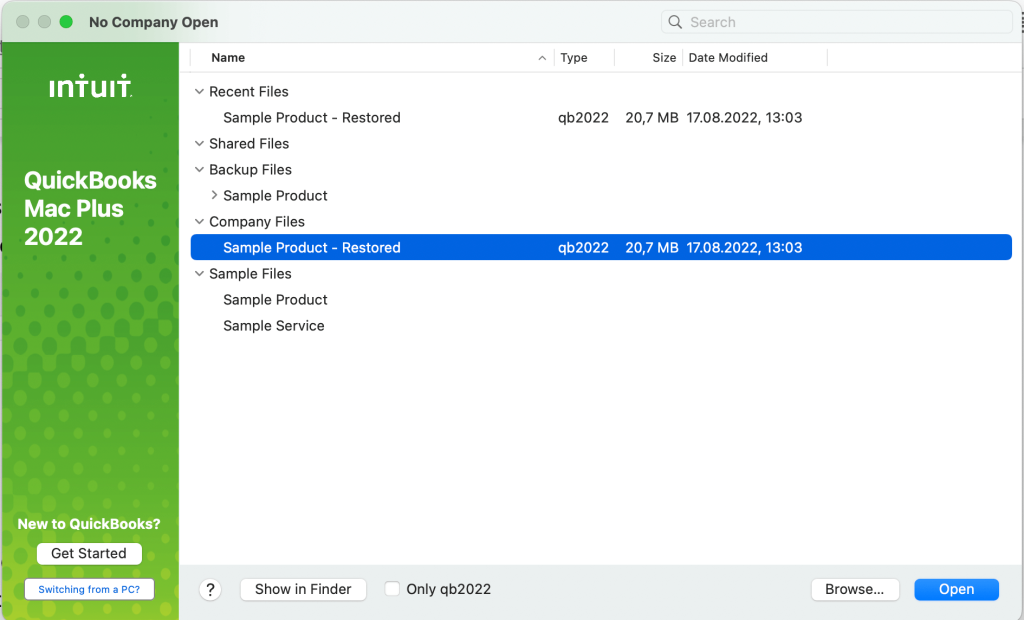
- Click Open to view it.
- When you restore your data this way, the previous version of your company file is not deleted or overwritten. The restored copy will be available as a separate file.
Restore QuickBooks backup from an online copy
- Find the Intuit Data Protect icon on the menu and right-click it. If you are not signed in, you’ll be redirected to a page where you can do so.
- Then, select Restore from Backup. You’ll see the available options – backup copies from different dates. Pick the one you need and press Continue.
- After this, specify where you want to save the restored file and click Restore. That’s pretty much it! You can now work with the restored file.
What to do if QuickBooks backup is not working?
Given the importance of keeping your data safe, it’s always upsetting if, for some reason, QuickBooks backup is not working. So, if you see an error message like “Backup failed” or “QuickBooks unable to back up company file”, here are some ideas on what might have caused this and some tips on how to tackle the issue.
Possible reasons for backup problems with QuickBooks Desktop:
- You’re trying to save your backup to an external hard drive. In such a case, QuickBooks is unable to create a backup file because it sees the external location as incorrect. How to fix: first, make a local backup file on your computer (we’ve already explained how to do this earlier). Then, copy and paste the backup file to the external drive or flash drive.
- The company file name has more than 65 characters. How to fix: rename the file so that its name is shorter. Make sure the new name doesn’t contain too many spaces, underscores, and special characters, as all of this may cause a problem.
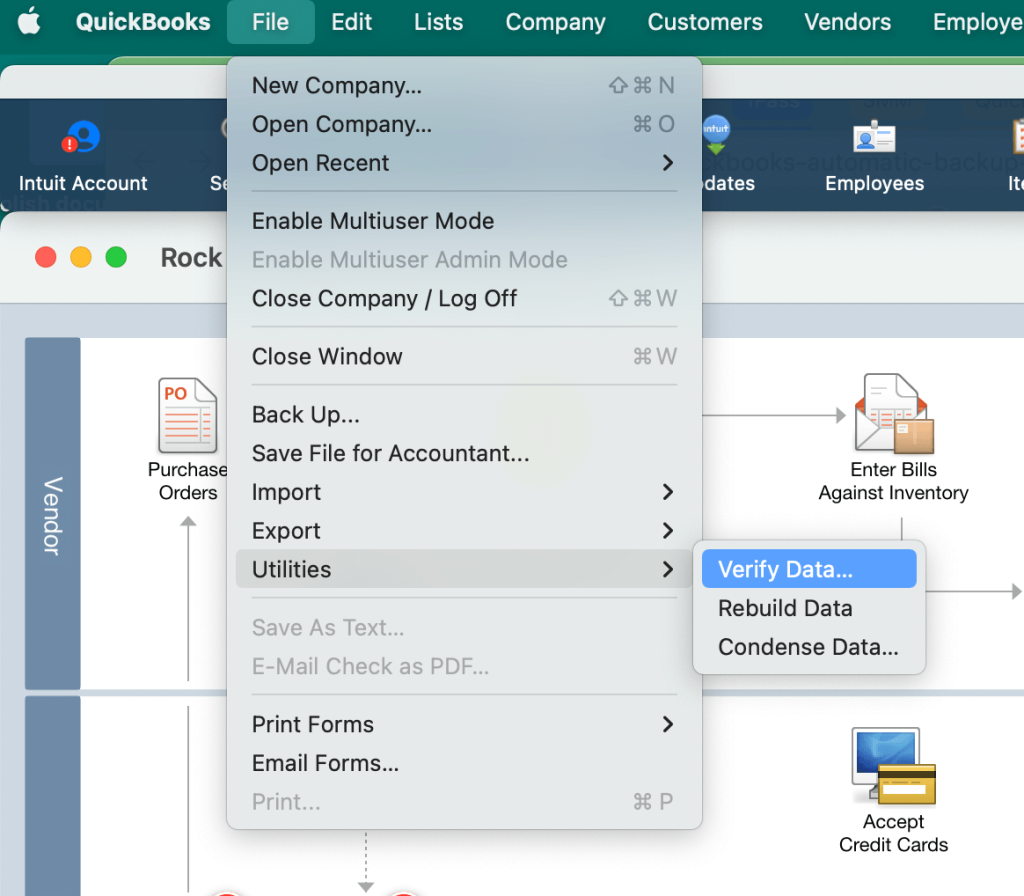
- There’s a problem with your data. If the data is damaged, QuickBooks won’t be able to create a backup file for it. There are several methods you can use to address this issue:
– Verify and rebuild your data. First, click File menu -> Utilities -> Verify Data. Second, click File menu -> Utilities -> Rebuild data. After this, check if the automatic backup is now working.
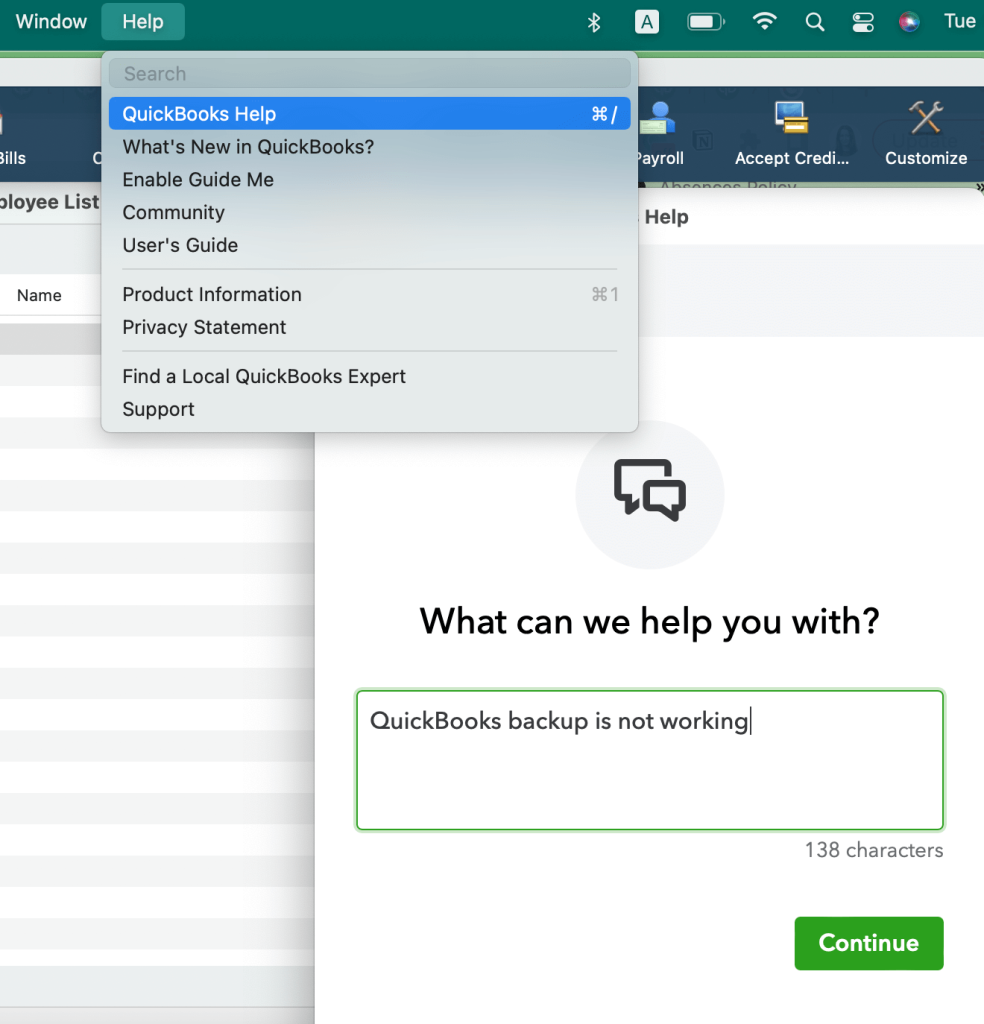
– If none of this helps and QuickBooks backup is not working anyway, the best solution can be to contact the QuickBooks tech support team. They have the resources to look into your issue in detail and identify the exact cause of the problem. To contact them, go to Help -> QuickBooks Help -> Contact Us.
Why is QuickBooks scheduled backup not working?
Some of the issues related to automated scheduled backups are unique, and others are the same as for manual backups. So if you’re wondering why your QuickBooks automatic backup is not working, it might make sense to first check the list of possible reasons given above. These issues are common for both automated and manual backups. So, make sure your backup destination is a local folder on your computer, check if the company file name is correct, and verify and rebuild data, if necessary.
If none of this does the trick, here are some tips on how to address issues that are specific to automatic backups.
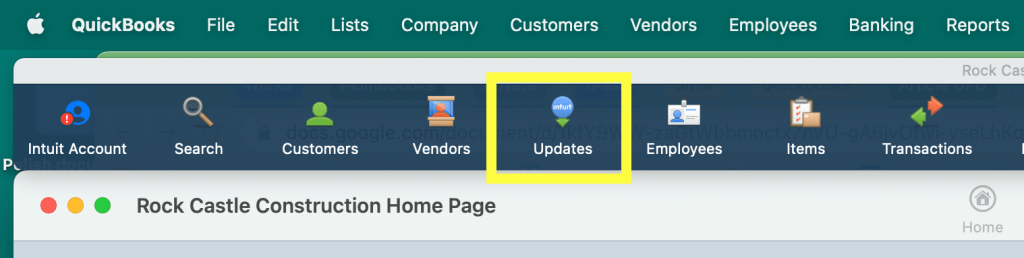
- Update QuickBooks. Make sure that you are using the latest version of QuickBooks Desktop and that all the available updates are installed. To check if your version is up to date, go to Updates in the main menu. If this option is not displayed, click Customize, find Updates, and add this option to the toolbar.
- Check the compatibility. Your version of QuickBooks Desktop should be compatible with the OS you are using. For example, many people experienced problems with running QuickBooks on Windows 10, because their QuickBooks was configured for earlier versions of Windows. If this is the case, you can run QuickBooks in compatibility mode (this tip is for Windows users). Right-click the QuickBooks icon on your desktop and click on the Properties tab. Then, select the Compatibility tab and check Run this program in compatibility mode. After this, select your Windows version from the drop-down list. Click Apply and OK and check if the issue is resolved.
- Double-check the settings. Make sure the scheduled backup is set up correctly. To do so, you’ll need to go through all the steps we’ve described above for setting up a scheduled backup in QuickBooks Desktop. While doing so, check that everything is correct and looks exactly as intended.
- Disable the “Keep QuickBooks running for quick startups” feature. If it’s active, it can prevent QuickBooks from running the automatic backup process properly. Once it’s disabled, you can schedule automatic backups again.
- Contact the support team. Go to Help -> QuickBooks Help -> Contact Us to request further assistance if these general methods couldn’t help you resolve the issue.
We hope that you’ve found these tips useful, and you never have to see the “QuickBooks scheduled backup is not working” error again!
QuickBooks Online backup – key takeaways
Some QuickBooks users complain that they had to sacrifice the backup feature when they moved from QuickBooks Desktop to Online. Indeed, it’s crucial to have a copy of all your accounting data that can save you time and effort in case of an emergency. Nevertheless, there’s always a workaround that you can use.
You can choose QuickBooks auto backup to spreadsheets or data warehouse and have your data in a one-size-fits-all format – Coupler.io will help you with this. Or you can open your pockets and purchase an app that will let you backup and restore your QuickBooks data. The decision is up to you. Good luck with your data!

Automate QuickBooks Online data exports with Coupler.io
Get started for free