You can export deals and other data from HubSpot manually as CSV or Excel files. It’s a simple process for one-off needs, but manual exports break down when you need fresh numbers on a recurring basis.
Coupler.io is a data integration platform and AI analytics solution that automates HubSpot data export to spreadsheets, BI tools, data warehouses, and AI tools. Learn how to set up automated exports, transform raw HubSpot data into analysis-ready datasets, and use AI to ask questions about deal performance and customer acquisition without writing code.
How to automate HubSpot data export with Coupler.io
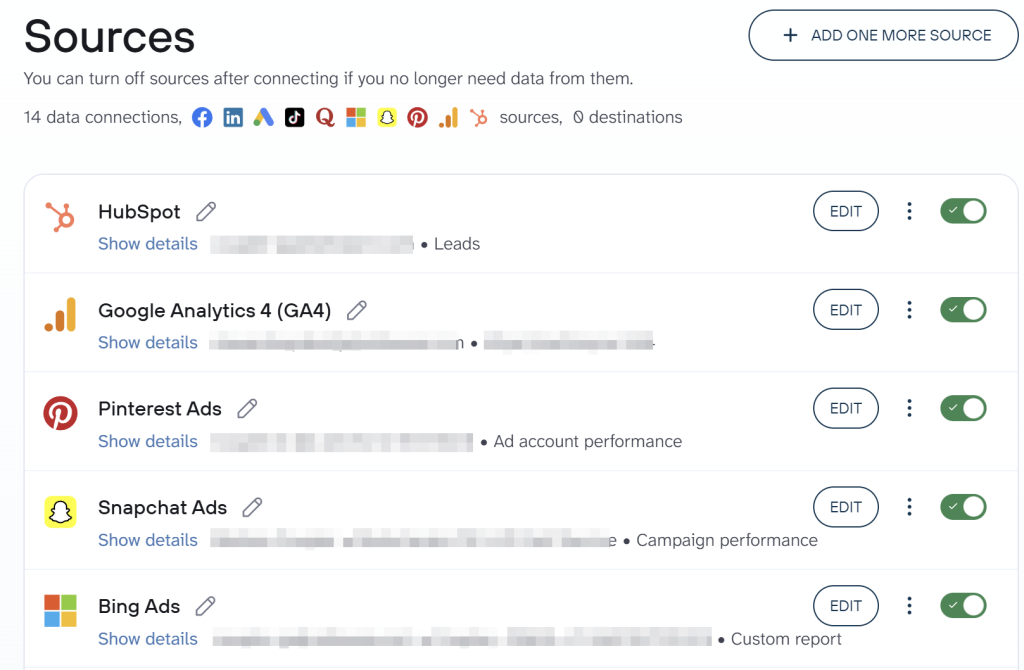
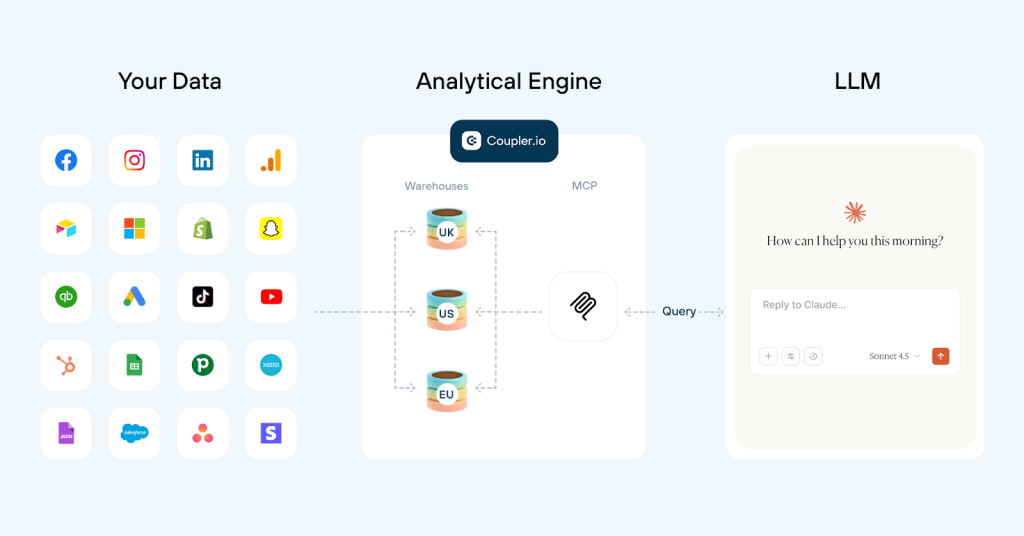
Coupler.io connects to HubSpot and 400+ other data sources, lets you organize data before it reaches the reporting or AI tools, and refreshes everything on a schedule. You can export your HubSpot data to multiple destinations within a single data flow: a spreadsheet for shared reporting, a BI dashboard for visualization, and an AI tool for conversational analysis.
Try it right away for free with no credit card required. Select the destination app to export HubSpot data from the form below and click Proceed.
Then complete three simple steps:
1. Collect your HubSpot data
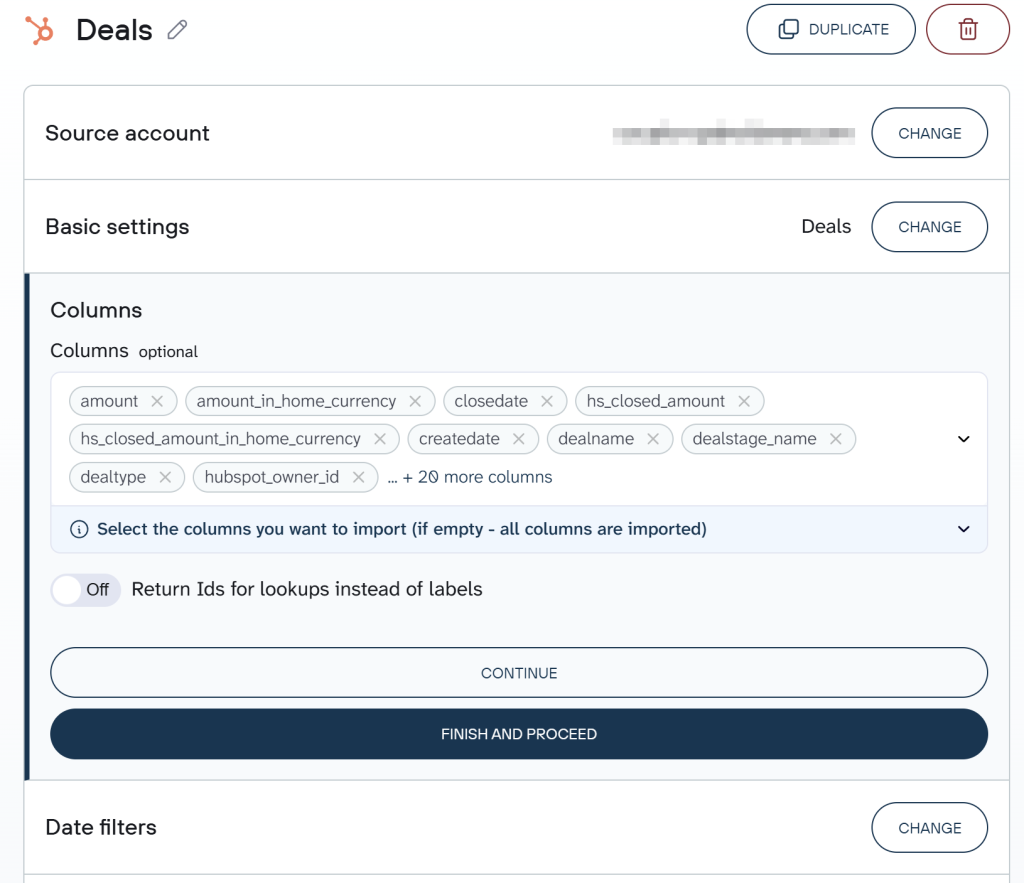
Connect your HubSpot account to Coupler.io and select the data entity you want to export: Deals, Contacts, Companies, Products, Line items, Tickets, or 20+ other options.
During this step, you can optionally customize the data to collect using filters:
- Date range: Export only deals created or updated after a certain date.
- Advanced filters: Choose specific properties (like deal stage or deal owner) to refine your dataset.
Coupler.io connects to over 400 sources, so you can combine HubSpot with other platforms in the same data flow. For example, add a second HubSpot entity like contacts alongside deals, or blend HubSpot data with Google Ads, GA4, or Facebook Ads to build a full customer acquisition view.
2. Organize your HubSpot data set
Raw HubSpot data often includes extra properties you don’t need for reporting, or requires reformatting to match your analysis workflow. Of course, you can export HubSpot data as is, and this step is optional. At the same time, Coupler.io lets you organize the HubSpot data set and make it analysis-ready:
- Hide or remove unwanted columns — drop internal fields like
hs_object_id,hs_lastmodifieddate, or tracking properties you don’t need, so your report only contains relevant data. - Rename or rearrange columns — rename
dealnameto “Deal Name” andamountto “Deal Value,” or move “Close Date” and “Deal Stage” to the front for better readability. - Filter rows or sort the data — filter to show only deals in “Contract Sent” or “Closed Won” stages, exclude deals with $0 value, or sort by “Amount” descending to prioritize high-value opportunities.
- Aggregate data — count deals per owner to track team workload, or sum deal amounts by pipeline stage to see where your revenue sits.
- Add calculated columns — create “Days in Stage” to identify stalled deals, or calculate “Win Rate” as Closed Won / (Closed Won + Closed Lost).
- Combine data from multiple sources — if you’ve connected multiple sources, choose how to combine your data: append (stack rows) or join (match on a shared field like email or company name).

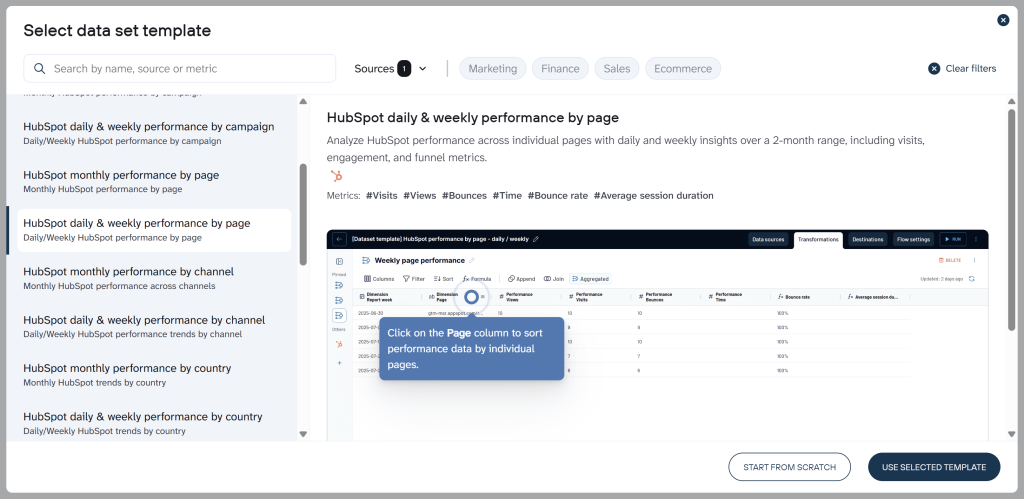
To help you get started faster, Coupler.io provides pre-built data set templates for HubSpot. They come with your HubSpot data already structured, combined where relevant (e.g., joining deals with contact details or company information), and organized for immediate analysis in tools like Google Sheets, Looker Studio, or Power BI.
If you plan to connect this data to AI tools later, the transformation step is where you control what the AI sees. Hide internal fields like hs_object_id or sensitive properties you don’t want in the AI context. The AI layer never connects to your HubSpot account directly. It works only with the structured dataset you build here.
Tip: Coupler.io lets you add business context to your data: descriptions of what fields mean, how metrics are calculated, what pipeline stages represent. If you plan to use AI Agent or send this data to Claude or ChatGPT, adding context here improves the quality of the answers you get back.
Step 3. Load data and schedule refresh
When you’ve organized your data, follow the in-app instructions to load it to your destination. For instance, to export HubSpot to Google Sheets, you need to connect your Google account and specify the file and sheet for the data.
Coupler.io supports multiple destinations within the same data flow. Once your HubSpot export is running, you can add more destinations: Google Sheets for a shared report, Data Studio for a dashboard, Claude for conversational analysis.
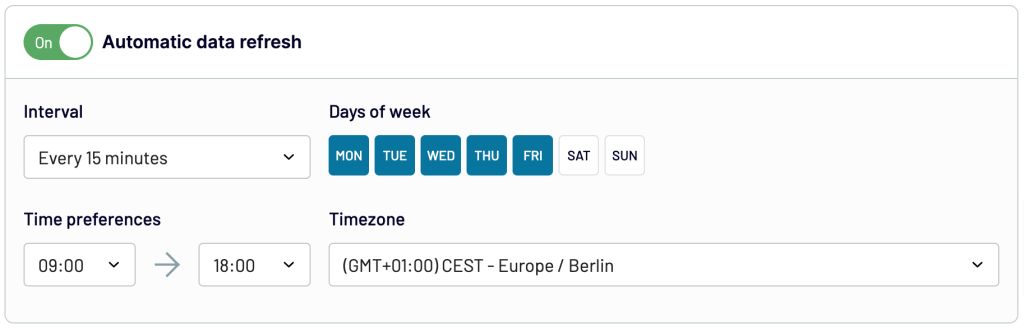
To automate HubSpot data exports on a schedule, toggle on Automatic data refresh and specify your schedule preferences. Save and run the importer.
Bonus step. Analyze exported HubSpot data with AI
Once your HubSpot data flow is active, you can go beyond dashboards and ask questions about your data in plain English inside Coupler.io.
AI Agent is a conversational analytics tool built into the platform. Open it on any active data flow, type a question like “which deal owners have the longest average sales cycle” or “show me deals stuck in the negotiation stage for more than 30 days,” and get an answer based on your actual HubSpot data.
What makes this different from pasting a CSV into ChatGPT: Coupler.io’s Analytical Engine handles the calculations (counts, averages, comparisons, aggregations) and passes only confirmed numbers to the AI. The AI interprets the results and explains them in plain language, but it doesn’t guess at the math.
No additional setup is needed. If your data flow is running, AI Agent is ready to use.
For teams who prefer working in external AI tools, AI Integrations lets you send the same prepared HubSpot data to Claude, ChatGPT, Gemini, Perplexity, and other AI tools. You can connect your data flow via Coupler.io HubSpot MCP and have conversations about deal pipelines, customer acquisition costs, and team performance in the AI tool you already use.

Automate HubSpot data export and AI analysis with Coupler.io
Get started for freeWhere you can export HubSpot data
Coupler.io supports the following destination categories for your HubSpot data:
- Spreadsheets: You can export HubSpot to Google Sheets, or connect HubSpot to Excel
- BI tools: Connect HubSpot to Looker Studio, Power BI, Tableau, and Qlik
- Data warehouses: Export data from HubSpot to BigQuery, PostgreSQL, Amazon Redshift, Snowflake
- AI tools: Connect HubSpot to ChatGPT, Claude, Gemini, Perplexity, and Cursor for conversational data analysis
What data can you export from HubSpot with Coupler.io?
HubSpot integrations by Coupler.io let you automate exports of the following data:
Blend HubSpot data with other sources
One of the biggest advantages of automating HubSpot exports through Coupler.io is the ability to combine CRM data with information from other apps in the same data flow. Coupler.io connects to over 400 sources, so you can build reports that go beyond what HubSpot shows on its own.
Here’s how teams are already using this in practice:
- HubSpot + Google Analytics — the most popular combination. Connect HubSpot deal and contact data with GA4 sessions, traffic sources, and conversion events to understand which website activity drives actual pipeline. Teams use this to build ROAS reports and attribute revenue to marketing channels.
- HubSpot + Google Ads + Facebook Ads — combine CRM deal outcomes with ad spend data to calculate true cost per lead, cost per SQL, and cost per customer across paid channels. This is the foundation for customer acquisition dashboards that connect marketing investment to sales results.
- HubSpot + QuickBooks — merge CRM deal data with financial records for payment reconciliation, revenue recognition, and tracking which closed deals have actually been invoiced and paid.
- HubSpot + Google Ads + Facebook Ads + Microsoft Advertising — build a complete cross-channel paid media report tied to CRM outcomes. Teams use this to compare CPL across platforms and allocate budget to the channels that produce the best leads.
- HubSpot + LinkedIn Ads + Google Ads + Google Analytics — a common setup for B2B customer acquisition dashboards. Track the full funnel from ad impression through website visit to HubSpot lead creation and deal close.
- HubSpot + Airtable — combine CRM data with project management or property tracking data for account-level reporting that spans sales and operations.
These aren’t hypothetical — they reflect the actual data flows Coupler.io users have built. You can add any combination of sources to a single data flow and join or append the data as needed.
Analyze your HubSpot data with ready-to-use report templates
Exporting your HubSpot deals is just the beginning. Turning that data into actionable reports can take time and effort. With ready-to-use HubSpot report templates, you can skip the manual work and get instant access to dashboards with your data. These templates allow you to track sales performance and analyze customer acquisition trends in minutes. Let’s explore these HubSpot dashboards you can start using today for free!
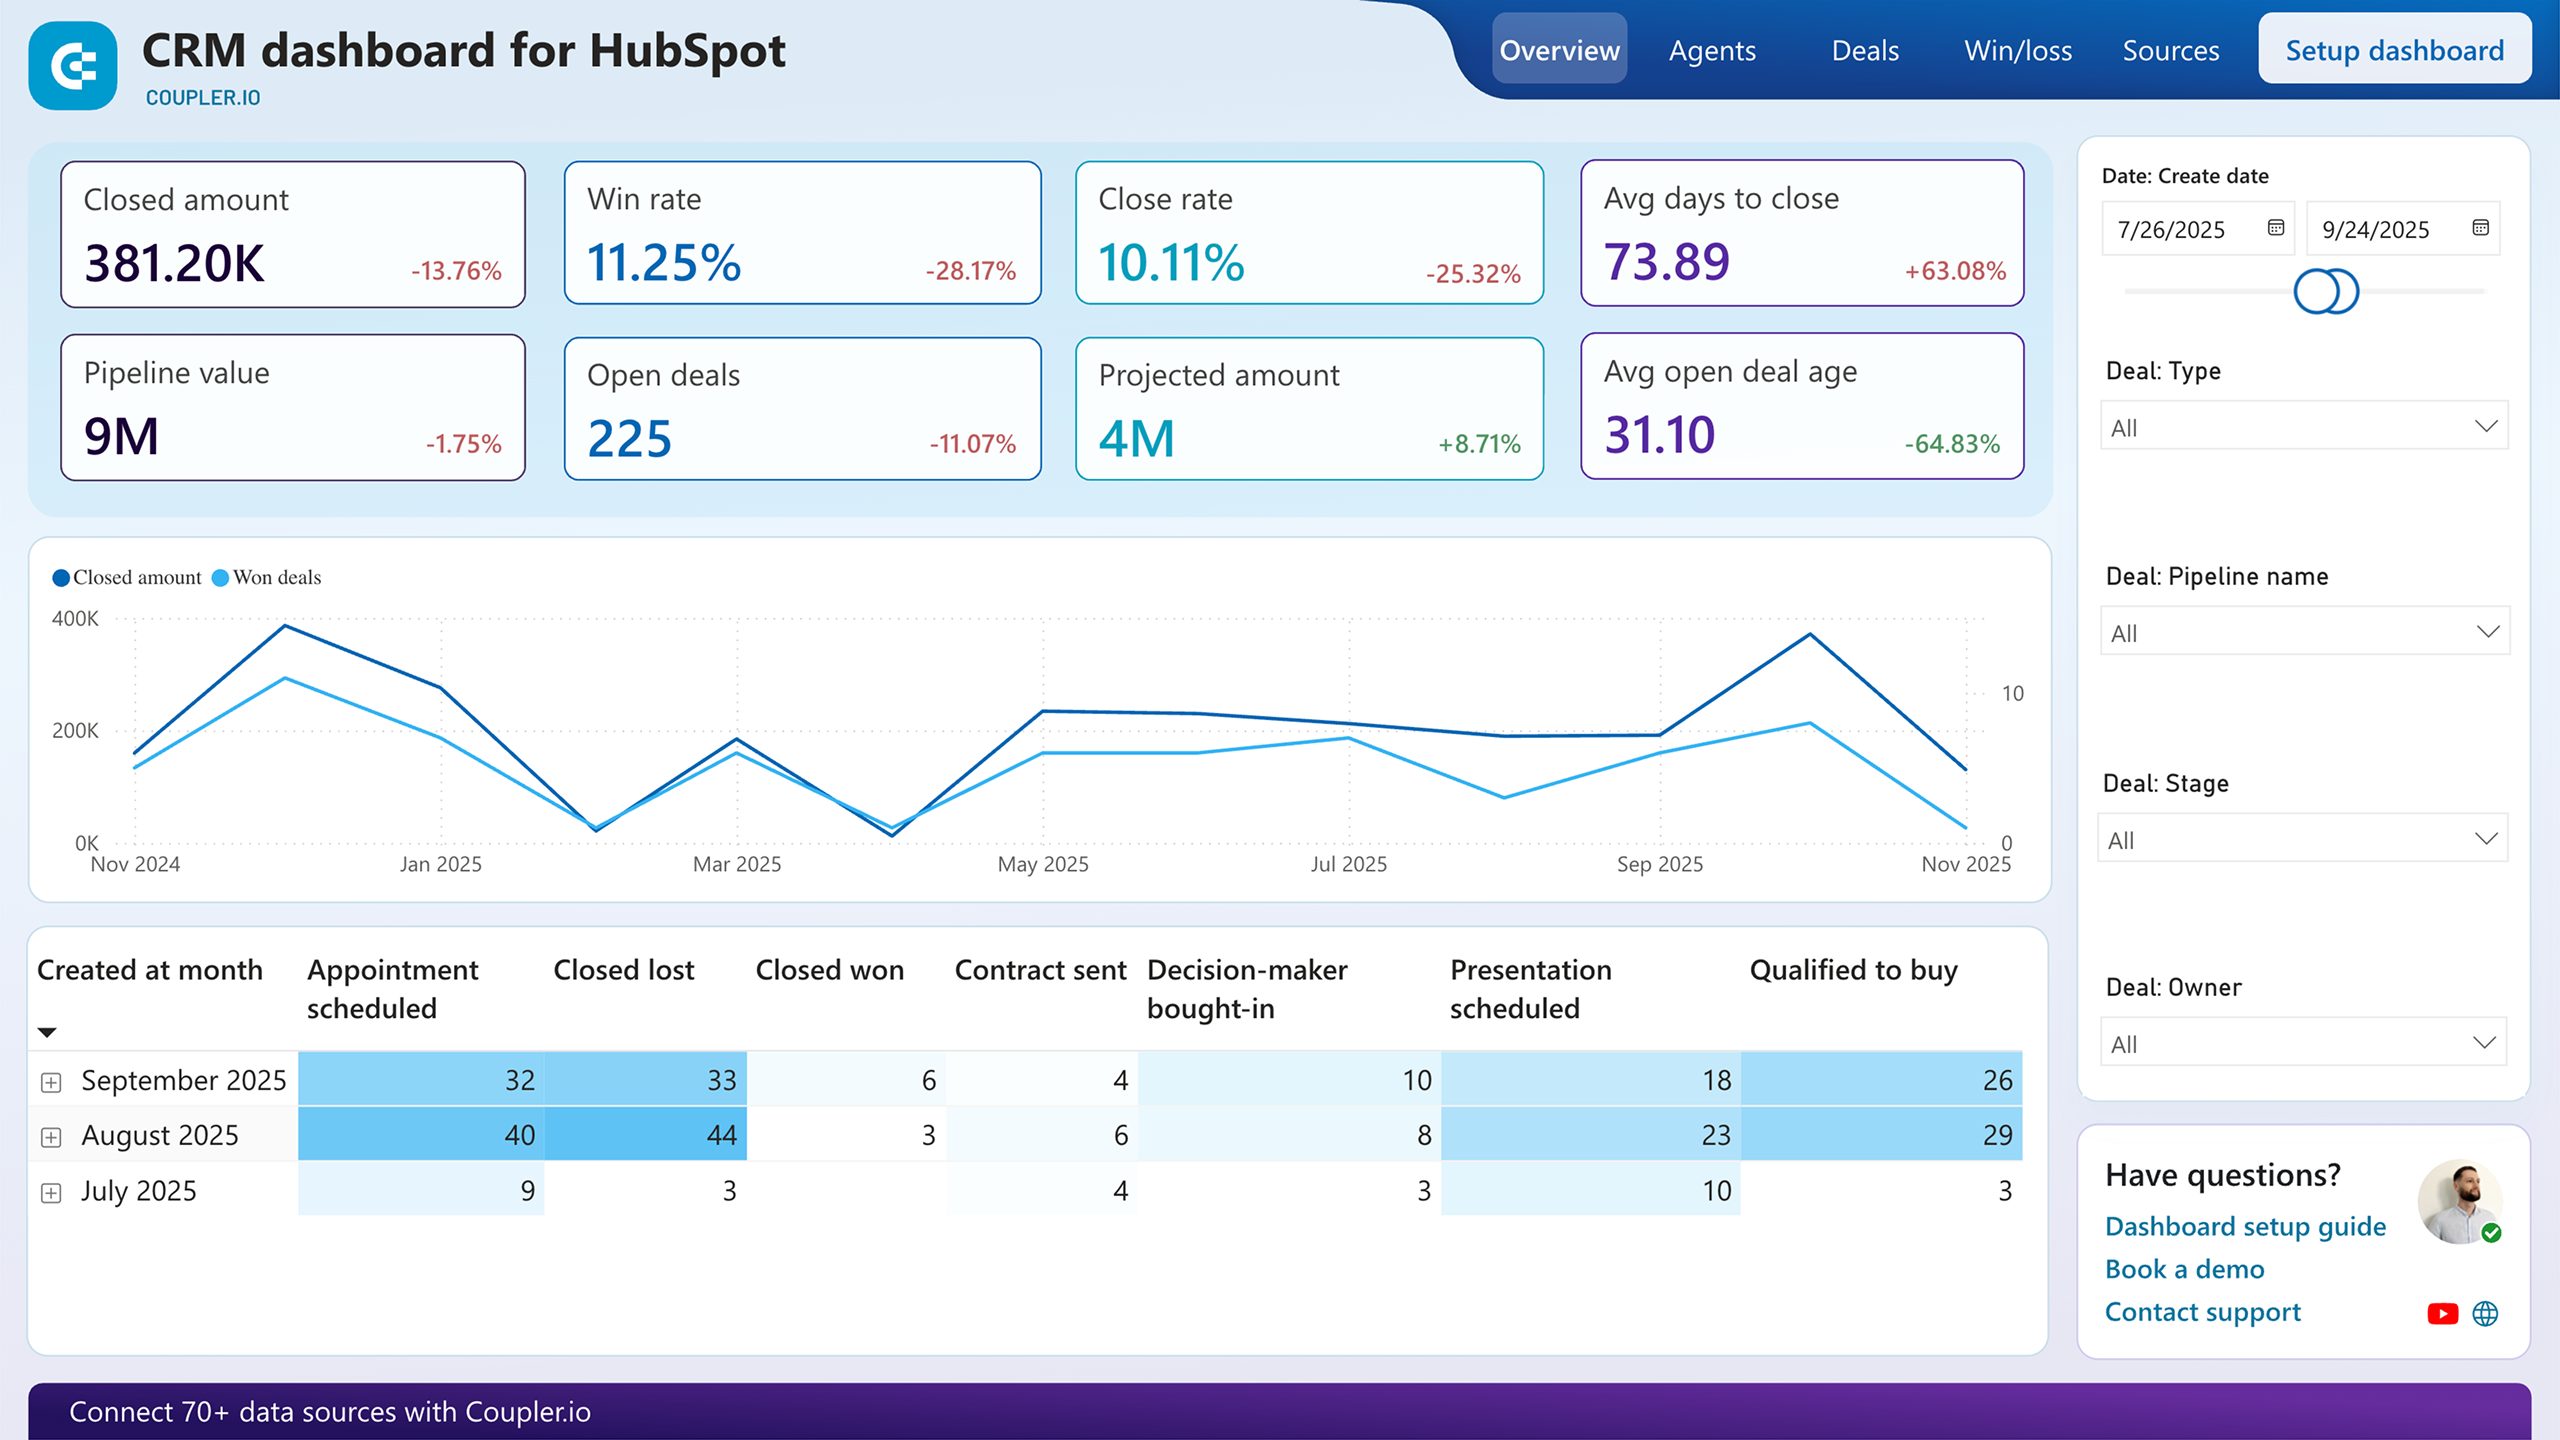
HubSpot sales KPI dashboard
If you manage a sales team and need a single view of pipeline health, close rates, and deal progression, this dashboard covers it. It pulls HubSpot deal data into reports across three pages: sales overview, pipeline health, and team performance.
You’ll see closed deal amounts and lost deals over time, which helps identify where revenue trends shift. The pipeline breakdown tracks how deals move through stages like appointment scheduled, qualified to buy, and contract sent, and where they tend to stall. A team comparison page shows closed amounts, median sales cycle length, and open deal age per rep, so you can spot performance gaps without pulling separate reports.
HubSpot CRM dashboard template
When you need a detailed view of deal performance, pipeline progression, and agent activities across your CRM, this dashboard brings it together. It tracks total sales, win rate, close rate, average days to close, pipeline value, and projected sales in one report.
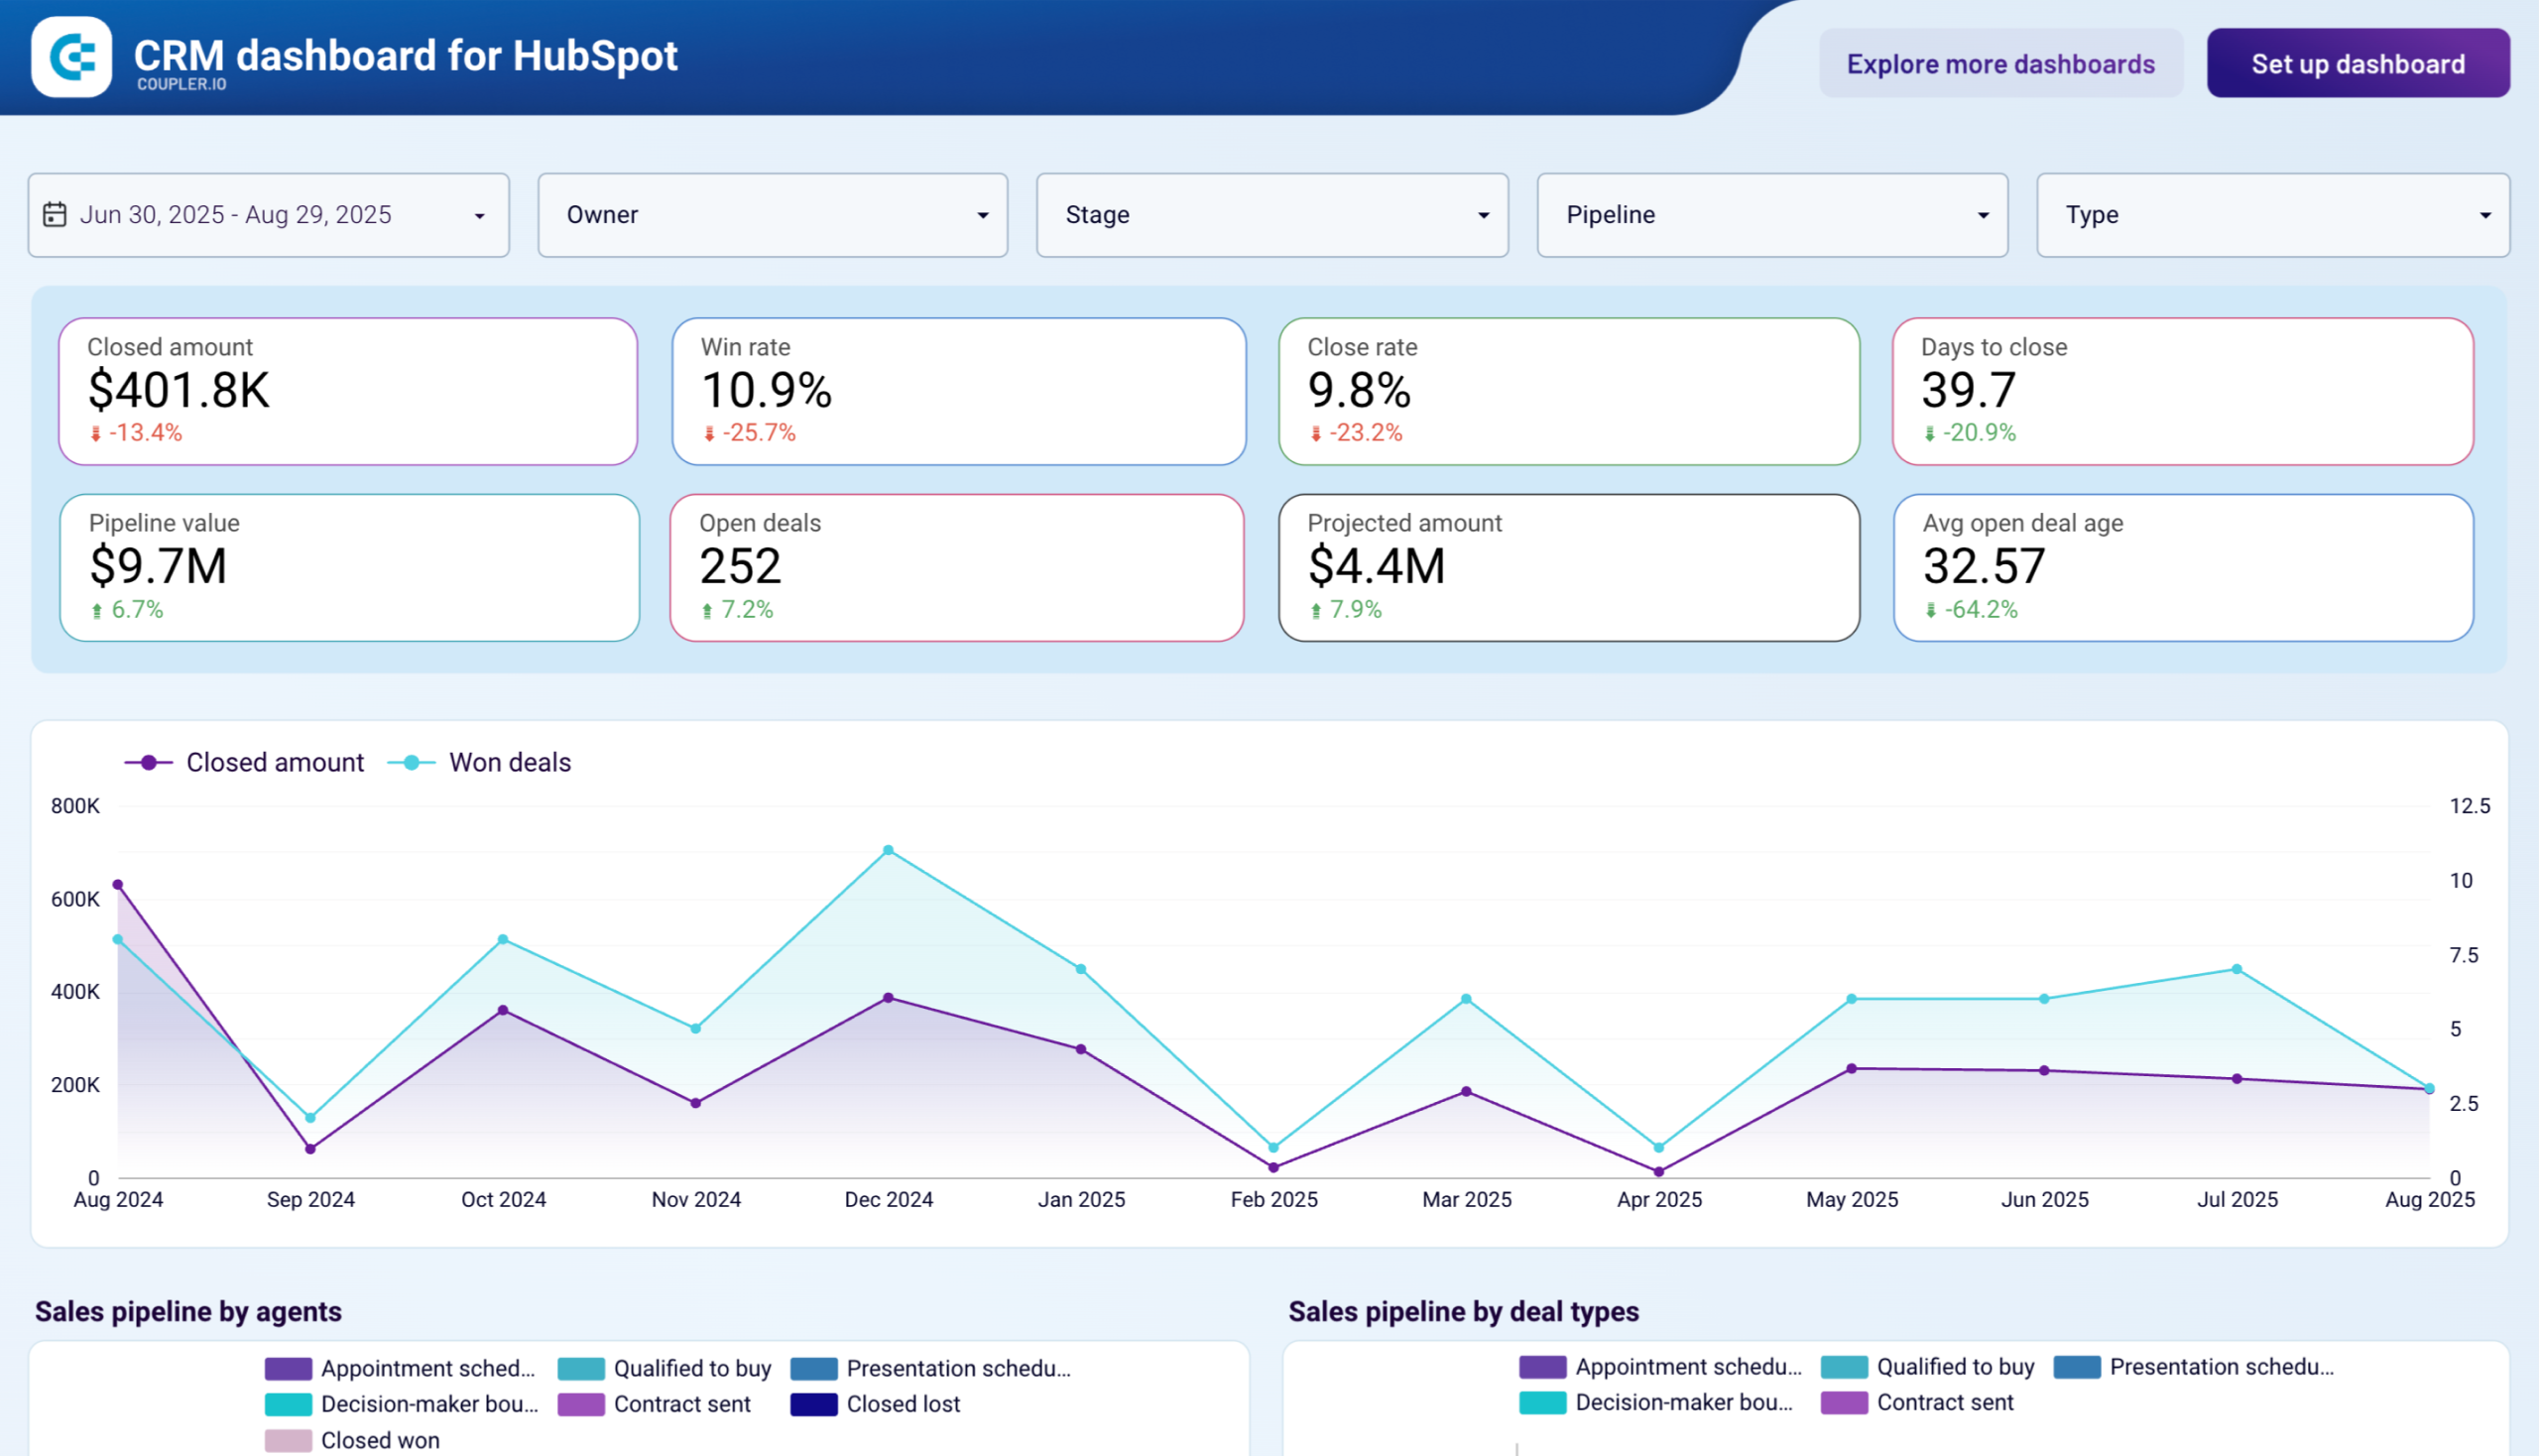
The deal breakdown shows amounts by source, so you can identify which lead channels produce the most revenue. Agent performance cards compare closed amounts, win rates, and average time to close per rep. An open deals table lists each opportunity with its owner, current stage, and probability, which is useful for pipeline reviews and forecast calls.
The HubSpot reporting dashboard is available as a template in Looker Studio and Power BI, powered by Coupler.io’s HubSpot connector. Follow the instructions to set up the dashboard with your data.


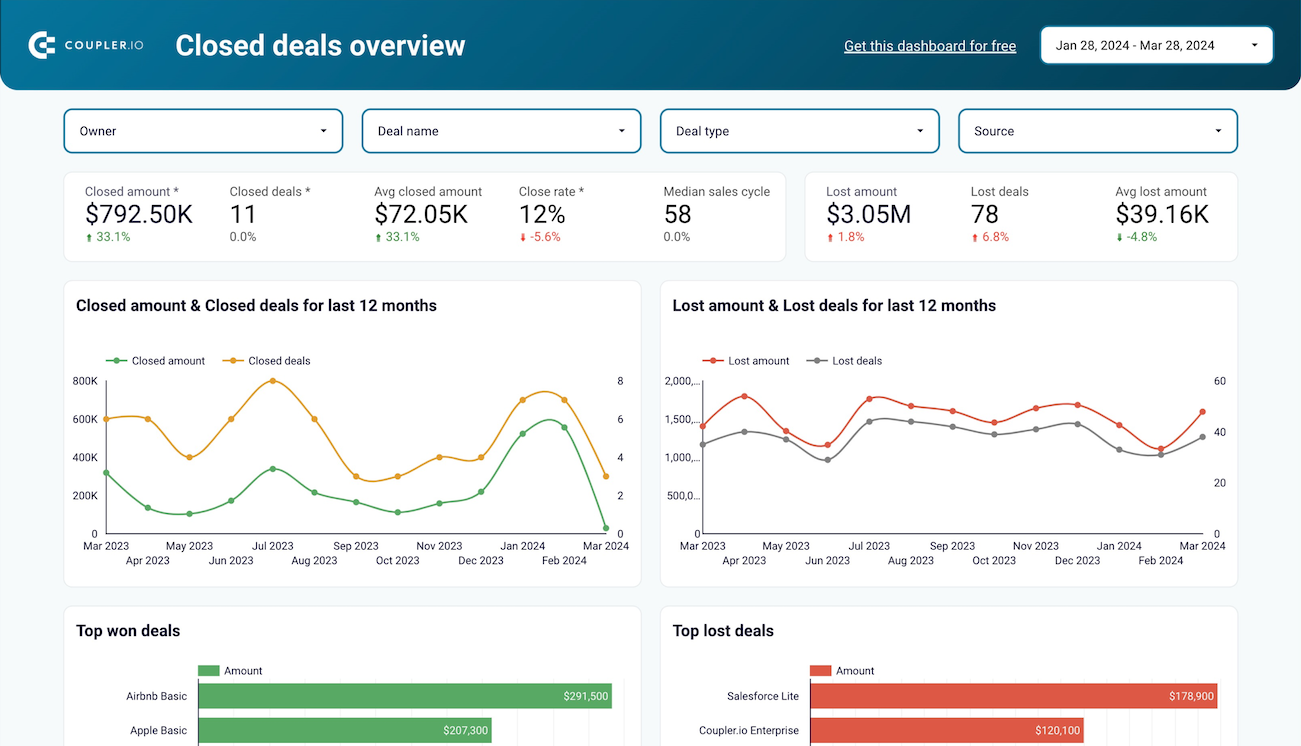
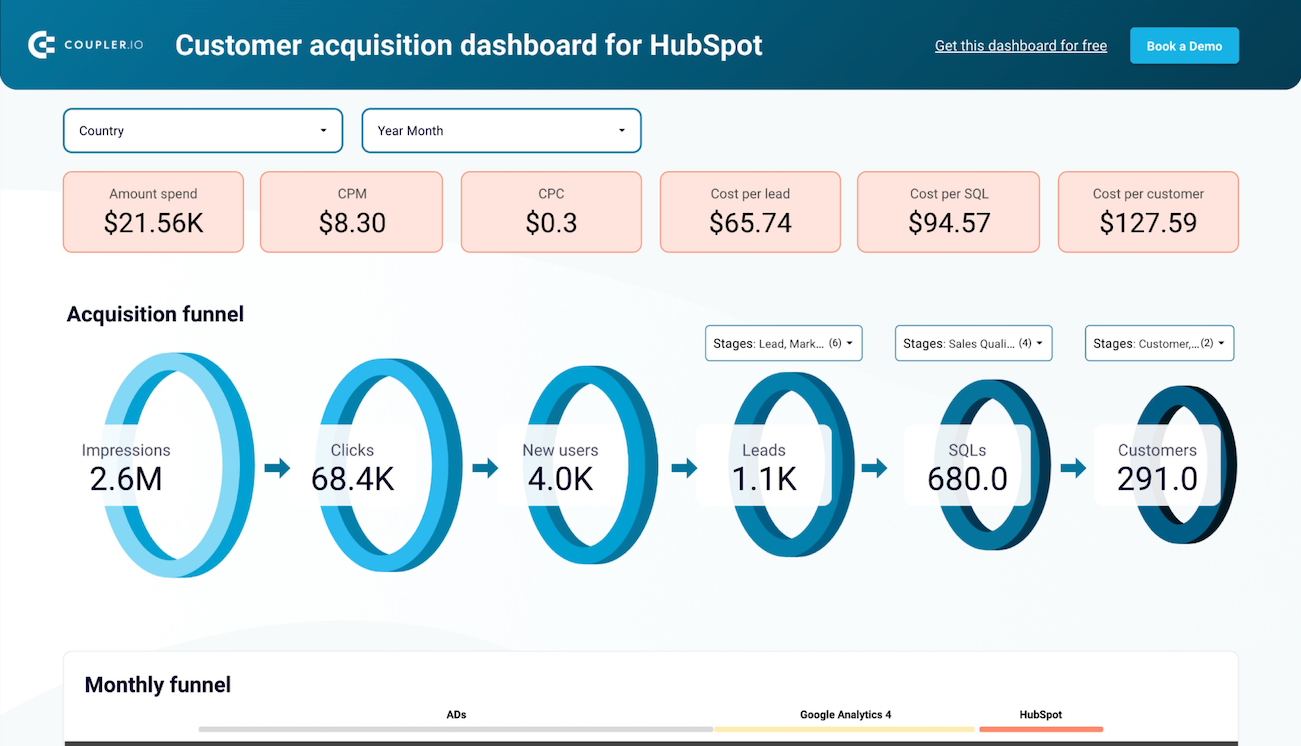
HubSpot customer acquisition dashboard template
For teams tracking the full path from ad spend to closed customer, this dashboard combines HubSpot CRM data with ad platform metrics. It covers ad spend, CPM, CPC, cost per lead, cost per SQL, and cost per customer across your channels.
Customer acquisition dashboard for HubSpot
 Preview dashboard
Customer acquisition dashboard for HubSpot
Preview dashboardThe funnel visualization shows where leads drop off between stages, from impression to click to lead to SQL to customer. You can compare campaign performance across regions, track how contacts move through qualification stages, and identify which platforms deliver the best cost-per-customer ratio. Spend trend charts surface changes in CPM, CTR, and CPL over time.
This template requires connecting your HubSpot account, ad platforms, and GA4 using the built-in Coupler.io connector. Data loads and refreshes automatically. Follow the instructions in the Readme tab.
How to export data from HubSpot in a manual way
The logic of the manual HubSpot data export can be the following:
- Choose the data entity, for example, Deals.
- Find the magic Export button and click on it.
- Prepare the export file by selecting format, properties to include, language for the column headers, and other available options. Click Export and wait until HubSpot prepares the exporting file. You’ll receive an email and notification when it’s ready.
- Download the file from the provided link.
This looks easy, but in practice, you may face hardships during the workflow. For example, you can’t export HubSpot tasks this way. Instead, you need to create a report of tasks and export it. Other properties also have differences in terms of HubSpot data export. We’re going to cover the most common cases later in the text.
What data can you export from HubSpot manually?
Here is a list of data entities and their formats that you can export from HubSpot:
| Data | Entity type |
|---|---|
| Website content | |
| Analytics | |
| CRM content | |
| Sales data | |
| Marketing content | |
| Customer feedback | |
| Account data |
What formats are available for you to export HubSpot data?
Most of the data, including CRM content, analytics, sales data, and others, can be exported in CSV or Excel (XLS or XLSX). However, certain data entities are exportable in other formats:
- Quotes in PDF only
- Workflows in CSV or PNG
- Website pages in HTML
- Blog posts in HTML or CSV
- Sitemap in XML
You can also export files from your file manager as an archive (.zip file). If you plan to bring your HubSpot data export into a spreadsheet or data warehouse for further processing, an automated option is worth considering. It lets you pull data to Google Sheets, Microsoft Excel on OneDrive, or even Google BigQuery. However, not all data entities can be exported this way.
Export HubSpot data: contacts, products, and other data entities
Each HubSpot data entity has a different export path. Some are available through Coupler.io for automated, recurring exports. Others require a manual download from HubSpot’s interface. Here’s how to handle each one.
Can you export all data from HubSpot at once?
There is no single button to export all HubSpot data at once, either manually or through Coupler.io. Each data entity (deals, contacts, companies, tickets, etc.) needs to be exported separately.
With Coupler.io, you can set up a data flow for each entity you need and schedule them to refresh automatically. Pre-built dataset templates like “HubSpot Deals with Contacts and Companies” or “HubSpot Tasks with Deals” combine related entities into a single export, which reduces the number of separate flows you need to manage.
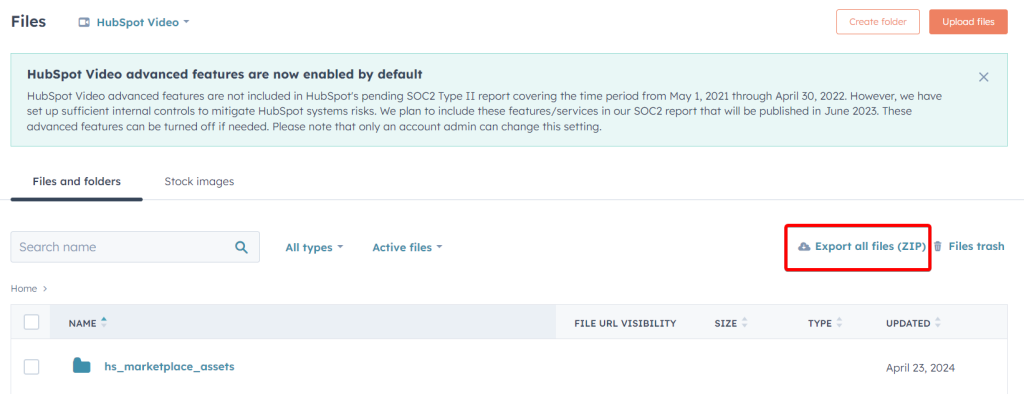
With HubSpot’s native export, you can download your files as a ZIP archive. To do this, go to Library => Files.
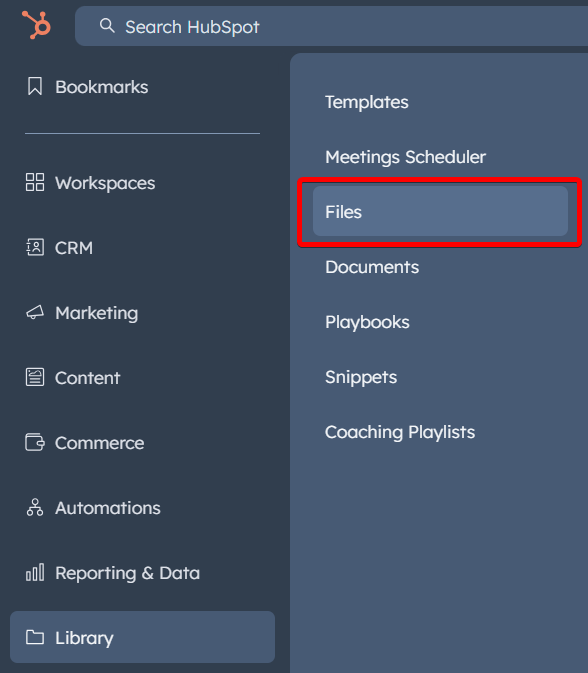
Now click Export all files (ZIP) – you’ll need to select an email address to receive a link to download them. Click Export to confirm your action.
How to export contacts and companies from HubSpot
Coupler.io supports both Contacts and Companies as data entities. You can export them individually or use dataset templates that join them with related data: “HubSpot Deals with Contacts and Companies” gives you deals alongside their linked contacts and companies, while “HubSpot Deals with Contacts” focuses on the deal-to-contact relationship. With filters, you can narrow by lifecycle stage, lead status, or any contact property before the data leaves HubSpot.
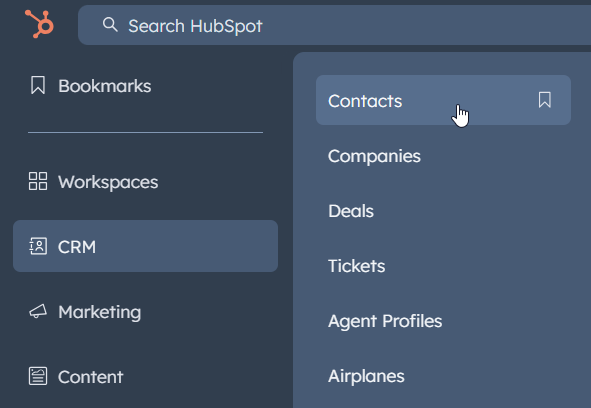
If you need a one-time manual export instead, HubSpot lets you download contacts and companies as CSV or Excel. Go to CRM => Contacts
Click the Export button in the table’s top right corner and configure the export settings.
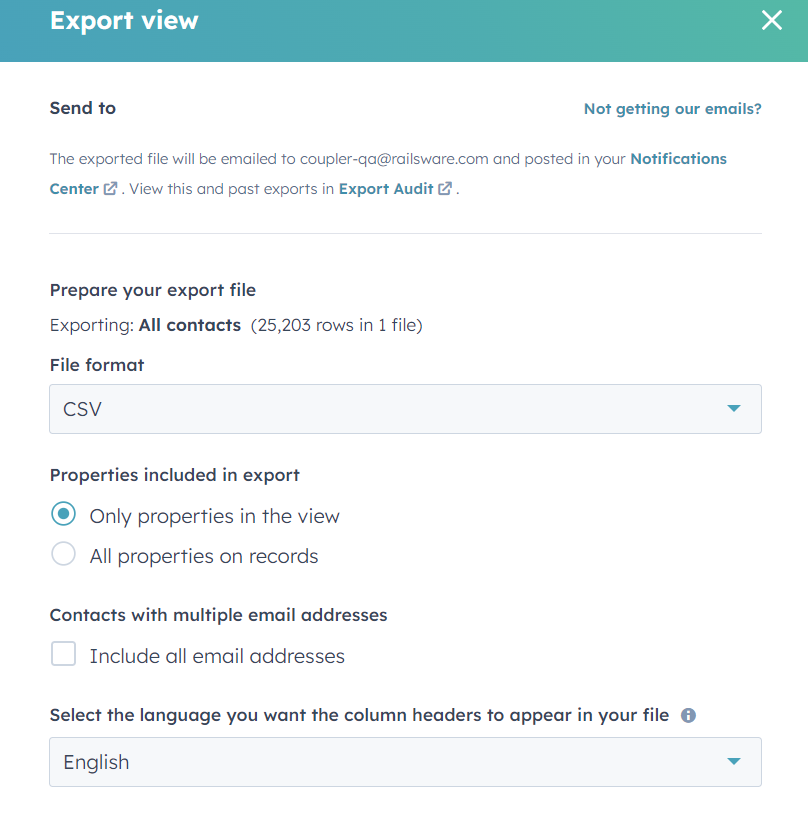
Click Export and wait for a link to download the export file. In a similar fashion, you can export data from HubSpot about companies.
If you want to export a list of contacts and their property values, the workflow is a bit different.
Export list of contacts data from HubSpot
If you regularly need filtered contact lists, Coupler.io handles this without manual re-exports. Set your filters once (by property values, date ranges, or custom criteria), and the data flow refreshes the list on schedule.
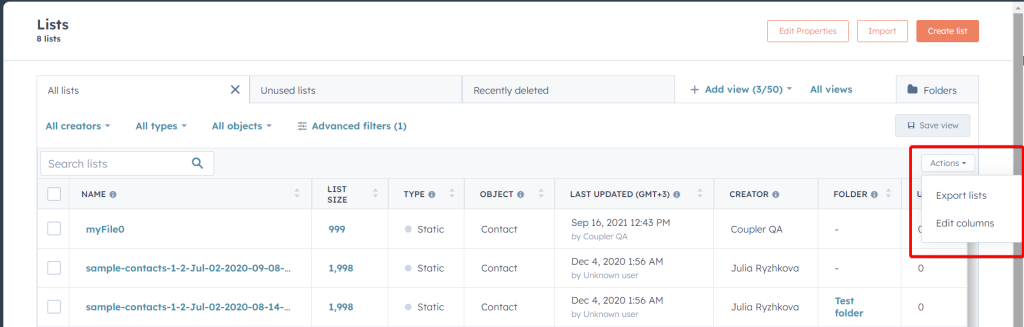
For a one-time export, you can use HubSpot’s native list export:
Go to CRM => Lists. Select the list of contacts you want to export, and click Actions => Export lists.
On the next page, select properties (columns) that will be exported and click Next.
Then select the export file format and click Export.
Once your HubSpot export data file is available, you can download it to your device.
How to export a HubSpot list using filters
Coupler.io’s advanced filters cover the same logic: filter by owner, status, date range, or any HubSpot property. The difference is that filters persist across refreshes, so you don’t repeat the setup each time.
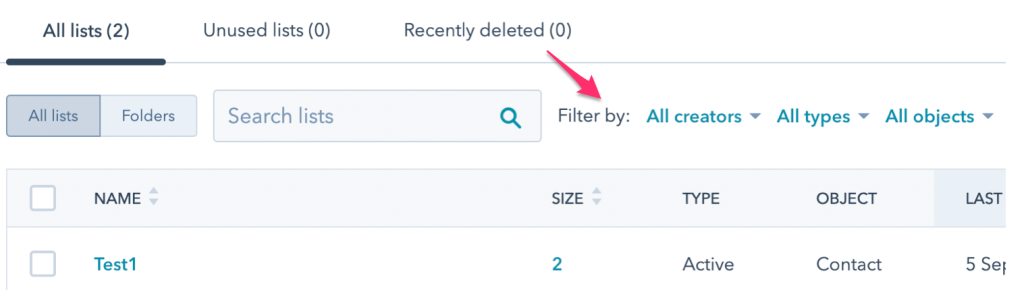
For manual filtering and one-time exports, HubSpot provides three filter categories:
- Creators: This filter is used when a lot of contacts have been created by different users. If you wish to see all lists, select All creators from the dropdown menu.
- Types: There are two types of lists: Static and Active lists. Use this when you want to filter based on the type of contact list you have. Active and static lists are created based on set criteria and they are different for both lists.
- Objects: One can use this when you want to filter based on which company or contact list your contact was created under. If you select All objects, you can see the company and contacts list.
Now, let’s have a look at how these filters are used to export a list from HubSpot:
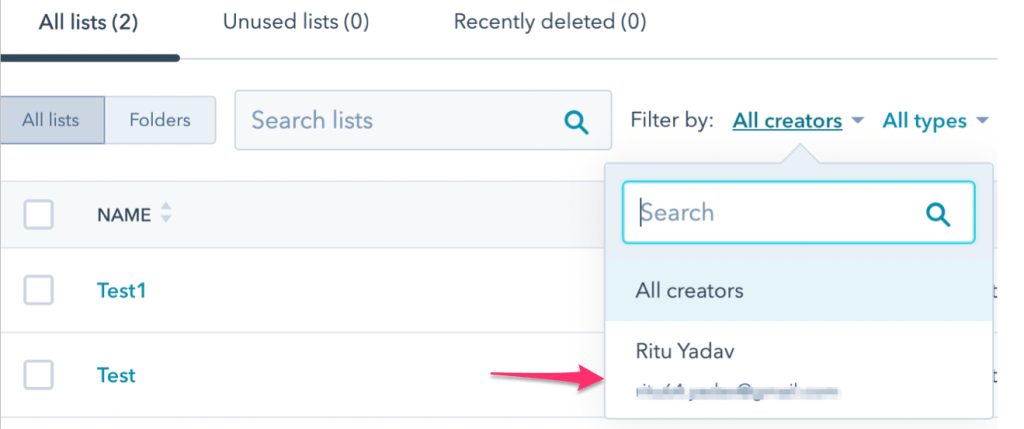
- Once you’re on the Lists Home page, you’ll see three filter categories just above the lists.
- Let’s assume you are looking for a list created by a particular user of your team. Click on All Creators and then search for the user. You will now see lists created by only that user.
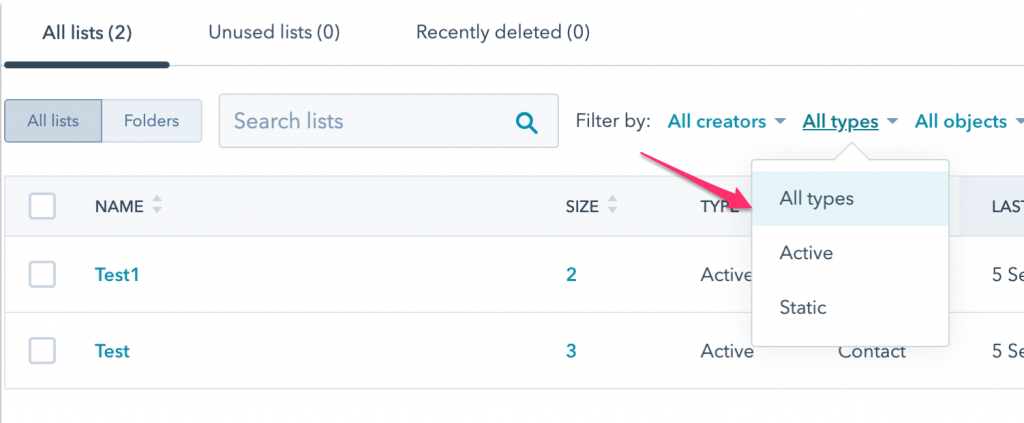
- Next, you need to select the type of list that you are looking for. It could be either Static or Active. Select the one you want out of these.
- Lastly, you need to select the objects. When you click on All objects, you will see two options in the dropdown menu – Company List or Contact. Select one.

After applying all three filters, what we have is an Active or Static list of either Company or Contacts created by a particular user of your team.
To further filter out your lists while exporting, you can make use of selecting/deselecting properties once you click on the Export button.
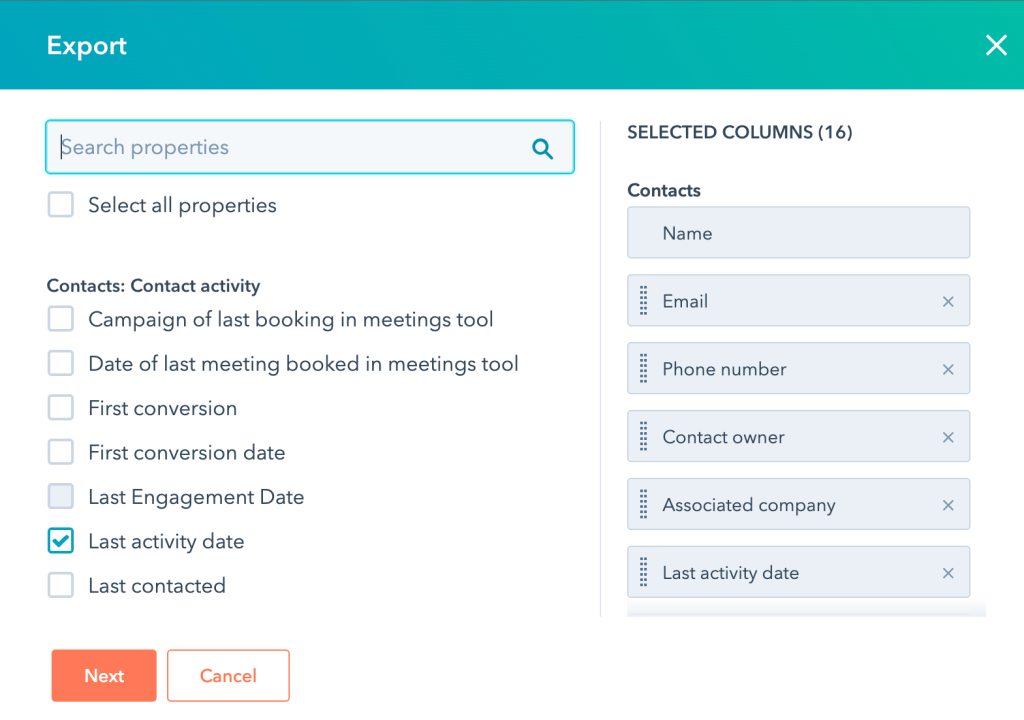
From here, you can select Last activity date as a property if you want to see the last activity dates of your Contacts or Company list. Similarly, other properties can be selected/deselected to get the required list. The rest of the Export List HubSpot flow, you already know.
How to export a list from HubSpot based on date?
Here’s another use case of using filters. Let’s say you have a list in HubSpot that you want to export based on a particular date (e.g., Date Added to List). It could be used for analyzing leads as to when they were created and what the progress is until now. Exporting such a list might seem like a daunting task, but it’s simple if we use the right filters.
While exporting any list, you’ll see there’s an advanced property called Added to list date.
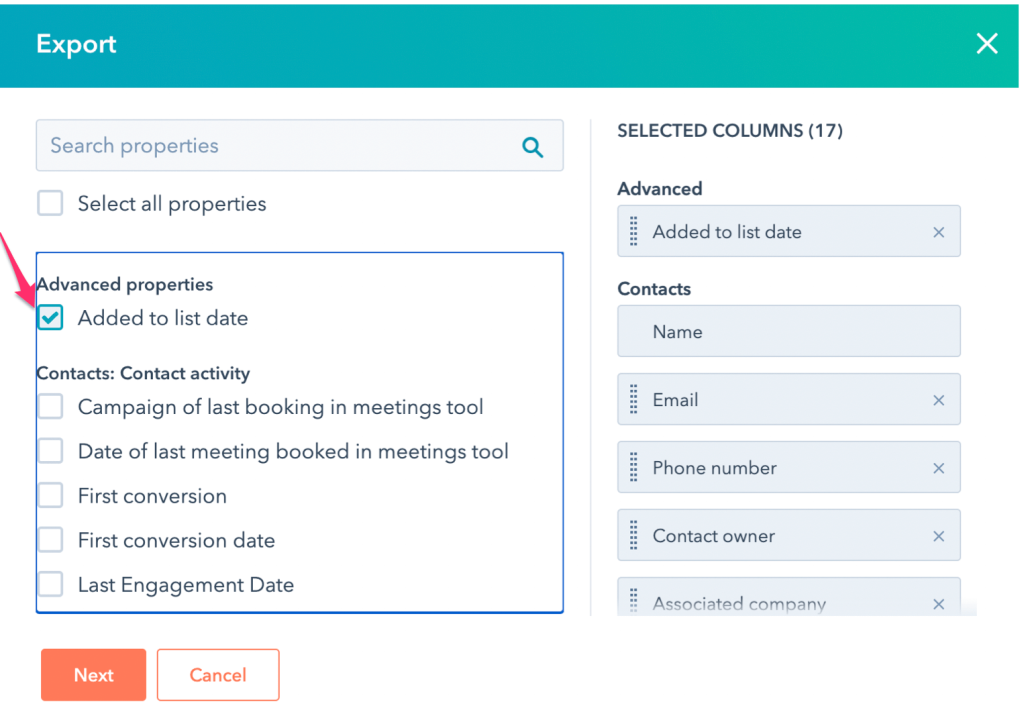
If you choose the option Added to list date, in the exported CSV file – you will find a column titled Added To List On with dates.
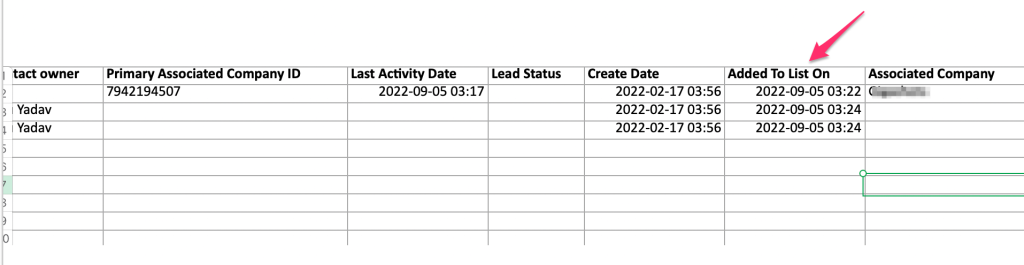
Now, you have a list with a column Added To List On – which can be used for more in-depth analysis.
How to export deals from HubSpot
Coupler.io supports Deals as a core data entity with several dataset templates that combine deals with related records:
- HubSpot Deals with Companies and Line Items tracks deal progress alongside associated companies and product line items
- HubSpot Deals with Quotes connects quote-level records with deal pipeline data
- HubSpot Deals with Line Items shows product-level contributions per deal
- HubSpot deals performance by channel analyzes deal progression across traffic sources over a 12-month range.
You can filter by deal stage, owner, amount, or date range before the data loads to your destination.
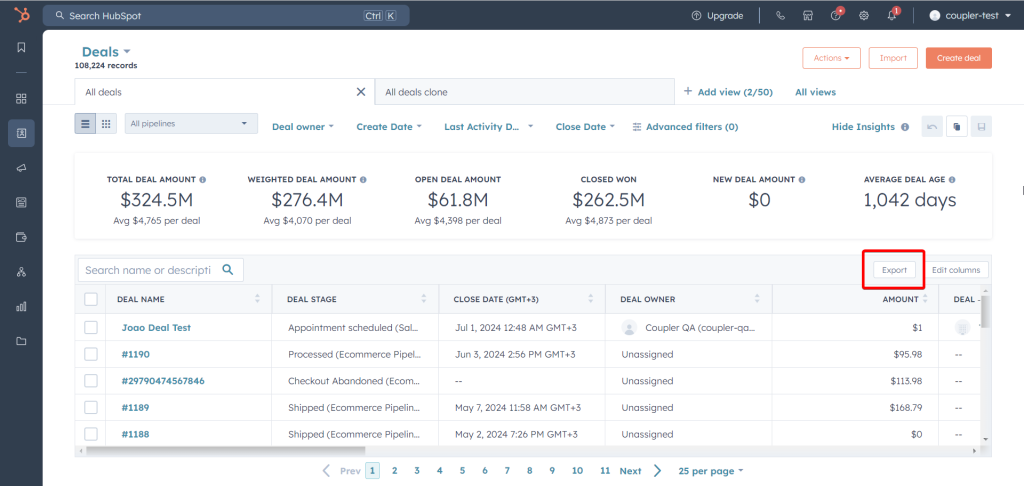
To export HubSpot deals manually, go to CRM => Deals, then click Export.
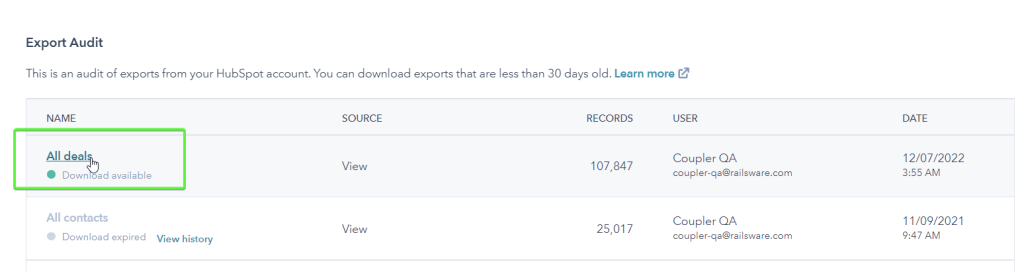
Then configure the export file and wait till HubSpot generates it. After that, you can download the export file using the provided link.
HubSpot products data export
Coupler.io supports Products as a data entity. You can also export line items tied to deals using the “HubSpot Deals with Line Items” dataset template, which connects product-level pricing and quantities to the deals they belong to.
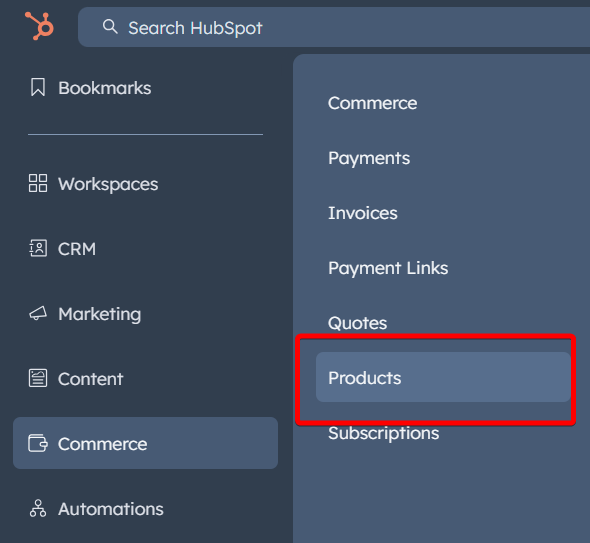
For a manual exports of product data, go to Commerce => Products
Then select the products you want to export data about and click the Export button in the table’s top right corner.
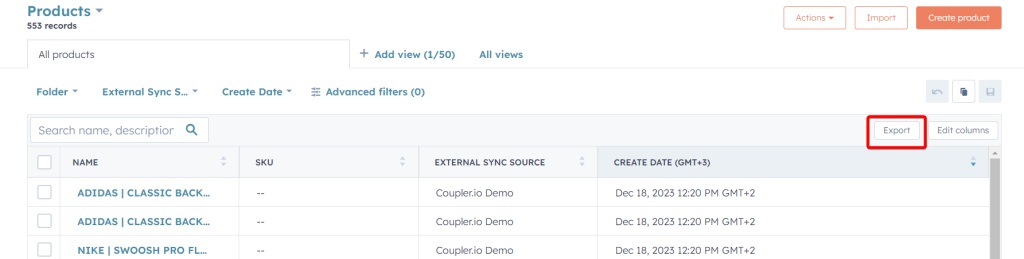
Configure the export file and wait till HubSpot generates it. After that, you can download the export file using the provided link.
Export custom reports from HubSpot
For recurring reporting needs, Coupler.io’s dashboard templates and dataset templates often replace the need to export custom reports from HubSpot. The performance report entities (by channel, country, page, and campaign) cover the most common HubSpot analytics use cases, and the data refreshes automatically.
If you need to export a specific custom report from HubSpot’s reporting tool:
- Go to Reporting & Data => Reports
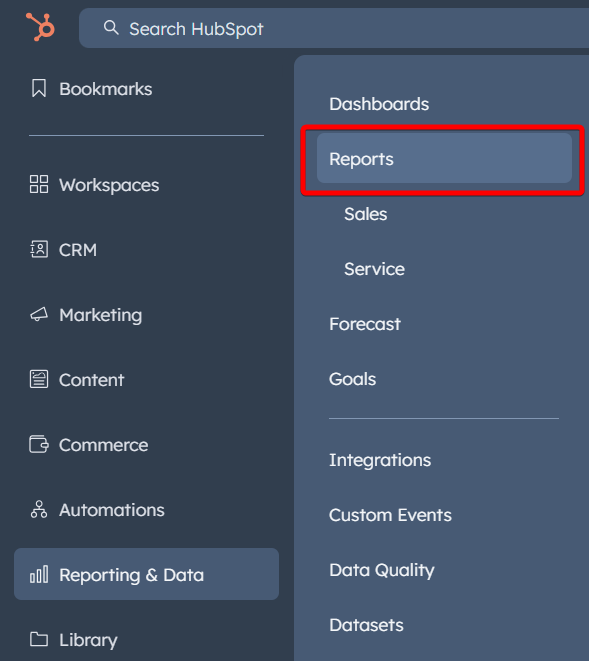
- Select the desired report you want to export, click Actions => Export
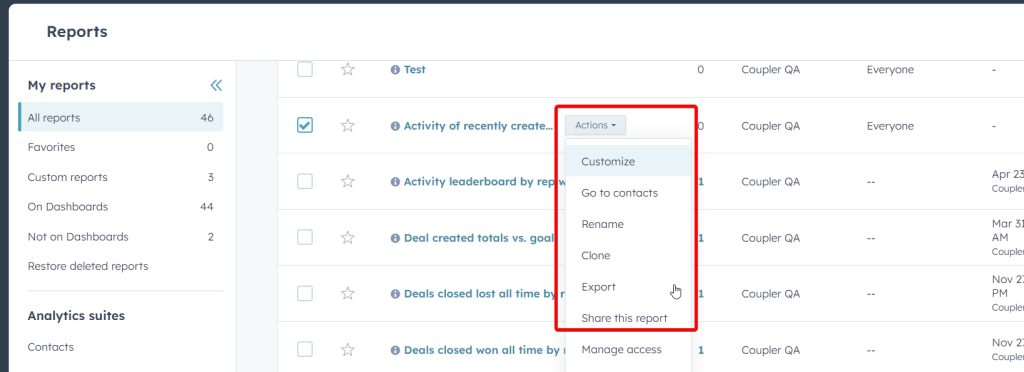
- Add a name to your report and select the export format. Click Export and download the export file when the link is available.
Export HubSpot workflows and their images
Coupler.io supports Workflows as a data entity, so you can export workflow records (names, statuses, types) on a schedule. However, workflow images (the visual flow diagrams) are only available through HubSpot’s native export.
If you go to Automations => Workflows, you’ll be able to export a list of your workflows. Click Actions => Export workflows.
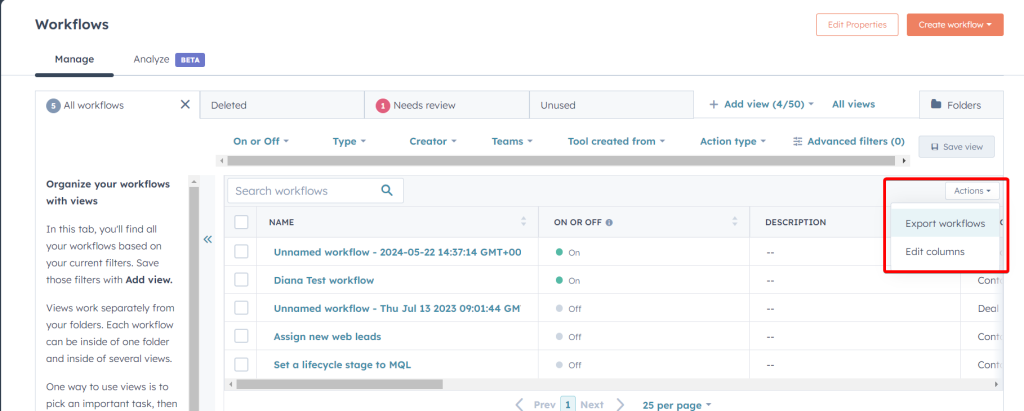
Configure the export file and wait till HubSpot generates it. After that, you can download the export file using the provided link.If you need an image of a particular workflow, you need to select a workflow and click Edit actions.
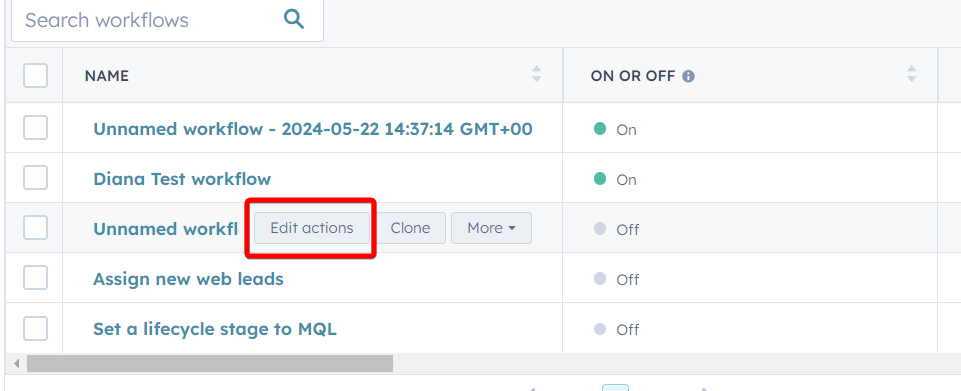
On the next page, click File => Export as .PNG
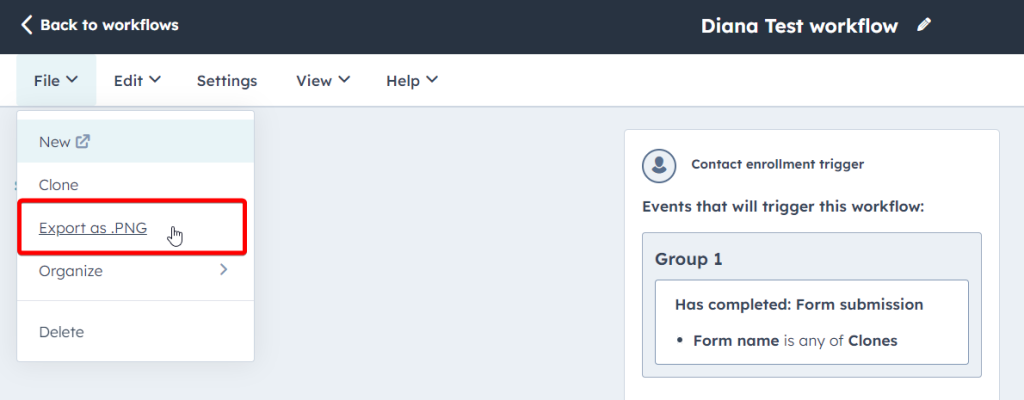
Confirm your action by clicking Export to download an image to your computer.
How to export property history from HubSpot
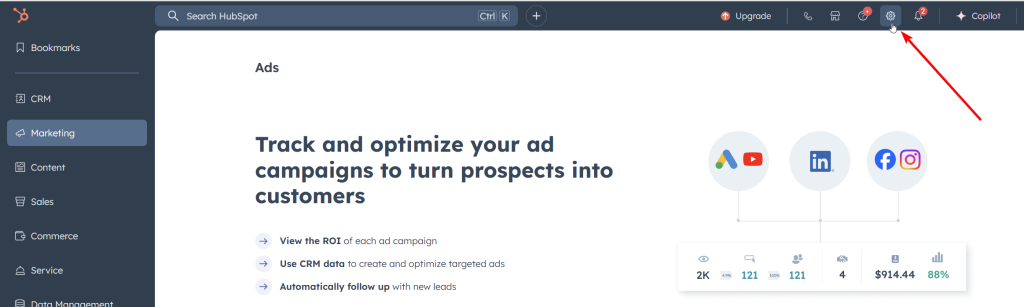
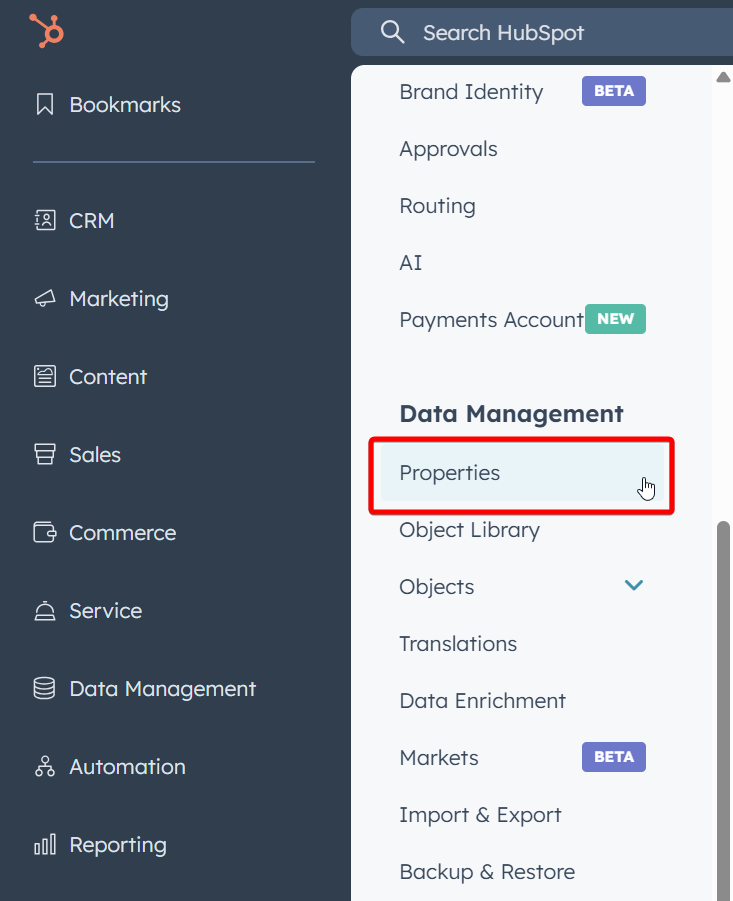
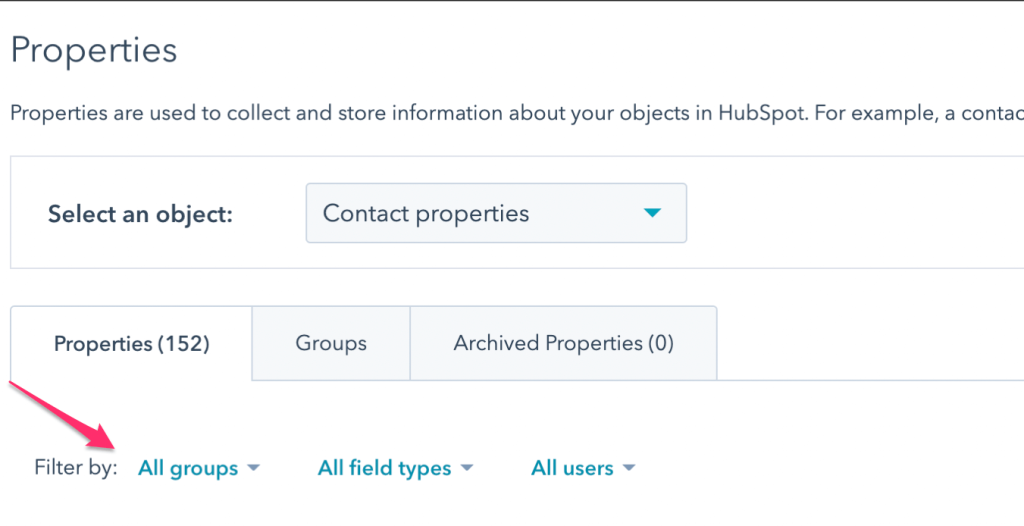
- Go to Settings on the top right corner of the main page.
- On the left-hand side menu, find and click on Properties listed under Data Management.
- On the Properties page, select an object from the dropdown at the top. So, if you wish to export, for example, Contact Properties – select it.
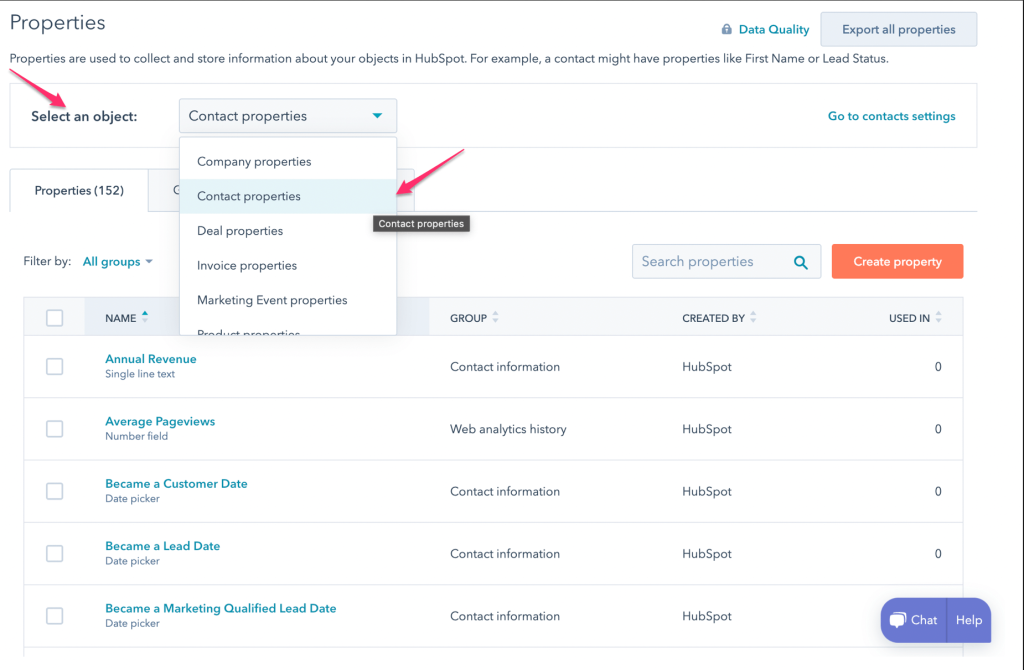
- Use filters to filter out categories by Groups, Field Types, and Users. These filters are provided to ensure you get the most accurate information as per your specific requirements. To fully understand and comprehend how these field types work, you can head over to HubSpot’s Knowledge Base on Property field types in HubSpot.
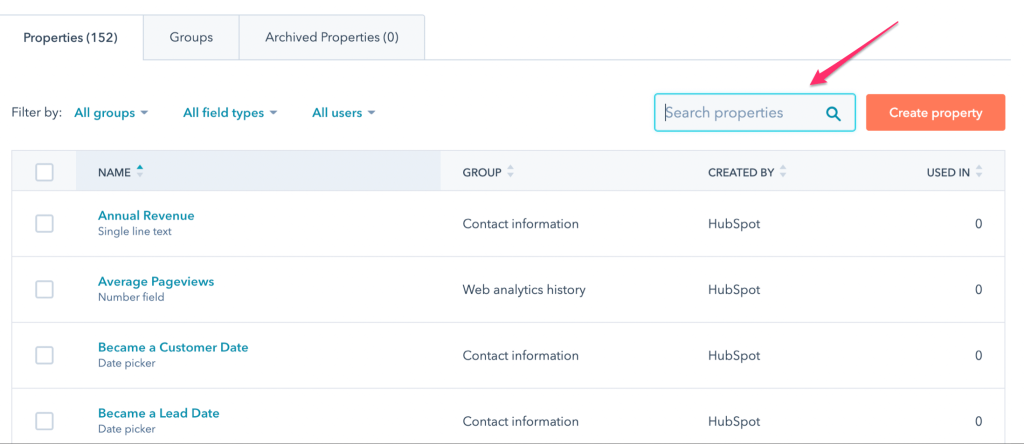
- Next to it, there’s an option for Search Properties from where you can look up specific properties. In this case, we are going to export the history of the property Create Date, so just simply type it in the Search Properties section.
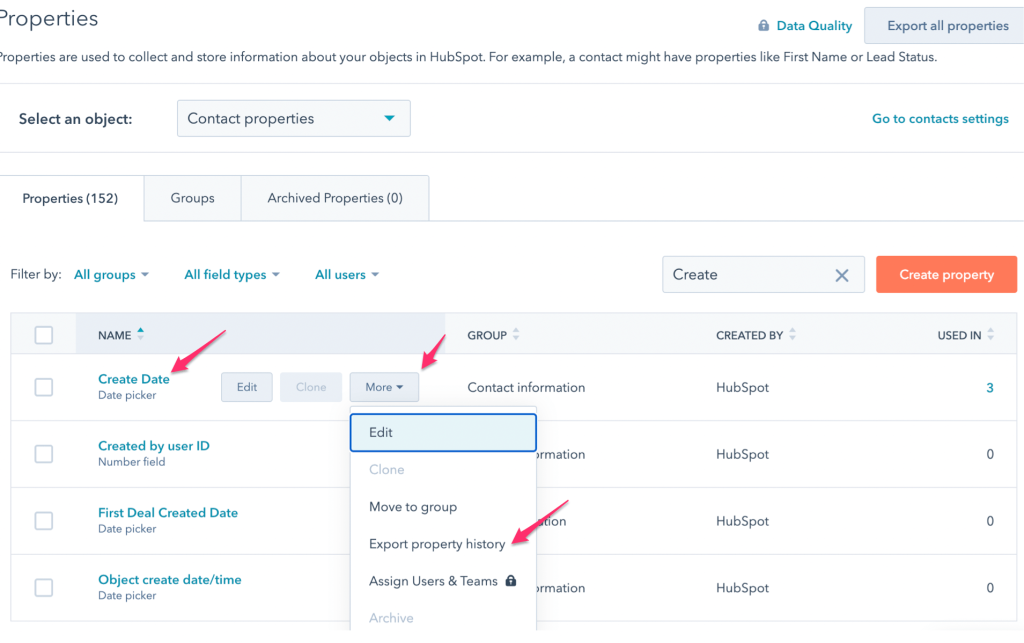
- When you hover over Create Date, you will find the More menu. Click on the Export Property History from the More dropdown menu.
- You can now choose the File Format among CSV, XLS, and XLSX options. Finally, click on Export.
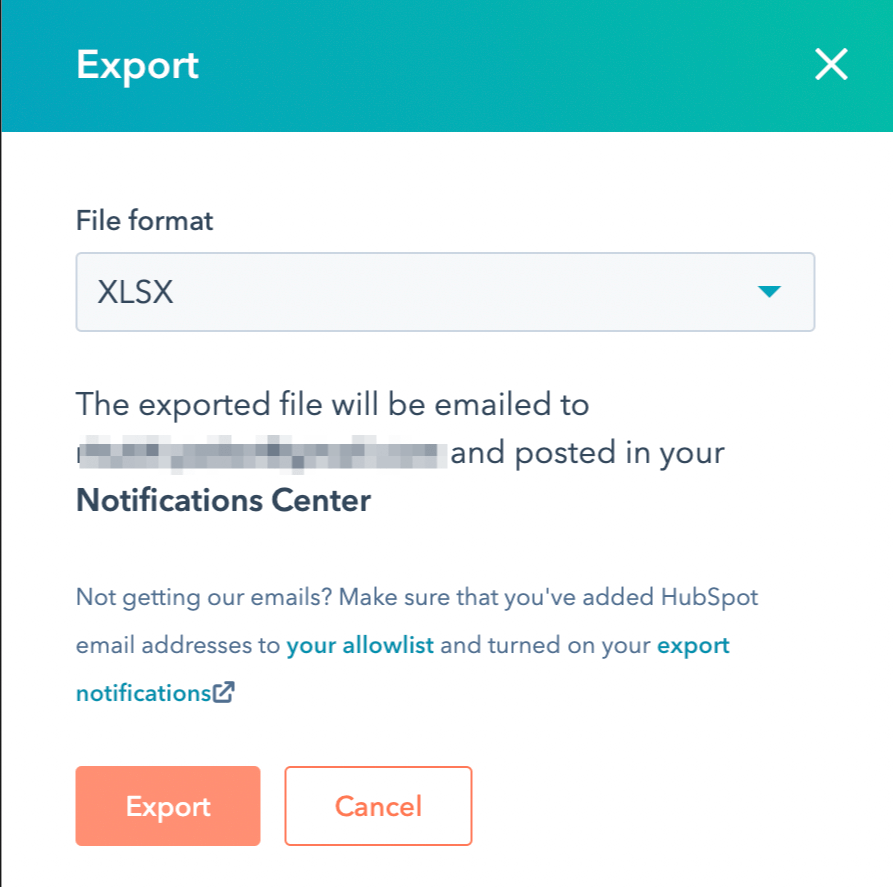
- The HubSpot export property history file will be sent to your email and will be posted in your notifications center in HubSpot. The received email will have a Download link at the bottom. All you have to do is click on it. In the notifications center, it says – Click here to download.
HubSpot export data: making sense of your options
Manual HubSpot exports work for one-off tasks: transferring contacts to another CRM, pulling a specific deal list, or grabbing a quick snapshot. CSV and Excel formats handle those jobs fine.
For recurring reporting and HubSpot data analytics, Coupler.io automates the pipeline: connect HubSpot, transform the data, load it to spreadsheets, dashboards, or data warehouses, and set it to refresh on a schedule. The same data flow can feed AI tools too, so you can ask questions about your deal pipeline, win rates, and customer acquisition in plain language through AI Agent or external tools like Claude and ChatGPT.
The export is step one. What you do with the data afterward, in a dashboard, a spreadsheet, or an AI conversation, is where the value compounds.
Automate HubSpot data export with Coupler.io
Get started for free