Manual data entry is one of the most time-consuming tasks in every business. Therefore, by automating it with Google Sheets you can significantly increase productivity and focus on more important things. For example, analyzing your data — instead of spending hours entering data manually.
This article provides a step-by-step guide on how to automate data entry in Google Sheets, from using Forms and HtmlService to reporting automation tools.
Types of automatic data entry in Google Sheets
Two common uses of automatic data entry in Google Sheets: to collect input from users and to import data from other sources.
1. Collecting input with forms
You will need a form-like interface that automatically records responses in Google Sheets.
The easiest way to do this? Well, absolutely, by using Google Forms. You can set up a customer feedback form or other survey forms to collect information from respondents. Configuring it to save data in a Google spreadsheet is also easy.
Another option to automate data entry in Google Sheets is to use HtmlService to create the form. This service returns HTML from a script. You can use it to build an HTML form that interacts with Google Sheets. HtmlService provides a templating mechanism for generating HTML dynamically by using scriptlets (mixed HTML and Apps Script code) executed on the server side. You can also add CSS and client-side JavaScript for custom styling and interactivity.
2. Importing data from other sources
Google Sheets offers several options for importing data from external sources automatically. Choose it based on your needs. You don’t need to copy-paste or manually enter the data.
Google Sheets functions
Several Google Sheets’ built-in functions can help you quickly import data from various sources. Popular ones include IMPORTHTML, IMPORTXML, IMPORTDATA, IMPORTFEED, and IMPORTRANGE. In addition, the GOOGLEFINANCE function allows you to import financial data automatically to Google Sheets.
You can just use these functions in a spreadsheet cell. However, it’s important to understand the syntax and source of the data you will import. Also, know their limitations to avoid any unexpected issues when working with your spreadsheets.
Google Apps Script
Google Apps Script allows you to write code and custom functions for importing data into your spreadsheet. This development platform has a script editor integrated with your browser. You don’t need to install anything.
With Apps Script, you can easily access other Google apps and services, such as Google Docs, Google Drive, Gmail, and more.
In addition, you can use triggers to refresh your data at chosen intervals automatically.
Google Sheets integrations
Data integration tools connect applications using API (short for application programming interface), which essentially allows these apps to communicate and share data. These Google Sheets integrations allow you to automate data entry in Google Sheets from different apps and platforms.
Many low-code/no-code tools let you harness data automation’s power without advanced programming skills. To name a few: Coupler.io, Zapier, and Skyvia. These platforms provide an easy way to connect your spreadsheet with other apps and services—such as Salesforce, Google Analytics, Facebook Ads, and many more.
Add-ons for Google Sheets
A range of add-ons are available, specifically designed for automating data imports in Google Sheets. You’ll need to install them via the Google Workspace Marketplace.
Want a few examples? Coupler.io lets you connect various apps— such as CRM apps, ecommerce, marketing, finance, and more— to Google Sheets. You can also apply basic ETL processes with this tool. SurveyMonkey allows you to bring your SurveyMonkey data straight into a Google Sheet with just a few clicks.
Let’s focus on these three methods:
- Data integration tools
- Google Forms
- HtmlService forms
We’ll dive into each method in more detail, providing a step-by-step guide.
After going through one or several of the techniques covered here, we hope you feel more ready for your data entry automation journey with Google Sheets.
How to automate data import in Google Sheets with data integration tools
Data integration tools can help you pull data into Google Sheets automatically. Coupler.io is one of them. It’s a reporting automation platform that allows you to import data from over 60 apps. And the list is constantly growing! Moreover, with Coupler.io’s Google Sheets connector, you can not only import data but also preview and transform it before loading it into the spreadsheet.
The platform is also simple to use. Here are the simple steps to automate data import in Google Sheets.
Step 1. Collect data from the source spreadsheet
Select the needed app source in the form below and click Proceed. You’ll be offered to get started with Coupler.io for free with no credit card required.
You will need to configure the connection to the selected data source. For example, if you import data from Airtable, you’ll need to provide a link to a shared Airtable view. If you connect Linked Ads to Google Sheets, you’ll need to log in to your LinkedIn account, select the needed data entity, and specify the metrics to include. And so on. Follow the in-app instructions to complete the connection.
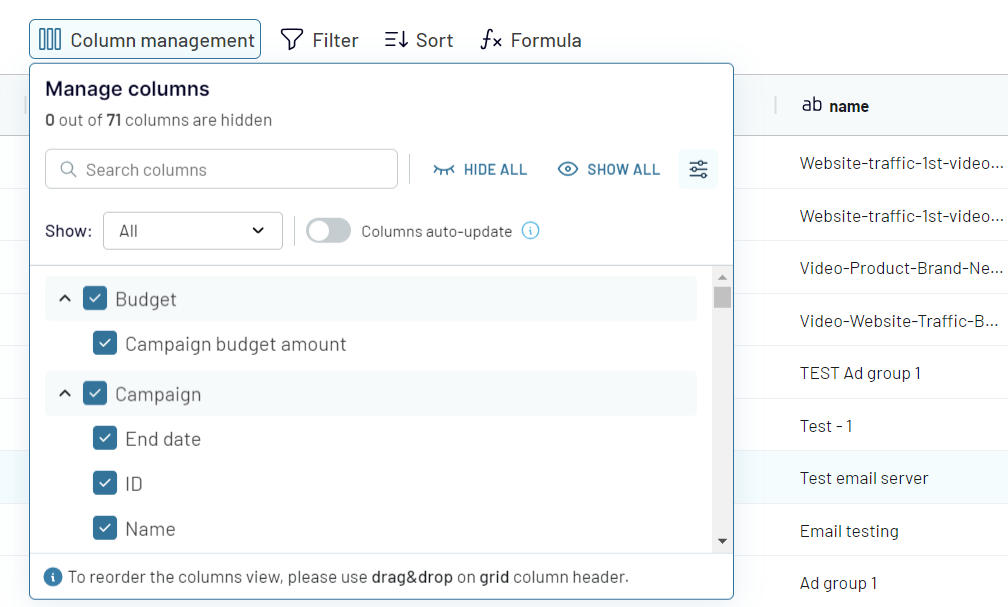
Step 2. Preview and transform data
At this step, you can preview the imported data and organize it using the following transformation options:
- Column management (hide, edit, rearrange, and add new columns)
- Filtering and sorting (add criteria to filter the data)
- Data blending (join data if you’ve connected multiple sources)
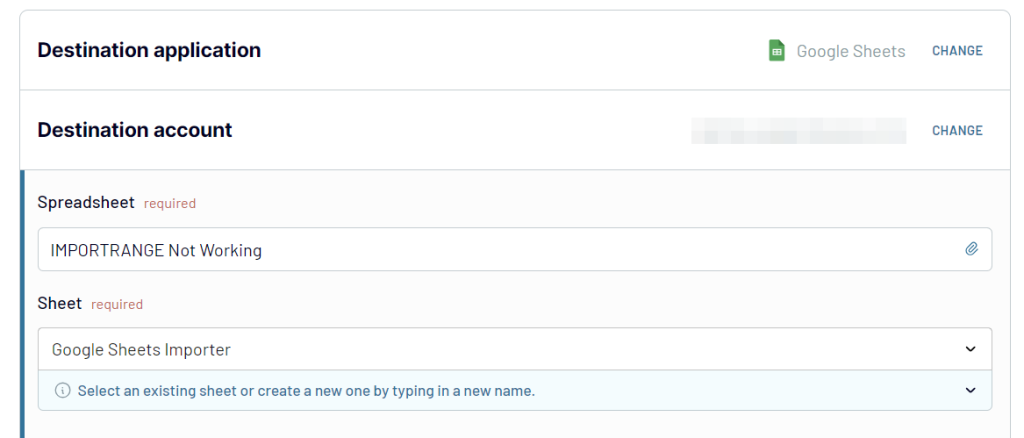
3. Load data and schedule refresh
Connect your Google account and select the Google Sheets file where you want to save your data. By default, your data will be imported to Sheet1, range A1 (the first cell of column A), but you can always change it. Type a name to create a new sheet or pick an existing one.
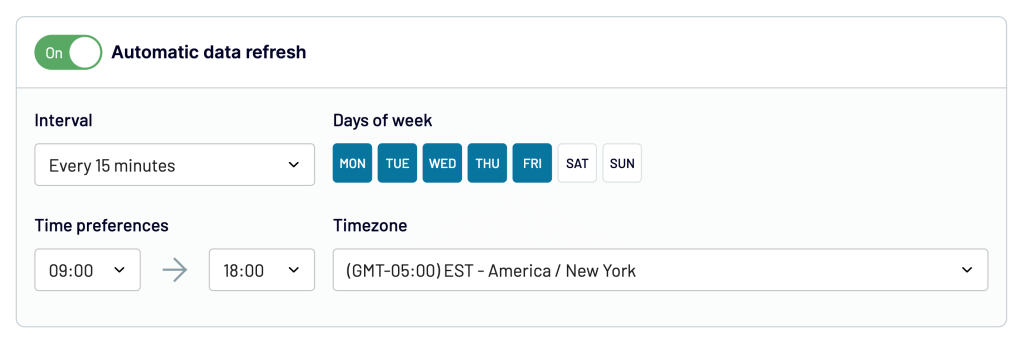
Turn on Automatic data refresh and configure the schedule for your automated imports.
If everything looks good, SAVE AND RUN your importer. You can always edit the configuration if you need to make any changes later.
Coupler.io is also available as an add-on for Google Sheets. You’ll need to install it from Google Workspace Marketplace and then set up the connection the same way as described above. The only difference is that you can do this right from your spreadsheet.
How to automate data entry in Google Sheets with Google Forms
Well, using Google Forms is one of the easiest ways to automatically enter data into Google Sheets. It allows you to create custom forms for collecting users’ data.
Now, let’s look at an example.
Example: A simple customer feedback form
Forms are common for data entry. And in this example, we’ll build a simple one using Google Forms to gather valuable customer feedback and write automatically to a Google spreadsheet.
The form takes four input fields:
- Name (required)
- How would you rate our product? (required)
- How would you describe your experience with our team? (required)
- Any additional feedback? (optional)
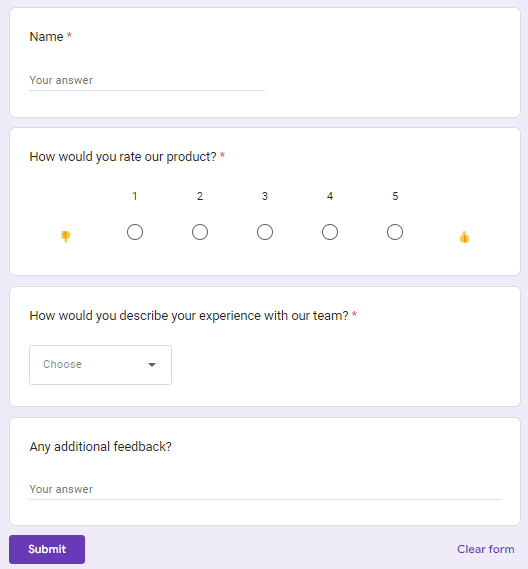
Check out the following screenshot for a preview of the final result:
Let’s begin creating the form.
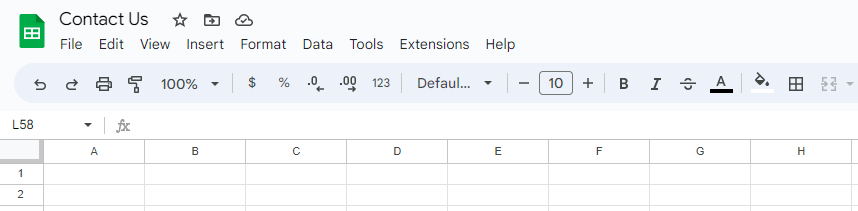
Step 1: Create a new spreadsheet
Navigate to your Google Drive and open any folder that you want. Right-click and select Google Sheets > Blank spreadsheet.
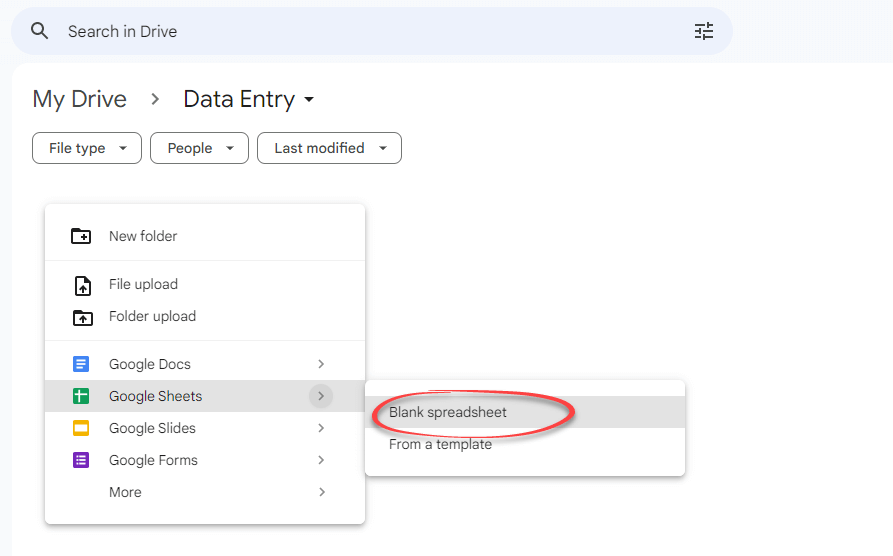
Click the document’s title to rename it, for example, “Customer feedback”.

Step 2: Create a new form
To create a new form that is automatically linked to the spreadsheet file, click Tools > Create a new form.

By the way, this is probably the quickest way to get the responses automatically saved in the spreadsheet.
Another way? You can open the Forms app by going to docs.google.com/forms. Get started by choosing a template or creating a blank form.
Step 3: Create questions
In this step, we’ll create the four questions for the form.
Google Forms provides a variety of question types to choose from: short answer, paragraph, multiple choice, checkboxes, dropdown, file upload, linear scale, multiple choice grid, checkbox grid, date, and time.
The floating menu on the right lets you add new questions, texts, photos, and videos to your form. If you’re going to send a long survey, the last button allows you to break your form into sections. This will create a better survey experience because your respondents won’t be overwhelmed by seeing a lot of questions on one page.
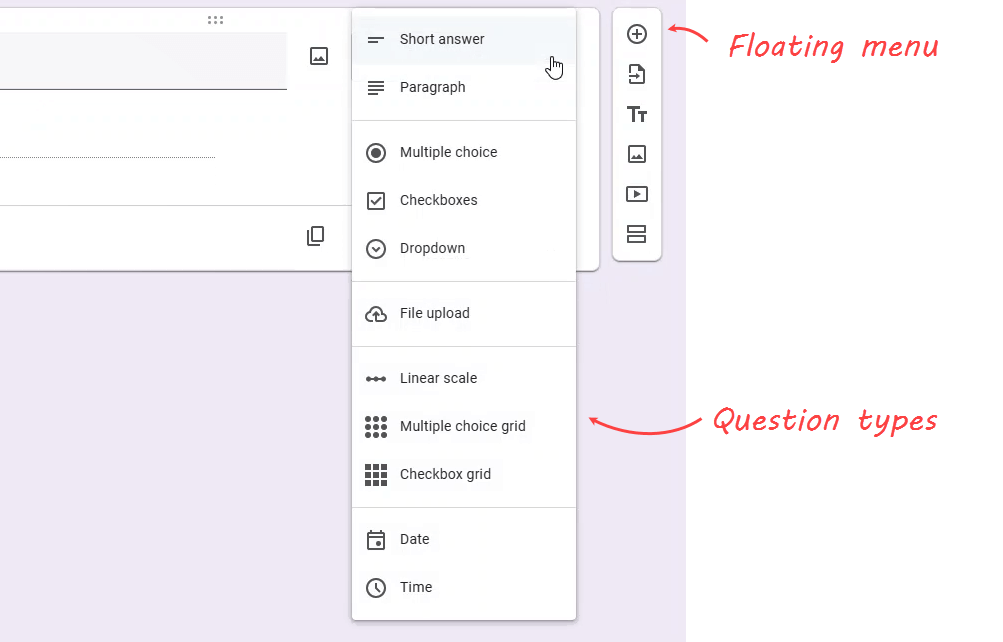
Now, let’s create the questions one by one.
First, we’ll use the Name field to collect customer names. Simply enter Name in the question box and select Short answer as the question type. Make this field required.

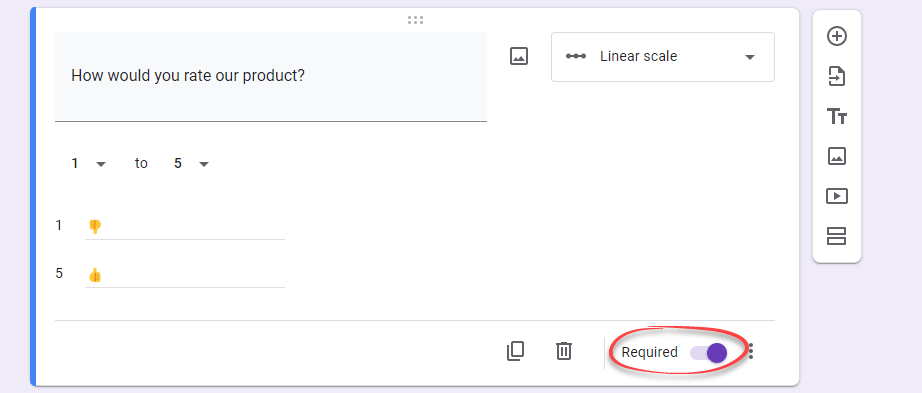
Next, click the Add question button on the right, then enter How would you rate our product?. Select the linear scale and make this field required. If you want, you can add labels for the lowest and highest options.
For the third question, enter How would you describe your experience with our team?. Select Dropdown for the question type and enter these values: Poor, Okay, Good, and Great. Remember to make this field required.

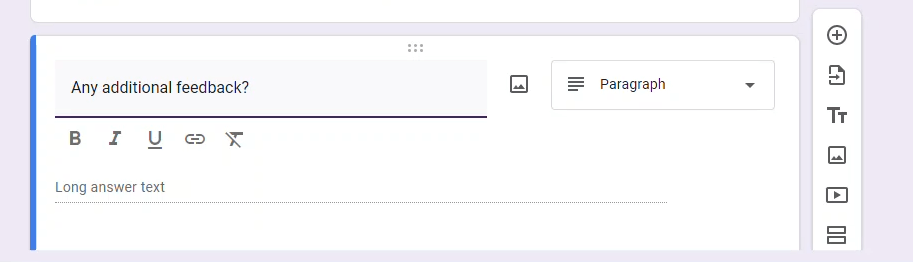
Finally, the last question. Enter Any additional feedback? and select Paragraph to accept long answer text.
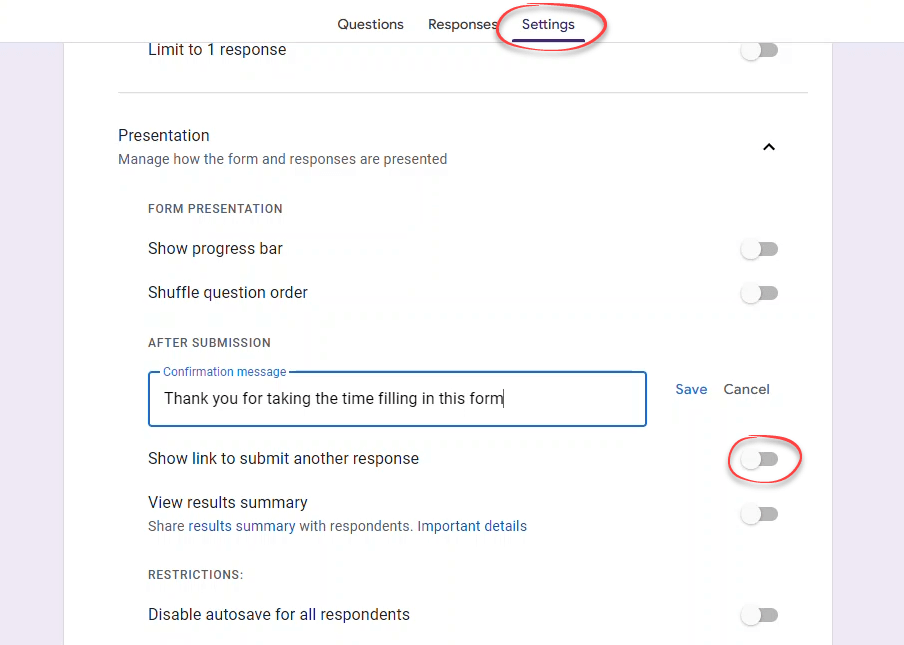
Step 4: Review the form settings
Once done with the questions, you can review the form’s settings.
Click the Settings tab, review each section, and change it as necessary to best suit your needs.
For example, in the Presentation section, as shown below, you can add a confirmation message that will be shown after a new response is recorded. You can also show or hide the link to submit another response.
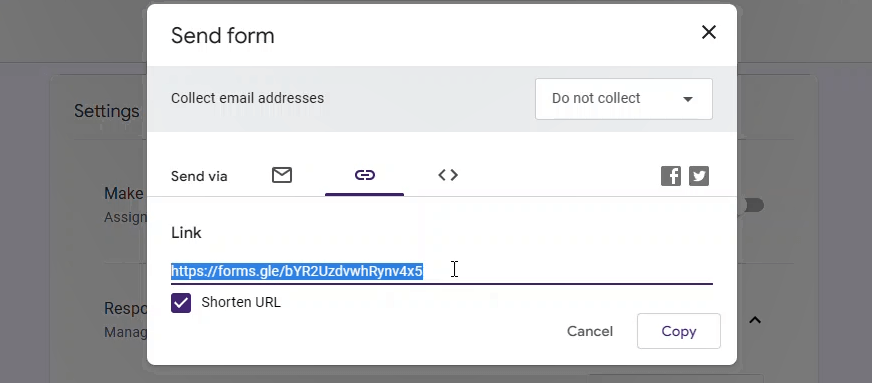
Step 5: Share the form
If you’re ready to get responses, just click the Send button in the top-right to share the form via email, link, or get an embed code to add it to your site.
Let’s choose the Link option and tick the Shorten URL option. Click Copy and share the URL to start collecting responses.
Here’s what your customers will see when opening the form URL:

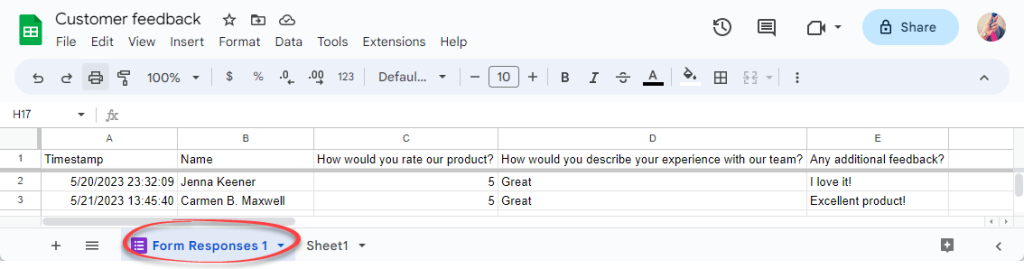
Step 6: View responses
Every time a customer fills out the form, the answer is automatically recorded in the sheet. Access the Form Responses 1 sheet in your spreadsheet to view their responses.
How to automate data entry in Google Sheets with HtmlService forms
While Google Forms is a popular choice, HtmlService offers something more powerful: the full power of HTML5, CSS, and client-side JavaScript.
It doesn’t have a drag-and-drop form designer, but with it, you can build a custom web app that controls and interacts with your Google spreadsheet. You can create your own design, input fields, and validations.
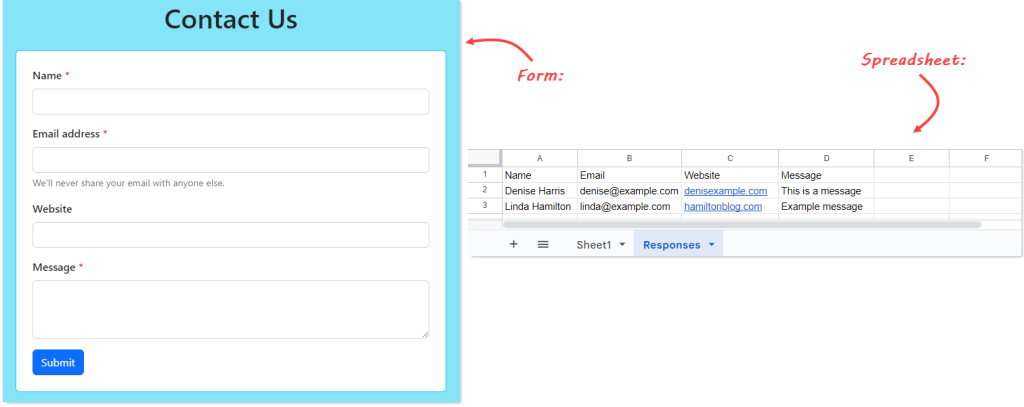
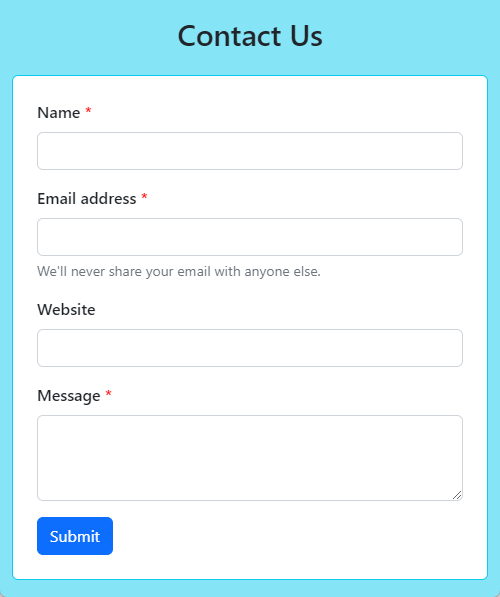
Example: A simple Contact Us form
This example shows you how to create a simple form using HtmlService and Apps Script. This data entry form also automatically saves the responses to Google Sheets.
As the topic of HtmlService itself is broad, we’ll be focusing on the basics of creating the form. We’ll keep everything about HTML5, CSS, and Javascript simple.
Here’s a screenshot of the final result: the form and the spreadsheet.
Step 1: Create a new spreadsheet
To get started, access your Google Drive and open any folder that you want. Then, click the New button at the top left and select Google Sheets > Blank spreadsheet. Give it a name, for example, Contact Us.
Step 2: Create an HTML template
From the spreadsheet, access the Apps Script editor by clicking Extensions > Apps Script. This will launch the editor with a new project opened.
Click the plus (+) icon next to Files. From the dropdown menu, select HTML.
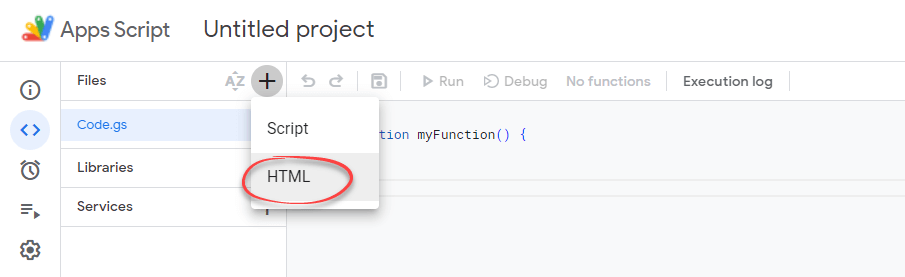
Name your file Index and replace its content with the following code. Notice that the code includes Bootstrap’s CSS & JS and jQuery.
<!doctype html>
<html lang="en">
  <head>
    <meta charset="utf-8">
    <meta name="viewport" content="width=device-width, initial-scale=1">
    <title>Contact Us</title>
    <link href="https://cdn.jsdelivr.net/npm/bootstrap@5.2.3/dist/css/bootstrap.min.css" rel="stylesheet" integrity="sha384-rbsA2VBKQhggwzxH7pPCaAqO46MgnOM80zW1RWuH61DGLwZJEdK2Kadq2F9CUG65" crossorigin="anonymous">
    <style>
      div.required label:after { content:" *"; color:red; }
    </style>
  </head>
  <body class="bg-info" style="--bs-bg-opacity: .5;">
    <div class="container">
      <div class="row">
        <div class="col-md-6 offset-md-3">
          <h1 class="py-3 text-center">Contact Us</h1>
          <form id="contact-us" class="bg-white p-4 border border-info rounded">
            <div class="required mb-3">
              <label for="inputName" class="form-label fw-semibold">Name</label>
              <input class="form-control" id="inputName" name="inputName"required>
              <div class="invalid-feedback">Please input your name.</div>
            </div>
            <div class="required mb-3">
              <label for="inputEmail" class="form-label fw-semibold">Email address</label>
              <input type="email" class="form-control" id="inputEmail" name="inputEmail" aria-describedby="emailHelp" required>
              <div class="invalid-feedback">Please input your email.</div>
              <div id="emailHelp" class="form-text">We'll never share your email with anyone else.</div>
            </div>
            <div class="mb-3">
              <label for="inputWebsite" class="form-label fw-semibold">Website</label>
              <input class="form-control" id="inputWebsite" name="inputWebsite">
            </div>
            <div class="required mb-3">
              <label for="inputMessage" class="form-label fw-semibold">Message</label>
              <textarea class="form-control" id="inputMessage" name="inputMessage" rows="3" required></textarea>
              <div class="invalid-feedback">Please input your message.</div>
            </div>
            <button type="submit" class="btn btn-primary">Submit</button>
          </form>
          <div id="result" class="pt-3"></div>
          <script src="https://cdn.jsdelivr.net/npm/bootstrap@5.2.3/dist/js/bootstrap.bundle.min.js" integrity="sha384-kenU1KFdBIe4zVF0s0G1M5b4hcpxyD9F7jL+jjXkk+Q2h455rYXK/7HAuoJl+0I4" crossorigin="anonymous"></script>
          <script src="https://code.jquery.com/jquery-3.7.0.slim.min.js" integrity="sha256-tG5mcZUtJsZvyKAxYLVXrmjKBVLd6VpVccqz/r4ypFE="
crossorigin="anonymous"></script>
        </div>
        </div>
      </div>
  </body>
</html
Then, replace the content of the Code.gs file with the following code to render the previously mentioned HTML file.
function doGet() {
 var template = HtmlService.createTemplateFromFile("Index.html");
 var html = template.evaluate();
 return HtmlService.createHtmlOutput(html);
}
If you want, you can deploy your project by clicking Publish. Select New deployment and deploy it as a Web app. Copy the Web app’s URL and paste it on your browser. You can find more detail on the deployment in the later section.
Here’s the HTML form we created:
Step 3: Submit the form data to the spreadsheet
One great option is to submit the form data to the spreadsheet using the Google Apps Script API. We’ll use scripts.run method to run a function in the Apps Script code.
First, let’s add the onclick property to the Submit button, as shown below. It will call the postData function when the button is clicked.
<button type="submit" class="btn btn-primary" onclick="postData(this.parentNode);">Submit</button>
Then, we will need to create the postData function inside a <script> tag in the HTML file. We can also add success and failure handlers with a callback function. Here’s an example code:
function postData(form){
  clearMessage();

  if (isValidateFields()) {
    google.script.run
    .withSuccessHandler(showSuccess)
    .withFailureHandler(showError)
    .withUserObject(form)
    .postFormDataToSheet(form);
  } else {
    form.preventDefault();
  }
}

function showSuccess(msg) {
  $("#result").append('<div class="alert alert-success" role="alert">' + msg + '</div>');
  $("form").trigger("reset");
}

function showError(msg){
  $("#result").append('<div class="alert alert-danger" role="alert">' + msg + '</div>');
}

function isValidateFields() {
  return !($("#inputName").val() === ""
    || $("#inputEmail").val() === ""
    || $("#inputMessage").val() === "");
}

function clearMessage() {
  $("#result").html("");
}

function preventFormSubmit() {
  $("#contact-us").on("submit", function (e) {
    e.preventDefault();
  });
}

$(function() {
  preventFormSubmit();
});
Within the postData function, first, the code clears any error or success message of the previous form submission. It then validates the input fields. If there are any invalid inputs, it prevents the form from submitting. Notice that the code also prevents the default form submit behavior on the document ready function.
If everything is okay, it submits the form data and calls the server-side function postFormDataToSheet.
The showSuccess and showErrors are callback functions and are used to show the success or error message.
Finally, here’s the postFormDataToSheet function to be added to the Code.gs file.
function postFormDataToSheet(e){

  // Replace with your spreadsheet's Id.
  var ss = SpreadsheetApp.openById("1O9nHyvcXWuOKMbEBacaAuzcX5EMPJf79iVq1hRYdFqU");

  var SheetResponses = ss.getSheetByName("Responses");

  try {
    // Create a 'Responses' sheet if it does not exist.
    if (!SheetResponses){
      SheetResponses = ss.insertSheet("Responses");

      // Create header
      SheetResponses.appendRow(["Name", "Email", "Website", "Message"]);
    }

    // Append data
    SheetResponses.appendRow([e.inputName, e.inputEmail, e.inputWebsite, e.inputMessage]);

    return "Thank you! Your response has been submitted successfully.";
  } catch (ex) {
    throw Error(" An error has occurred.");
  }
}
The code access for the spreadsheet file is by its ID. It looks for a Sheet with the name Response. If not found, it creates a new Sheet and inserts a header row. Then, the form data is added to existing rows. Finally, the function returns a success/error message.
Here is the final code for Index.html and Code.gs file:
Index.html
<!doctype html>
<html lang="en">
  <head>
    <meta charset="utf-8">
    <meta name="viewport" content="width=device-width, initial-scale=1">
    <title>Contact Us</title>
    <link href="https://cdn.jsdelivr.net/npm/bootstrap@5.2.3/dist/css/bootstrap.min.css" rel="stylesheet" integrity="sha384-rbsA2VBKQhggwzxH7pPCaAqO46MgnOM80zW1RWuH61DGLwZJEdK2Kadq2F9CUG65" crossorigin="anonymous">
    <style>
      div.required label:after { content:" *"; color:red; }
    </style>
  </head>
  <body class="bg-info" style="--bs-bg-opacity: .5;">
    <div class="container">
      <div class="row">
        <div class="col-md-6 offset-md-3">
          <h1 class="py-3 text-center">Contact Us</h1>
          <form id="contact-us" class="bg-white p-4 border border-info rounded">
            <div class="required mb-3">
              <label for="inputName" class="form-label fw-semibold">Name</label>
              <input class="form-control" id="inputName" name="inputName"required>
              <div class="invalid-feedback">Please input your name.</div>
            </div>
            <div class="required mb-3">
              <label for="inputEmail" class="form-label fw-semibold">Email address</label>
              <input type="email" class="form-control" id="inputEmail" name="inputEmail" aria-describedby="emailHelp" required>
              <div class="invalid-feedback">Please input your email.</div>
              <div id="emailHelp" class="form-text">We'll never share your email with anyone else.</div>
            </div>
            <div class="mb-3">
              <label for="inputWebsite" class="form-label fw-semibold">Website</label>
              <input class="form-control" id="inputWebsite" name="inputWebsite">
            </div>
            <div class="required mb-3">
              <label for="inputMessage" class="form-label fw-semibold">Message</label>
              <textarea class="form-control" id="inputMessage" name="inputMessage" rows="3" required></textarea>
              <div class="invalid-feedback">Please input your message.</div>
            </div>
            <button type="submit" class="btn btn-primary" onclick="postData(this.parentNode);">Submit</button>
          </form>
          <div id="result" class="pt-3"></div>
          <script src="https://cdn.jsdelivr.net/npm/bootstrap@5.2.3/dist/js/bootstrap.bundle.min.js" integrity="sha384-kenU1KFdBIe4zVF0s0G1M5b4hcpxyD9F7jL+jjXkk+Q2h455rYXK/7HAuoJl+0I4" crossorigin="anonymous"></script>
          <script src="https://code.jquery.com/jquery-3.7.0.slim.min.js" integrity="sha256-tG5mcZUtJsZvyKAxYLVXrmjKBVLd6VpVccqz/r4ypFE="
crossorigin="anonymous"></script>
          <script>

            function postData(form){
              clearMessage();

              if (isValidateFields()) {
                google.script.run
                .withSuccessHandler(showSuccess)
                .withFailureHandler(showError)
                .withUserObject(form)
                .postFormDataToSheet(form);
              } else {
                form.preventDefault();
              }
            }

            function showSuccess(msg) {
              $("#result").append('<div class="alert alert-success" role="alert">' + msg + '</div>');
              $("form").trigger("reset");
            }

            function showError(msg){
              $("#result").append('<div class="alert alert-danger" role="alert">' + msg + '</div>');
            }

            function isValidateFields() {
              return !($("#inputName").val() === ""
                || $("#inputEmail").val() === ""
                || $("#inputMessage").val() === "");
            }

            function clearMessage() {
              $("#result").html("");
            }

            function preventFormSubmit() {
              $("#contact-us").on("submit", function (e) {
                e.preventDefault();
              });
            }

            $(function() {
              preventFormSubmit();
            });

          </script>
        </div>
        </div>
      </div>
  </body>
</html>
Code.gs
function doGet() {
  var template = HtmlService.createTemplateFromFile("Index.html");
  var html = template.evaluate();
  return HtmlService.createHtmlOutput(html);
}

function postFormDataToSheet(e){

  // Replace with your spreadsheet's Id.
  var ss = SpreadsheetApp.openById("1O9nHyvcXWuOKMbEBacaAuzcX5EMPJf79iVq1hRYdFqU");

  var SheetResponses = ss.getSheetByName("Responses");

  try {
    // Create a 'Responses' sheet if it does not exist.
    if (!SheetResponses){
      SheetResponses = ss.insertSheet("Responses");


      // Create header
      SheetResponses.appendRow(["Name", "Email", "Website", "Message"]);
    }

    // Append data
    SheetResponses.appendRow([e.inputName, e.inputEmail, e.inputWebsite, e.inputMessage]);

    return "Thank you! Your response has been submitted successfully.";
  } catch (ex) {
    throw Error(" An error has occurred.");
  }
}
Step 4: Deploy the script
To deploy, click Publish within the script editor. Select New deployment and deploy it as a Web app. A pop-up will open as shown below:
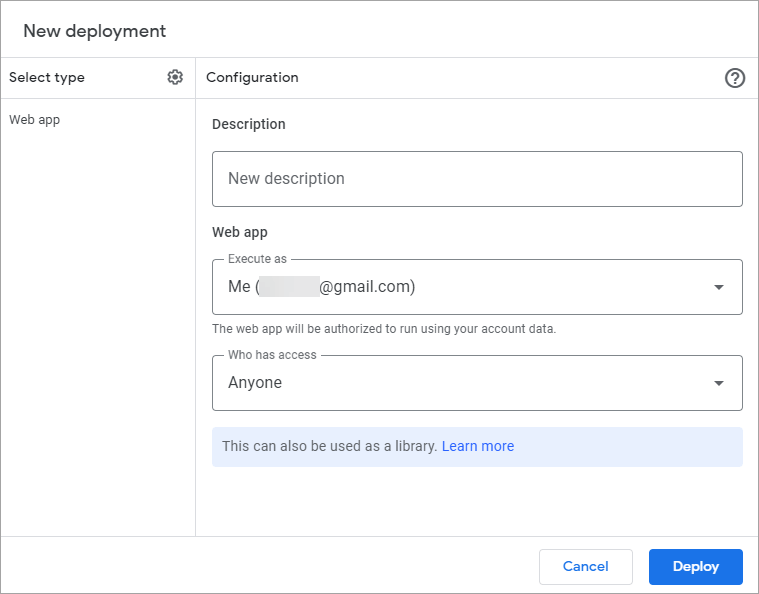
There will be two choices under the Execute as dropdown: Me and User accessing the web app. If you select Me (your user ID), the script will run on behalf of your user ID. The second option means that the script would run on behalf of the user who is accessing the application.
Under the Who has access dropdown, there are three choices: Only myself, Anyone with Google account, and Anyone. Select Only myself if you want only to get access to the published app. Select Anyone with a Google account if you would like to give access to others with their Google account. If you select Anyone, then even anyone without a Google account can access the form.
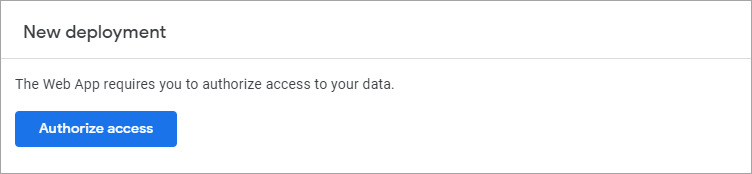
After reviewing the options, click the Publish button. You will need to authorize the script if you are publishing for the first time. Authorization is initiated before web app deployment. Click Authorize access in the pop-up dialog.
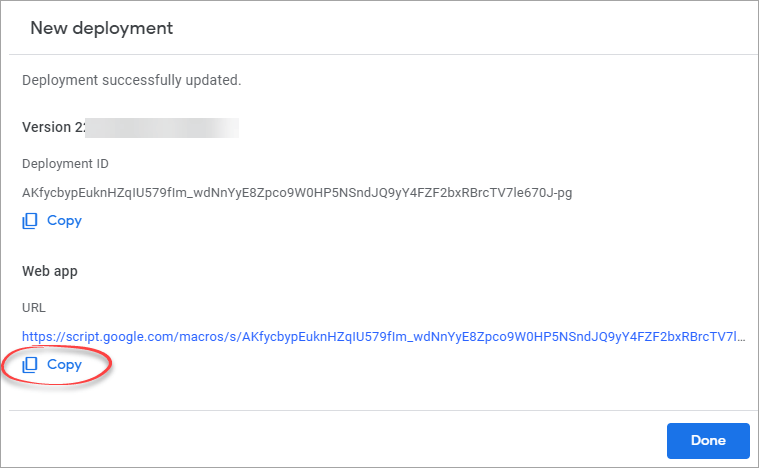
Once the deployment is done, you will see a pop-up containing a published URL.
Use the URL to share your form with others.
How to automate data import in Google Sheets – Final words
Automating data entry in Google Sheets can be a great way to save time and effort when dealing with repetitive tasks. Whether collecting user responses or importing data from external sources, several options can make your workflow more efficient and accurate. If you’re working on importing data from multiple sources to Google Sheets, Coupler.io is an excellent tool for that!
In addition, Coupler.io’s data expert team can assist with various data tasks if you need help with automating your data entry process. These include data automation, reporting, dashboarding with Google Sheets marketing dashboard templates, and setting up infrastructure for your data.

Automate data import to Google Sheets with Coupler.io
Get started for free