Power BI is packed with a powerful set of features for data analytics and reporting. It supports DAX (data analysis expressions) formulas, i.e., functions, operators, and values, for creating new fields or measures based on logic.
LOOKUPVALUE in Power BI is one such useful DAX filter function. Similar to the VLOOKUP function in Microsoft Excel, it is used to retrieve a specific column value from a table based on another column.
In this complete guide, you’ll learn about Power BI LOOKUPVALUE function, understand its syntax, and see useful examples of how to master it.
What is Power BI LOOKUPVALUE DAX function?
LOOKUPVALUE in Power BI is an in-built DAX filter function that you can use to retrieve the required column value based on another column in a table.
To understand this better, let’s say we have a table containing columns for employee ID and name. And we want to fetch the employee’s name based on the employee ID. We can use the LOOKUPVALUE in Power BI to do that (more on that later.)
Before we dive deeper, let’s dissect and have a closer look at the LOOKUPVALUE Power BI syntax.
Power BI LOOKUPVALUE syntax
The Power BI LOOKUPVALUE function requires multiple parameters to search and retrieve the required results.
Here’s the general syntax of LOOKUPVALUE in Power BI:
LOOKUPVALUE (
<result_columnname>,
<search_columnname>,
<search_value>
[, <search2_column>, <search2_value>]…
[, <alternate_result>]
)
Parameters:
The LOOKUPVALUE function takes the following four parameters as inputs:
- result_columnname: the name of the column containing the required value.
- search_columnname: the name of the column based on which we want to retrieve the required value.
- search_value: the value we want to look for in the search_column.
- alternate_result: the value that is returned in case no or multiple results are returned matching the declared criteria. This parameter is optional.
In simple terms, the above syntax returns the value of result_column where the value of search_column matches the search_value. It iterates through the entire record to find the column value matching the provided criteria.
You can also declare multiple pairs of search_value and search_column in the LOOKUPVALUE function.
Important points:
- The result column and search column should be in the same table.
- Power BI evaluates the search value and alternate value before performing the look-up.
- The LOOKUPVALUE function is not supported in the DirectQuery mode when used in calculated columns or row-level security rules.
- LOOKUPVALUE function is case-insensitive.
- The data type of the search column should match that of the value.
How to use LOOKUPVALUE in Power BI?
To use the LOOKUPVALUE function in Power BI, you’ll first need to create a new report and load data into it. And then you can proceed to adding visuals, using DAX functions, and analyzing your data in it.
Let’s go through the tutorial and learn to import data to Power BI and use the LOOKUPVALUE function.
1. Connect your data source to Power BI
You can use native Power BI connectors or third-party tools to load data. In this example, we’ll use Coupler.io, a data automation and integration platform, to connect our data source. Coupler.io can pull data and schedule imports from 50+ data sources to Power BI and other destinations.
It saves a lot of time as it can send your data to Power BI automatically on a schedule and keep it fresh.
To transfer data into Power BI, select your data source from the dropdown in the widget below and click Proceed.
Follow the instructions to connect the data sources and click “Continue.”
Now, a preview of the data will appear in the transformation module. Here, you can use Coupler.io’s data transformation features to filter and sort data before loading it into Power BI.
You can also use basic formulas to create new calculated columns and hide any unnecessary columns from the dataset.
Once you’re done, click “Proceed.”

Finally, click the button to generate and copy the integration link for the importer and proceed further.
Now, toggle the data automation option on to schedule updates.
You can set the data refresh interval up to every 15 minutes and select the appropriate weekdays and time for automated data refreshes.
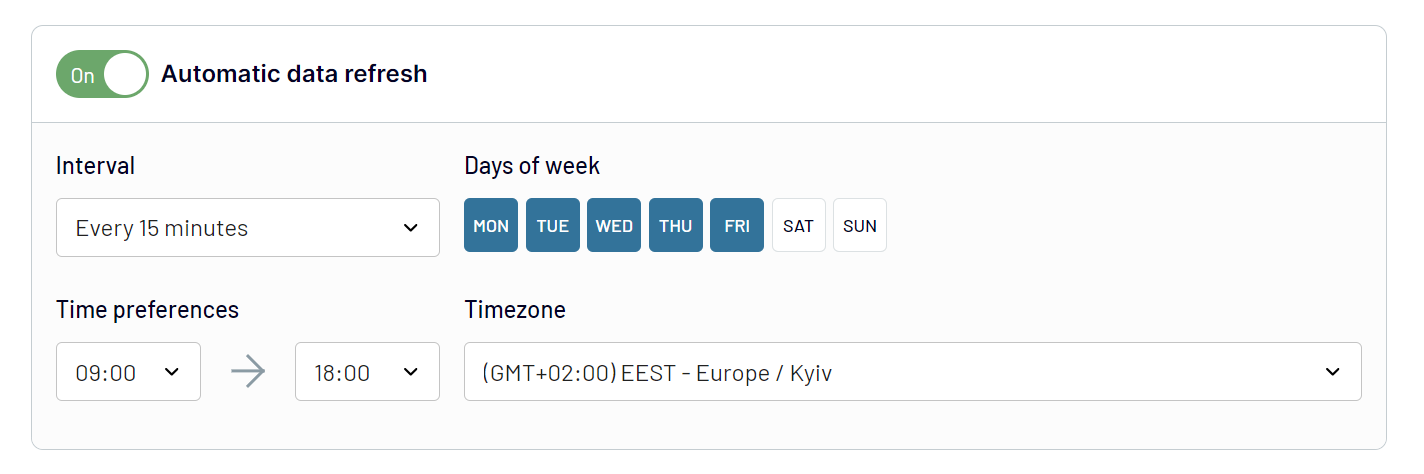
Once configured, click the “Run Importer” button.
Now, go to Power BI Desktop, and paste the copied link in Get Data > Web.

Click “Ok” to add the data source to Power BI. You can edit the data in the Power Query editor before finally adding it.
Now, you can use the added data to create visuals and use the LOOKUPVALUE function in Power BI.
2. Use the LOOKUPVALUE function in Power BI
Let’s say we have a table (named Employees) containing employee records with columns like employee ID, name, department, etc. (In this entire guide, we’ll use this table as an example dataset.)

And we want to fetch the name of the employee whose ID is 33. We can use the LOOKUPVALUE function in Power BI to do that.
Here’s how.
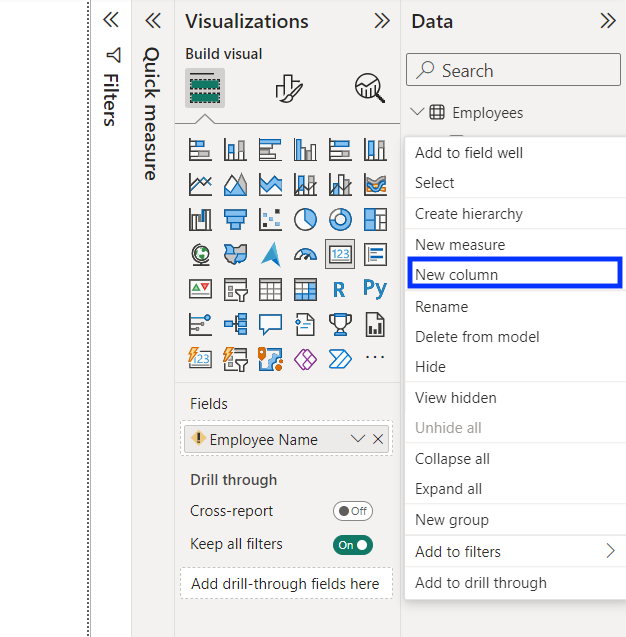
First, we’ll need to create a new column. Click on the three dots beside the datasource name and click “New column” in the dropdown.
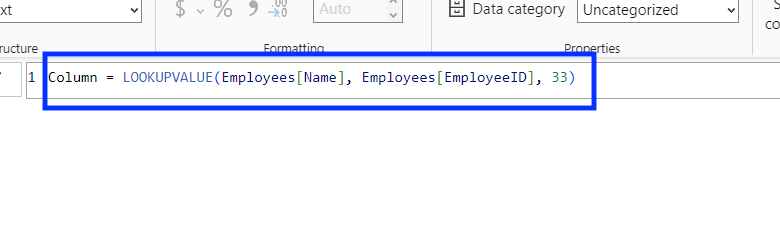
Now, enter the following DAX formula for the new column:
LOOKUPVALUE(Employees[Name], Employees[EmployeeID], 33)
Note: You’ll need to modify the DAX code as per the table and column names.
Press the Enter key to commit.
Now, you can use this newly created column in the dataset for creating visuals.
In this example, we have created a card visual to display the name of the employee matching the criteria (i.e. employee ID = 33.)
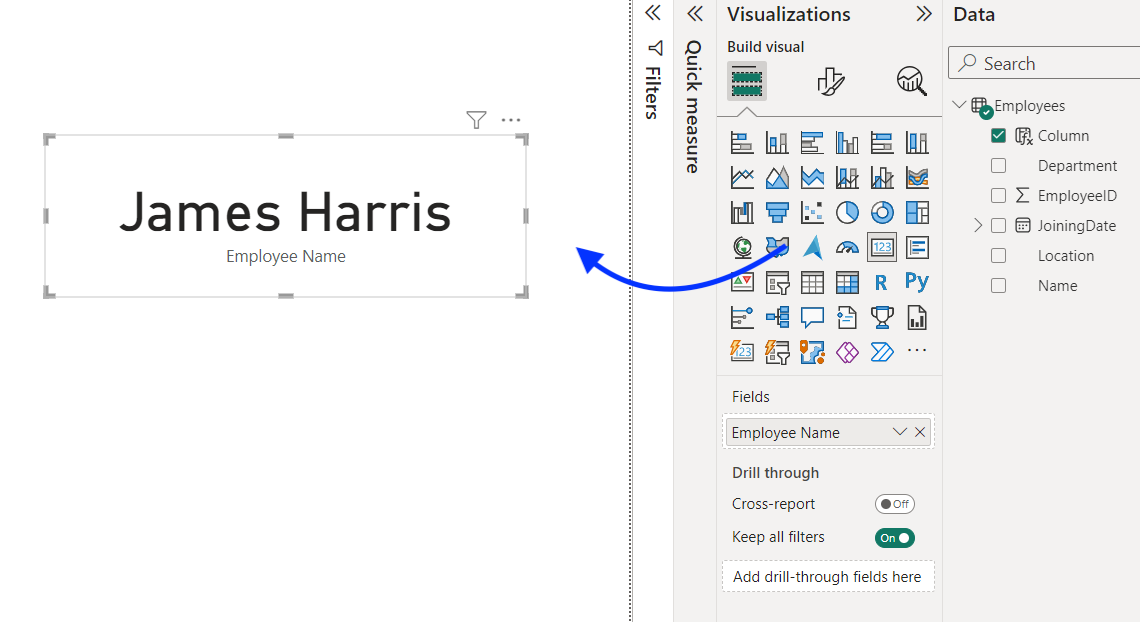
That’s how you can use the Power BI LOOKUPVALUE function to retrieve specific values from tables.
Power BI LOOKUPVALUE examples
The Power BI LOOKUPVALUE function can be utilized beyond the single-column value lookup. You can utilize it in advanced scenarios as per your analytics needs. For example, you can use it with multiple search conditions, filters, etc.
Let’s now go through some advanced examples and use cases.
Power BI LOOKUPVALUE with multiple conditions
The LOOKUPVALUE Power BI function supports multiple criteria declarations. This means you can add more than just one condition to look for a specific value in the table.
Multiple conditions in the LOOKUPVALUE function in Power BI can be helpful when you want to perform a more targeted lookup and complex data filtering. You can add multiple pairs of search columns and search values in series.
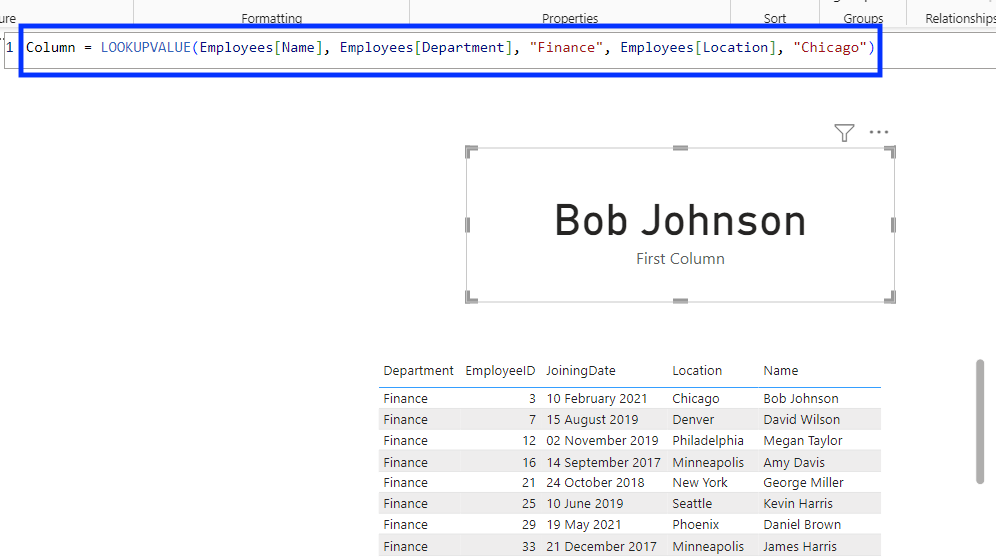
For example, let’s say we want to retrieve the name of the employee who works in the finance department and lives in Chicago.
Here’s the formula to add these two conditions in the LOOKUPVALUE function:
LOOKUPVALUE(Employees[Name], Employees[Department], “Finance”, Employees[Location], “Chicago”)
It will return the value of the Name column where the Department is “Finance” and Location is “Chicago” from the table.
In the same way, you can add more conditions to the LOOKUPVALUE function and make it more specific. Power BI has not defined any limit on the number of conditions you can add. However, adding more conditions can slow down the process and impact reporting performance.
Power BI LOOKUPVALUE with multiple values
The Power BI LOOKUPVALUE function is meant to return only one value matching the defined conditions. And it is not well-suited to retrieve multiple values. But there are workarounds to lookup multiple values in Power BI using custom DAX formulas.
The in-built LOOKUPVALUE function will result in an error in case of multiple values matching the criteria.
Let’s understand this through the same example of the Employee’s table.
Suppose, we want to fetch the names of employees working in the finance department. We can use the following formula:
LOOKUPVALUE(Employees[Name], Employees[Department], “Finance”)
Here, since we have entries of multiple people in the finance department, the LOOKUPVALUE function will return an error like the one displayed below.
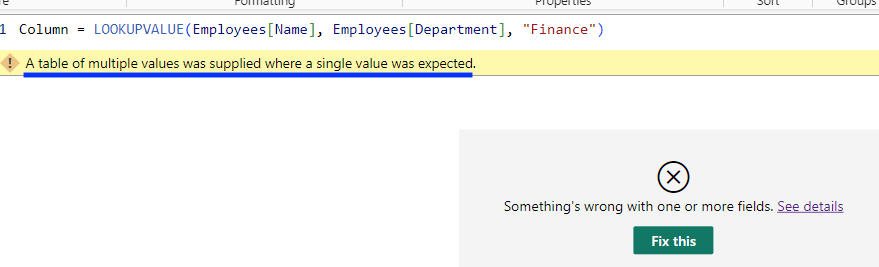
To handle such LOOKUPVALUE errors, you can use alternate value parameter.
It is returned as a value in case no or multiple values match the defined condition or conditions. For example, we can modify the above function to:
LOOKUPVALUE(Employees[Name], Employees[Department], “Finance”, “Error: Zero or multiple values”)
The alternative value parameter is an effective way to handle errors and debug reporting issues.
Power BI LOOKUPVALUE from another table
The Power BI LOOKUPVALUE function can also look up values in other tables. It can be helpful for cross-table calculations and referencing.
For example, you can use:
LOOKUPVALUE(Table2[Result_Column], Table2[Search_Column], Table1[Value_Column])
to get the value column from Table 2 to Table 1.
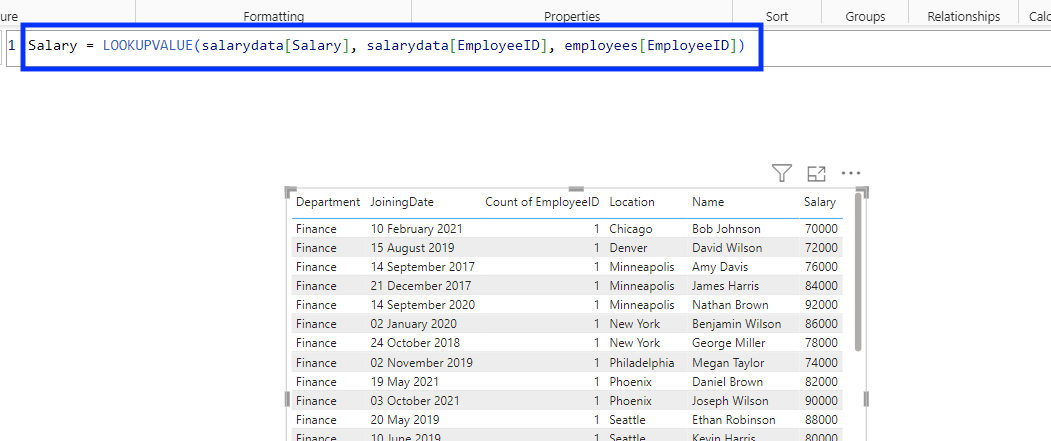
Consider our previous example of the employee’s table, for example. And let’s say we’ve another table that contains Employee ID and Salary details.
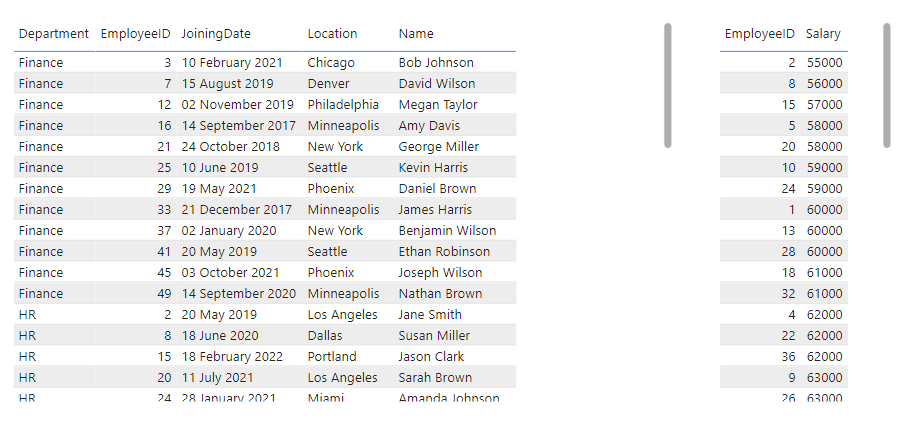
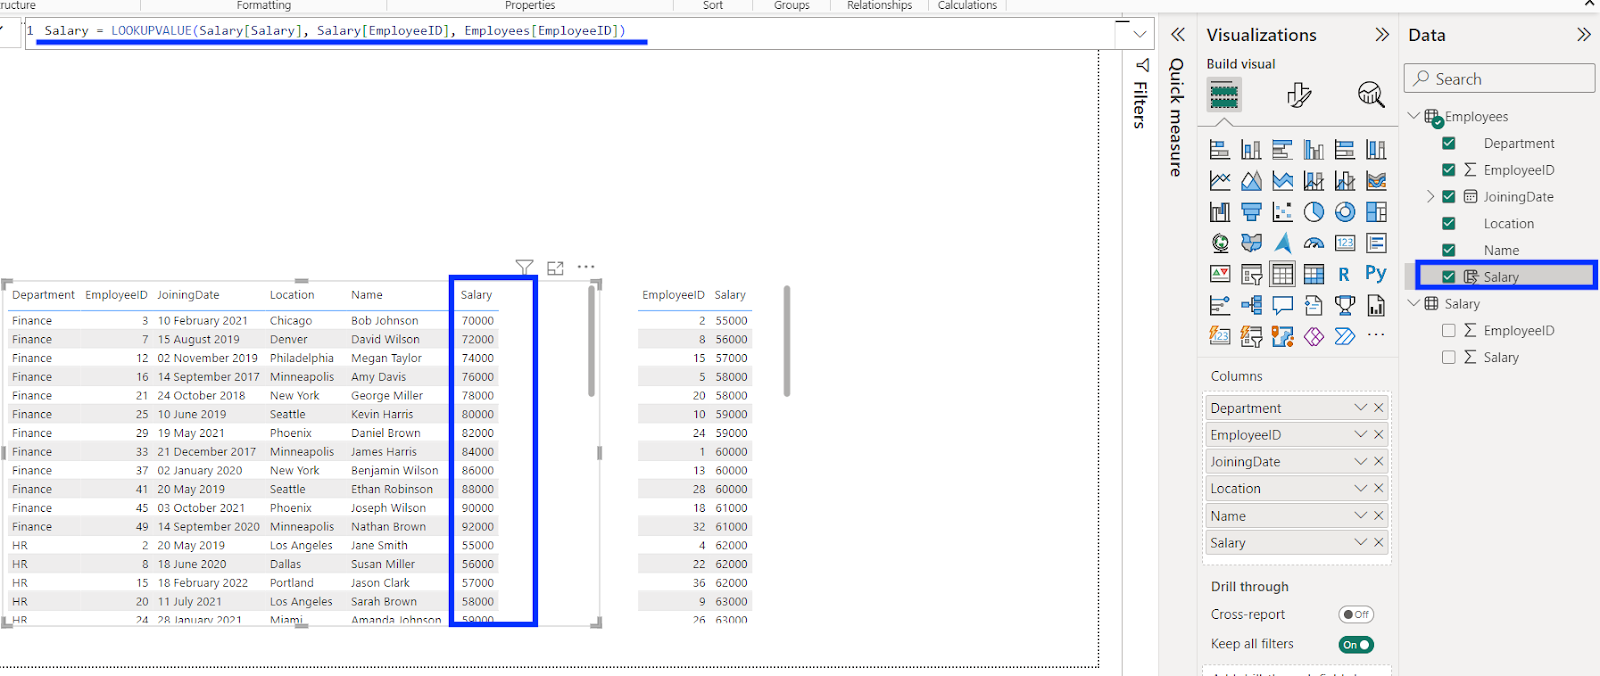
We can use the LOOKUPVALUE function to create a new column and add salary details by EmployeeID from another table. Here’s the example formula:
Salary = LOOKUPVALUE(Salary[Salary], Salary[EmployeeID], Employees[EmployeeID])
Power BI LOOKUPVALUE vs RELATED function
Power BI LOOKUPVALUE and RELATED are two different DAX functions to reference a calculated column from another related table.
But they serve different purposes and are used in different contexts.
The RELATED function in Power BI references a column from another table related to the current one. It follows the table relationships defined in the data model to retrieve the referenced column.
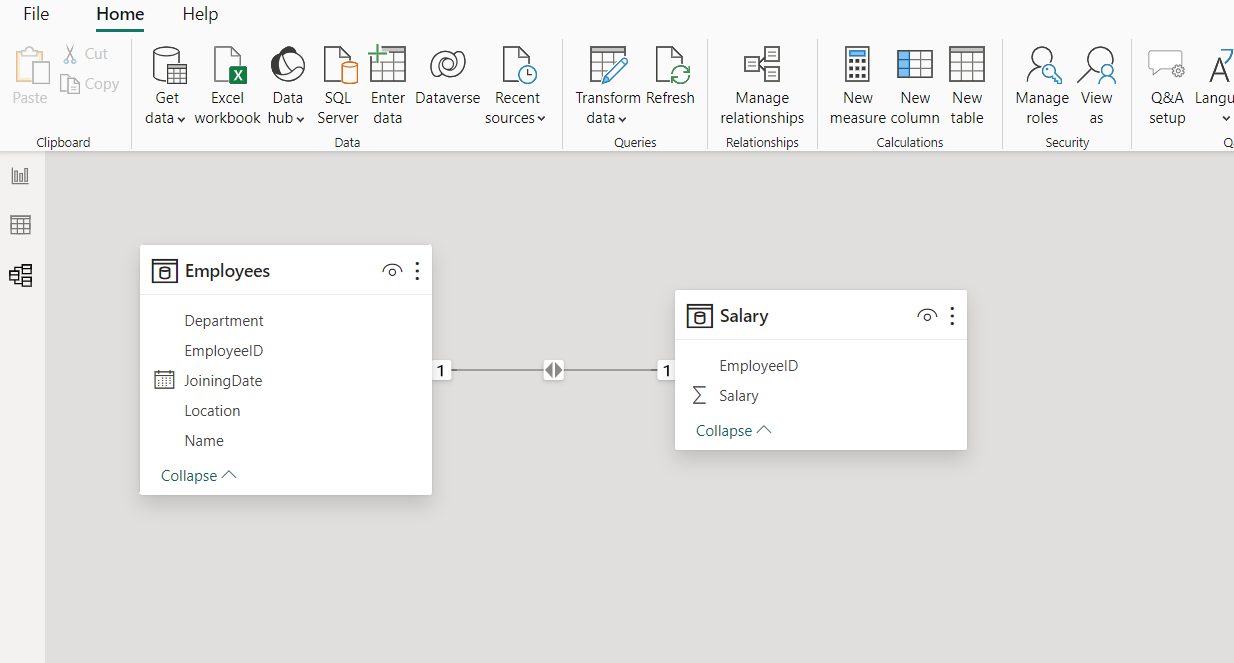
Generally, Power BI automatically establishes relationships between tables that share columns. But you may need to create a relationship manually between tables to use the RELATED function.
Here’s the general syntax for the RELATED function:
RELATED(Table_name[Column_name])
Parameters:
- Table_name: It is the name of the table you’re referencing.
- Column_name: It is the name of the column to retrieve.
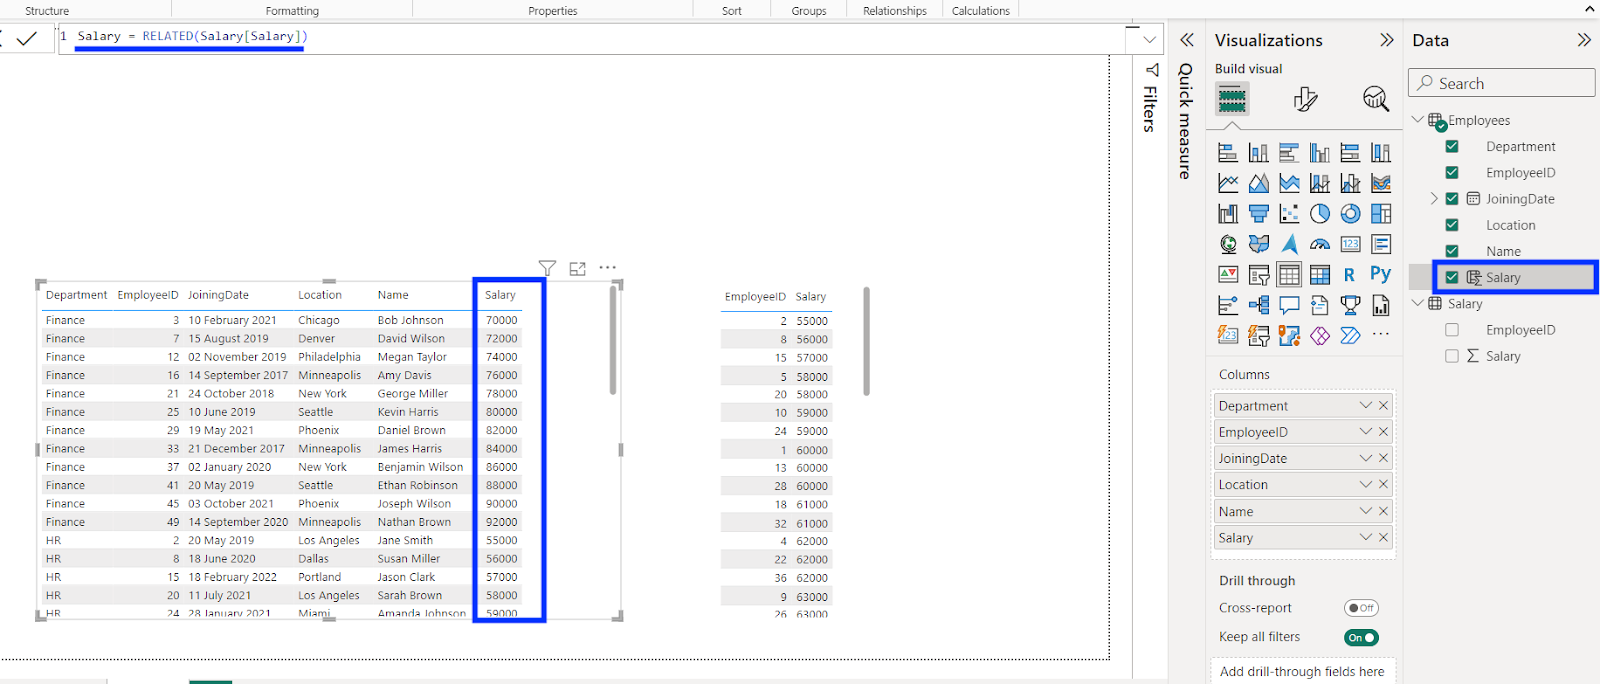
In the example shown below, we used the RELATED function in Power BI to retrieve an entire column from another table. Here’s the example formula:
Salary = RELATED(Salary[Salary])
The RELATED function is a better choice when it comes to performance. It is recommended to use the RELATED over LOOKUPVALUE function in Power BI when there is a relationship between tables. On the other hand, the LOOKUPVALUE function is a good choice when you want to retrieve data based on a unique identifier (primary keys in data.)
Frequently Asked Questions
Can you use Power BI LOOKUPVALUE with a filter?
No, the LOOKUPVALUE Power BI function ignores the filters applied to the tables. However, you can use the columns calculated using the LOOKUPVALUE function to filter the Power BI report or visualization.
Let’s see how to use Power BI LOOKUPVALUE with a filter.
You can apply filters to the column with the LOOKUPVALUE function. To do this, select the visual containing the column, expand the Filters section and apply relevant filters to the column as shown below.

In the above example, we’ve filtered the table visual based on the Salary column that we created using the LOOKUPVALUE function.
Does LOOKUPVALUE return the first match in Power BI?
No. The Power BI LOOKUPVALUE function only works if there is one value matching the criteria. It will return an error if there are no or multiple matching results.
Why is Power BI LOOKUPVALUE not working?
There could be several reasons why the Power BI LOOKUPVALUE function may not work as expected. The most probable reasons include:
- Invalid table or column name: The LOOKUPVALUE in Power BI may not work appropriately if the table or column names are invalid. Look for typos in the formula. Use the smart suggestions you get for table and column names to auto-complete the formulas as you type.
- Data type mismatch: The search value and the column to be searched should be of the same data type. Power BI may be unable to look up the value in case of a data type mismatch.
- No or multiple matching values: The Power BI LOOKUPVALUE function is used to identify unique values based on criteria. Double-check if the criteria are correctly defined. It may not work as expected if there are no or multiple results.
- Case sensitivity: The Power BI LOOKUPVALUE is a case-sensitive function. It may not work as expected if there is a case mismatch in the name of the table and column parameters. E.g., a table named “CouplerData” can not be declared as “couplerdata”
Many users also reported a common issue – LOOKUPVALUE stopped working after a data refresh. This can be due to multiple scenarios because of changes in data.
For example, the refresh introduced more rows in the data that match the criteria defined in the LOOKUPVALUE function. In such a case, the function may stop working because of multiple values in the result.
Another possible cause can be a change in the name of the columns. The LOOKUPVALUE function may break if there is a change in the column name during a refresh.
In all these cases, you can debug the issue by double-checking the LOOKUPVALUE function in Power BI against the above-mentioned points.
Tips to use LOOKUPVALUE in Power BI for optimal performance
Power BI LOOKUPVALUE is a powerful function to retrieve single values from columns matching specific criteria. However, it can slow down the reporting, if not used correctly. The calculated columns are computed on every data refresh. Therefore, using the LOOKUPVALUE function to create custom columns can significantly impact the reporting performance when working with a vast dataset.
Here are some useful tips for optimized usage:
- Do not use too many pairs of search columns and values, unless required.
- Prefer RELATED over LOOKUPVALUE when there is a relationship between tables.
- Use the alternative value parameter to show an error instead of using ISBLANK, ISERROR, or IFERROR functions.
The key is to keep it simple. Not too complex. Minimal.
You can also use Coupler.io to automate dataflows to Power BI and speed up the reporting. The powerful transformation module lets you pull data from 50+ data sources and make it report-ready before loading it.
You can filter out unwanted columns, sort data, or add new calculated columns required for reporting. And that too without affecting the Power BI reporting performance. So go ahead and try Coupler.io now for free.
To continue learning about Power BI functions, check our articles on Power BI IF Statement, CONCATENATE formula in Power BI, and Power BI COUNTIF.