Need to extract massive volumes of Harvest data and don’t want to lose track of time? Then, you’d better avoid manual data entry, make sure to automate this process, and put it on a schedule. Fortunately, this is possible to do even without any coding skills.
Have a look at how you can export data from Harvest at your preferred frequency and pick the best option for yourself.
Methods to export data from Harvest
To get started, let’s consider an overview of each method we have at our disposal:
Automated data exports without coding
If you’d like to automate and schedule Harvest data export, but coding is missing from your skillset, then consider using a third-party connector. Coupler.io, a reporting automation platform, allows Harvest data to be imported into 10+ applications. Among supported destinations, you can find popular business intelligence (BI) tools, spreadsheet apps, data warehouses, and others.
With automated data collection and querying, Coupler.io keeps you from wasting hours copying and pasting. It also minimizes the likelihood of human error, thus ensuring only accurate data will reach the destination. Furthermore, you can auto-update your reports. To make this happen, customize the data refresh schedule to resonate with your reporting and analytics needs. As a result, you’ll consistently receive the latest data, kept in sync with ever-changing records in the source.
API integration
With coding in your skillset, you can use Harvest API to export data from Harvest. It’s a highly customizable method for importing huge amounts of data into the required destination.
However, the flexibility of API integration comes with the need for technical expertise under your belt. It’s not an issue if you’re familiar with coding or have a developer to help you. If not, then you won’t be comfortable with this approach.
Additionally, pay attention to API rate limits. In the case of Harvest, you can only make 100 calls per 15 seconds.
Manual data exports
There’s also a manual method for Harvest data export that doesn’t require any technical background or third-party applications. You just download natively generated reports as .csv files and upload them to the destination app – without the possibility of automation or scheduling.
This option will work for infrequent imports of small data sets – in this event, it won’t be time-consuming or effortful. Nevertheless, it’ll take you an eternity to load huge quantities of data, especially if you’re going to do this often. On top of that, it poses a stern challenge to data accuracy.
So, let’s dive into the details of the most optimal solution – Coupler.io’s automated on-schedule data exports.
How to set up an automated export of Harvest data on a schedule?
To automate and schedule Harvest data export with Coupler.io, you must take the following steps:
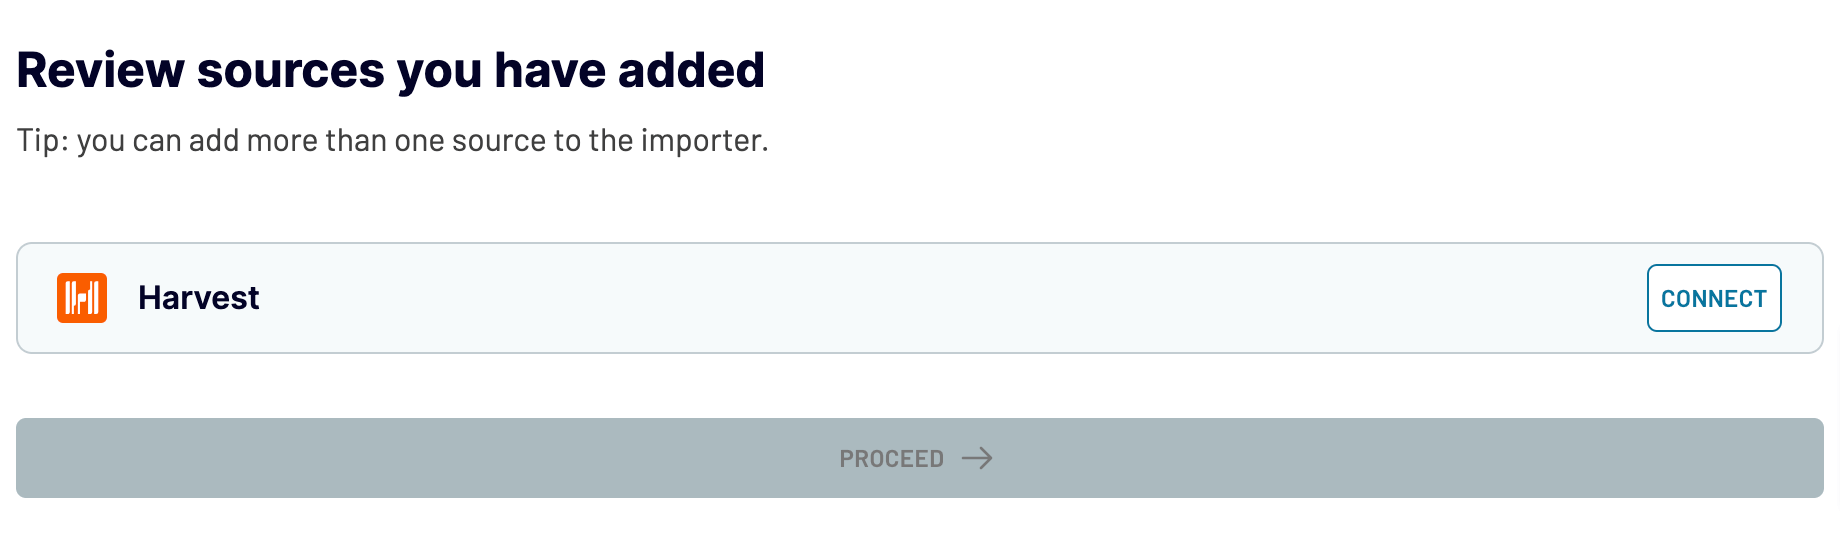
Step 1: Collect Harvest data
Begin with the form below. Here, we’ve preselected Harvest as the source. You need to choose the preferred destination from the dropdown list and click Proceed:
Now, sign up to Coupler.io for free (no credit card required). Then, authorize your Harvest account and configure the source settings:
- Specify the Harvest account from where you’d like to load data.
- Select the Data entity – the particular data type you’ll export. We’ve preselected Clients, but you have 20+ other options.
- If there are any other mandatory settings next, configure them too.
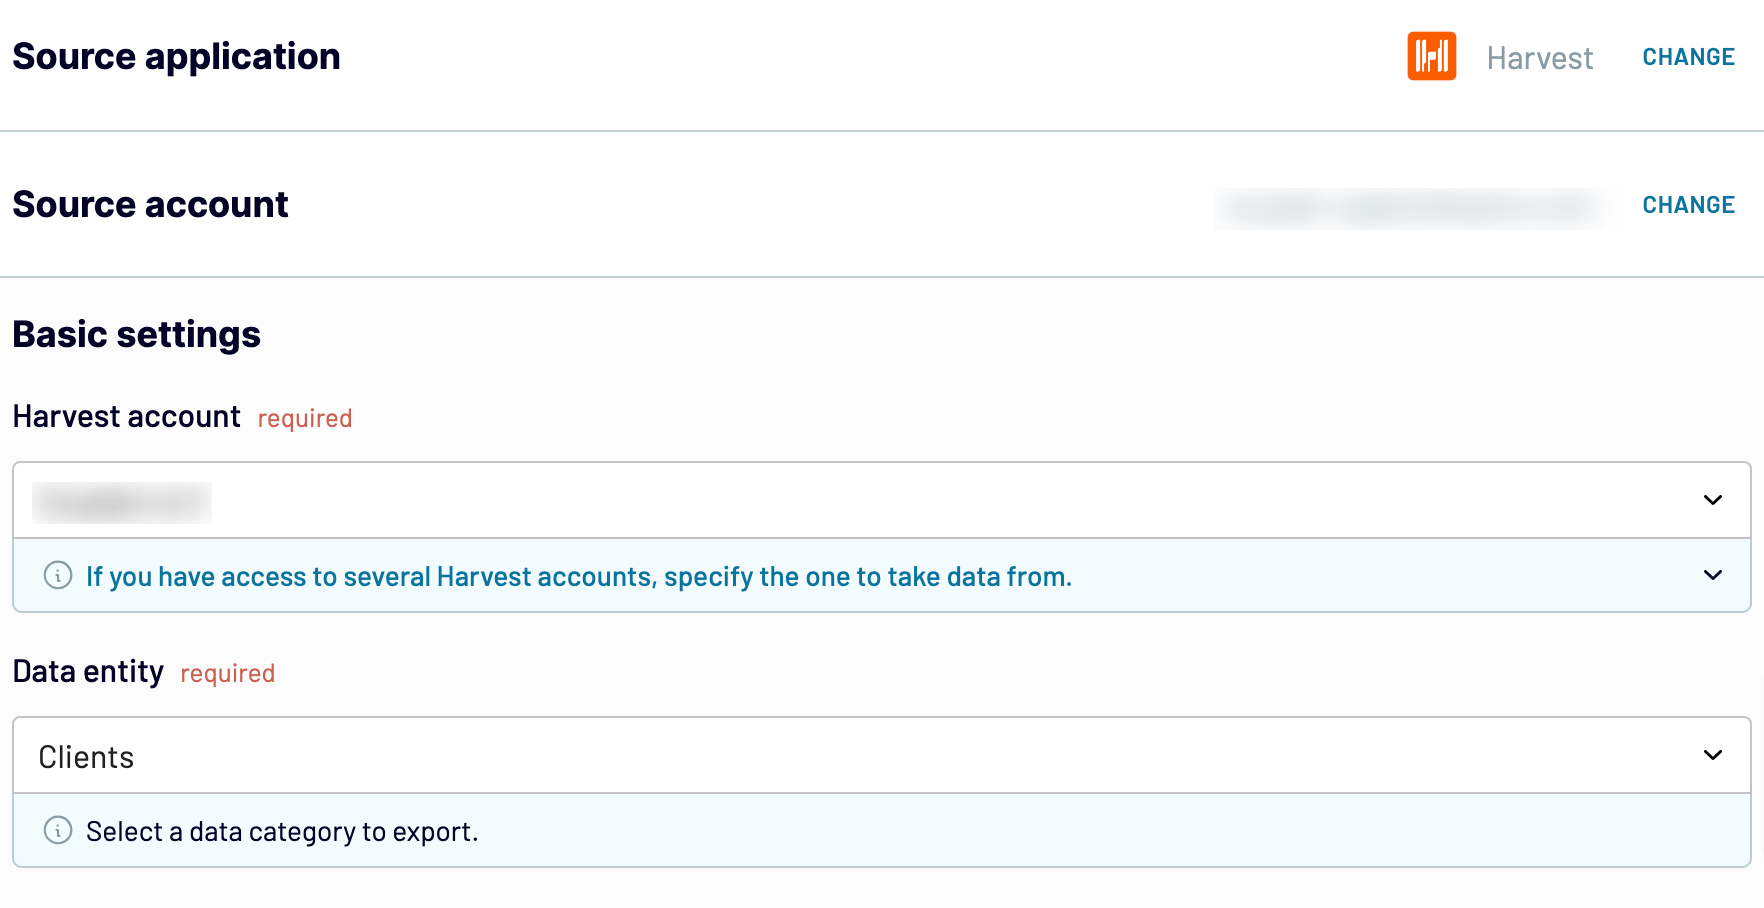
Click Finish and proceed. Then, press Transform data.
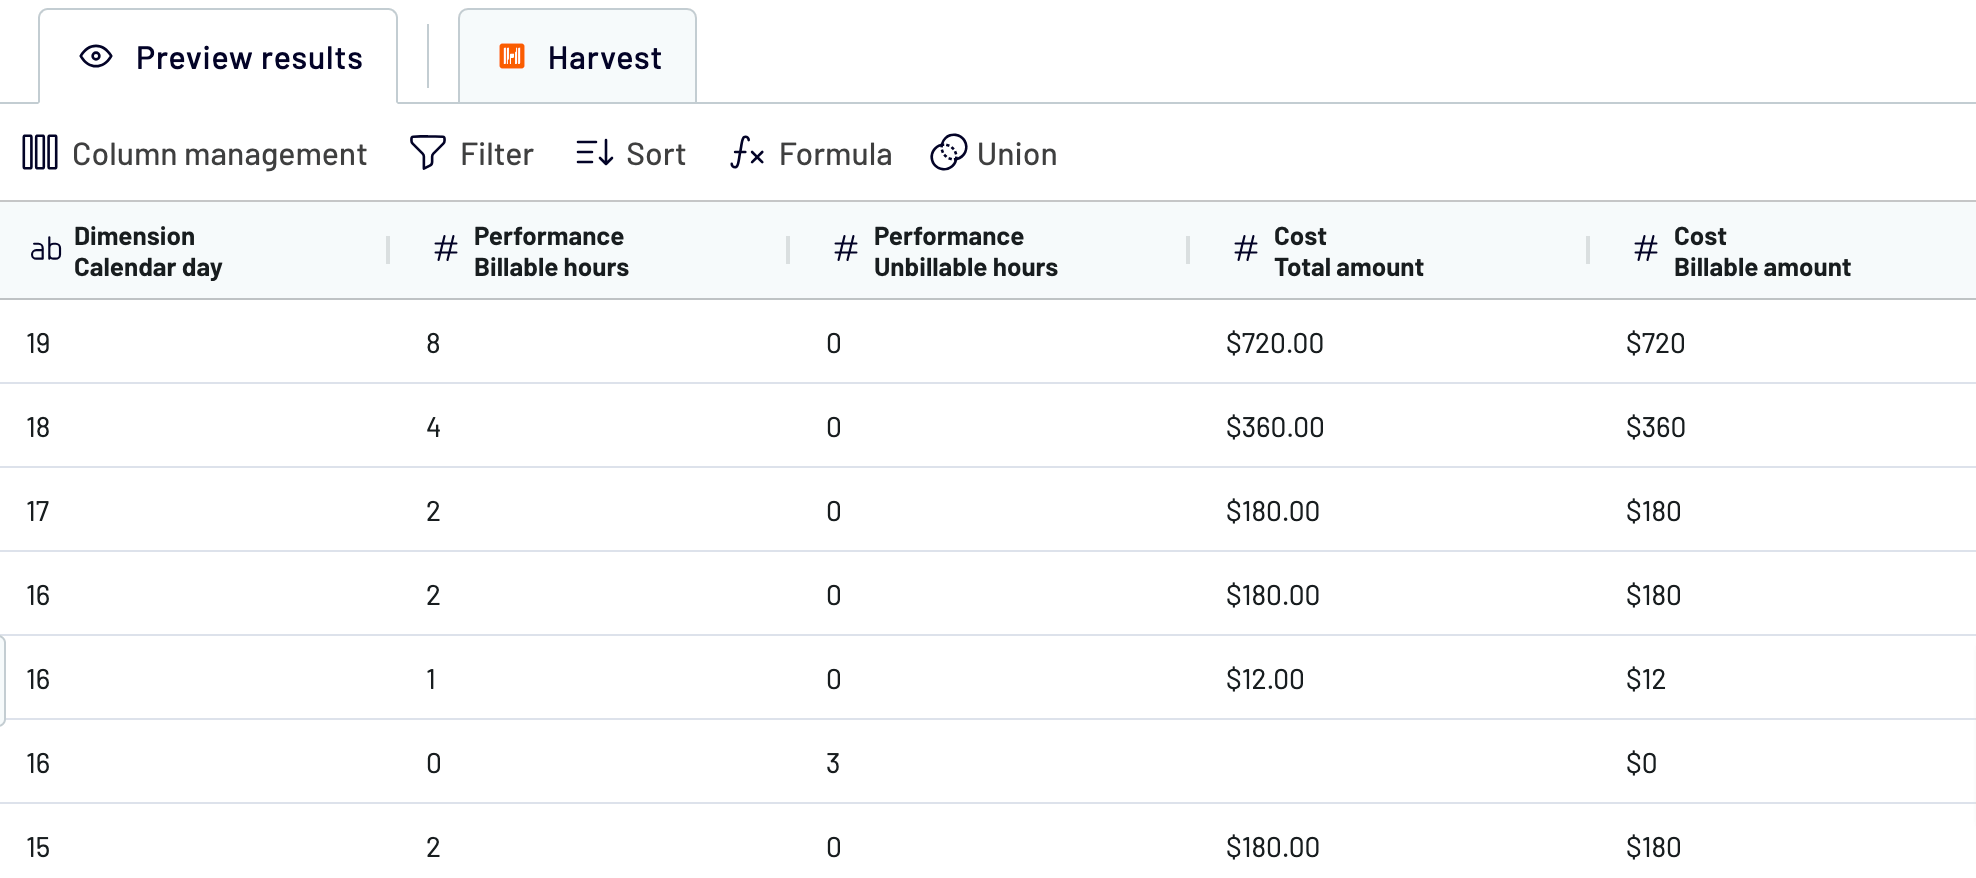
Step 2: Organize and transform data
This time, you have to preview your data and transform it if needed. Coupler.io supports the following data transformations:
- Edit, rearrange, hide, or add columns.
- Apply different filters and sort your data.
- Create columns with custom formulas.
- Merge data from multiple accounts or apps.
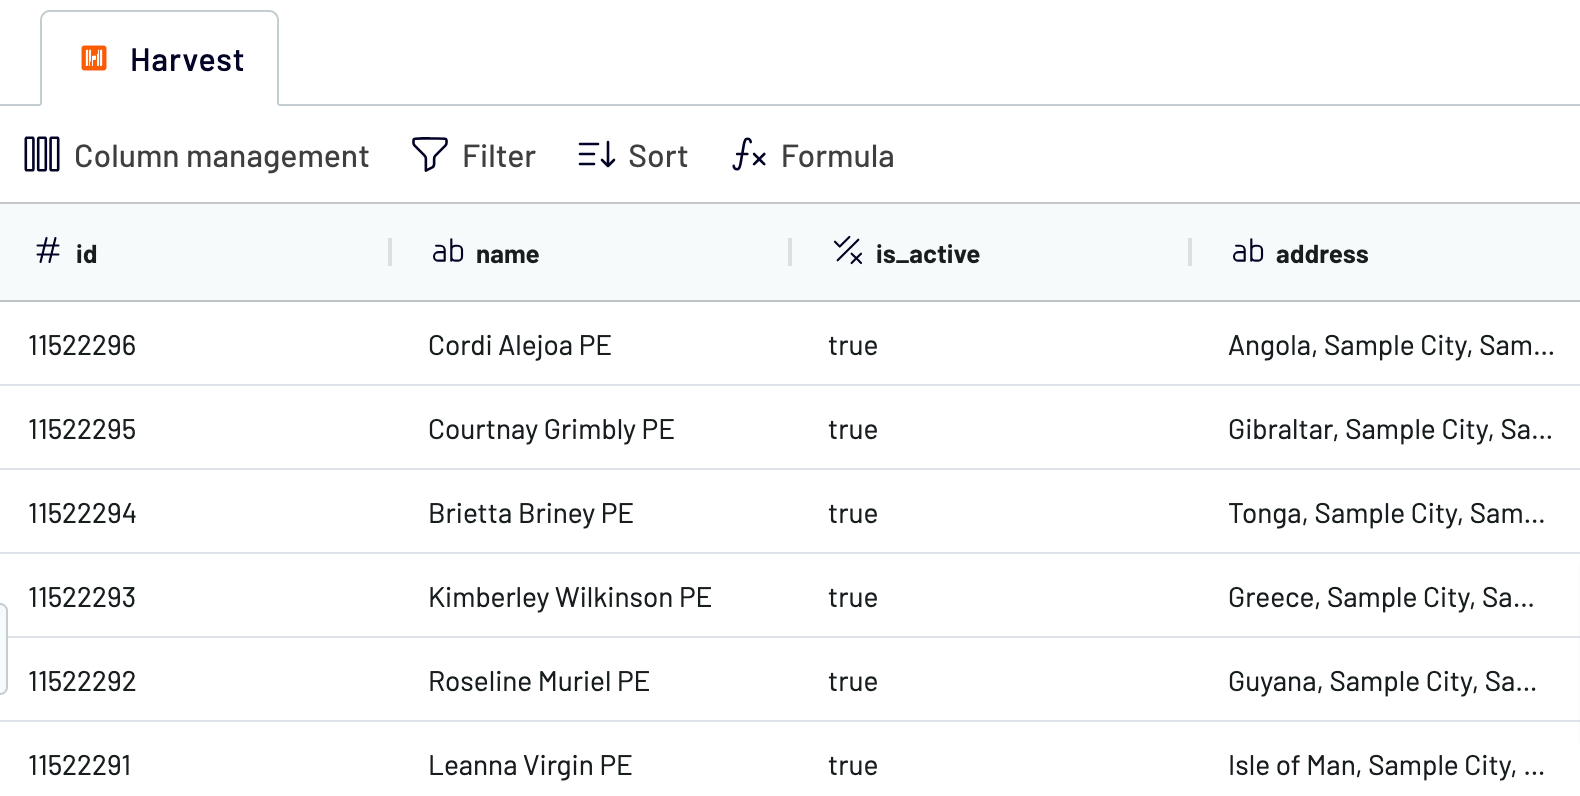
Once you’ve transformed or just previewed your data, click Proceed and follow in-app instructions to connect to the destination. After that, click Setup a schedule to go next.
Step 3: Schedule your updates
Turn on the Automatic data refresh button. Then, select the preferred interval, days of the week, hours, and time zone for auto-updates. If you leave the settings unchanged, your report will get refreshed daily. Alternatively, you can make it more frequent, from hourly to every 15 minutes, achieving almost live reporting.
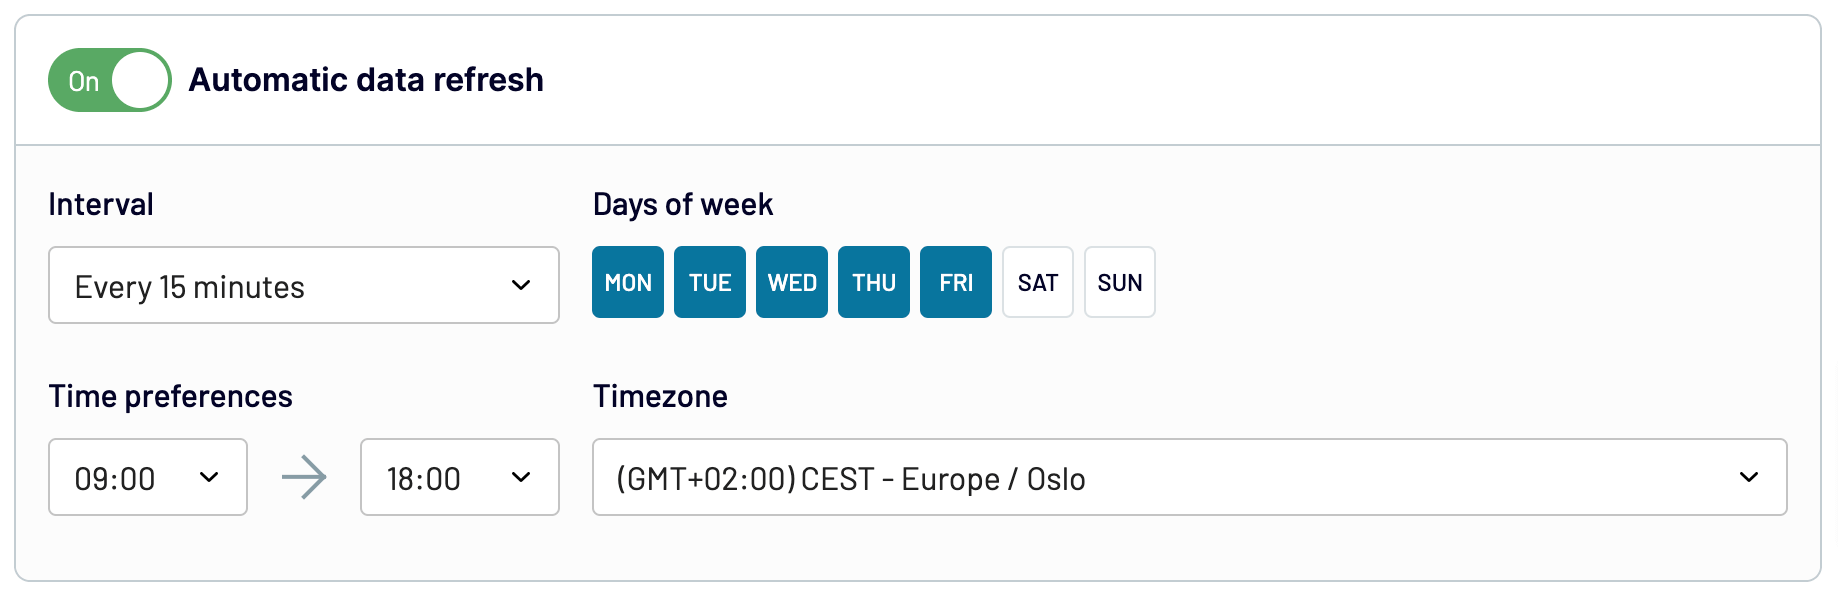
Lastly, click Run importer to get your Harvest data to the destination.

Automate data export with Coupler.io
Get started for freeWhat data can be exported by Coupler.io from Harvest?
Coupler.io enables you to export 20+ Harvest data entities. You get a list of those when configuring the source settings. To guide you through this diverse range of data categories, we’ve provided a clear outline of the most widely used options:
| Data type | Description |
| Expense report | See the big picture of expenses: categories, amounts, vendors, and linked projects. It’s ideal for accurate expense tracking, categorization, and reimbursement processes. Use this report to maintain financial order and support effective budget monitoring. |
| Time report | Capture records of hours worked across projects or by individual employees. This data includes date-specific breakdowns and task-specific efforts. It’s essential for managing workforce productivity, billing accuracy, and operational analysis in real time. |
| Uninvoiced report | Overview amounts pending invoicing from projects that have been completed but not yet billed. Critical for cash flow management, it helps in the prompt identification and resolution of billing issues, ensuring no revenue is missed. |
| Project budget report | Gain insights into project financials with details on budgeted versus actual expenditures and hours. This report is a viable choice for evaluating project performance, managing budgets, and making informed financial decisions. |
| Clients | Access client data, such as contact details, project associations, invoice history, and communication logs. It’s useful for enhancing customer relationship management, optimizing communication, and improving service delivery. |
| Company | Extract essential company-wide configurations like business name, operational address, tax information, and detailed settings. This will allow you to maintain compliance, enable corporate reporting, and manage the company’s standards. |
| Estimates | Examine estimated project costs and terms agreed with clients. This report comprises information on all estimates issued, their current status, and historical conversion rates, which are key for tracking sales processes and improving client proposal success. |
| Invoices | Collect data on all issued invoices, tracking amounts, statuses, due dates, and recipient details. This information is crucial to processes such as financial monitoring, managing accounts receivable, and improving cash flow. |
| Roles | Look at data on team roles, including role descriptions, associated permissions, and responsibilities. By using these details, you can set up access controls, organize team structure, and align responsibilities with project needs. |
| Tasks | Explore every task involved in your operations, including task names, associated projects, billable status, and rates. It’s helpful for task management, resource allocation, financial planning, and securing efficient project delivery within budget. |
| Time entries | Go through individual time entries covering data on the employee, date, hours logged, and project assignment. This report plays a significant role in labor cost analysis, productivity tracking, and ensuring accurate billing to clients. |
| Users | Get user profiles: names, roles, email addresses, and contact details. These specifics affect team management, internal communications, role assignments, and responsibility delineations within the organization. |
All the above data entities are importable into various destination apps, so let’s find out which ones.
What are the supported destinations to import Harvest data?
Thanks to Coupler.io, you can export data from Harvest to a broad array of applications. You just need to create and configure separate importers for each destination:
- Spreadsheets. If you aim for quick and straightforward reporting, spreadsheet apps – Google Sheets and Microsoft Excel – will satisfy your needs.
- Data warehouses. BigQuery, PostgreSQL, and Redshift data warehousing software are feasible choices for storing, querying, and analyzing exported data.
- BI tools. Coupler.io is integrable with diverse business intelligence tools for visual analytics: Looker Studio, Power BI, Tableau, and Qlik Sense.
- JSON. By exporting your Harvest data as a .json file, you can further use it in applications compatible with this format.
- Project management. To contribute Harvest data to workflow improvement, import it into monday.com.
Since we’ve mentioned visualization as a way to use your data, let’s delve deeper into this process.
How to visualize data from Harvest
If you’d like to make information more accessible to grasp and reach meaningful conclusions based on raw data, data visualization comes into play. For this purpose, you may connect Harvest to Power BI or import data into Looker Studio, Tableau, or another app to build dynamic dashboards for visual analytics.
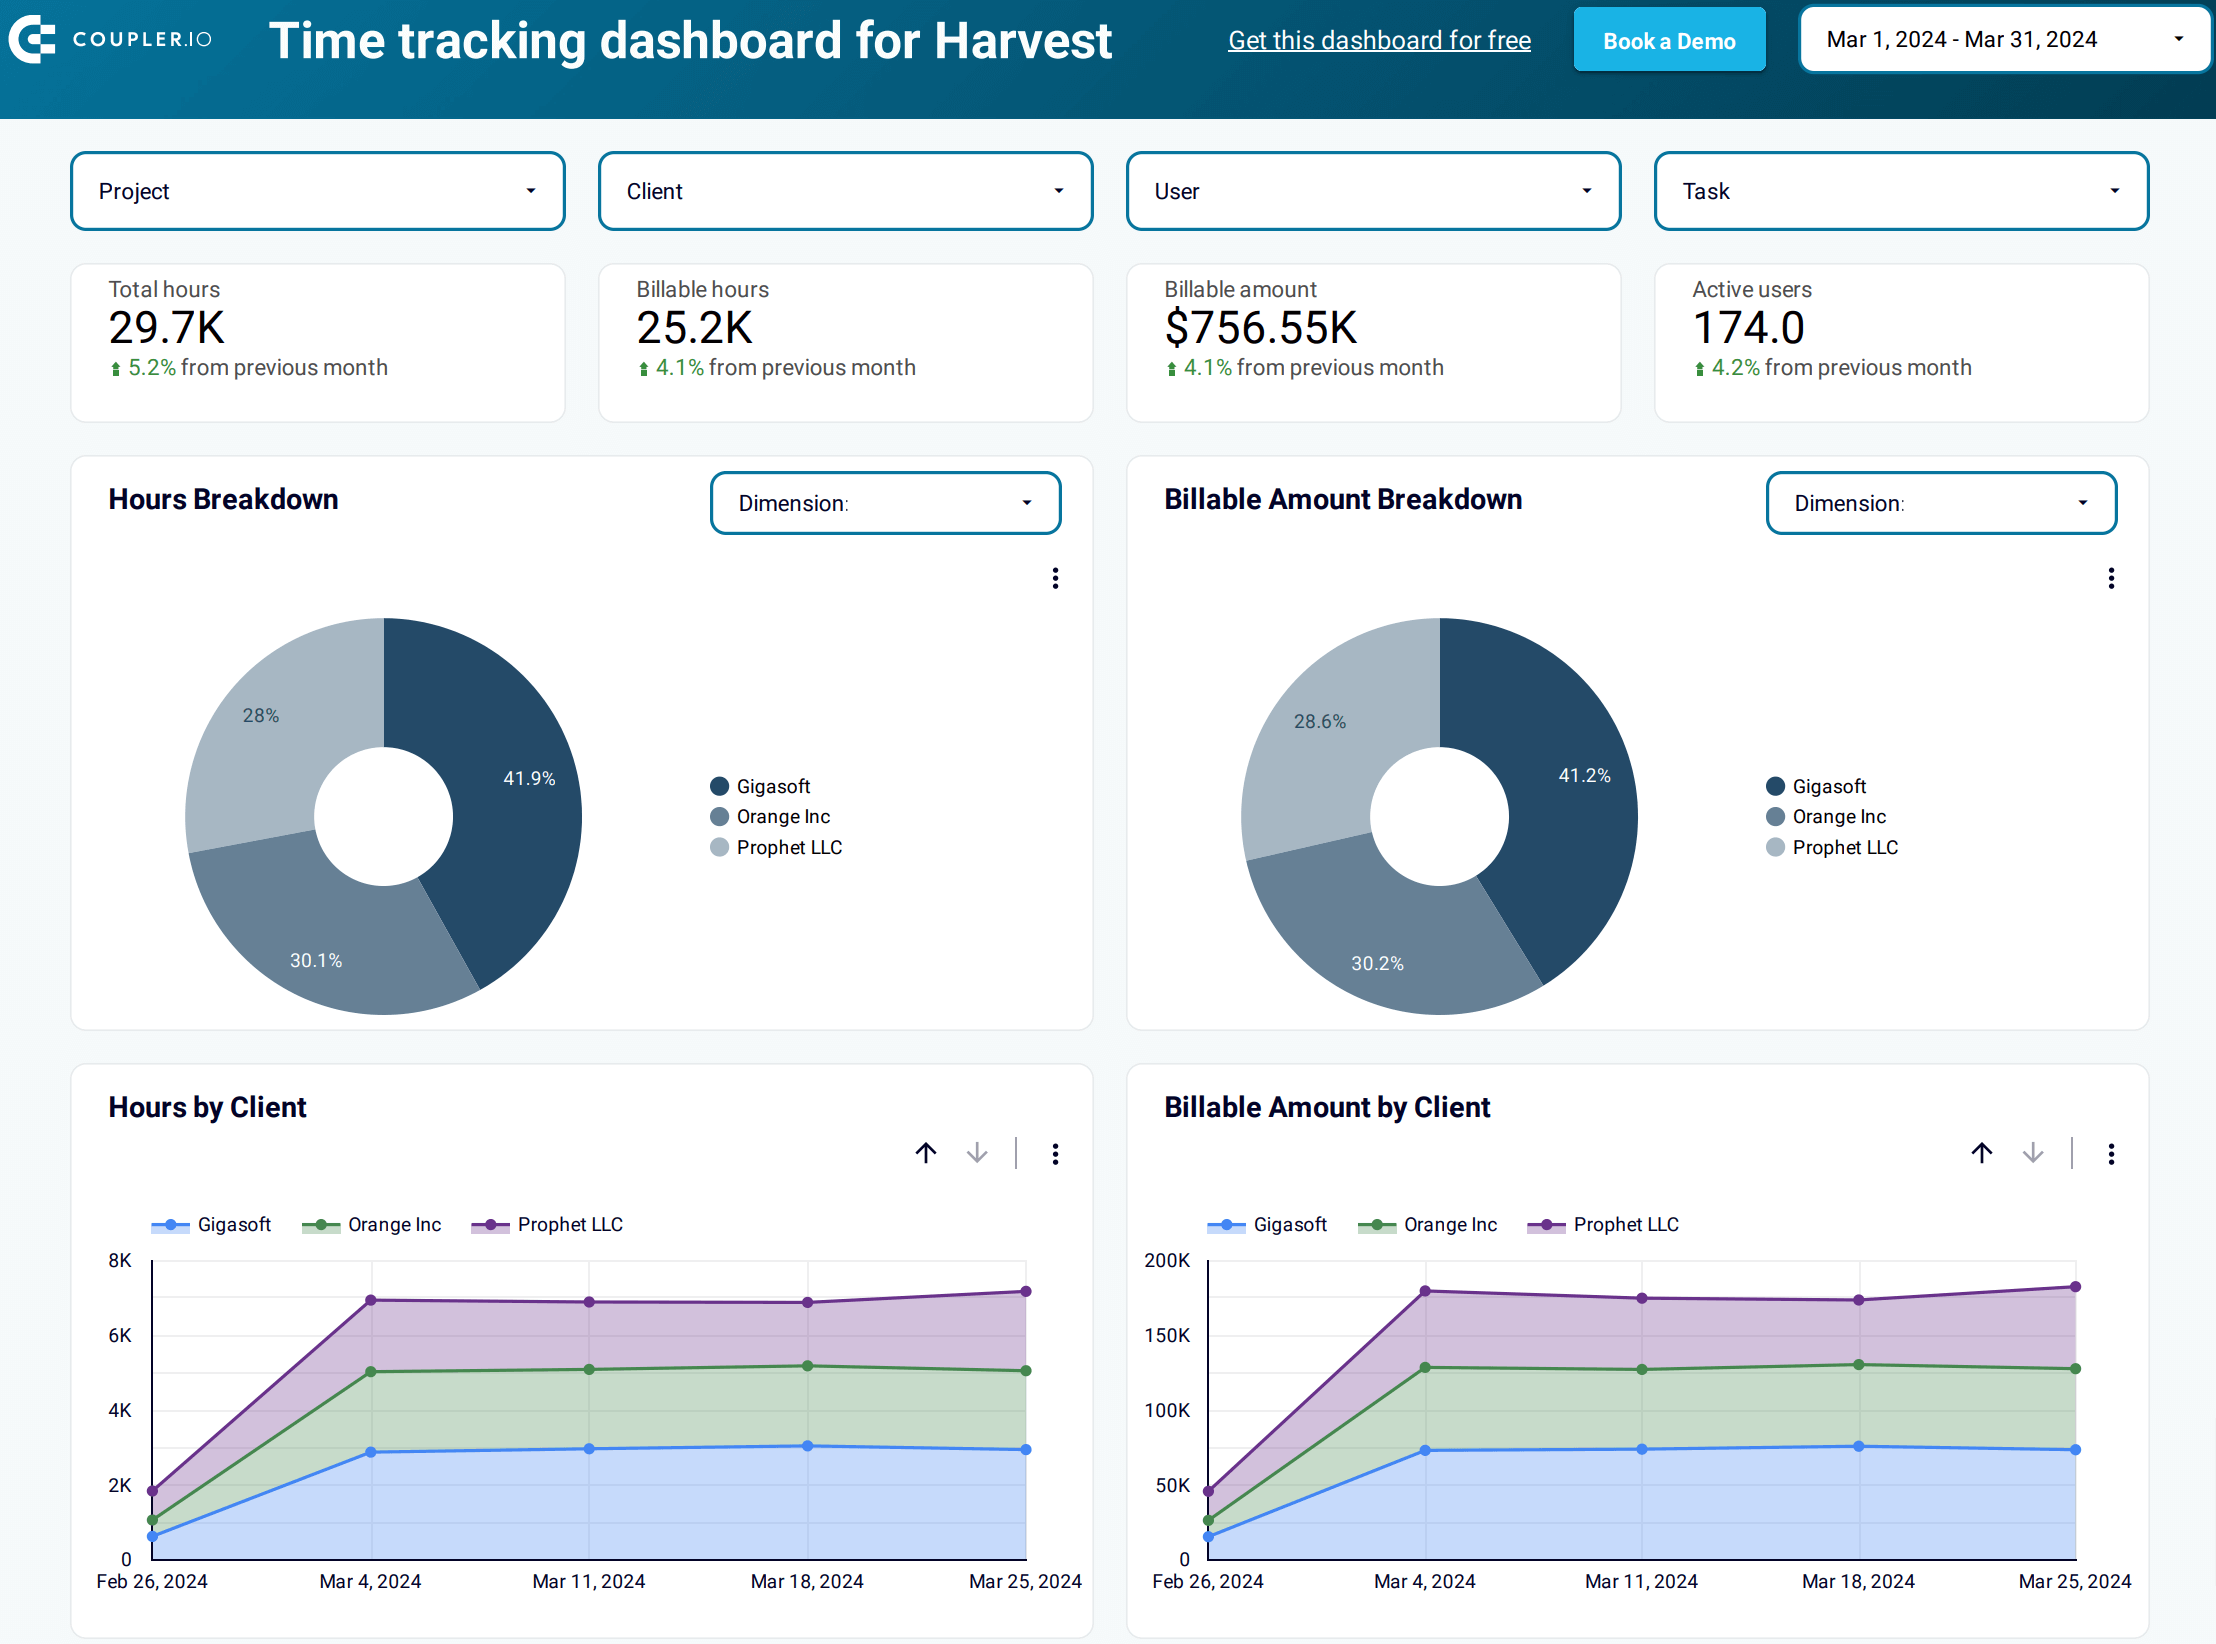
To simplify this task, use our free Harvest dashboard template in Looker Studio for time tracking and get your data automatically visualized. With this dashboard, you can analyze data based on aggregated numbers or filter it by a specific project, client, user, or task.
The setup itself is straightforward and only takes a few minutes:
- Follow this link to start configuring the dashboard and creating an automated data integration. If you are already a Coupler.io user, then you’ll be directed right to the importer.
- Connect your Harvest account.
- Once you’ve connected the account, click Finish and proceed to preview the data you’ll include in the report. No actions are needed here.
- Click Proceed and follow the in-app instructions to authorize the connector and create a data source in Looker Studio.
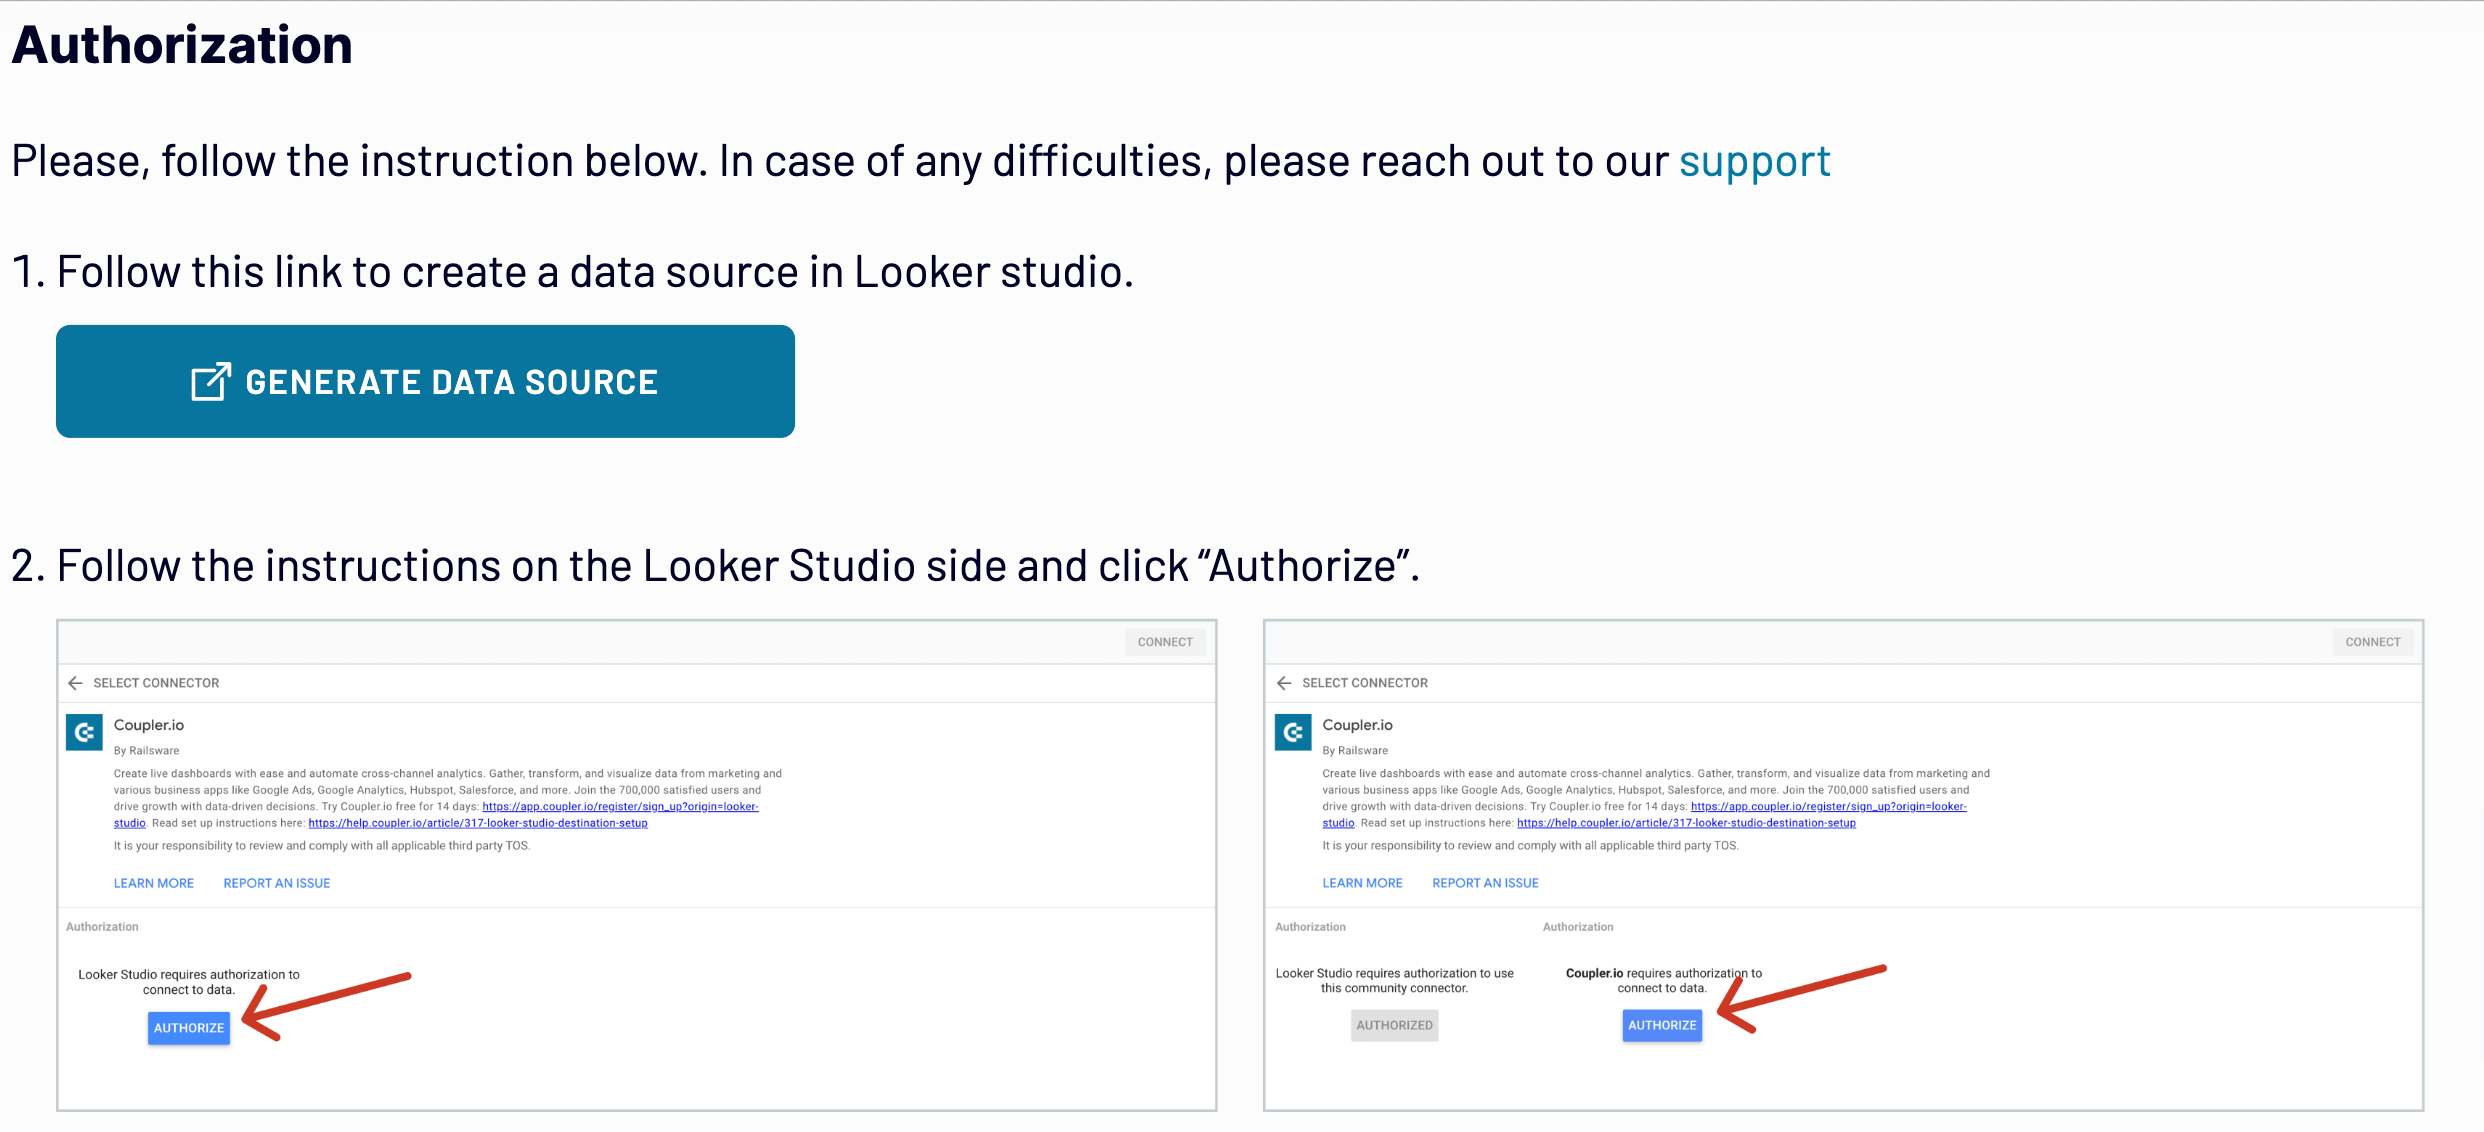
- The final click should be on the Create report button.
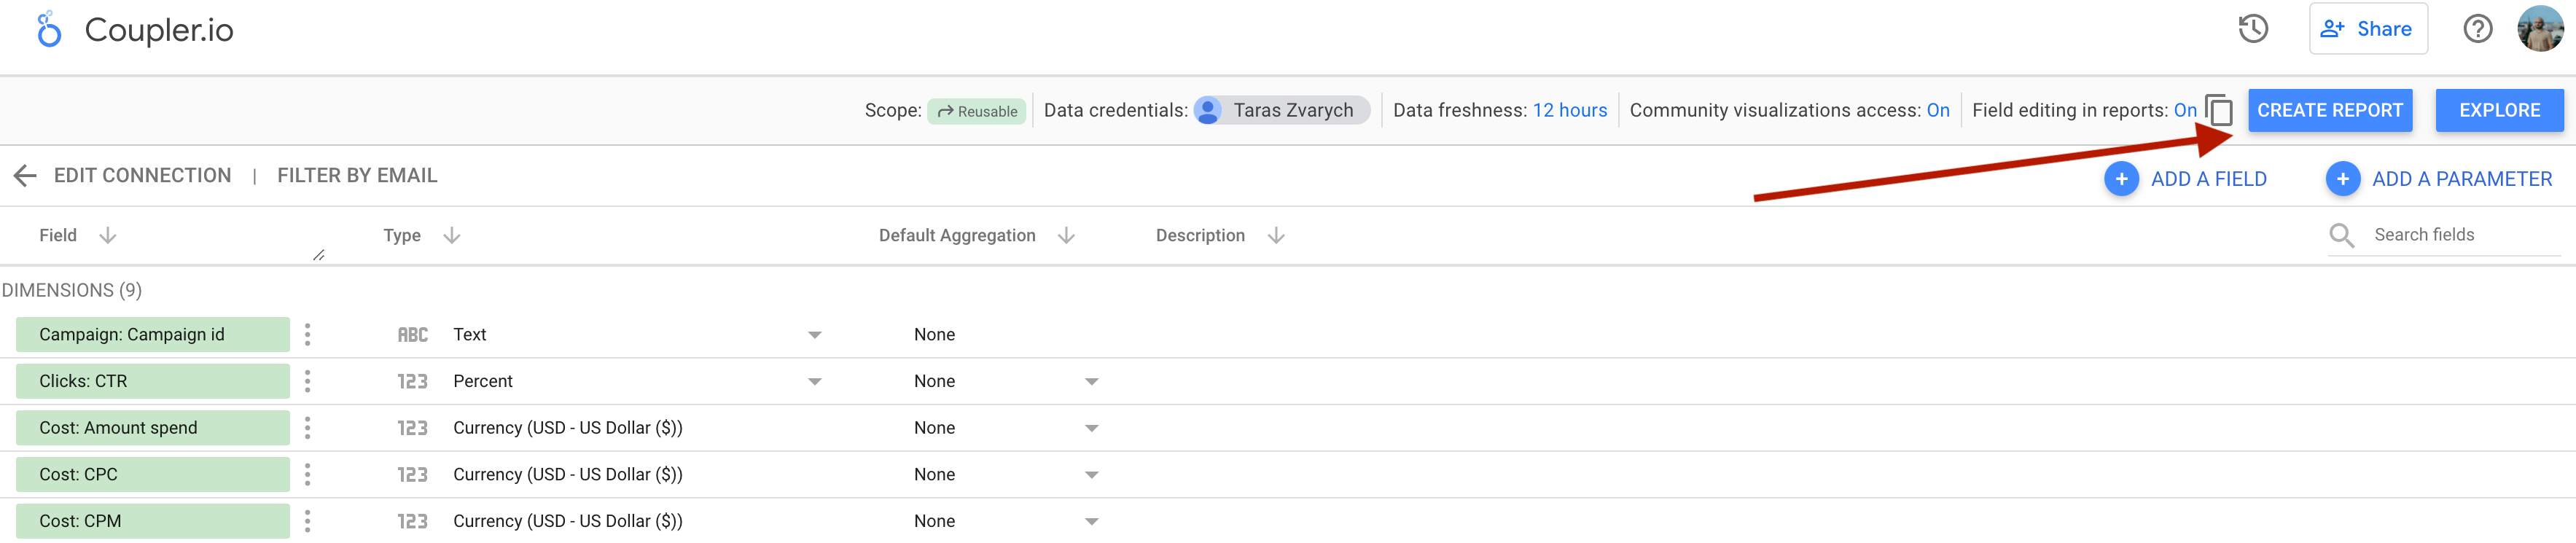
In a moment, you’ll be redirected to the copy of the Harvest report. To adjust the schedule for automatic data refreshes, go back to Coupler.io and do this as described earlier in the article. Bookmark the dashboard to always have your Harvest data at hand.
Payroll dashboard for Harvest
If you track time in Harvest and need to calculate labor costs from those records, the payroll dashboard for Harvest is a ready-to-use Looker Studio template that does this automatically.
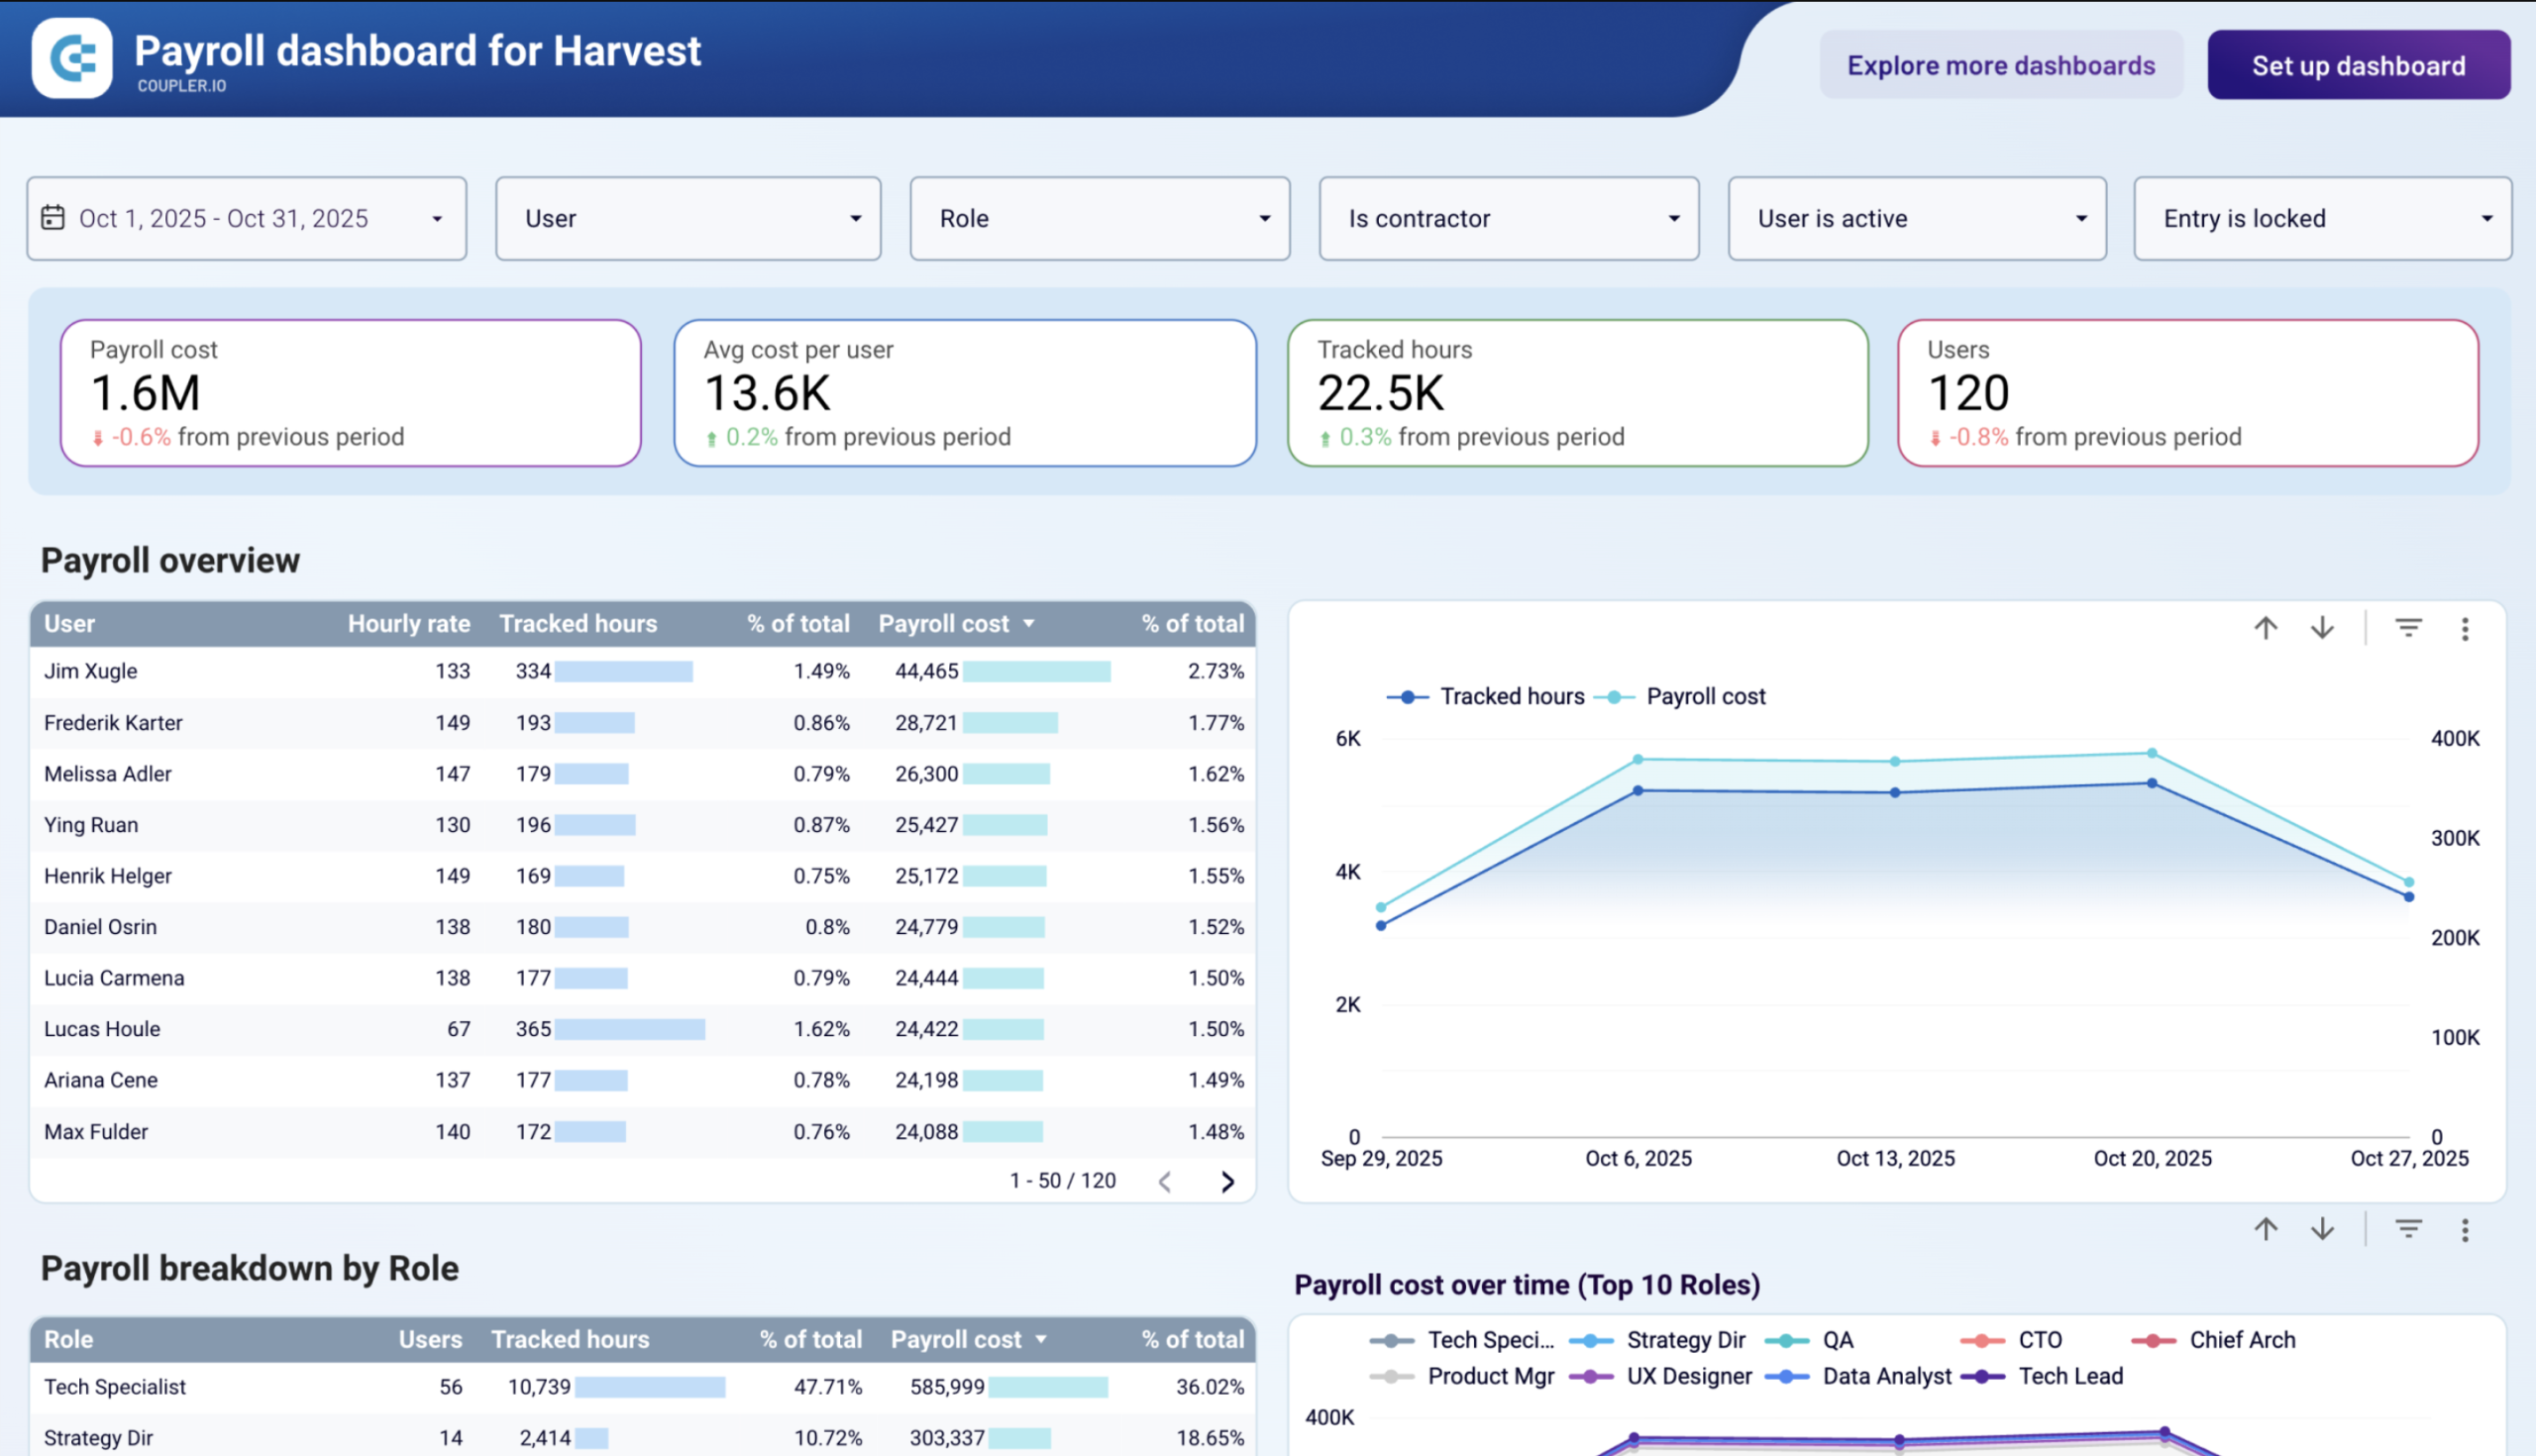
It pulls your Harvest time entries and converts them into payroll figures, so no spreadsheet formulas are needed. The dashboard shows total payroll cost, tracked hours, and average cost per user at the top level. Below that, a role-level table breaks down how much of your payroll budget each job function consumes. A calendar heatmap makes it easy to catch time entry errors like batched weekly logs or missing days before they affect your payroll run. And a transaction-level Details table lets you drill into any entry by user, project, client, or task.
To use it, follow the same setup steps described above: connect your Harvest account via Coupler.io, load the data into Looker Studio, and configure a refresh schedule so your payroll figures stay up-to-date.
Refresher: How to export Harvest data manually
Apart from the automated exports we’ve learned about, let’s discover how to load Harvest data manually. The process involves a few simple steps:
- Sign in to your Harvest account.
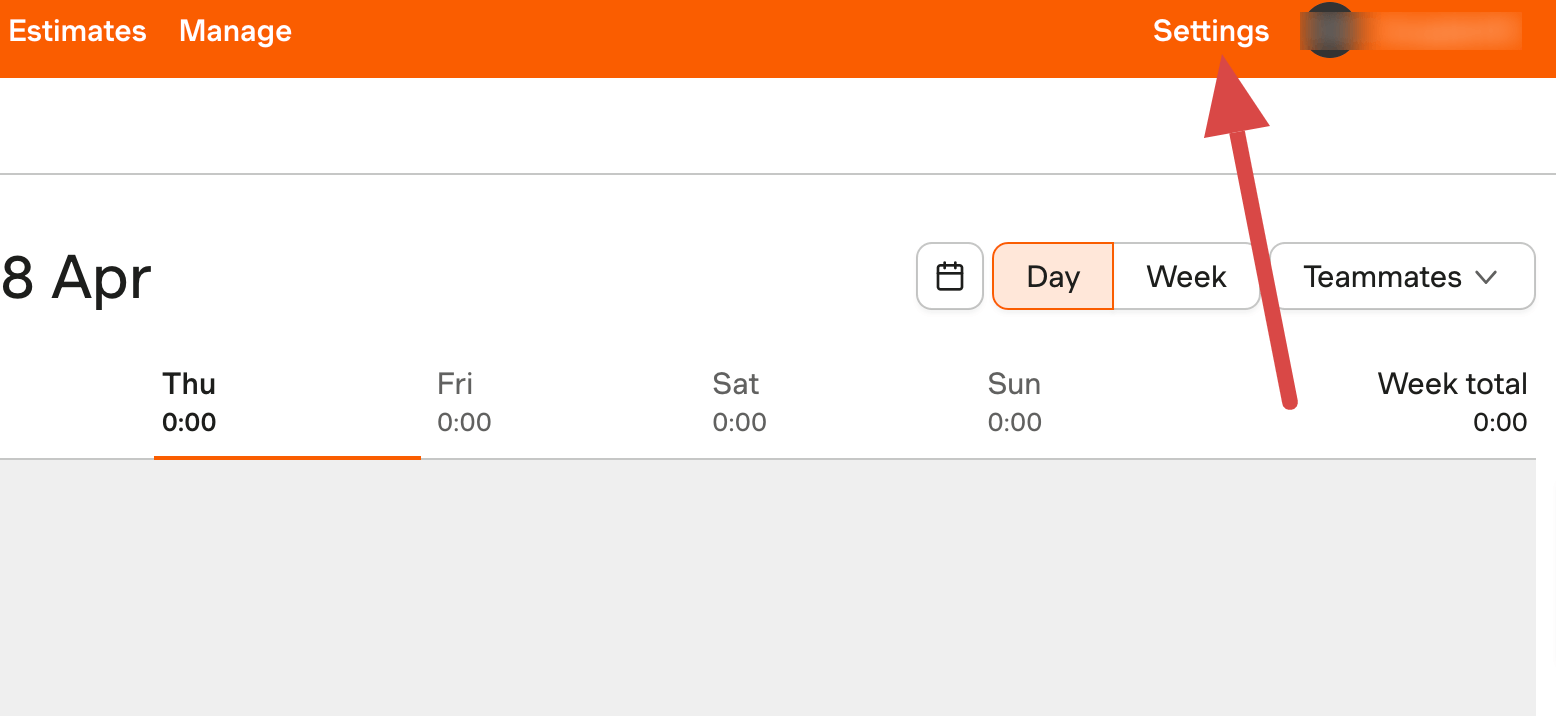
- Click on Settings in the upper panel.
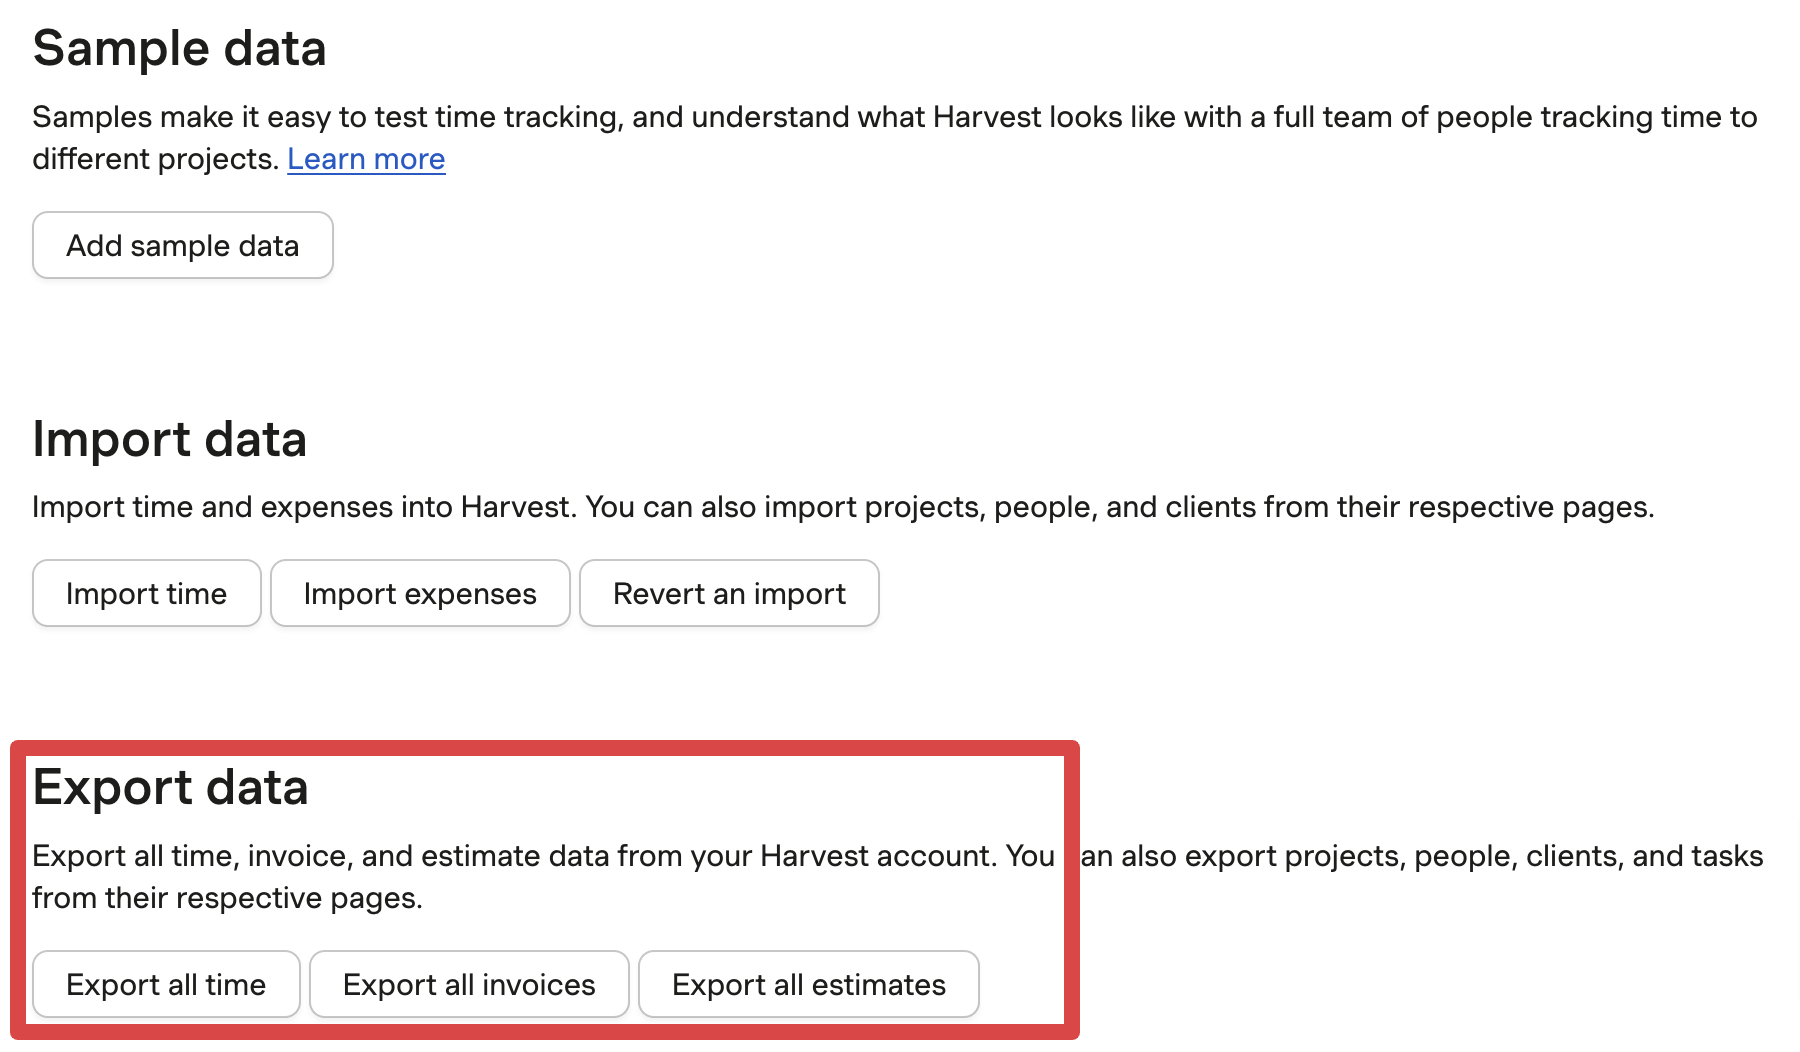
- Click on Import/export in the left panel.
- In the Export data section, you’ll have three export options available: Export all time, Export all invoices, and Export all estimates. Let’s take invoices, for example.
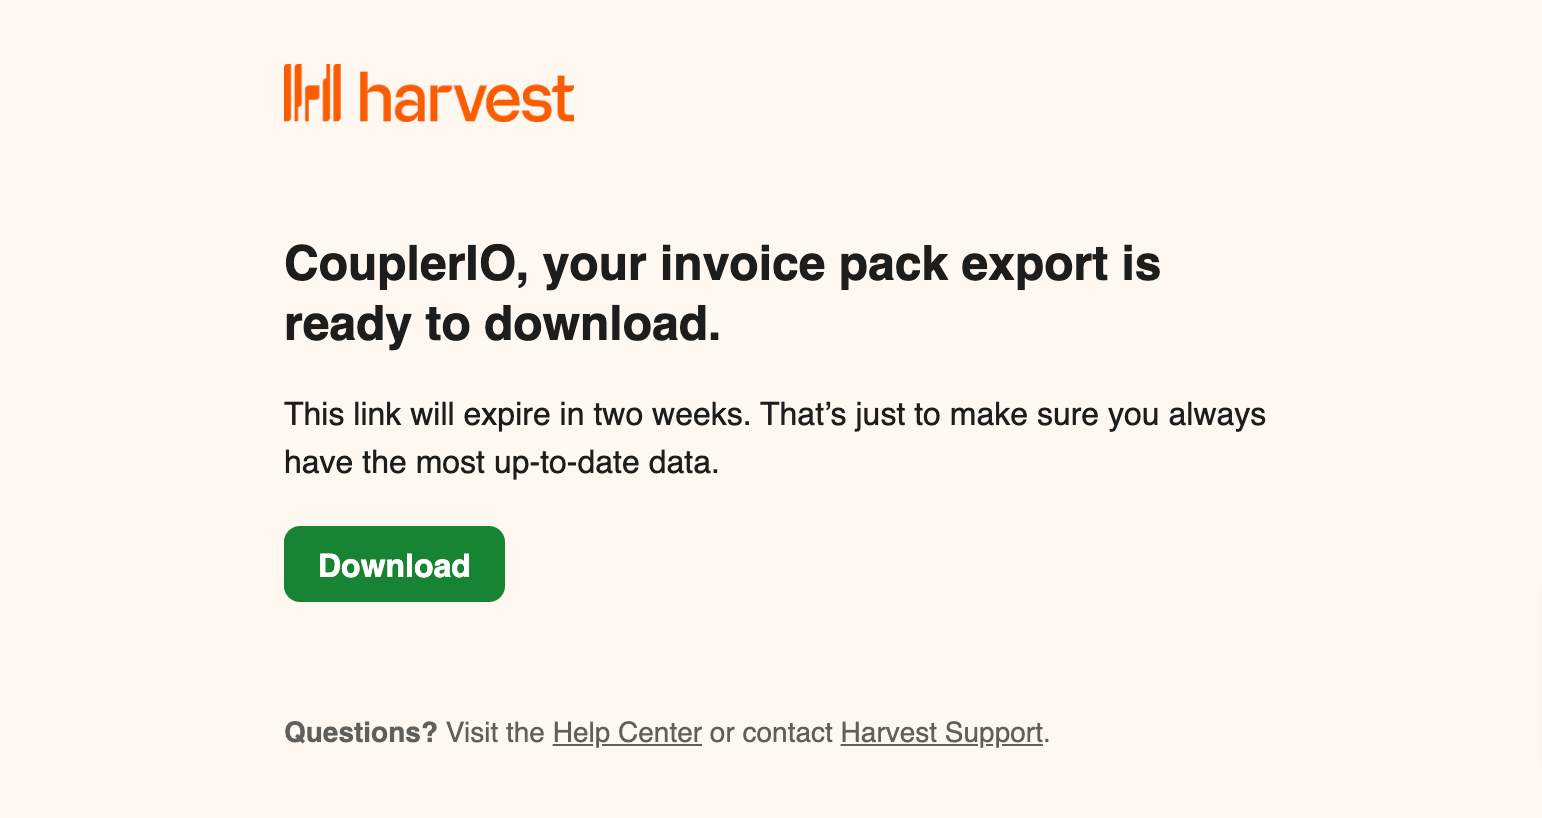
- In a minute or two, you’ll receive a letter in the mailbox associated with your Harvest account. Open it, then click Download, and save data on your device.
Now, you can upload the .csv file with your Harvest data to the destination. Still, remember this approach is only relevant if you deal with small-scale data sets exported from time to time. For immense data volumes and repeated imports, automation is a much better solution.
Coupler.io automates the export of any Harvest data, no matter how large it is, and imports it into the required app in minutes. More importantly, it can regularly ensure your report is as accurate as the data in the source, thanks to the auto-refresh feature. So, try Coupler.io for free and see how it performs in practice!
Automate data export with Coupler.io
Get started for free