Google takes various precautions to ensure you can recover the data stored in BigQuery if needed. Built-in BigQuery backup features include snapshots, time travels, multi-server data writing, and more. It’s worth knowing how each works and what the limitations are – we’ll cover all of that for you.
Sometimes, though, you may require an even more sophisticated solution to back up BigQuery data. Here, we explain some of the options available with some practical examples.
BigQuery backup – the basics
Various events could potentially result in data losses. You may accidentally write a faulty query that overrides important data. Perhaps a system failure prevents changes from being saved into a dataset. In the doomsday scenario, data centers’ hardware could be damaged. The good news is that Google has got you covered in each of these scenarios, at least to some extent.
Arguably the most common reason for data-related failures is when system disruptions happen. Typically they’re caused by network connectivity issues or power outages at a data center. While they’re not common by any means, they may happen. If such a failure occurs and doesn’t escalate into a major outage, it won’t result in any data loss. In fact, you likely won’t even notice that an issue occurred in the first place.
When a failure occurs, BigQuery automatically switches a user to a server in a functioning zone so the data warehouse can run without any interruptions. Only the queries already running can be affected, but even they will execute correctly once an outage is addressed. This can lead to an interesting situation where queries started right before an outage take a lot of time to finish while identical queries initiated a few minutes later are much faster to complete.
Another type of failure can be caused by software bugs. A query can mistakenly change the data against your initial intentions. On the other hand, bugs in the Google BigQuery code itself could also be to blame. Here, again, no data loss should be inflicted, as long as you realize what happened rather quickly.
All data written into Google BigQuery is immutable. It means that once data is written into the data warehouse, it can’t be changed. You can, of course, update values in the BigQuery tables or delete anything at will, but a copy of the initial data will remain in the system for a short period of time. BigQuery time travel function lets you recover the data up to seven days into the past. We’ll discuss it further in a later chapter.
The last category of data-related failures can result from physical damage or failure of data infrastructure. Such events, albeit very uncommon, can result in data loss, and it’s worth taking the needed precautions to mitigate this risk.
However, even if a server where you store your data is destroyed, you’re still likely to retain a copy of your projects. Any data you write into BigQuery is automatically saved into two different zones. If a failure occurs to a copy in one zone, you’ll be able to collect the data from another zone. An event where two different zones are affected at the same time is extremely unlikely to happen.
Either way, it’s worth knowing what the options to back up BigQuery are and building a disaster recovery strategy your organization requires. We’ll discuss various techniques next.
How to back up BigQuery with time travel
The time travel functionality built into Google BigQuery lets you indeed travel back in time. In other words, you can retrieve a table from any point in the last seven days by running a simple SQL query and specifying the desired timestamp. It’s very handy if you made an error and need to restore to a certain point in time over the previous week. It will also work if a BigQuery table you need expired lately or was deleted.
There are two drawbacks to this approach. First is the time frame that sometimes may prove to be too short, especially if you don’t monitor your queries on a frequent basis. The other problem with this method is that to restore a particular BigQuery backup, you need to know when exactly was that “last good time.” If you’re unsure, you can try jumping back to different timestamps over the previous seven days, but it may prove to be time-consuming.
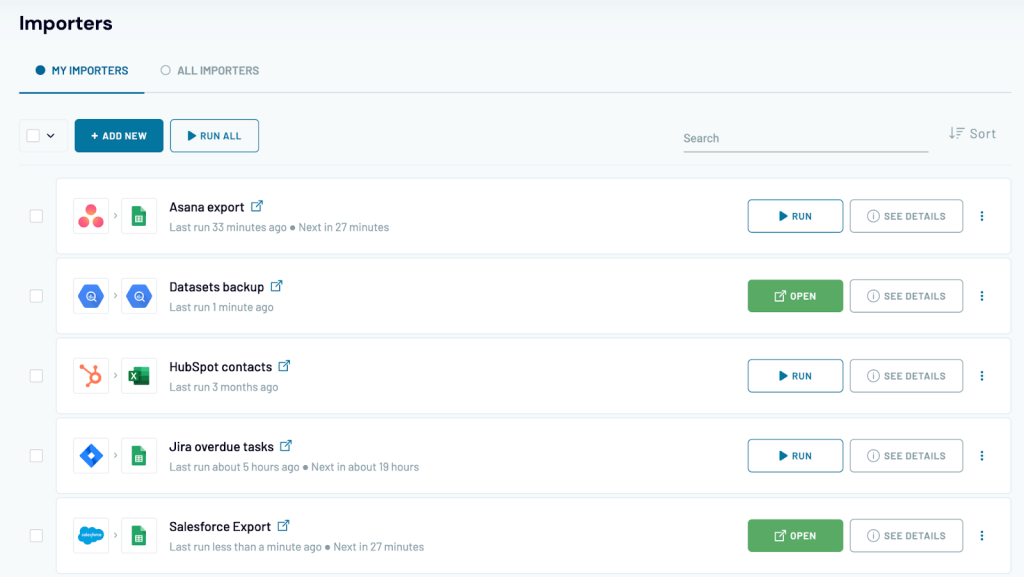
Let’s look at an example of using time travel. Using Coupler.io, we’re running automated imports from different advertising and analytical apps into BigQuery.
Coupler.io is an all-in-one data analytics and automation platform that helps businesses automate their data flows. The platform offers 200+ integrations, scheduled transfers, webhooks, and more. BigQuery is one of the possible destinations for the data as well as a source for sending the data further.
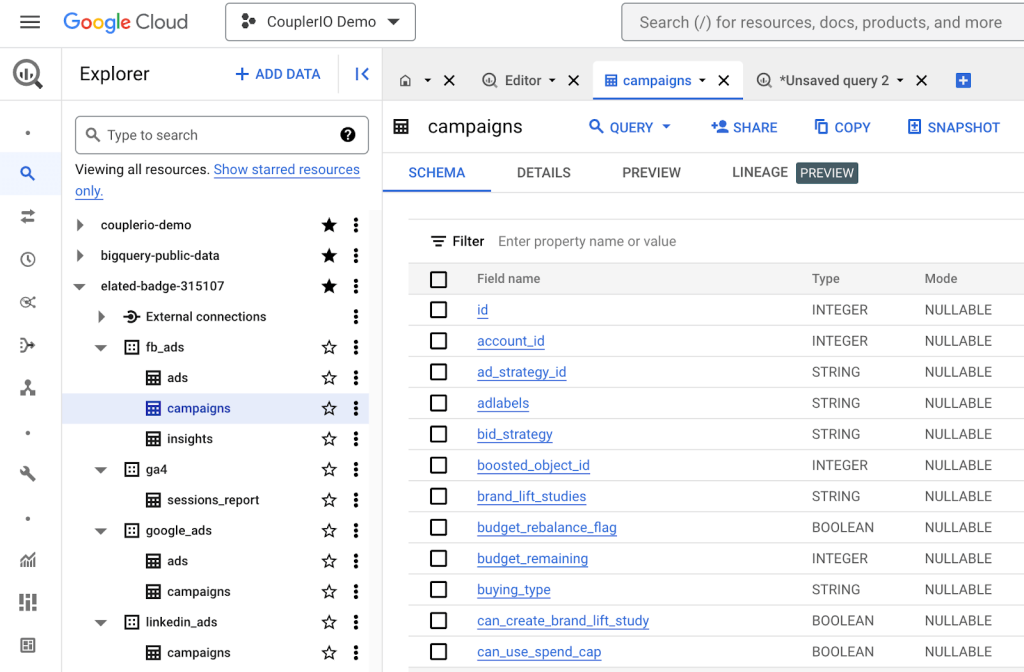
Here’s, for example, a BigQuery table with the latest list of campaigns from our Facebook Ads account:
While transforming the imported data, we accidentally deleted some vital rows. Rather than wait for the next import from Facebook that’s scheduled for tomorrow morning, we can retrieve the table as it looked 10 minutes ago with the following SQL:
SELECT *
FROM `project_name.fb_ads.campaigns`
 FOR SYSTEM_TIME AS OF TIMESTAMP_SUB(CURRENT_TIMESTAMP(), INTERVAL 10 MINUTE);
If you need a backup further in time, you can use HOUR and DAY operators, up until the time travel limit (by default, seven days, can’t be prolonged but can be shortened down to two days).
Rather than use an interval, you can specify a specific timestamp to jump back to. For example:
SELECT *
FROM `project_name.fb_ads.campaigns`
 FOR SYSTEM_TIME AS OF "2023-02-09 7:45:00"
With either method, if you choose a timestamp outside of the time travel window (in the future, too far into the past, also before a table has been created), you’ll receive an error message:
Invalid time travel timestamp 1675878300000 for table project_name:fb_ads.campaigns@1675878300000. Cannot read before 1675956215475
or:
'FOR SYSTEM_TIME AS OF' expression for table 'project_name:fb_ads.campaigns' evaluates to a TIMESTAMP value in the future: 2023-02-10 17:45:00 UTC.
Once you’ve figured out where that “last good time” is in the past, you can override the current data or create a new one with a standard syntax. Here, for example, we’re creating a new table named ‘campaigns_new’ that will be populated with the data as of 7:45 am on Feb 9th:
CREATE OR REPLACE TABLE`project_name.fb_ads.campaigns_new` AS
SELECT *
FROM `project_name.fb_ads.campaigns`
 FOR SYSTEM_TIME AS OF "2023-02-09 7:45:00"
Note: You can also use the bq command line and API with time travel.
Time travel functionality is useful, but Google has recently introduced a more powerful way to back up BigQuery data – Snapshots. We’ll discuss them next.
How to back up BigQuery data with snapshots
Snapshots are much more powerful than the time travel feature because they let you keep BigQuery backups for as long as you need them. Storing these extra copies of your tables is also considerably cheaper than duplicating your data in any other way.
Snapshots preserve the content of a table at a chosen time. It can be the content fetched at the time of creating a snapshot or any timestamp from the previous seven days.
What’s more, snapshots can but don’t need to have an expiry date, at which point they’ll be deleted from the system. For example, you can choose to take daily snapshots of your tables but keep each snapshot only for a month.
Table snapshots are read-only, meaning that they can’t be queried or modified in any way. If you back up BigQuery to a snapshot but at some point want to modify its data or schema, you’ll first have to restore a table from that particular snapshot. For that purpose, you can either replace a current table or create a brand-new one. At this point, you can save an updated table as a snapshot again.
What’s more, snapshots aren’t billed as regular data storage. Instead, you only pay for the bytes that are different between a current table and its snapshots.
For example, let’s say you had a table the size of 10MB, and you took a snapshot of it. The next day you loaded some more data, without modifying the existing content, and the size grew to 15MB. Since 5MB of data are different between a table and its snapshot, you’ll only pay for that, plus, of course, the regular storage pricing for the 15MB in the current table (for a total of 20MB).
To back up BigQuery with snapshots, you’ll need to have bigquery.tables.createSnapshot IAM permissions assigned to your service account. These permissions are also included with the usual bigQuery.dataViewer and bigQuery.dataEditor roles you often need to manipulate the data.
You can compute snapshots directly from the interface of the Google Cloud Platform (GCP), or you can use SQL, command line, or API. Continuing an earlier example, we’re working with the campaigns export from Facebook Ads. Coupler.io now pulls the data hourly, which keeps our data in BigQuery very up-to-date. However, for the purpose of weekly reporting, we want to also take a snapshot of a table so we can use it later for analysis.
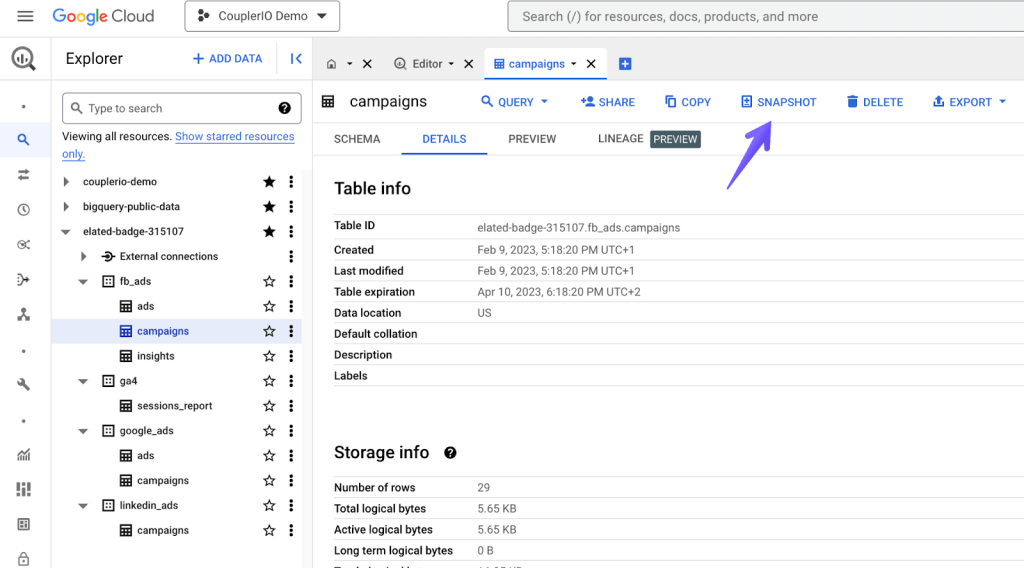
In the cloud console, open BigQuery, then load a table view and click the Snapshot button on top.
A pane to the right will open. By default, the table name will be created using the format current_name-current_timestamp. If you’re fetching the data as of now, it should work just fine. Here, however, we want to back up BigQuery data as of 8 am today and set the expiration to be a month later.
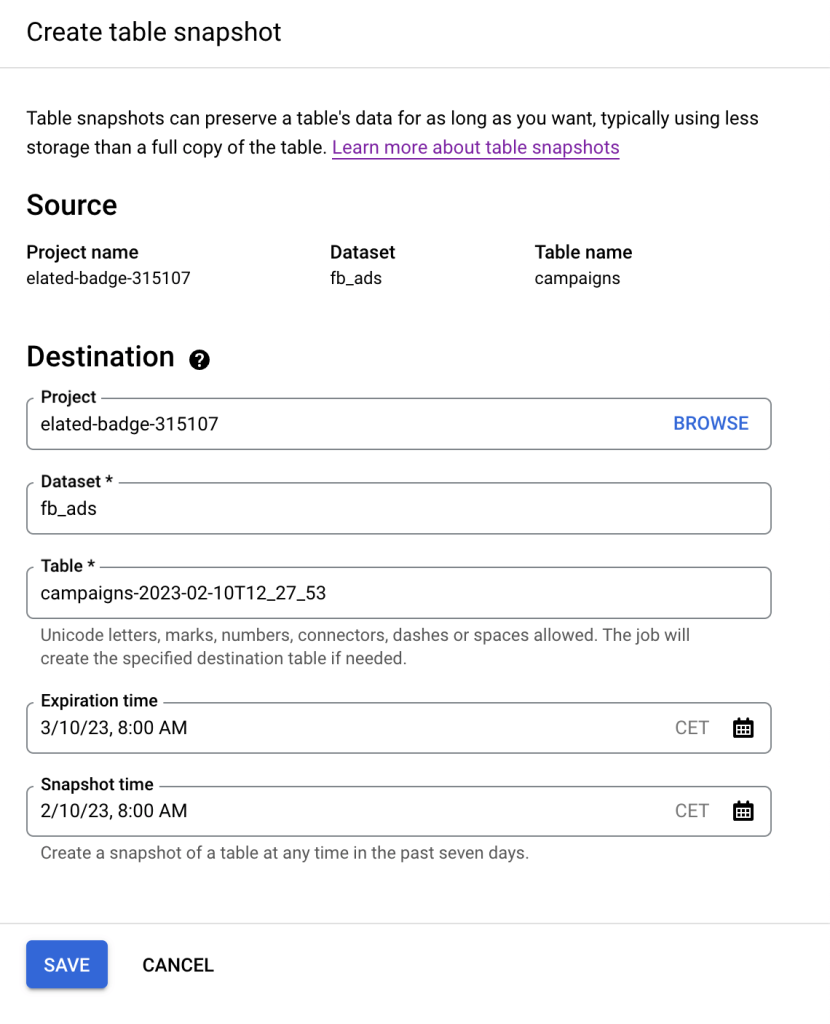
We update the table name so it reflects the actual timestamp used and click Save. Shortly, a BigQuery table snapshot will appear on the tables list. You can review its details, including the base table it was created from.
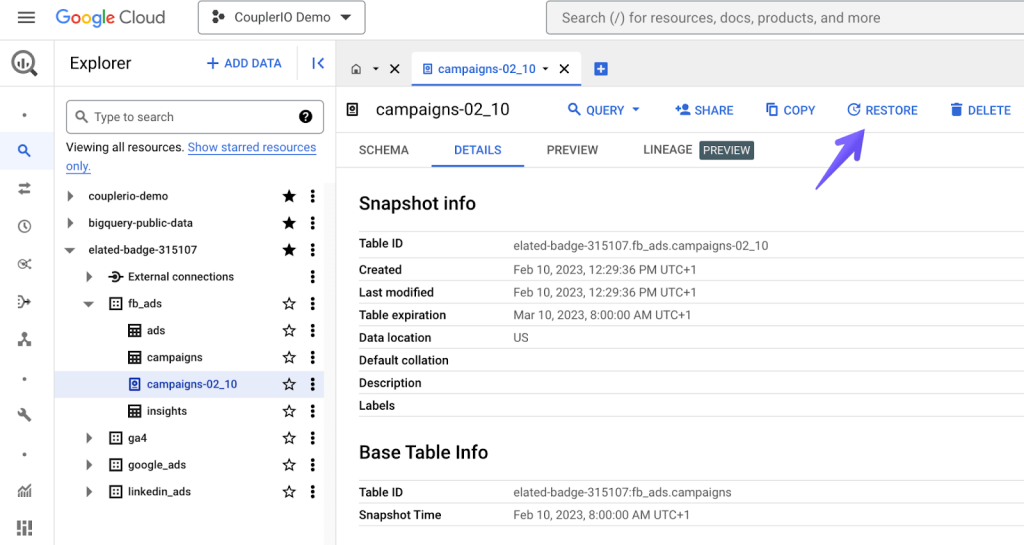
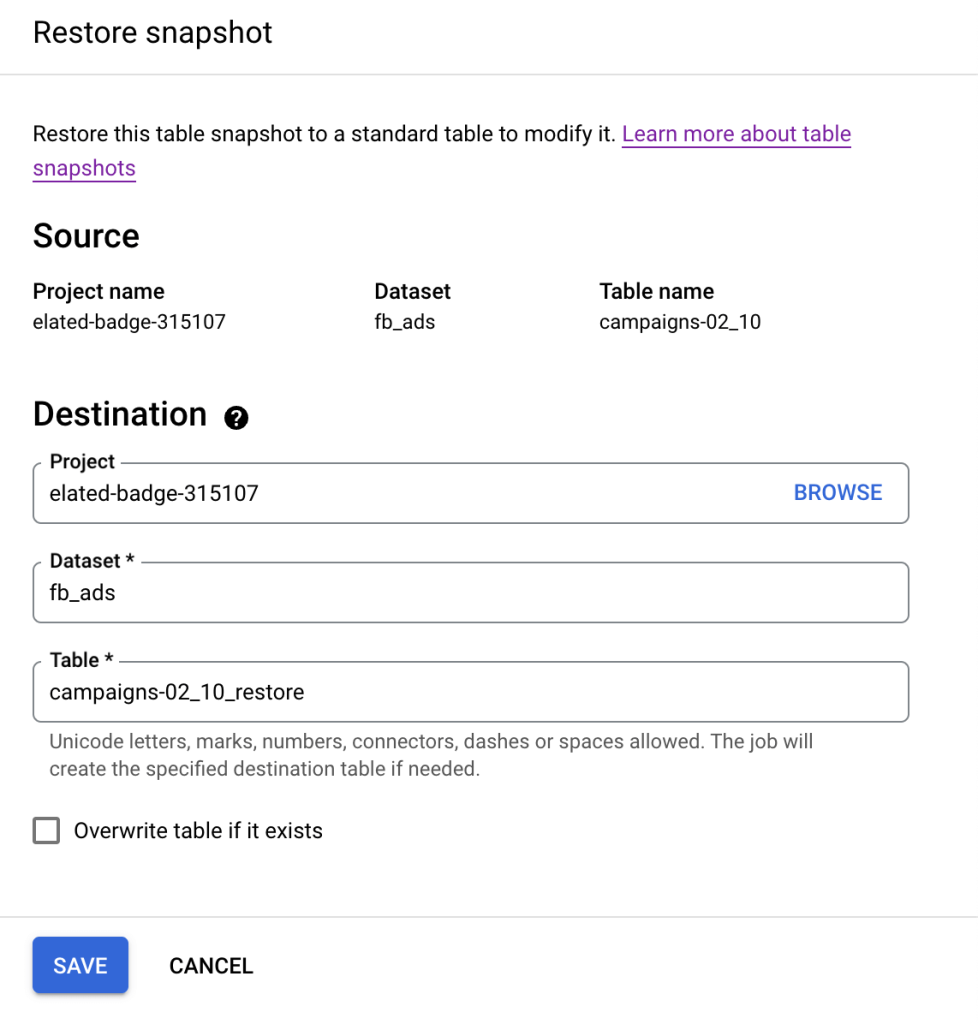
To restore a particular snapshot, click the relevant icon in the menu:
Next, choose where to restore a snapshot. You can either create a new table with the snapshot data or choose to overwrite an existing table.
The SQL to create a BigQuery backup of the current version of a table would be as follows::
CREATE SNAPSHOT TABLE `project_name.fb_ads.campaigns_02_10`
CLONE `project_name.fb_ads.campaigns`;
To create a snapshot from a certain interval prior to the current time, you’ll need to use the time travel syntax with a SELECT statement:
CREATE TABLE `project_name.fb_ads.campaigns_snapshot`
 OPTIONS(
   expiration_timestamp = TIMESTAMP "2023-03-10 00:08:00 UTC" ) AS
SELECT *
FROM `project_name.fb_ads.campaigns`
 FOR SYSTEM_TIME AS OF "2023-02-10 00:08:00 UTC"
BigQuery backup dataset – other available options
As we mentioned earlier, BigQuery saves data to two distinct zones. If there’s a disruption of service to one zone, identical data will be available to you and you shouldn’t even experience any service disruptions. However, there are some additional things you can consider doing to back up BigQuery – making copies of your datasets and loading BigQuery backups to GCS (Google Cloud Storage).
Making a copy of your data
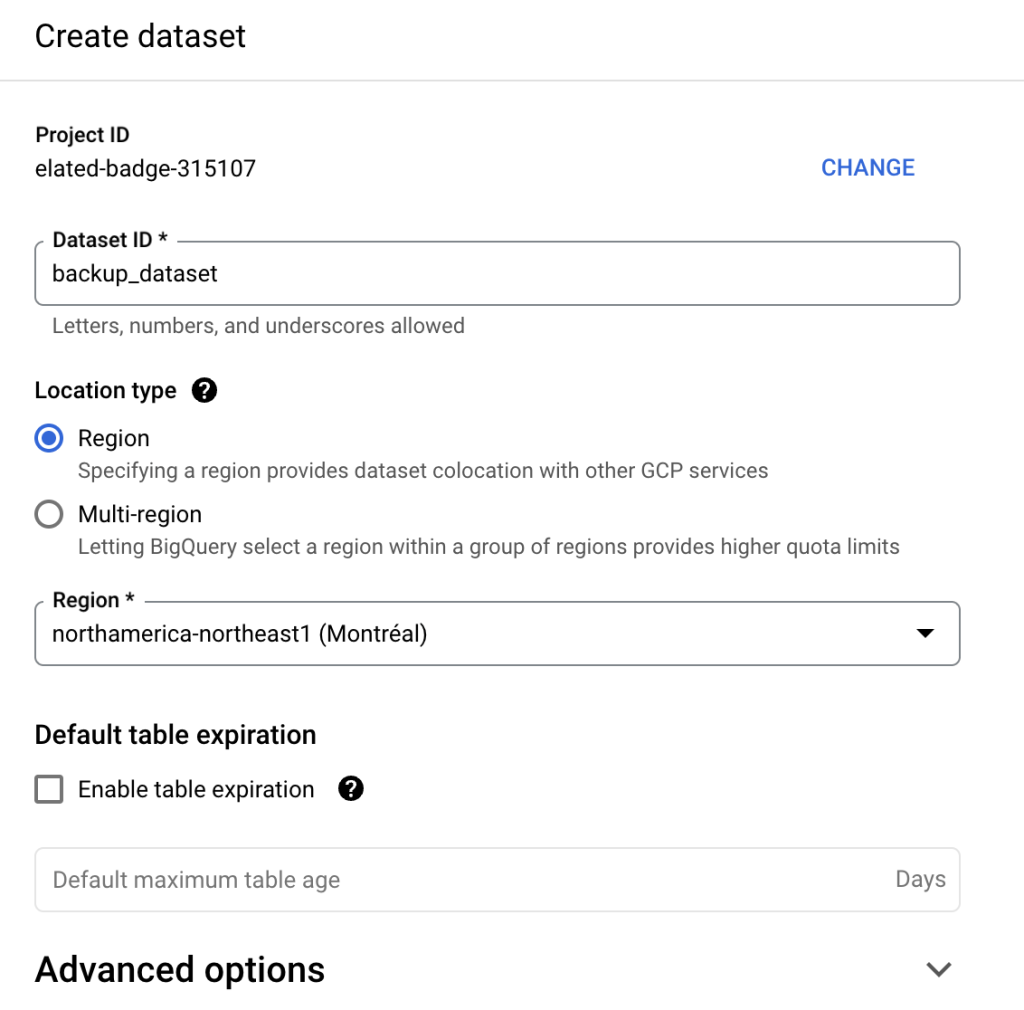
There’s more than one way to copy a BigQuery dataset. To back up BigQuery data once, you may want to do it manually through the Google Cloud interface. Click on the dataset name and select Copy from the menu on top. Then, configure the backup dataset settings, adjusting the region if needed. In the similar way, you can copy a BigQuery table.
For recurring backups, you will want to enable the BigQuery Data Transfer Service and configure a transfer.
Alternatively, if you rely on Coupler.io to automatically import data into your datasets from various data sources, it may be more convenient to also use it for BigQuery backup purposes. This way, you can have all your data transfer configurations in the same place and can easily make adjustments, initiate additional imports (if needed), and debug errors without leaving the platform.
Coupler.io allows you to export BigQuery data into another BigQuery project as well as to Excel and Google Sheets. With a simple query, you can set it up to collect the data you need and bring it to the destination of your choice on a chosen schedule – for example, daily, hourly, or even 15 minutes.
Exporting data to Google Cloud Storage
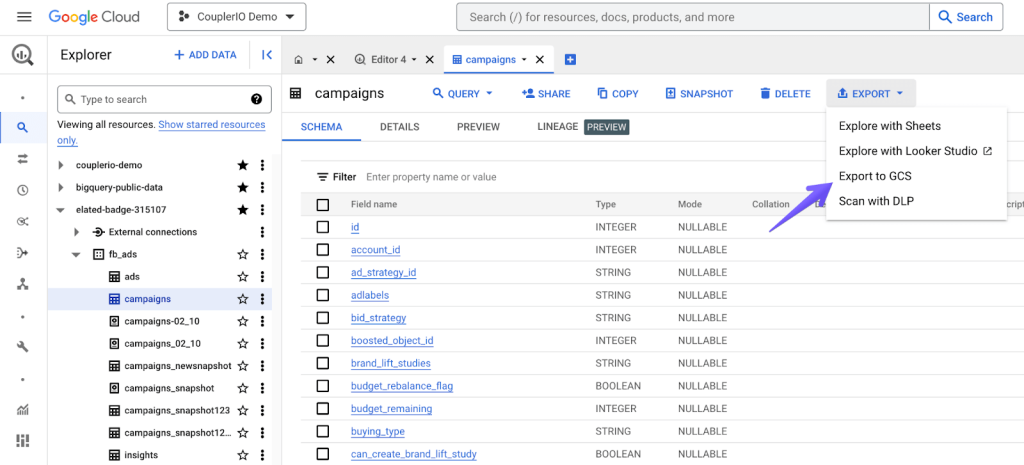
Lastly, exporting to Google Cloud Storage is also an option, particularly because GCS storage is cheaper than BigQuery storage. You can export data from BigQuery tables as CSV, JSON, Avro, and Parquet data formats, and the job can be done via the Google Cloud interface, bq command line, and the API.
In the Google Cloud interface, open a table you want to export, click the Export button, and then Export to GCS. Choose the file and compression types and proceed.
To make repeated exports to GCS, you may want to use other Google Cloud services, such as Dataflow.
Zone considerations
When making another copy of your data, you want to spread out your data between different zones. If a power outage or other disruption hits, likely only one of the versions of your data will be affected, not both. For example, if you write data to us-west1, creating a copy in us-east1 would be a reasonable option. Given that BigQuery saves data to two different regions anyway, you’ll, at this point, likely have data spread across three regions which makes for a really secure setup.
When storing data in multi-region zones, you’ll want to avoid regions that make up these zones when considering a location for a copy. For example, if you store data in the EU multi-zone, you may want to place a copy in Zurich-based europe-west6 or London-based europe-west2, rather than any EU-based zones.
BigQuery backups – sum up
Google does plenty to protect your data. This includes saving it to two different zones at a time, failing over queries onto another zone if a disruption occurs, and retaining the service even when an underlying infrastructure is down, when possible, of course. The built-in features for jumping back in time or saving snapshots will also come in handy if you mistakenly alter some data.
On top of that, there are a few other things you can append to your disaster recovery strategy – creating BigQuery backups of your data manually, using the BigQuery Data Transfer Service or Coupler.io to automate dataflows, or pushing data to GCS for more low-cost storage.
We wish you the best of luck, and please come for more BigQuery content we publish on our blog. See you around!