Tutorial on How You Can Export Google Calendar to Google Sheets with and without Coding

Google Calendar is widely known as one of the best tools to manage schedules and tasks. It captures your work and meetings that take both short and long periods of time. It has become a data source containing useful information about your work life. In some cases, you may need to export your calendar data to Google Sheets. But what method should you use? Find the answer in this blog post.
Auto-export Google Calendar to Google Sheets with Coupler.io
We decided to play our ace by showing the best method to export Google Calendar to Google Sheets – the Coupler.io data integration platform.
You can use the Google Calendar integration by Coupler.io as a web app or an add-on for Google Sheets. The latter requires you to install the add-on. In this article, we’ll use the web app. Nevertheless, the UI and the flow are the same for both the web app and the add-on.
Why is this Google Sheets connector the best one? It allows you to automate data flow from your calendar to spreadsheets. Moreover, you can change the destination (for example to export Google Calendar to JSON), transform data on the go, and benefit from many other valuable features. Let’s see what it looks like in action!
Step 1. Collect data
- To kick off, click Proceed in the form below. You’ll need to sign up for Coupler.io for free with your Google account, and then you’ll be directed to a newly created Google Calendar importer.
- After this, connect your Google account associated with the calendar you want to export and select a data entity to export:
- List of my calendars
- List of events
- Report: busy time for user

- Then, select a calendar from which you want to extract data. Optionally, you can specify the start and end dates or last update date (it must be at the latest 4 weeks from today).
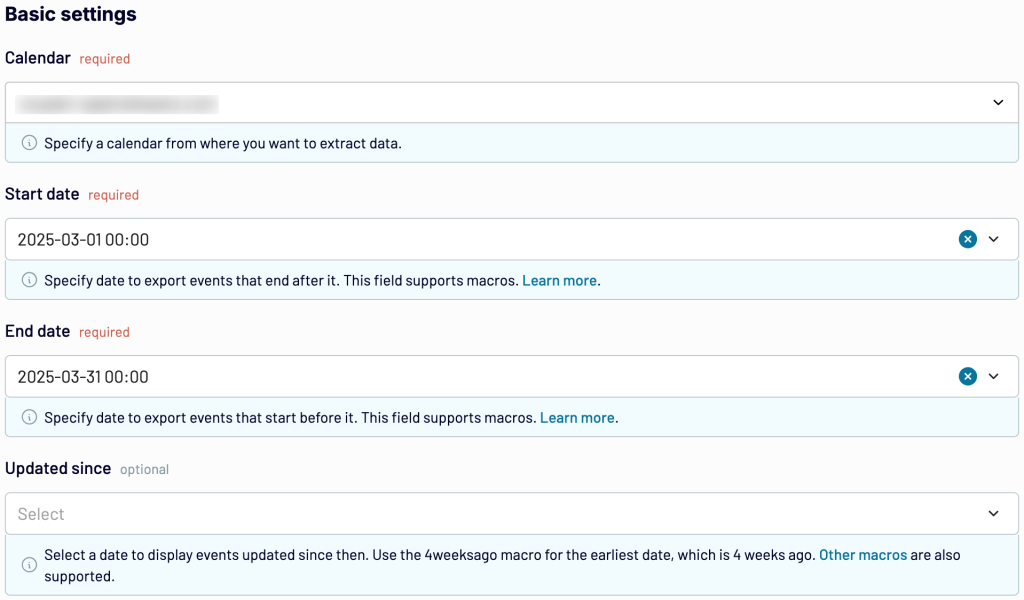
Another optional parameter is advanced filters.
Note: Coupler.io allows you to consolidate data from multiple sources. So, you can add several calendars to export data from and load into the one master view. For this, click +Add one more source and configure the connection as described above.
Step 2. Transform data
At this step, you can preview the data to be extracted from Google Calendar and transform it on the go:
- Rename, rearrange, or hide columns.
- Sort data in ascending or descending order.
- Create new columns with custom formulas.
- Aggregate data using operations like sum, average, count, min., or max.
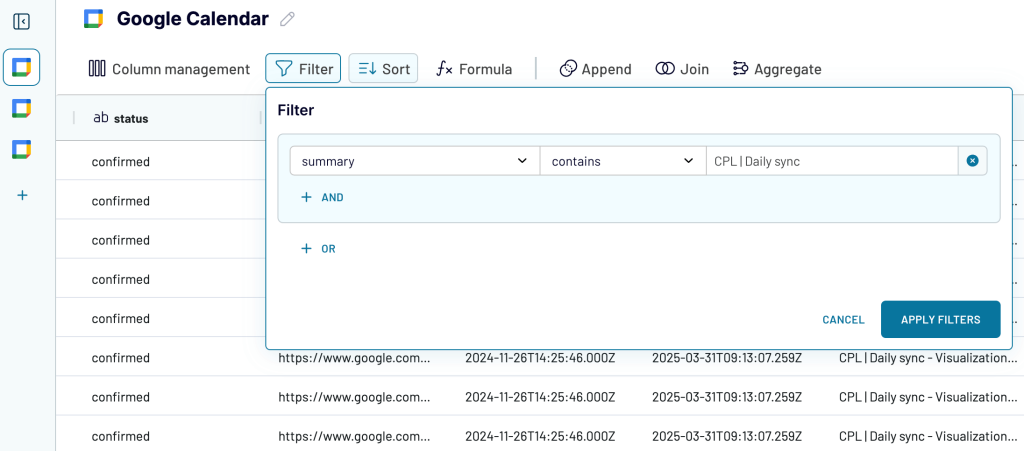
- Filter data based on the required criteria. For example, you can narrow it down to specific kinds of meetings, as shown below.
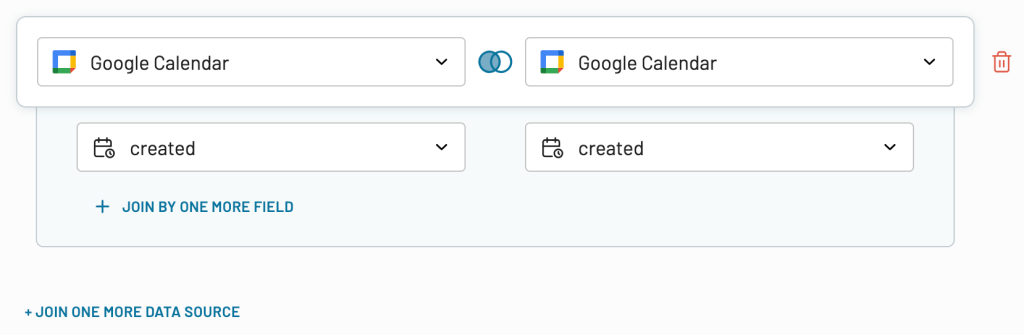
- If you’ve previously connected several sources, blend data in the chosen manner:
- Append – merge datasets with similar structures and columns matched by name.
- Join – combine datasets with different structures and at least one matched column.
Once the report is ready, proceed to set up your destination.
Step 3. Load data and schedule updates
Connect the Google account associated with a spreadsheet where you will load data. Then, select a spreadsheet and a sheet. You can create a new sheet by typing a new name.
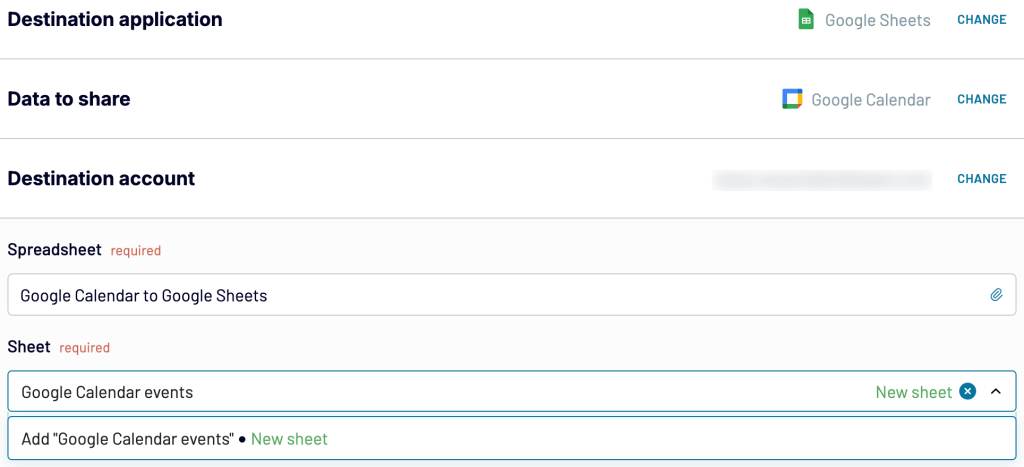
Optionally, you can select the first cell or range of cells where the calendar data is exported, change the import mode from replace to append, enable the last updated column, and disable data update per each run. Next, save and run the data export.
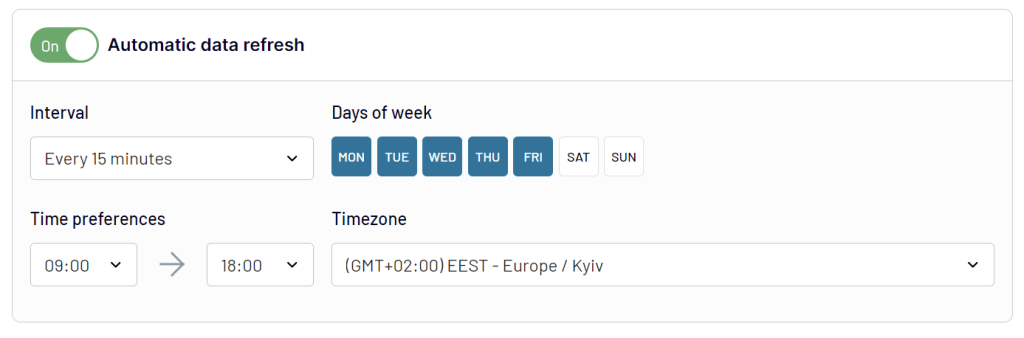
Then, toggle on the Automatic data refresh and schedule your exports. The available update intervals range from every month to every 15 minutes (that will make your report live).
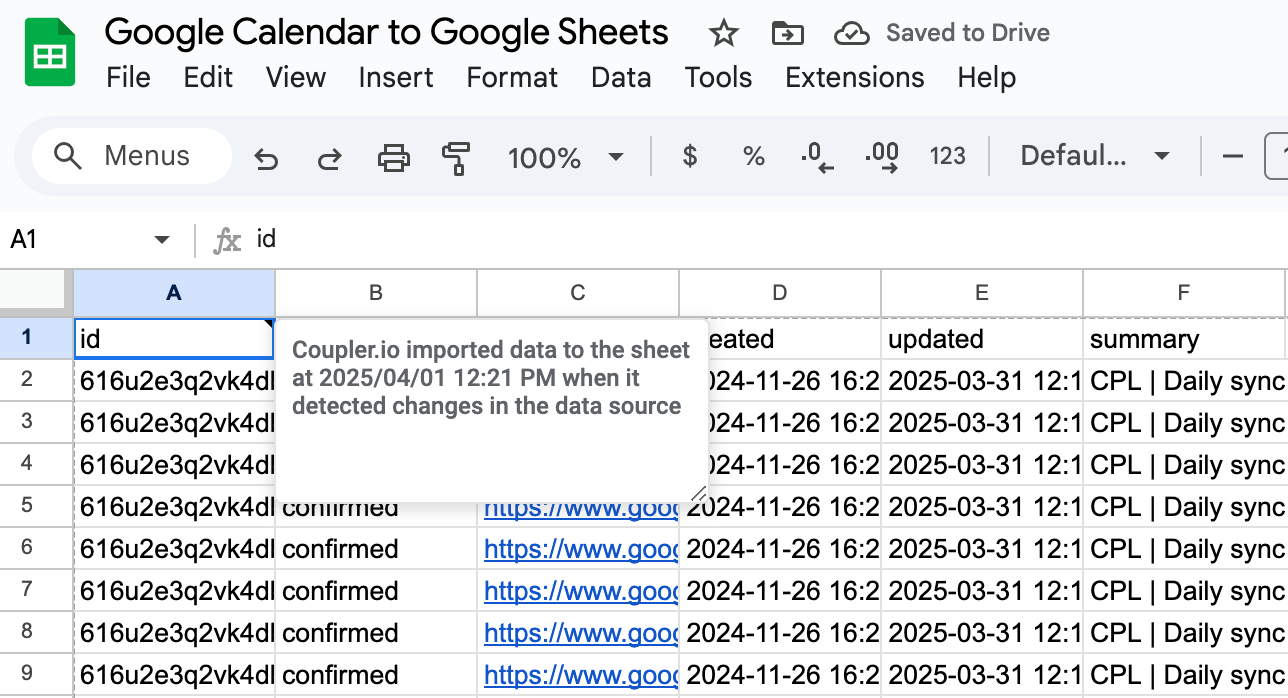
When you’re ready, launch the first export of Google Calendar to Google Sheets. After it, the automation will refresh the data in the spreadsheets on its own. Wanna see how your calendar data looks in the spreadsheet? There you go!
It’s pretty awesome, isn’t it? In addition to Google Calendar, Coupler.io also supports productivity and time-tracking apps such as Clockify, Harvest, Calendly, and TimeTonic.
Check out the full list of the 400+ available sources to see if you can export automatically from your favorite apps. By the way, the same list of sources is available for exporting to Excel, BigQuery, and different BI tools such as Looker Studio and Power BI, if you want to create really amazing reports.
Free Google Calendar dashboard templates
Speaking of reports, Coupler.io offers free, automated Google Calendar dashboards as templates for Google Sheets and Looker Studio. They are equipped with a built-in connector to automate data load from your Google Calendar account.
Google Calendar availability & meeting hours dashboard in Google Sheets
This dashboard allows you to analyze your meeting hours and track the availability of your calendar. You get an overview of your schedule to balance your available time.
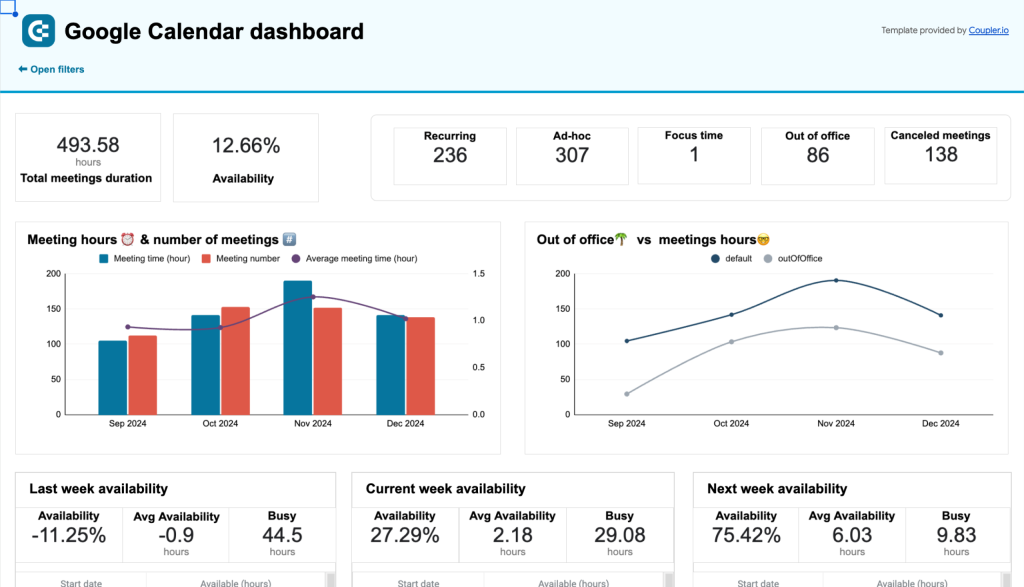
The dashboard presents several scorecards, charts, and tables that let you:
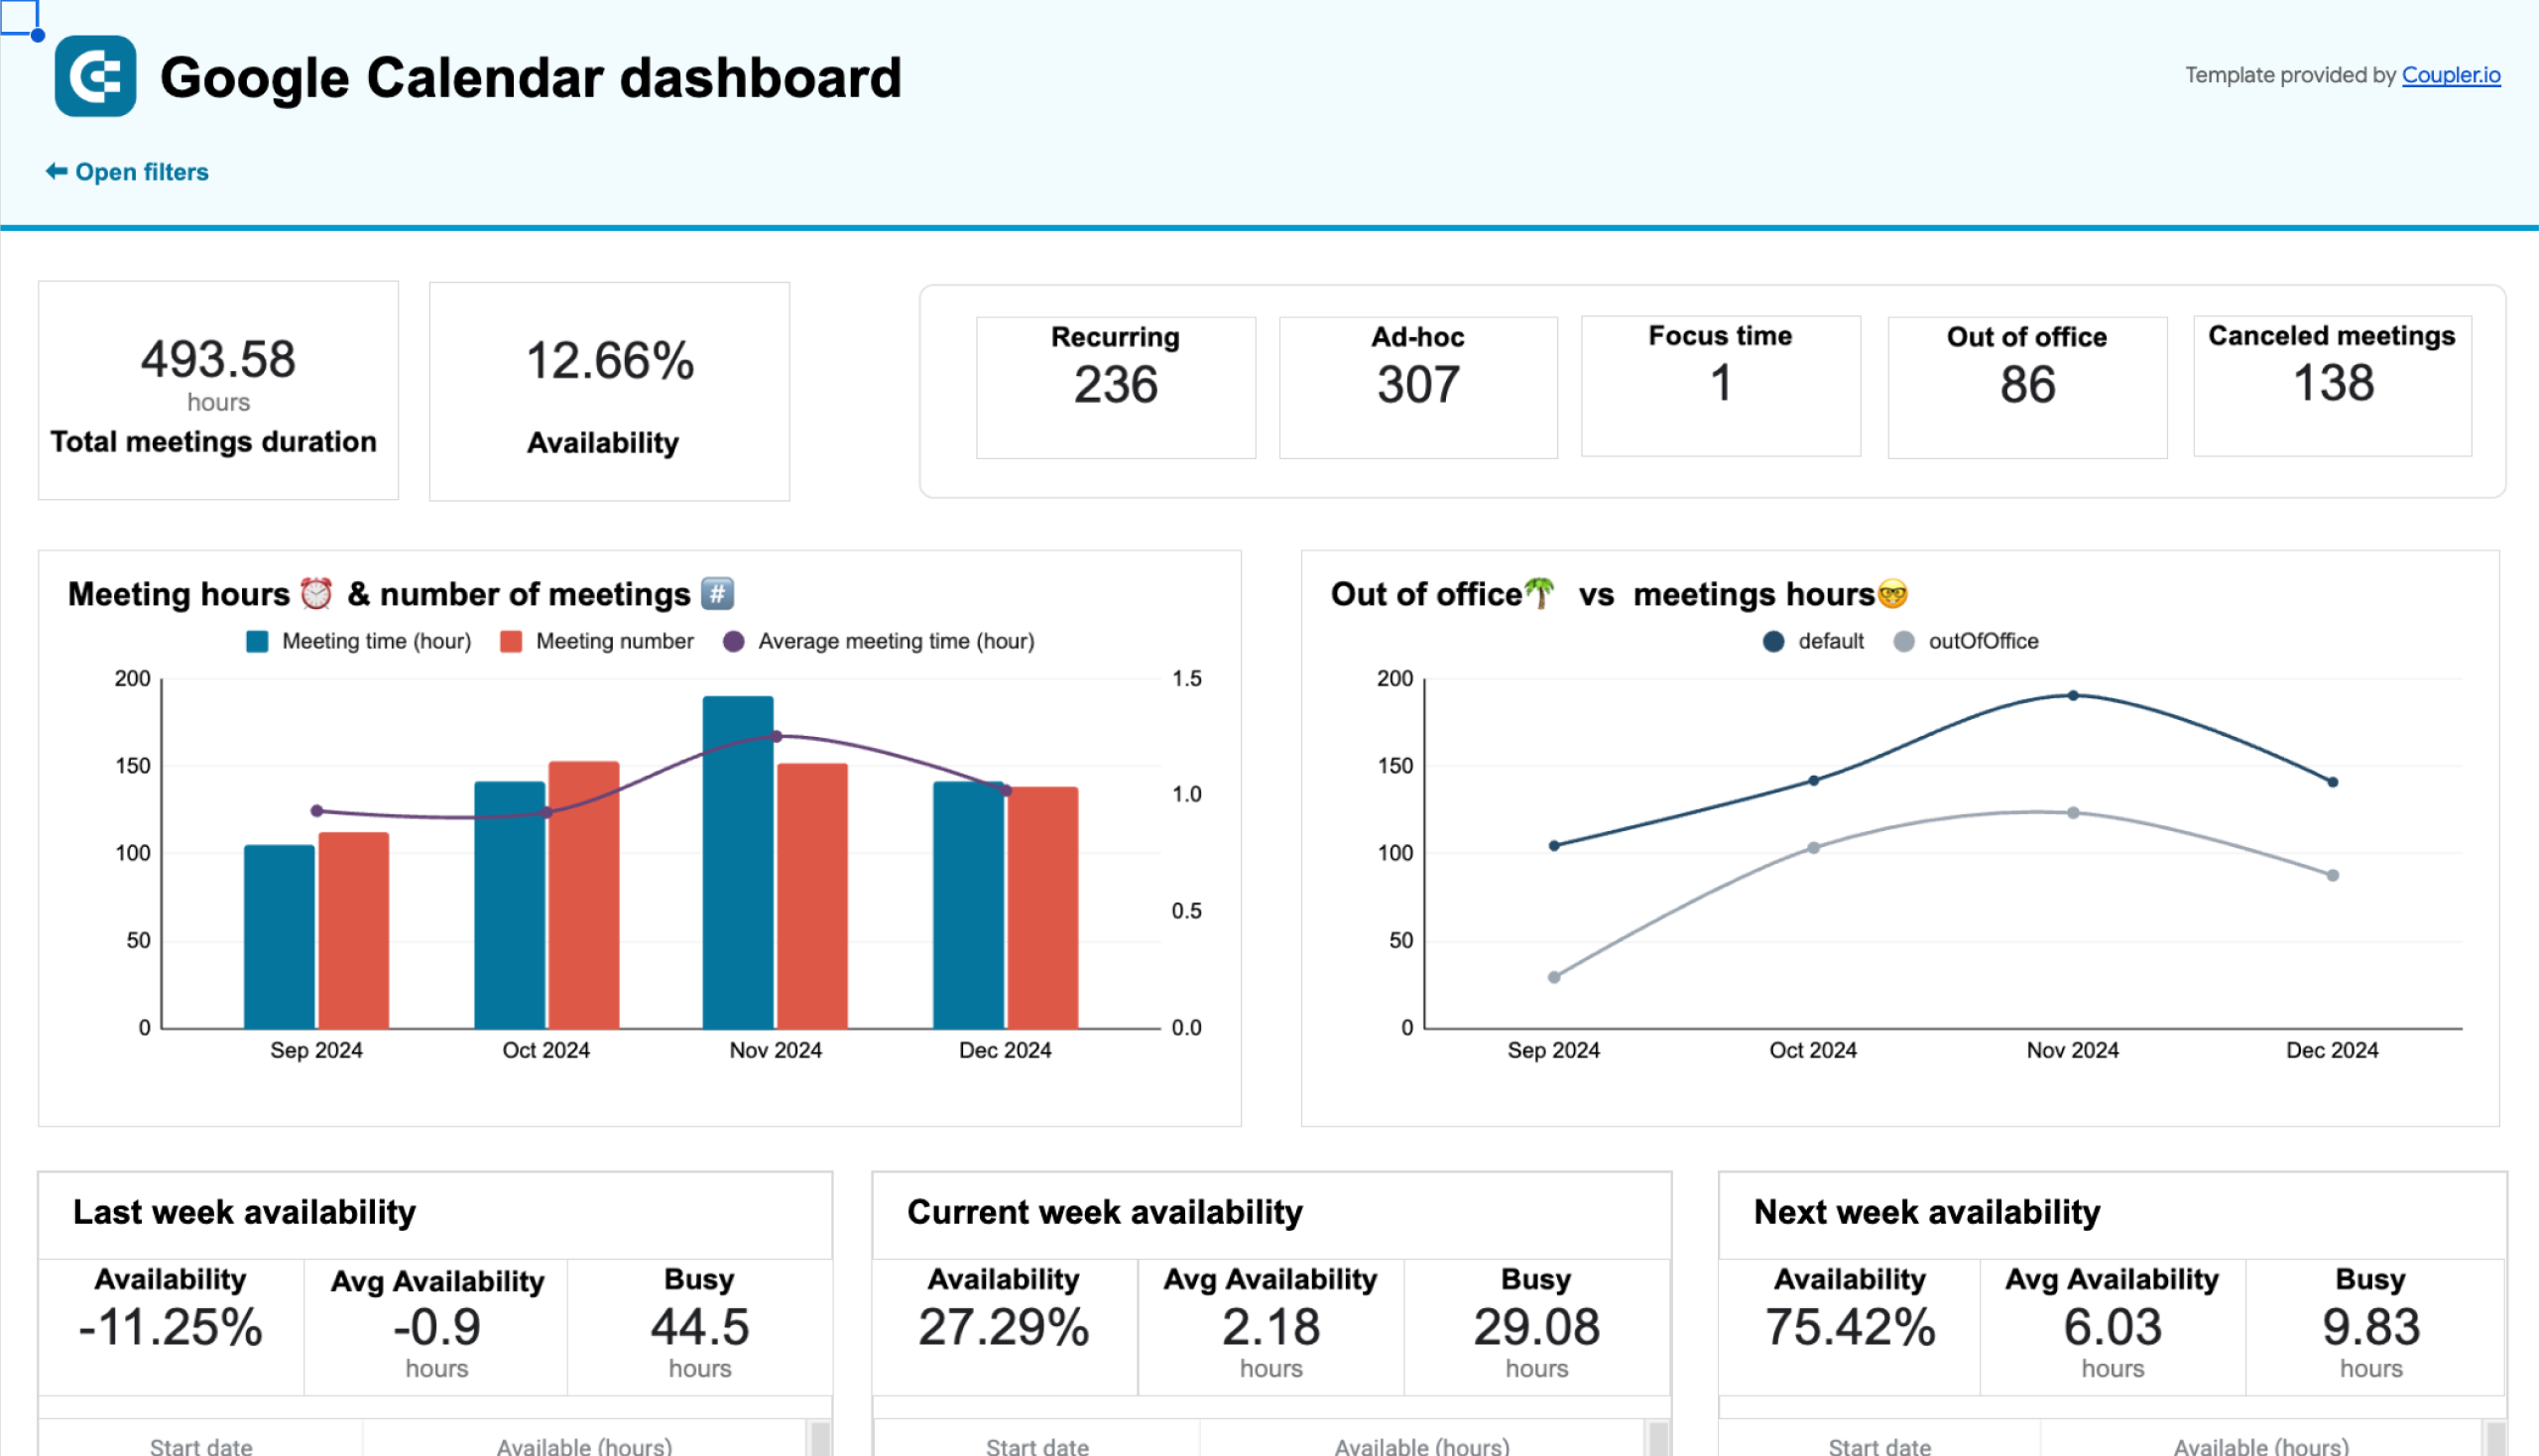
- Overview meeting hours and availability: Take a snapshot of your schedule to understand your overall time allocation. See the total meeting duration, availability, and the number of meetings by type (recurring, ad-hoc, etc.).
Additionally, view the total hours spent in meetings alongside the number of meetings per month. This helps identify patterns in your workload and highlight opportunities for optimization. You can also compare time spent out of the office with meeting hours each month to learn how external commitments impact your schedule.
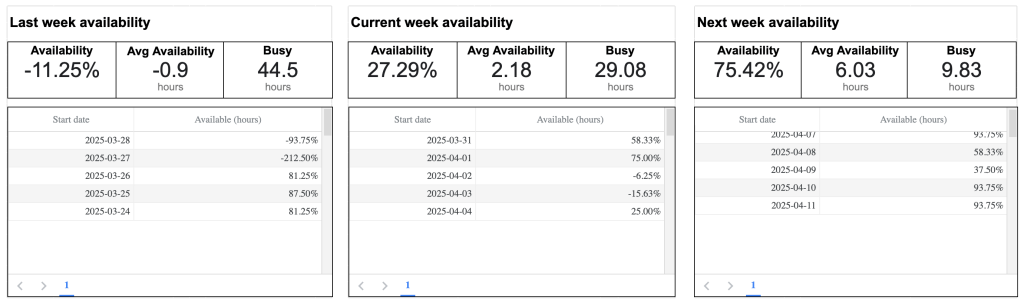
- Check out week-to-week availability: Have a look at your availability in the last, current, and upcoming weeks. You can see the percentage of available time, the average availability in hours, and your busy hours. This is useful for reflecting on your past week’s productivity and allocating time for important future tasks or meetings.
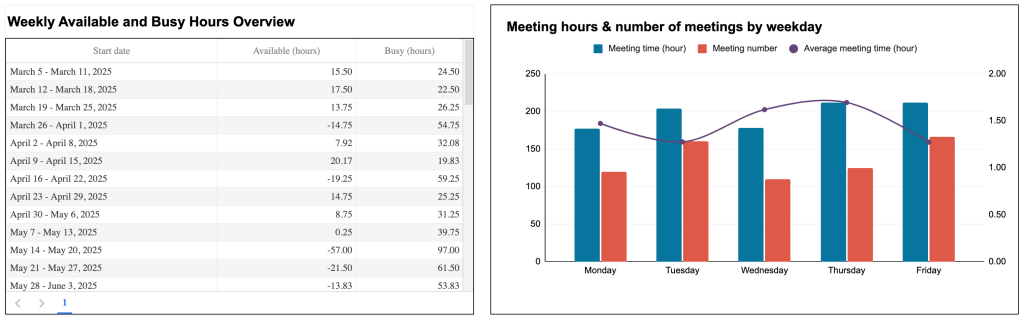
- Delve into your availability by week: Get a summary of your busy and available hours for each week during the selected period. This gives you a high-level perspective on how your time is distributed.
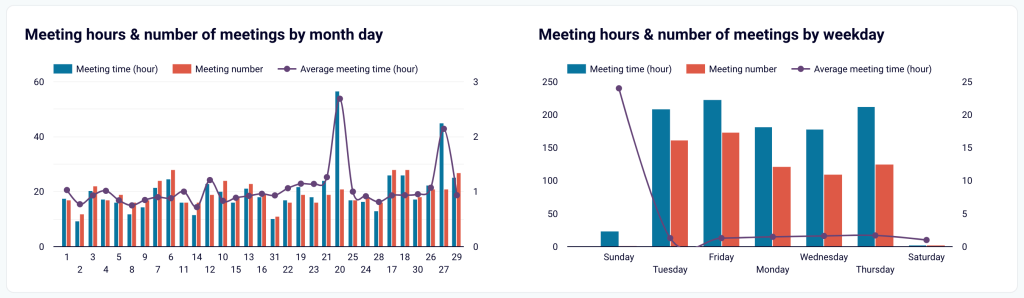
You can also see the correlation between meeting hours and the number of meetings by day of the week. By doing so, you’ll know which weekdays are the busiest and be able to manage recurring commitments.
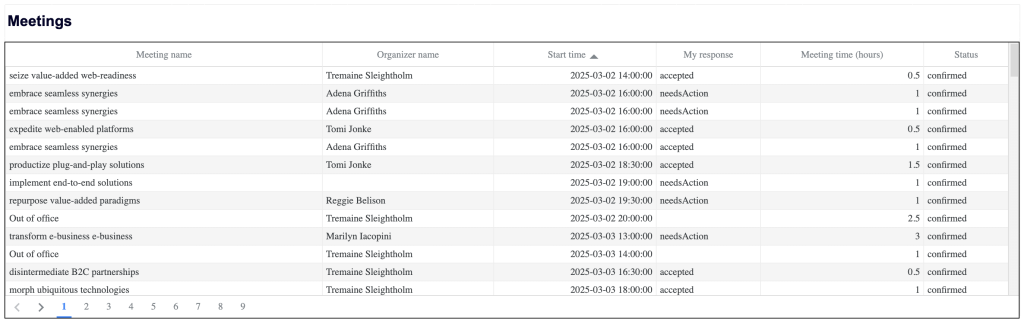
- Go over your meeting details: See in-depth information on all meetings, including their creator, time, your response, and status. Use this data to identify recurring events, ad-hoc meetings, or other patterns in your schedule.
To use the dashboard for your needs, navigate to the Readme tab inside the Google Sheets template and follow the instructions provided.


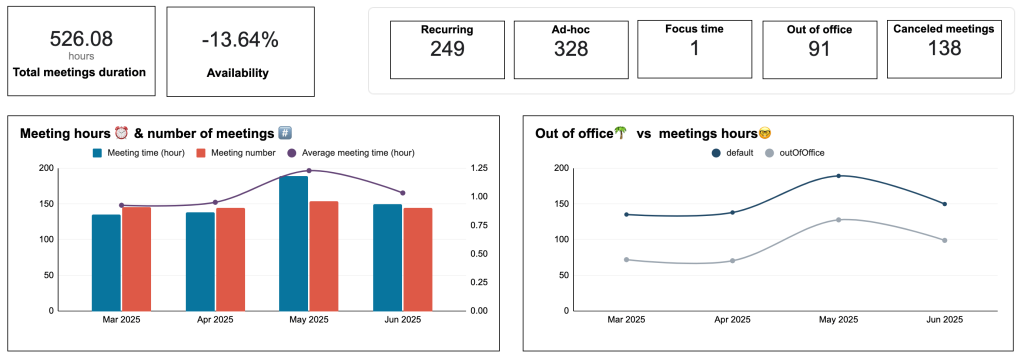
My last 12-month Google Calendar dashboard in Looker Studio
This Looker Studio dashboard template provides you with an overview of your events for the last 12 months.
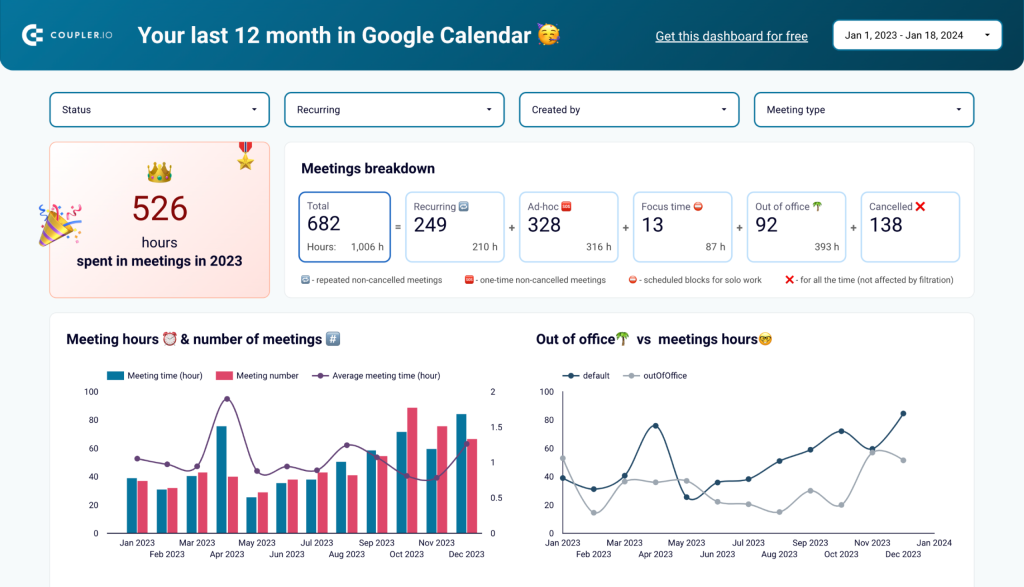
Here’s what you can do with this dashboard:
- Learn how much time you’ve spent in meetings and which meetings they were: Get the answer to how many hours you’ve spent in meetings. In addition, see a breakdown showing the share of recurring or ad-hoc meetings, focus time, time out of the office, and the number of canceled meetings.

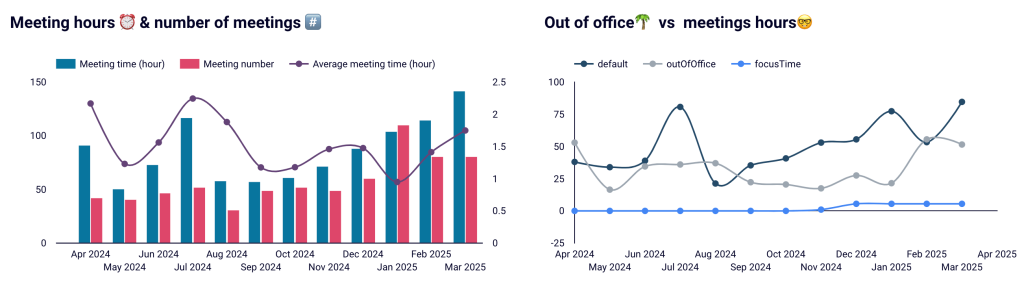
- See how many meetings you’ve had throughout the year: Gain insights into your year-long meeting schedule. You’ll see the average meeting duration and a comparison of out-of-office time versus meeting hours.
Later on the dashboard, review meeting hours and counts split by day of the month and weekday.
- Check out who controls your schedule: Figure out who has the biggest influence on your meeting schedule – you or your teammates. You’ll also see the ratio of recurring to ad-hoc meetings and your top conference tools, such as Google Meet, Zoom, and Slack.

The dashboard is available in Looker Studio. Go to the template’s Readme tab and set it up following step-by-step instructions. You can also learn more about the report and what insights it provides.


Now, let’s look at some other solutions for exporting your Calendar to Google Sheets.
Can I export Google Calendar to a spreadsheet with native functionality?
Unfortunately, currently, there’s no such functionality within Google Calendar that allows you to export data directly into Google Sheets. What you can do is export the ICS file of an individual Calendar.
An ICS file is a standard Internet calendar format that stores calendar event data. It’s used by several calendar programs, including Microsoft Outlook, Google Calendar, Yahoo! Calendar, and Apple Calendar. With ICS format, you can share your calendar data with someone else who’s using a program other than Google Calendar.
Follow the steps below if you’d like to export ICS files from all of your calendars associated with your Google account.
Open Google Calendar. In the top right corner, click the Settings icon, then click Settings from the menu.

On the Settings page, click the Import & export > Export menu. Then, under the Export section, click the Export button.
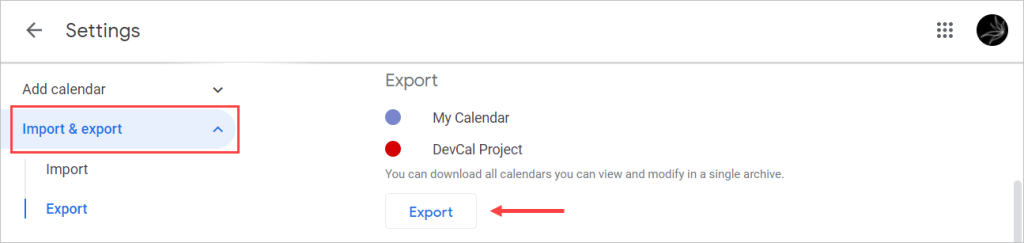
You’ll see a ZIP file download to your computer. Unzip it, and you’ll find individual ICS files for each of your calendars.

Now, you can share these ICS files (or one of them) with your friend. They should be able to open it using their calendar program – Outlook, Yahoo! Calendar, or Apple Calendar.
How to export Google Calendar to Google Sheets using add-ons
The most actionable way to transfer calendar data to Google Sheets is by using a Google Sheets add-on. As we mentioned above, Coupler.io is available as an add-on for Google Sheets.
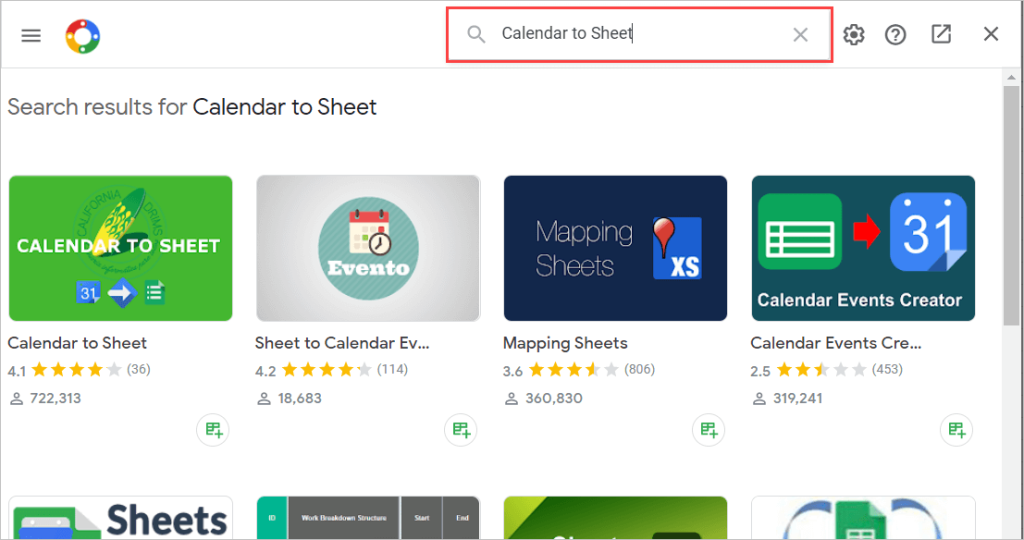
At the same time, there are a few other options that allow you to get data from Calendar, such as Calendar to Sheet and Sheets2GCal. Unfortunately, none of these add-ons allow you to export data from your Calendar automatically.
GSheets add-ons are third-party software applications. You can view the add-on library by clicking Extensions > Add-ons > Get add-ons from the top menu. It will open a new dialog window that allows you to browse or search for a particular add-on. Alternatively, you can go directly to Google Workspace Marketplace and search for the options right there.
Clicking on each add-on will bring up a description of what it does. To install it, click the Install button. It will ask permission to access your Google Drive, and you need to allow it to complete the installation.
Now, let’s discuss two of these add-ons: Calendar to Sheet and Sheets2GCal.
Export calendar data with the Calendar to Sheet add-on
Calendar to Sheet allows you to import your Google Calendar events into Google Sheets by applying date and text filters. After installing the add-on, you will see it in the Extensions menu.
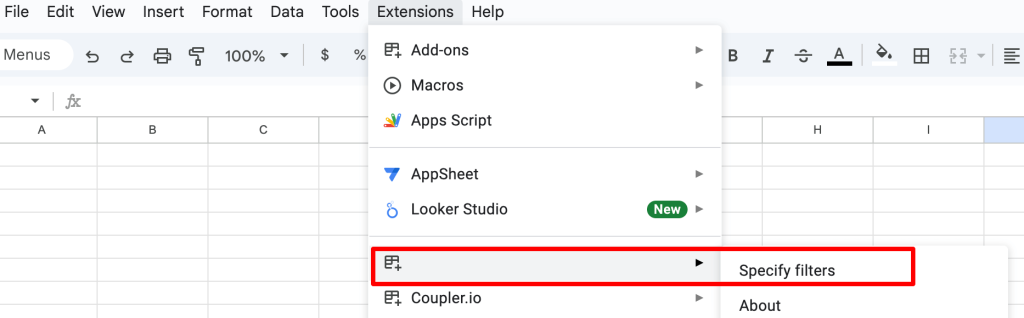
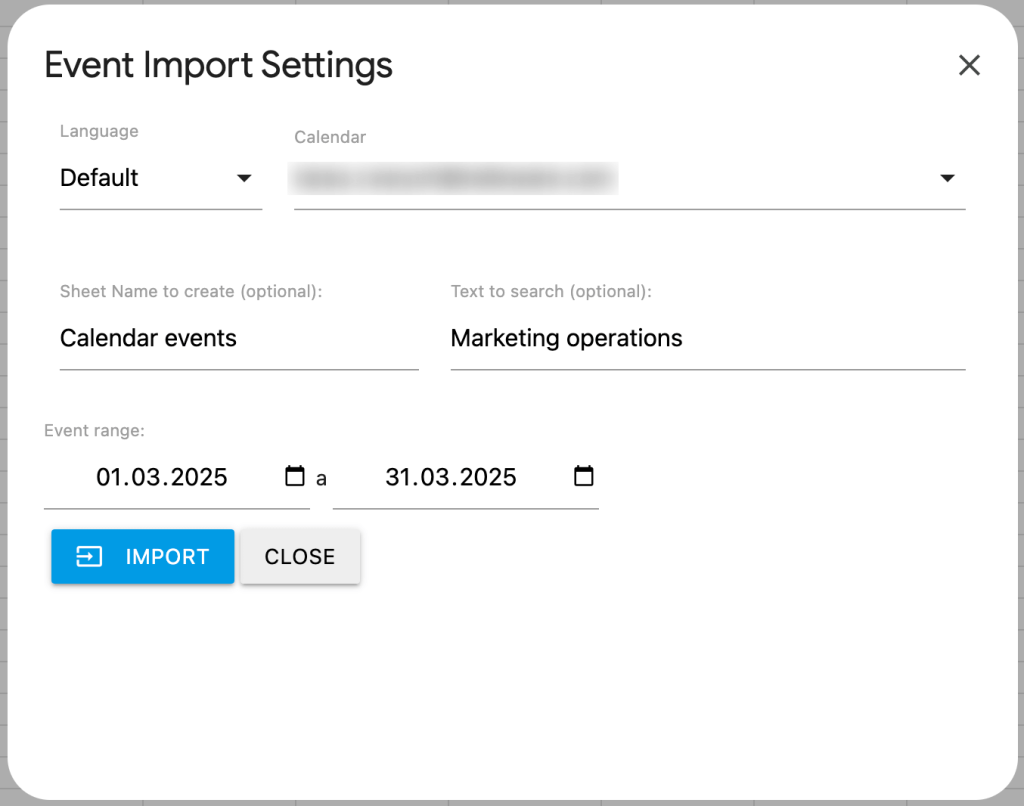
Before importing data, you need to specify which calendars you want to import. You can also add text and date filters.
Here is an example result of importing calendar data with Calendar to Sheet:
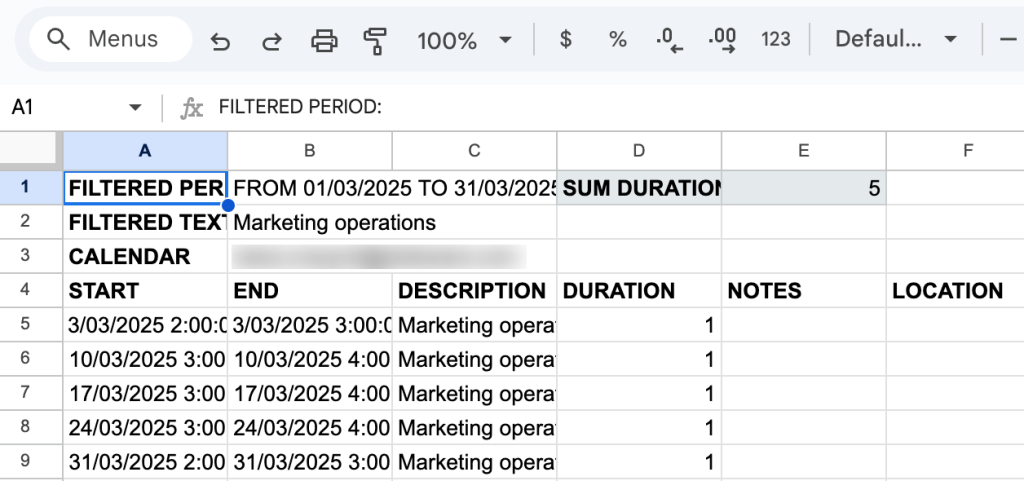
You have event data such as start time, end time, event description, duration, notes, and location exported in the spreadsheet. Info about the total duration is also displayed at the top of the page.
Export calendar data with the Sheets2GCal add-on
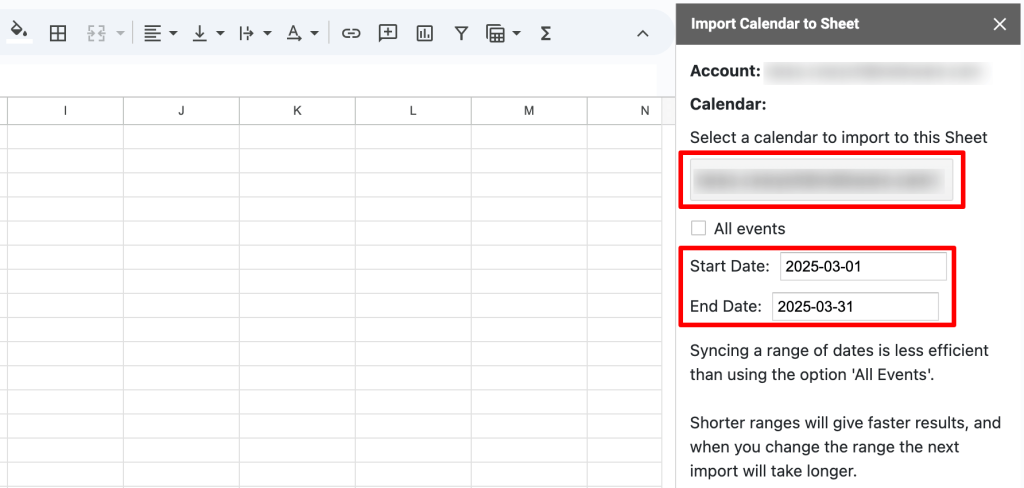
Sheets2GCal not only allows you to import Google Calendar events into Google Sheets but also update Calendar from Sheets. To get started after installing, click Extensions > Sheets2GCal > Import Calendar to Sheet menu to import data from Google Calendar.
You will need to specify which Calendar you want to import. You can also set the Start Date and End Date if you want to. However, before you can import, you need to sign up for a FREE account on sheets2gcal.com.
Click the Clear Sheet & Import Calendar button, and you will get a result similar to one below.
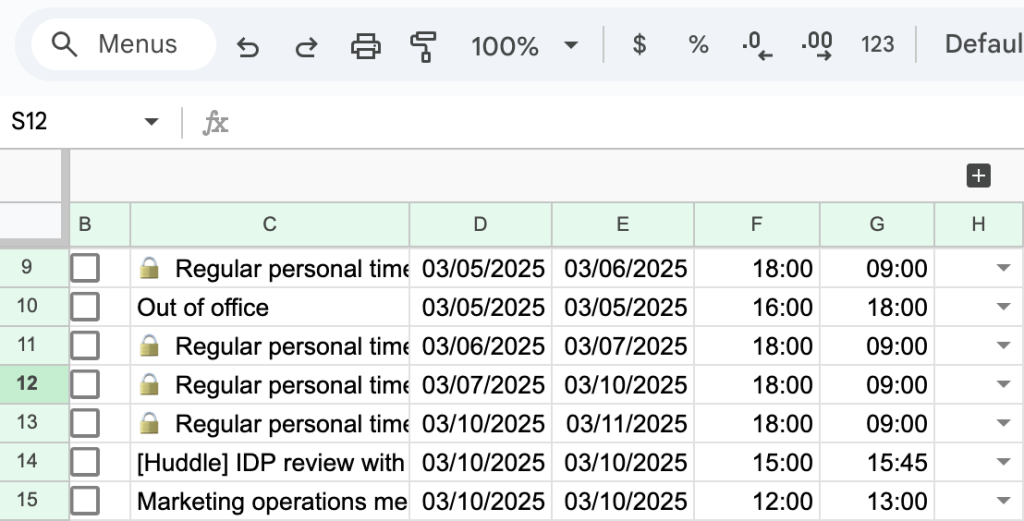
Notice that the result has more fields than the result of the Calendar to Sheet. However, it doesn’t have a column that shows duration, so you need to calculate it yourself. Here’s how you can do this:
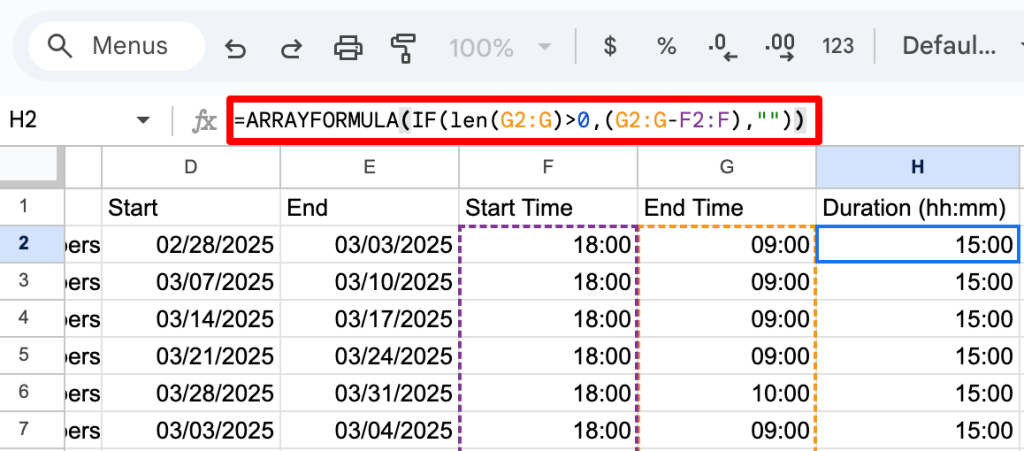
Step 1. Insert a new Duration (hh:mm) column after the End Time column.
Step 2. Enter this formula into a blank cell under the new column.
=G2-F2
Step 3. Apply the formula to the other cells by selecting the formula cell and then dragging the fill handle down to the other cells.

If your data set is large enough, you’d be better off using the ARRAYFORMULA function instead of dragging the formula. Here is how it will look:
=ARRAYFORMULA(IF(len(G2:G)>0,(G2:G-F2:F),""))
Other options for you to export information from Google Calendar to spreadsheet without coding
One of the SaaS tools that can help you export Google Calendar to Google Sheets is TimeTackle. It was originally a simple calendar exporter called Gcal2Excel. Now, they have expanded the list of features and sources, so you can consider it for your needs if you want to save time doing advanced analytics, generating invoices, creating many custom reports, and exporting automatically as scheduled.
What TimeTackle can do:
- Export Google Calendar to Excel and Google Sheets
- Export with tags and color options (calendar color or event color)
- Sync Google Calendar to Google Sheets and schedule automatic syncs
- Create invoices automatically from calendar entries
- Generate many types of custom reports
- Provide advanced calendar analytics
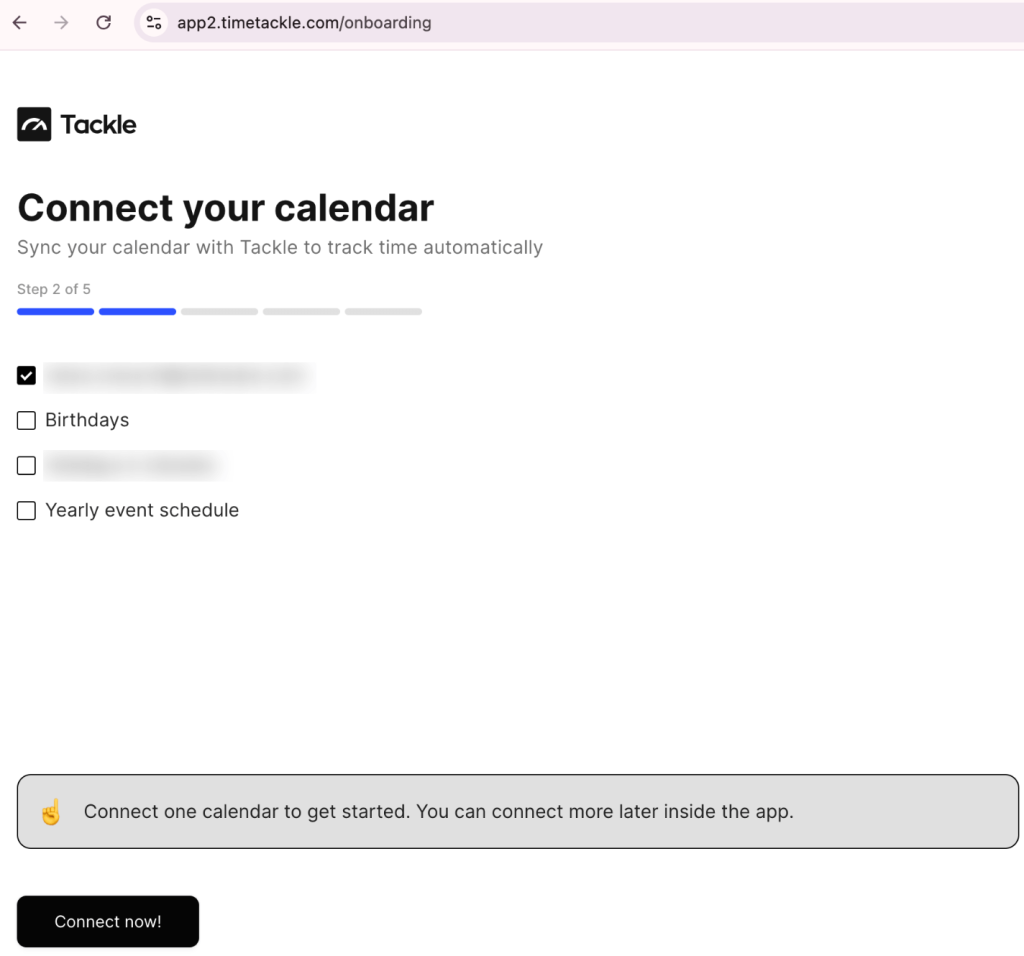
Once you sign up, you’ll be prompted to connect your calendar.
After this, you’ll be able to add tags, view your calendar entries in the timesheet format, analyze meeting health, trends, interactions, and more.
TimeTackle allows you to sync your Google Calendar with Google Sheets automatically. To turn this feature on, go to Automations in the menu on the left, then find the New automation button in the upper right corner. Press it, then choose At a scheduled time, select the Google Sheets option, and set your preferences for the updates.
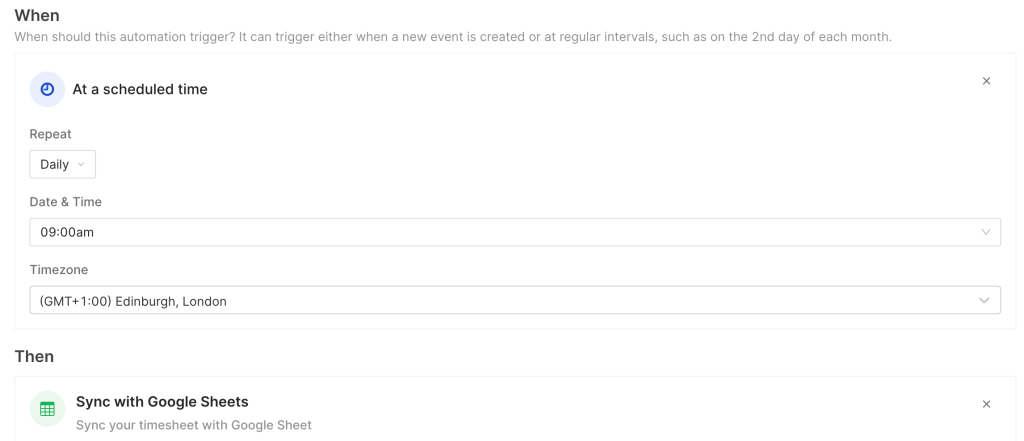
Once this is done, new meetings and other calendar entries will appear in the spreadsheet automatically. TimeTackle will keep updating your data according to your settings.
If necessary, you can download your data as XLSX from the Timesheet menu by pressing the Export button.
How to export Google Calendar to Sheets using Google App Script
Above, we introduced the no-code solutions. Now, let’s explore how you can export calendar data using Google App Script.
No need to worry even if this is your first script. We have provided the copy-and-paste solution for you, so you won’t have to code on your own. Feel free to check out our Google Apps Script Tutorial.
Export Google Calendar events to Google Sheets using App Script
Before you start, you will need to get the your Calendar ID.
How to get the Calendar ID:
Open Google Calendar, then click the Settings icon > Settings at the top right. On the Settings page, scroll down to the Calendar you want to export. Select Integrate calendar from the left menu. Then, copy the value of the Calendar ID displayed in the right pane, as the following screenshot shows.
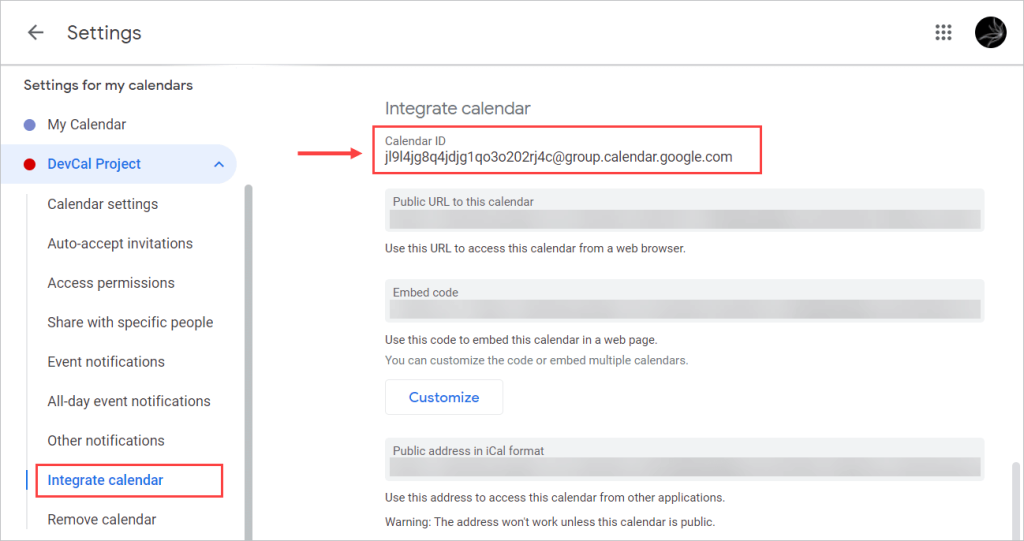
Note: You can also simply use your Google email address as the Calendar ID if you want. In that case, all your calendars will be exported.
Now, follow the easy step-by-step below:
Step 1. Create a new blank Google Sheets document. Give it a name – for example, Google Calendar Import.
Step 2. Copy and paste your Calendar ID into the B1 cell.

Step 3. Specify the criteria to filter the calendar data:
- Start date (B2 cell) in the format
mm/dd/yyyy hh:mm:ss - End date (B3 cell) in the format
mm/dd/yyyy hh:mm:ss - Text to search (B4 cell)
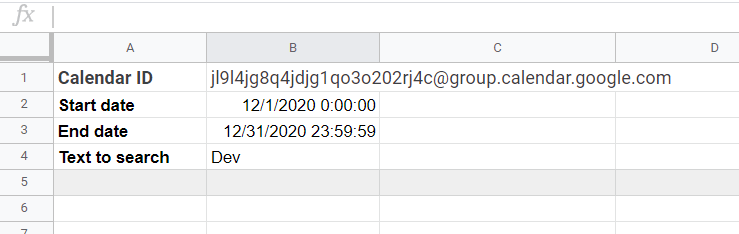
Note: Start date and End date values must be formatted as Date Time
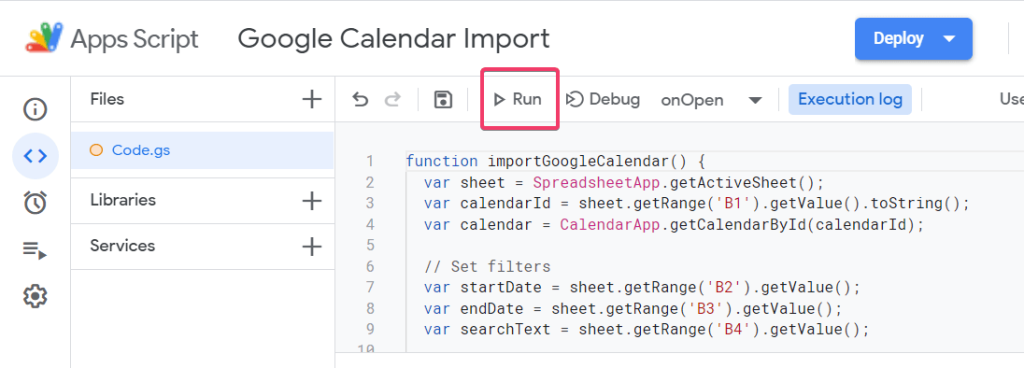
Step 4. From the menu, click Tools > Script editor.
Step 5. Remove all code in Code.gs. Then, copy and paste the following importGoogleCalendar() function into the file:
function importGoogleCalendar() {
  var sheet = SpreadsheetApp.getActiveSheet();
  var calendarId = sheet.getRange('B1').getValue().toString();
  var calendar = CalendarApp.getCalendarById(calendarId);

  // Set filters
  var startDate = sheet.getRange('B2').getValue();
  var endDate = sheet.getRange('B3').getValue();
  var searchText = sheet.getRange('B4').getValue();

  // Print header
  var header = [["Title", "Description", "Start", "End", "Duration"]];
  var range = sheet.getRange("A6:E6");
  range.setValues(header);
  range.setFontWeight("bold")

  // Get events based on filters
  var events = (searchText == '') ? calendar.getEvents(startDate, endDate) : calendar.getEvents(startDate, endDate, {search: searchText});

  // Display events
  for (var i=0; i<events.length; i++) {
    var row = i+7;

    var details = [[events[i].getTitle(), events[i].getDescription(), events[i].getStartTime(), events[i].getEndTime(), '']];

    range = sheet.getRange(row,1,1,5);
    range.setValues(details);

    // Format the Start and End columns
    var cell = sheet.getRange(row, 3);
    cell.setNumberFormat('mm/dd/yyyy hh:mm');
    cell = sheet.getRange(row, 4);
    cell.setNumberFormat('mm/dd/yyyy hh:mm');

    // Fill the Duration column
    cell = sheet.getRange(row, 5);
    cell.setFormula('=(HOUR(D' + row + ')+(MINUTE(D' +row+ ')/60))-(HOUR(C' +row+ ')+(MINUTE(C' +row+ ')/60))');
    cell.setNumberFormat('0.00');
  }
}
Note: Alternatively, you can set up filters right in the script:
// Set filters
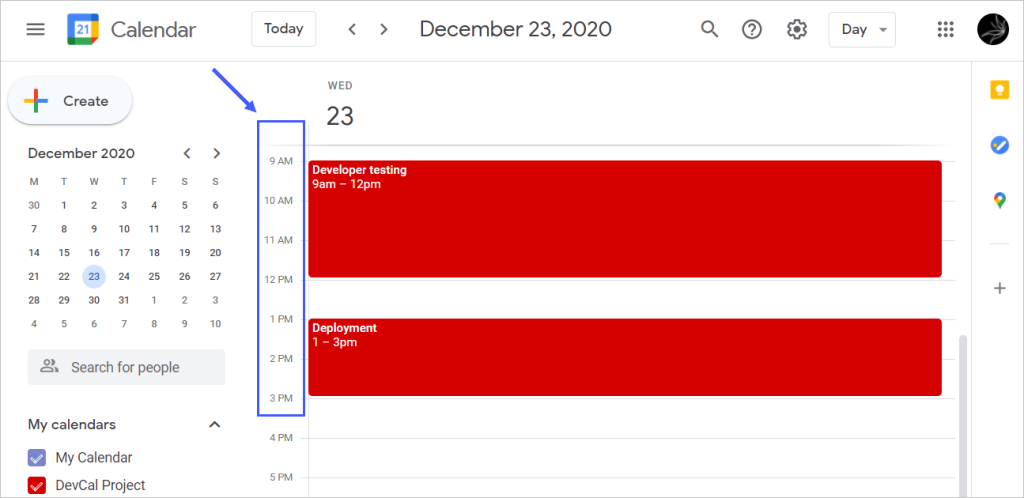
var startDate = new Date("December 1, 2020 00:00:00");
var endDate = new Date("December 31, 2020 23:59:59");
var searchText = 'Dev';
If you don’t want to apply a text filter, set the value of searchText to an empty string as follows:
var searchText = '';
Step 6. Run the script from the Editor.
Note: The very first time you run the script, you will be asked to authorize the script to access your data. Grant permission when requested.
Here’s the output:
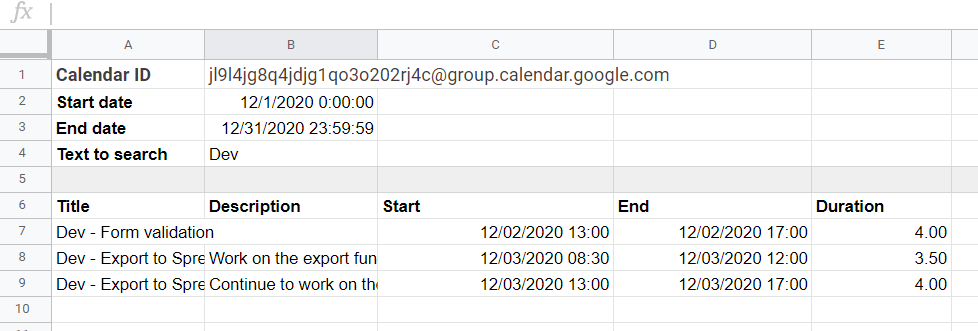
From the screenshot above, see that the script exports each event’s title, description, start time, end time, and duration. If you’d like to export more data, such as event color, location, and attendance, this method list can help you.
It’s not always convenient to run the script from the Editor. Thus, let’s tweak the script a bit so you can run it right from the spreadsheet.
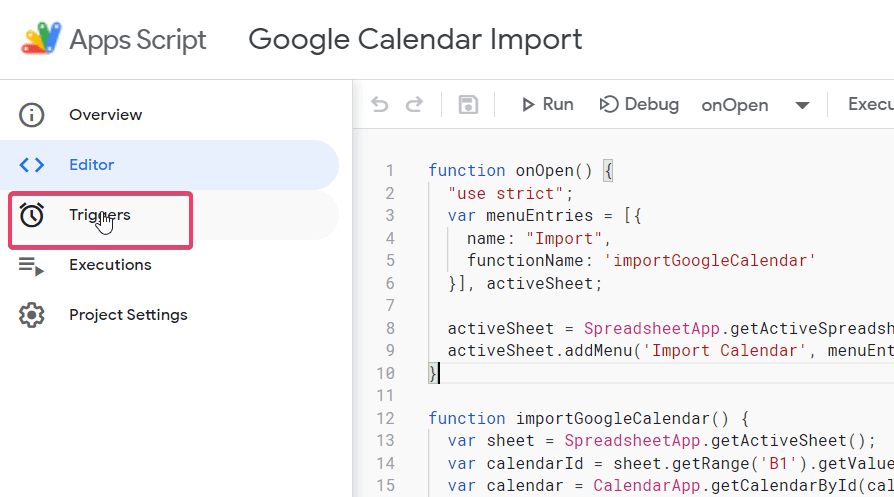
Add the following function to the Code.gs file.
function onOpen() {
  "use strict";
  var menuEntries = [{
    name: "Import",
    functionName: 'importGoogleCalendar'
  }], activeSheet;

  activeSheet = SpreadsheetApp.getActiveSpreadsheet();
  activeSheet.addMenu('Import Calendar', menuEntries);
}
Now your script has two functions, onOpen() and importGoogleCalendar(), as the following screenshot shows:

The onOpen() function adds a custom menu, Import Calendar, every time you open the spreadsheet. It has the Import sub-menu that calls the importGoogleCalendar() function.
Save the script, then refresh your spreadsheet. You will see a new menu added to your spreadsheet.

Now, every time you want to export data from the Calendar, just click the Import Calendar > Import menu.
Set up auto-export Google Calendar to Google Sheets with Apps Script
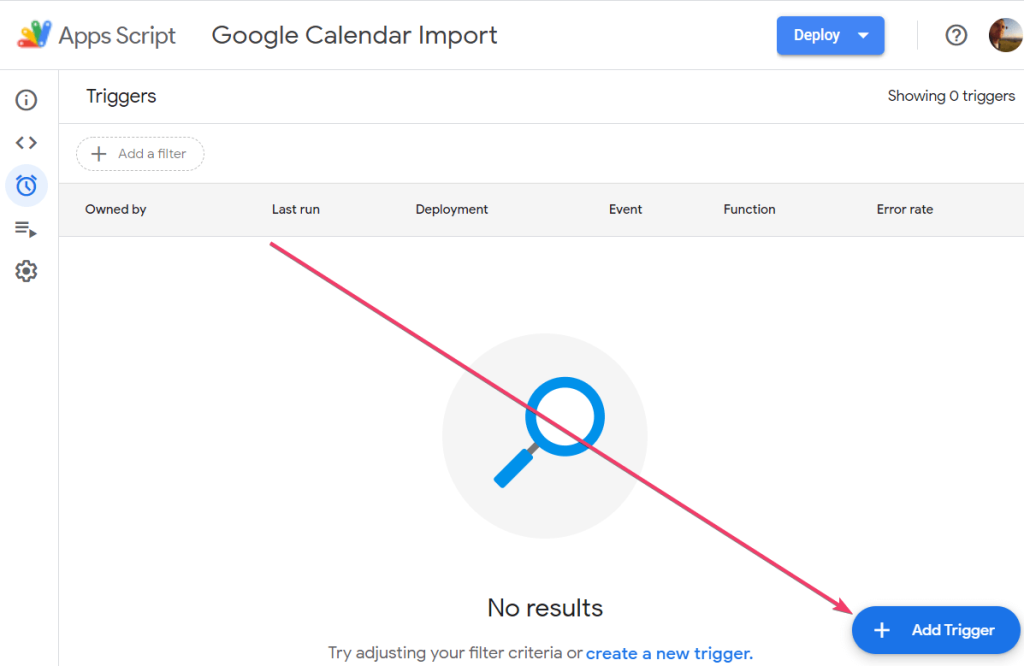
If you don’t want to click the Import Calendar button every time, you can schedule the export of data from Google Calendar to Google Sheets. To do this, you’ll need to set up a time-drive trigger. Go to the Triggers section in your Apps Script project.
Then click + Add Trigger in the bottom right of the window.
In the new window, you’ll need to set up the trigger.
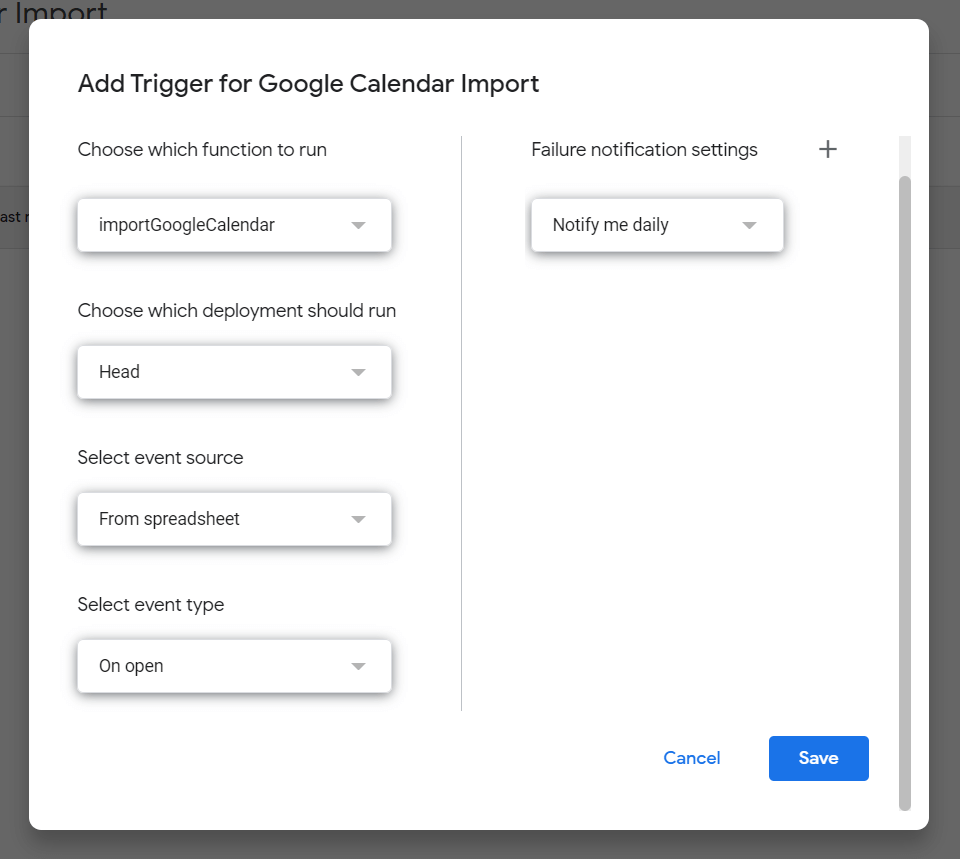
Choose which function to run
Select the function you want to automate on a schedule. Since we have two functions, onOpen() and importGoogleCalendar(), we need to choose the one that imports data from Google Calendar to the spreadsheet.
Choose which deployment should run
Select the deployment if you have different ones.
Select event source
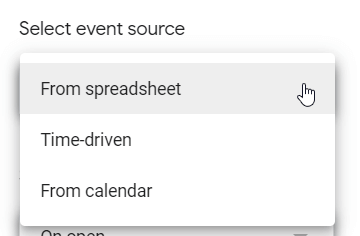
Select the event source among the options: from spreadsheet, time-driven, or from calendar. In our case, we need time-driven.
Select the type of time-based trigger
Once you selected the time-driven event source, the next field is to choose the type of time-based trigger:
- Specific date and time
- Minutes timer
- Hour timer
- Day timer
- Week timer
- Month timer
We want to import data from Calendar on a daily basis. So, we need to choose Day timer.
Select the time of day
Select the time when you want the data to be imported every day.
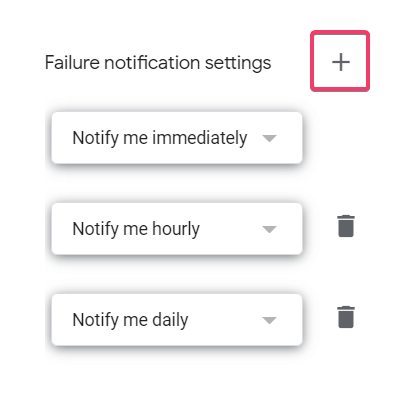
Failure notification settings
You can select the frequency of getting notifications in the case of failure:
- Immediately
- Hourly
- Daily
- Weekly
If you click on the plus symbol, you can set up multiple notifications.
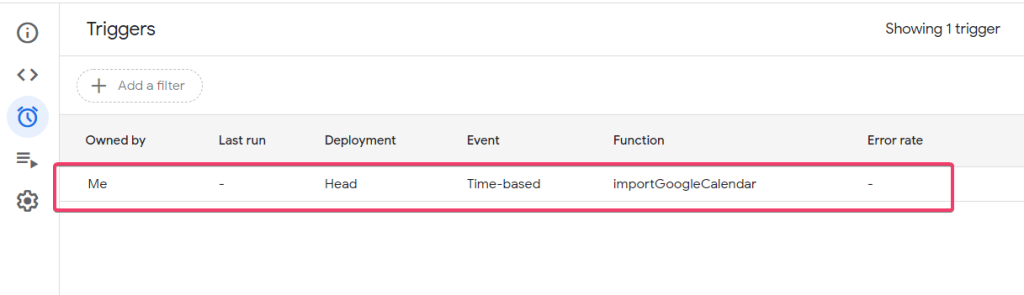
When ready, click Save. Your time-based trigger will appear on the list.
Why you would need to export data from your Google Calendar to Sheets
You may need a list of activities with the time spent on each of them for purposes such as:
- Sending invoices to clients, especially for services you charge on an hourly basis.
- Creating reports for administrative purposes.
- Analyzing your productivity or your teams’. For example, to know whether you spend too much time on certain types of tasks, or if you work on high-priority tasks first, etc.
Google Calendar has the data you need. You could click on each individual event on your calendar to see how much time you spent on each activity. However, having your data exported to Google Sheets automatically will always be a better solution. It saves you time and minimizes errors. It’s also easier to do basic data analysis in a spreadsheet, such as summing the hours and sorting the activities.
Bonus: from Google Sheets to Google Calendar
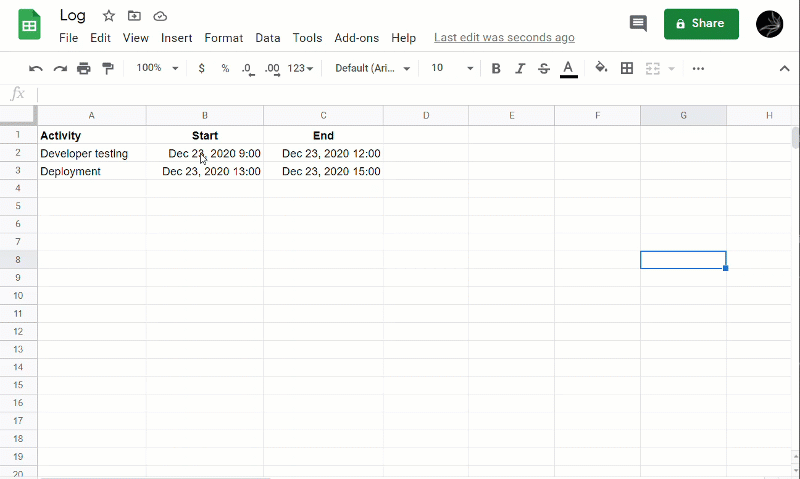
Suppose you worked during a vacation and simply logged your activities in a spreadsheet. To keep track of your schedules, you can automatically export your entries to Google Calendar. The following example shows you how to do that using a script.
Export dates in Google Sheets to Calendar
Before you jump into the code, ensure that the dates in your spreadsheet are in the correct format to make it easier to export.
Select the dates, then click Format > Number > Date Time from the menu.
Read our tutorial to learn more about how to change date format in Google Sheets.
- If you’ve previously connected several sources, blend data in the chosen manner:
- Append – merge datasets with similar structures and columns matched by name.
- Join – combine datasets with different structures and at least one matched column.
Once the report is ready, proceed to set up your destination.
Now, you’re ready to export to Google Calendar.
Google App Script to export from a Sheet to Calendar
Follow the steps below to create the script.
Step 1. Click Tools > Script editor.
Step 2. Remove all code in the Code.gs file. Then, copy and paste the following code.
function exportToCalendar() {
  var calendarId = "jl9l4jg8q4jdjg1qo3o202rj4c@group.calendar.google.com";
  var calendar = CalendarApp.getCalendarById(calendarId);

  var sheet = SpreadsheetApp.getActiveSheet();

  var events = sheet.getRange("A2:C3").getValues();

  for (x=0; x<events.length; x++) {

    var evt = events[x];

    var title = evt[0];
    var startTime = evt[1];
    var endTime = evt[2];

    calendar.createEvent(title, startTime, endTime);
  }
}
Step 3. Change the calendarId value in the script (jl9l4jg8q4jdjg1qo3o202rj4c@group.calendar.google.com) to yours.
Step 4. Run the script from the Editor. The first time you run it, again, you will be asked to authorize the script to access your data. Grant permission when requested.
Step 5. Refresh your Calendar. You’ll see new events added for the specified dates.
Calendar in Google Sheets is easy
We have explored several options for exporting Google Calendar to Google Sheets, with or without coding. If you want a simple solution, try using an Add-on or Google App Script. If you want to save time doing advanced analytics and reporting, go with the Coupler.io data integration platform. Hopefully, one of the options explained here is the best choice for you!

Automate exports of Caledar data to Google Sheets with Coupler.io
Get started for free