As new orders flow in or new customers find your store, it is getting harder and harder to manage all the data from within the Magento dashboard. The native export functionality is imperfect and each new edit -for example, to a product list- requires a fresh data transfer. That is why many shop owners choose to export Magento to Google Sheets and refresh their data automatically.
We will explain step-by-step how this works. If you are not proficient with APIs, do not worry – this approach requires absolutely no coding. All you need are a Magento store, a Google account, and a few minutes at your disposal.
How to export Magento to Google Sheets?
Many different data entities can be exported from Magento with its core functionality. In each section (for example, Orders), you will find it on the right side of the screen, under the Export menu. Two options are available: XML export suitable for Excel; and a more generic CSV export.
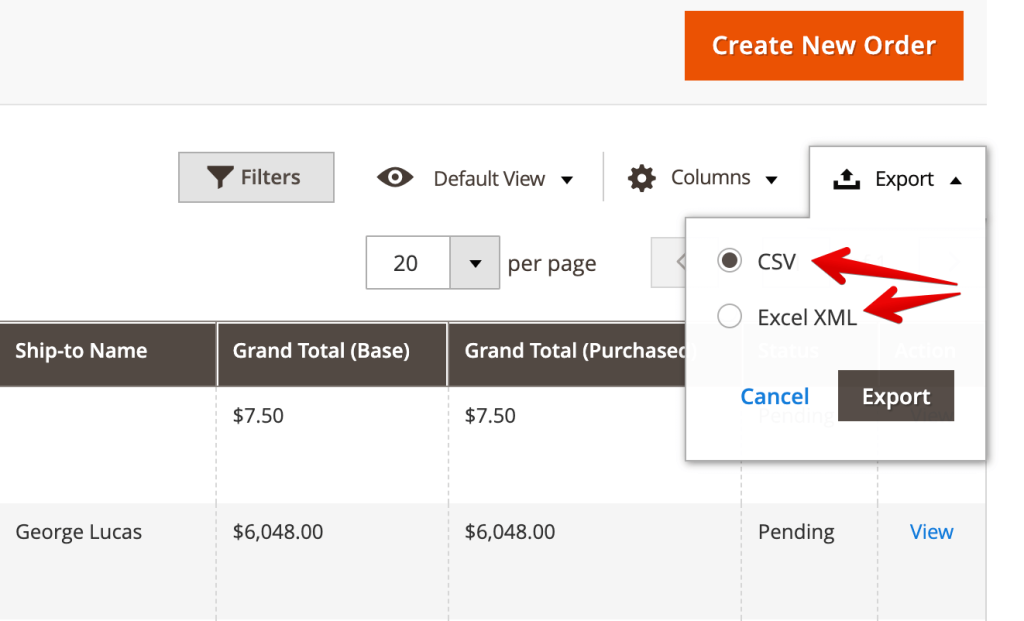
The latter is more suitable for Google Sheets users, although the formatting of imported .csv files is not always on par with the user’s expectations.
Keep in mind, this is the process you will need to do manually. It is fine if you need to make a monthly report and have no issue with jumping from one menu to another to get the desired data. If you, however, need to fetch data more frequently or simply wish to automate the process, using Magento’s API is the only option.
Although APIs are mainly the developers’ domain, tools like Coupler.io simplify data exports and make them accessible to a wide audience. Developers also eagerly deploy Coupler’s importers as they significantly cut down the time needed to set up the desired integration in Google Sheets (or Excel/BigQuery if one prefers).
We will now explain how to set up a Magento to Google Sheets integration using Coupler.io.
Note: The following instructions work primarily with Magento 2. If you are on the older version, some tweaks may be necessary.
Magento 2 and Google Sheets integration – initial setup
The instructions provided in this article are sufficient for creating an automated integration. But please note that we are not responsible for the outcome if you use the instructions incorrectly, specify incorrect settings, or if there are changes in the app’s API.
If you need help with the setup or want to have a more user-friendly version of this connector, we can develop this premium integration for you for free. Just select the app you need from the list and follow the instructions on requesting the automated integration
Coupler.io is available as a Chrome add-on as well as a web app. For the initial setup, the add-on will be more suitable for our needs.
Head to https://workspace.google.com/marketplace/app/couplerio/532272210531 and add it to your Google accounts.
The next time you open any Google Sheets file, you will find the Coupler add-on in the Add-ons menu.

Also, open the configuration template that we’ve prepared for you. From the menu, choose File -> Make a copy and name it the way you’d like. That’s the file we’ll use to run the Magento export to Google Sheets.
Magento to Google Sheets connector setup
Now it’s time to set up a Magento integration so that Coupler.io can fetch the necessary data from your store.
- Go to your Magento dashboard.
- From the menu to the left, select System -> Integrations
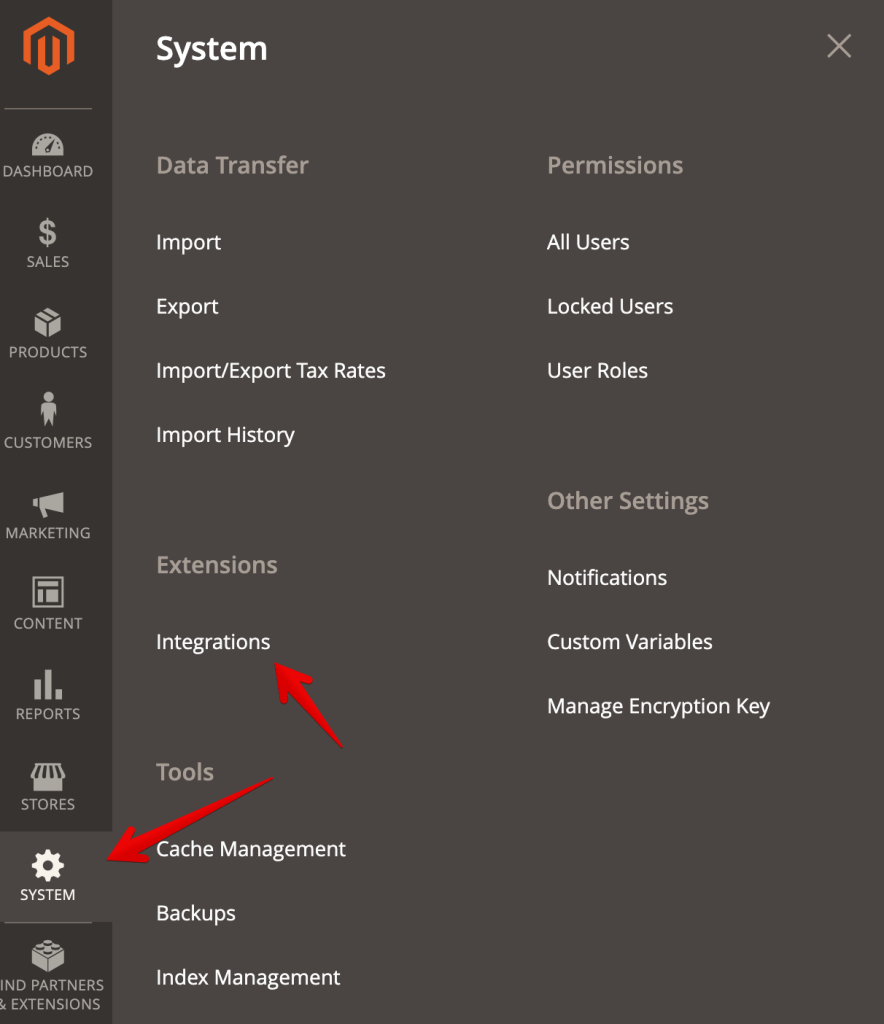
- Click the Add New Integration button.
- Name this Magento integration and re-enter your password below. As an option, you can leave your email so that Magento notifies you of any issues or updates. Ignore the other fields for now. Then, jump to the API section.
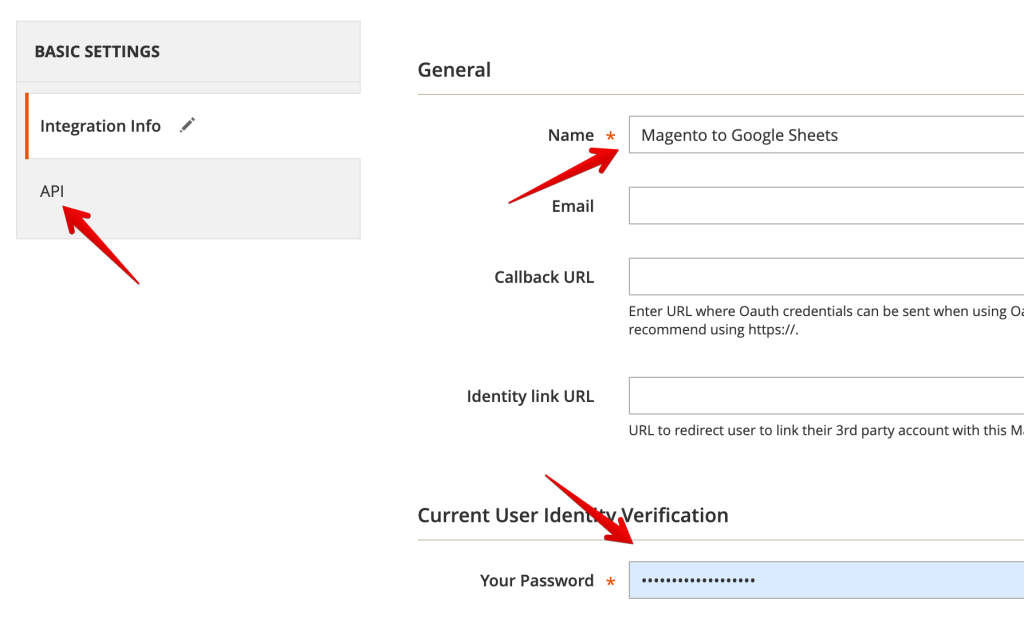
- In the API section, you can specify which data entities Coupler.io will have access to. If you only want to export -for example, orders- choose only the corresponding entity. If you are not sure yet and would like to try different types of data, it is best to select All in the Resource Access menu. You can always modify these permissions later.
- Click the Save button.
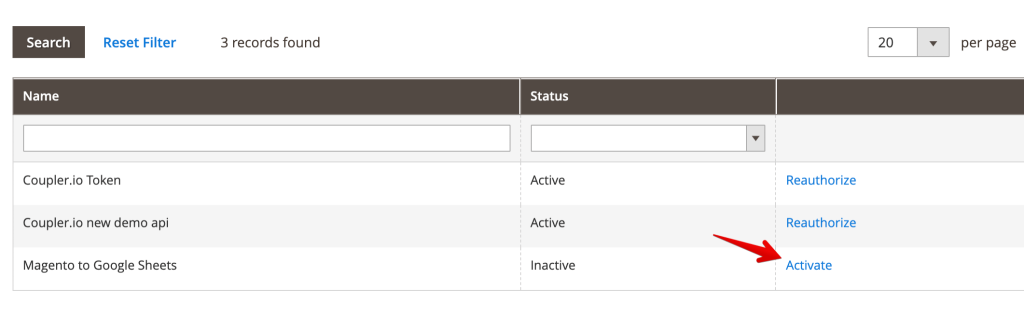
- The integration will appear on the list, but it is not active yet. You must activate it with the Activate button to the right.
- When asked, approve access to the previously selected entities.
- Finally, copy your Access Token from the final screen and click the Done button to finish the process.
How to bring Magento orders data to Google Sheets?
At this point, you already have the Google Sheets to Magento connector set up. Now, configure the importer and bring the latest orders data into a spreadsheet.
Go back to your individual copy of a template file. In the Datasource index tab, you will find an example configuration. All you need to insert on top are:
- The domain of your store (Cell C1)
- The access token you just fetched from Magento (Cell C2)
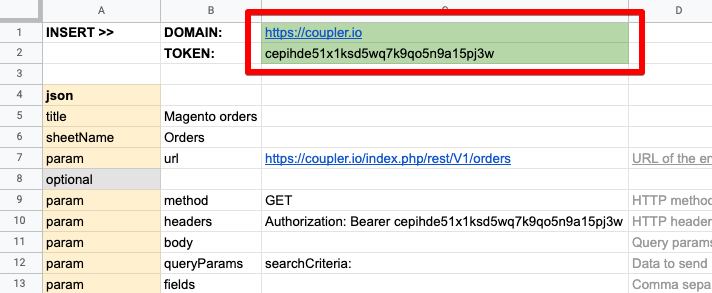
Both will be inserted into the configuration below.
Now, launch Coupler.io add-in by clicking on Add-ons -> Coupler.io -> Open dashboard. To the right of the screen, the list of importers will be loaded. For now, it will feature only one importer, with the configuration fetched from the left side of the screen.

If no importers pop up, make sure that the tab name is Datasource index. Coupler.io addon will ignore any other tabs, even if they contain a proper configuration.
If you wish to make any changes – for example, change the sheet name or update your credentials, do so and then press the refresh icon above the importers list.
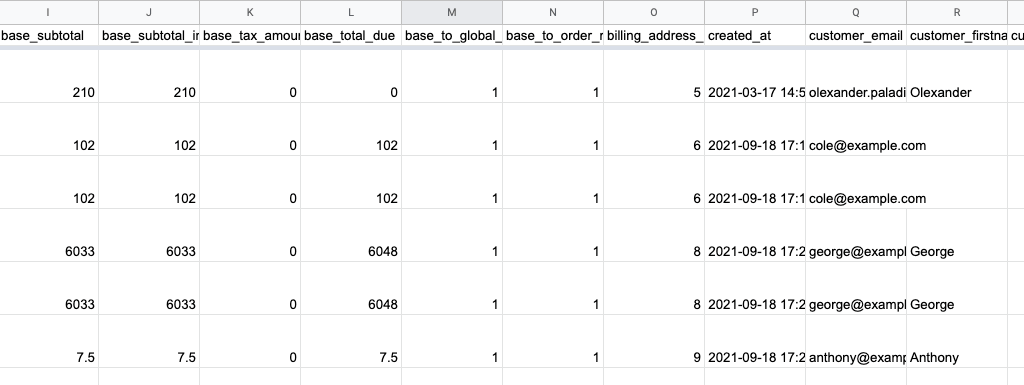
Finally, press the Run button to launch the importer. It will load for a bit and, when finished, create a new tab with all the fetched orders.
How to customize Magento data import into Google Sheets
Running the Google Sheets to Magento connection as above will return all your orders, regardless of the status. If you’ve processed thousands of orders thus far, you may not be that interested in fetching them. Instead, you would rather focus only on pending orders.
To fetch only them, adjust the queryParams field in the Datasource index tab. Add the following configuration to fetch only the pending orders:
searchCriteria:
  filter_groups:
  - filters:
    - field: status
      value: Pending
      condition_type: eq
You can put together any other filtering criteria. Please refer to the Magento API docs for the available condition_types and more.
As you noticed, each import brings dozens of different fields about your orders. For better readability, you may want to limit them only to those relevant to you.
In the fields row of the configuration tab, you can specify exactly the fields to fetch. Insert them comma-separated as on the example:
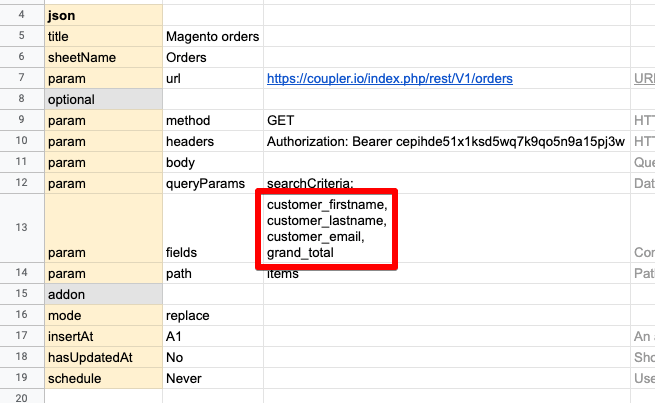
Here are all the available fields:
base_currency_code,
base_discount_amount,
base_grand_total,
base_discount_tax_compensation_amount,
base_shipping_amount,
base_shipping_discount_amount,
base_shipping_incl_tax,
base_shipping_tax_amount,
base_subtotal,
base_subtotal_incl_tax,
base_tax_amount,
base_total_due,
base_to_global_rate,
base_to_order_rate,
billing_address_id,
created_at,
customer_email,
customer_firstname,
customer_gender,
customer_group_id,
customer_id,
customer_is_guest,
customer_lastname,
customer_note_notify,
discount_amount,
entity_id,
global_currency_code,
grand_total,
discount_tax_compensation_amount,
increment_id,
is_virtual,
order_currency_code,
protect_code,
quote_id,
shipping_amount,
shipping_discount_amount,
shipping_discount_tax_compensation_amount,
shipping_incl_tax,
shipping_tax_amount,
state,
status,
store_currency_code,
store_id,
store_name,
store_to_base_rate,
store_to_order_rate,
subtotal,
subtotal_incl_tax,
tax_amount,
total_due,
total_item_count,
total_qty_ordered,
updated_at,
weight,
payment,
billing_address
How to sync Google Sheets and Magento automatically?
Arguably the best thing about this Google Sheets to Magento connection is that you can refresh the data as often as you would like. You can, for example, get fresh orders every hour on weekdays, or conduct a daily import run at the start of your workday.
To enable this and to see your importers in the Coupler.io web app, you will need to finalize the importer set up in a few simple steps.
To do so, click the three-dots menu to the right of your importer and then select Edit. A configuration screen will appear where you can finalize the settings of your Magento integration.
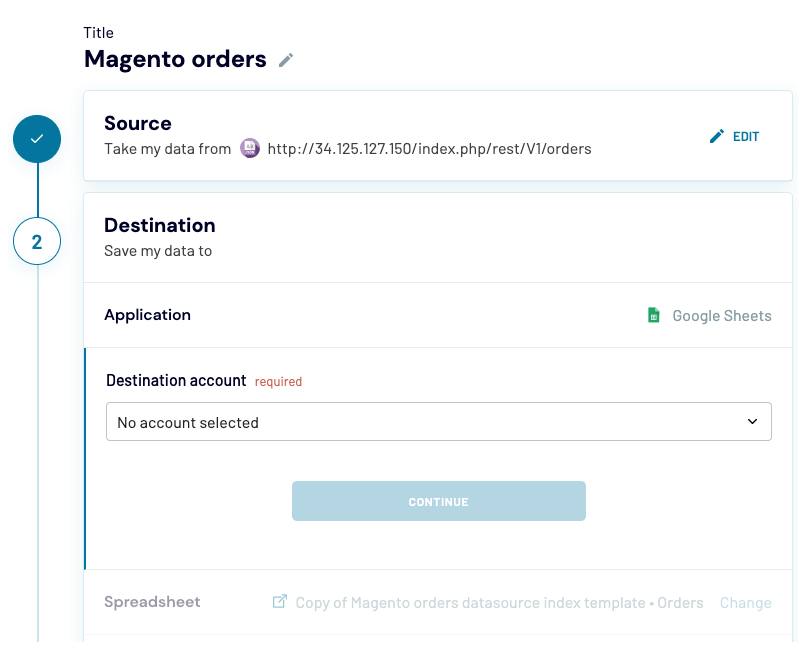
The Source is already pre-configured based on the Datasource index file. Next, connect your Google account and choose where exactly the data should be imported. You can pick the same file and sheet as previously or can create a completely different destination for this particular importer.
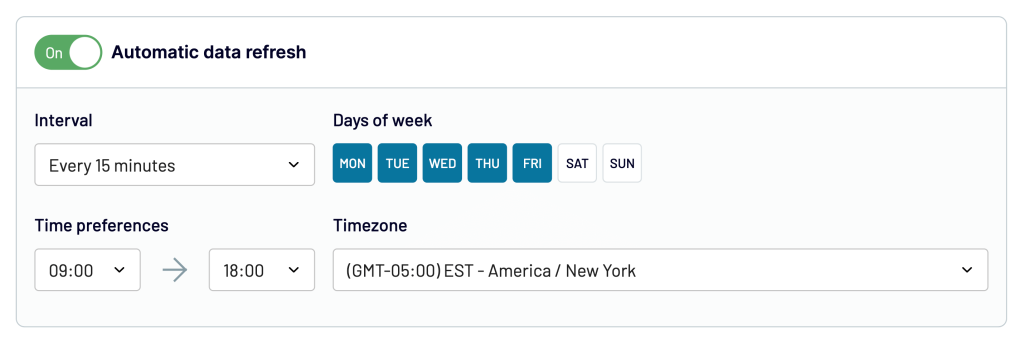
Toggle on Automatic data refresh and choose the settings that work best for you. Afterward, press the Save and run button to finish the setup.
Note that the configuration will disappear from the Datasource index file when you start editing the settings. It happens on purpose so that no duplicate importers are created.
Other use cases for the Magento integration
Orders are just one of the many entities you can fetch with this Magento integration. Fetching order things, such as products or categories may be as easy as swapping one word in the configuration file.
But first of all, a useful hack for you. If you plan to set up multiple importers, you don’t need to create new files with configuration or even separate sheets. As a matter of fact, all you have to do is insert the configurations one by one into the Datasource index sheet, as in the example below. Then, refresh the list of importers and each position will appear as a separate importer.
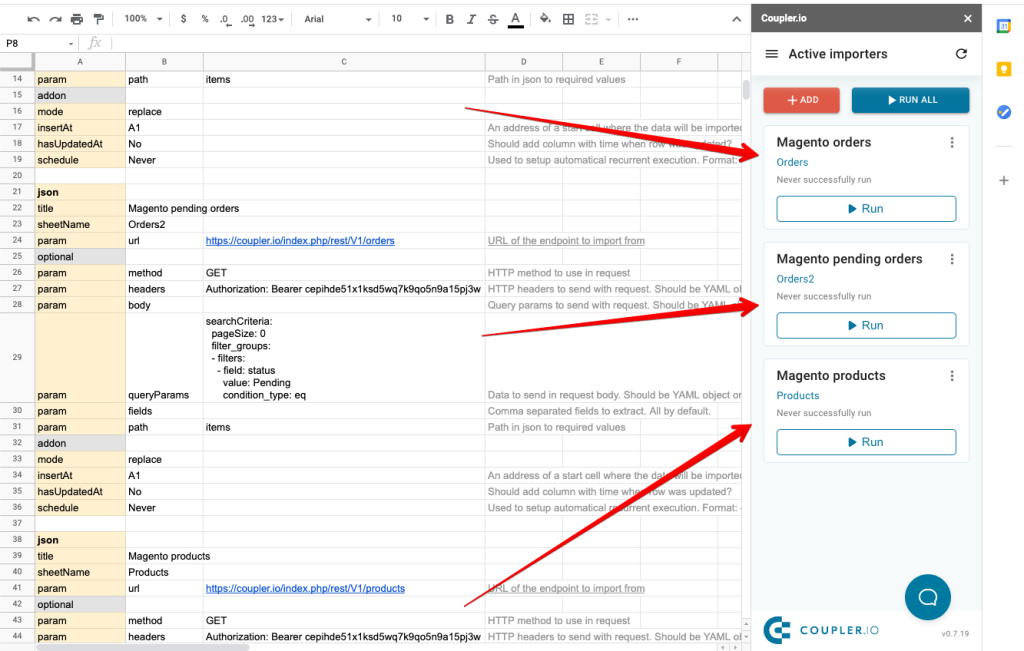
You can then choose to run either of them or press the Run All button to launch each importer simultaneously.
How to bring Magento customers to Google Sheets?
You may be eager to import your customers from Magento to Google Sheets and refresh the list as new clients find your store. It’s really easy.
Venture back to the configuration file that we discussed in the earlier chapters. Add your domain and access token if you haven’t yet.
When we were importing orders, the URL looked as follows:
https://YOUR-DOMAIN/index.php/rest/V1/orders
To fetch customers, change it to the following:
https://YOUR-DOMAIN/index.php/rest/V1/customers/search
Update the name of the sheet that you’ll be importing to, not to override the previous data. Name also the importer accordingly, for example, “Magento Customers” and run it.
Here’s a sample customers import:

How to bring Magento products to Google Sheets?
Once you integrate Magento with Google Sheets, fetching different data entities becomes very straightforward.
For products, you will only need to update the URL we have previously used to fetch orders.
Replace
https://YOUR-DOMAIN/index.php/rest/V1/orders
with
https://YOUR-DOMAIN/index.php/rest/V1/products
Then, run the importer to fetch the list of your current products. For example:
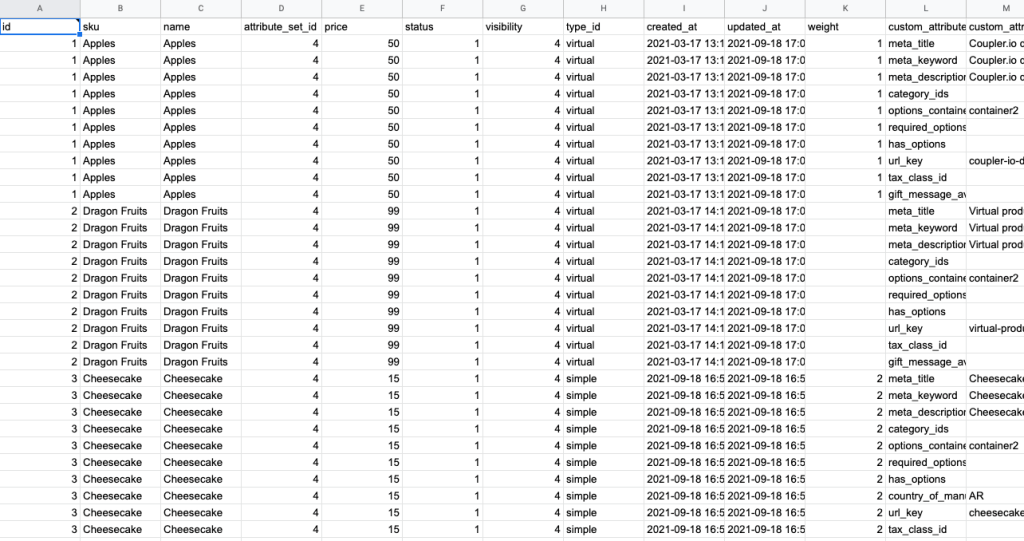
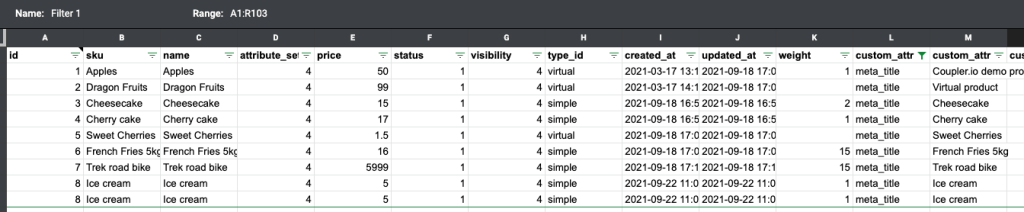
Note that there will be multiple rows imported for each product, due to different attributes associated with each. If you are interested only in -for example- meta titles, you can set up a corresponding filter view in Google Sheets to filter out all other results.
How to set up a dynamic update of Magento products to Google Sheets?
Rarely will you want to import the list of products just once. It is more likely that you would like to have the list of products refreshed automatically so that each new addition or change is quickly reflected in your Google Sheets file.
Same as we did above, set up the Magento to Google Sheets products import. Run the importer from within your spreadsheet. If the import is successful, click the three-dots menu, then Edit.
In the configuration menu, select the destination for your product import. In the last stage, toggle on the Automatic data refresh and create the schedule that the importer will follow.
From now on, your list of products in a Google Sheets file will be automatically refreshed as a chosen frequency.
How to bring Magento categories to Google Sheets?
As a separate import, you may be interested in fetching the list of product categories and subcategories, along with their attributes.
The first thing to do is replace the standard URL (https://YOUR-DOMAIN/index.php/rest/V1/orders) with the one dedicated for categories import: (https://YOUR-DOMAIN/index.php/rest/V1/categories)
But that is not all. If you ran an importer now, it would work but would return only the first category along with its subcategories. To fetch all categories you need to do two tweaks:
- In
queryParams, insertrootCategoryId: 1 - Change the
pathtochildren_data
Here is a sample configuration:
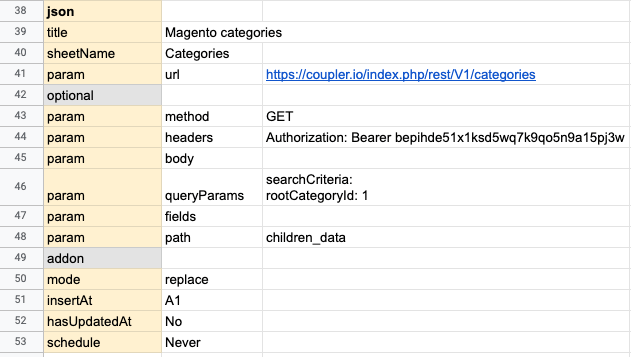
You will find this and the other examples in the Other Importers tab of the templates file.
How to bring Magento prices to Google Sheets?
There’s no separate entity in Magento API for fetching prices. Instead, all the prices (including tier prices) are available with the standard products import that we discussed earlier.
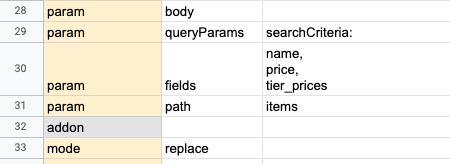
If you are specifically interested in prices, you may want to request only the price-related fields along with some basic fields, such as SKU or name.
Note that the tier_prices field works in a different way, as it is an array. To fetch all three tier_prices fields (customer_group_id, qty, and price) you just need to insert tier_prices in the field named “field.”
As a reminder, all fields need to be comma-separated. Here’s a part of a sample configuration:
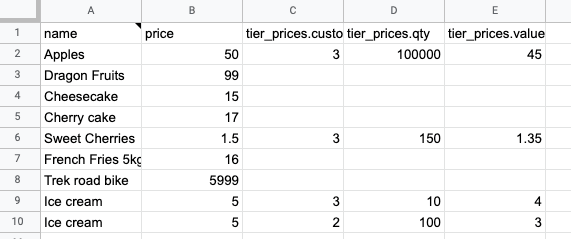
To get the products with prices, use the same URL as before:
https://YOUR-DOMAIN/index.php/rest/V1/products
Run the importer and you will see the results shortly. Here is an example:
Connecting Magento to Google Sheets – resources
For your convenience, we have added all the importers mentioned in this article to the templates file. Remember to copy and paste them into the Datasource index tab so that the Coupler.io addon recognizes them. Otherwise, they will be ignored.
Once you grasp how connecting Magento to Google Sheets works, you will have an easy time creating new importers and adjusting them to your needs. You will find each saved importer in your Coupler.io dashboard. This is also where you can edit their settings, duplicate them, or run them manually.
Magento integrations – the world of possibilities
Pulling your Magento data into Google Sheets opens up many possibilities for you.
The first approach would be to pull more data into the same or another sheet and couple it with your Magento data. Among our users who pull data from Magento, HubSpot, Pipedrive, QuickBooks, Xero, or even Shopify are common choices. Coupler.io features direct integrations with these services, which take just a few minutes to set up.
And what to do once you have the data in your spreadsheet? Analyze it. Of course, you can do it directly in your spreadsheet. But with an abundance of data flowing in from your store every day, you may have an easier time visualizing the numbers. Google Sheets offers, for example, easy integration with Data Studio.
Here are sample charts demonstrating the data from our Magento store:
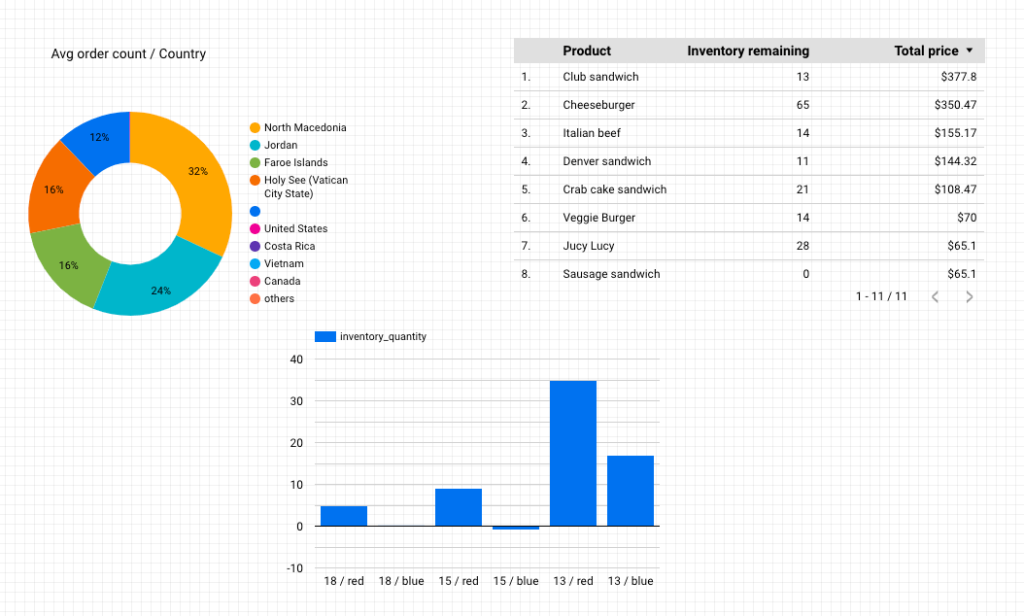
That’s all. Many thanks for your time!