Starting a new business is both exciting and overwhelming. You want to change the world with your product, read happy customers’ reviews, and make this small business last for generations. But if you, like many Shopify users, are starting a new business, there are so many things you don’t know about e-commerce, it’s frustrating.
But don’t start thinking that building your own online store is too much for someone with no design skills. Platforms like Shopify make building stores easy and you’re guaranteed to finish this tutorial with a result that looks great and works even better.
Follow this guide, and you’ll learn how to create a Shopify store step by step in under 25 minutes. It will take you through every step to make sure that when you have connected the domain name and launched your store, it will be an instant success.
What is Shopify and how does it work?
Shopify is the leading platform for creating and running an online store. This platform is essentially the WordPress of e-commerce websites. There are now over a million active users who sell their goods and services with Shopify.
The platform’s offer is pretty simple, yet very appealing to small and medium businesses. For a monthly subscription fee, you can develop, launch, and run a successful e-commerce store and build your Shopify sales funnel. It does have some competition, but Shopify is still leading the market. Here’s why.
Why Shopify?
If you have the budget to start a large online store, you probably don’t need Shopify. Designing and developing an e-commerce website can cost anywhere between $5,000 and $500,000 depending on your niche, the number of products you want to list, and multiple other factors.
For a company with a budget that big, this investment will surely pay off in the future. But for small business owners and self-employed online entrepreneurs, the upfront cost of developing a decent website is too high.
While Shopify was the first SaaS business to offer this kind of service to digital entrepreneurs, it’s not the only one. There are dozens of Shopify alternatives out there, and some offer a pretty similar range of features. Despite this, many entrepreneurs consider Shopify to be the best choice. Here’s why:
- Shopify is the biggest e-commerce platform
- Shopify has a large collection of design options and e-commerce tools
- Shopify sites are more mobile-friendly
- Shopify users can set up AMP pages
- Shopify’s point of sale app is considered to be better
- Shopify makes cross-channel selling easy
This makes Shopify a top pick for e-commerce websites. Wix is arguably better for general all-purpose websites, but the only edge it has on Shopify in terms of e-commerce is that Shopify’s tax app only works in the USA, Canada, and the EU.
Another Shopify rival, Etsy, may be better for some audiences. If you want to start a dropshipping business or a proper online store, Shopify is the best choice. However, if you only want to sell a few crafts once in a while, you may want to check out our Shopify vs. Etsy comparison.
How long does it normally take to set up a Shopify store?
You can set up a Shopify store in under 25 minutes if you follow the instructions below. However, this timeframe doesn’t take into account all the planning that goes into it beforehand. Apart from coming up with the business idea and finding trustworthy suppliers, you need to take care of the legal matters, browse the Shopify themes shop, and plan out your store.
If you consider the planning and the fine-tuning you’ll inevitably have to do after you’ve created your Shopify store, the process can take up to a couple of days.
How much is it to set up a Shopify store?
The price of creating a Shopify store varies depending on your needs. At the very least, you’ll need to pay for a Shopify basic plan, which is $29 per month. The platform does have a free trial period, but it doesn’t have a free plan. Another expense you can’t escape is purchasing a domain. It won’t be a major one though, the average price of a .com domain is $14 per year.
This makes the minimal price for setting up a Shopify store $43 upfront and $362 over the course of the year.
If you want to add a better theme to your website, you’ll have to pay for a premium one. You don’t have to start with a premium theme, but the ones you can get for free have far fewer features and are used by thousands of Shopify stores. Most themes in the marketplace cost $180 for a life-time license, even though you can get some for $100.
Add to that the premium Shopify plan, which is $299 per month, and we have an upfront cost of $493 and an annual cost of $3,782.
You can also spend some money on third-party hosting, but since all Shopify plans include it for free, it’s not worth mentioning it as a necessary expense. For hosting, you can expect to spend anywhere between $4 and $80 per month.
If you are looking for free themes, you may also consider the Wix website builder. Unlike Shopify, which only features 12 free themes, Wix has 60 completely free templates. You can learn all the differences in this Shopify vs Wix comparison.
Do I need to set up a tax ID for a Shopify store?
This depends on how you want to run your business. If you already have a registered business or want to register one, you will need to provide a tax ID. However, you don’t need to own a business to run a Shopify store.
You can operate it as a sole proprietor. In this case, you only need either your Social Insurance Number or your Social Security Number to set up a store.
How to set up a Shopify store in 2 languages?
Even the basic plan lets you translate your shop into up to five languages and add a language switcher button. You can even translate your shop either on your own or automatically via a third-party app.
If you want to add regional websites or change the pricing for different countries, you’ll have to upgrade to a better plan.
How to set up my Shopify store in 16 steps
Now that you know how much you’re going to pay for creating your store and how long it will take, let’s get down to making sure your business shines online.
Sign up to Shopify
The first thing you’ll need to do is set up a Shopify account if you don’t already have one. You only need your email and a password to do this. Shopify won’t ask you to confirm your email just yet, so you can jump right into creating the store.
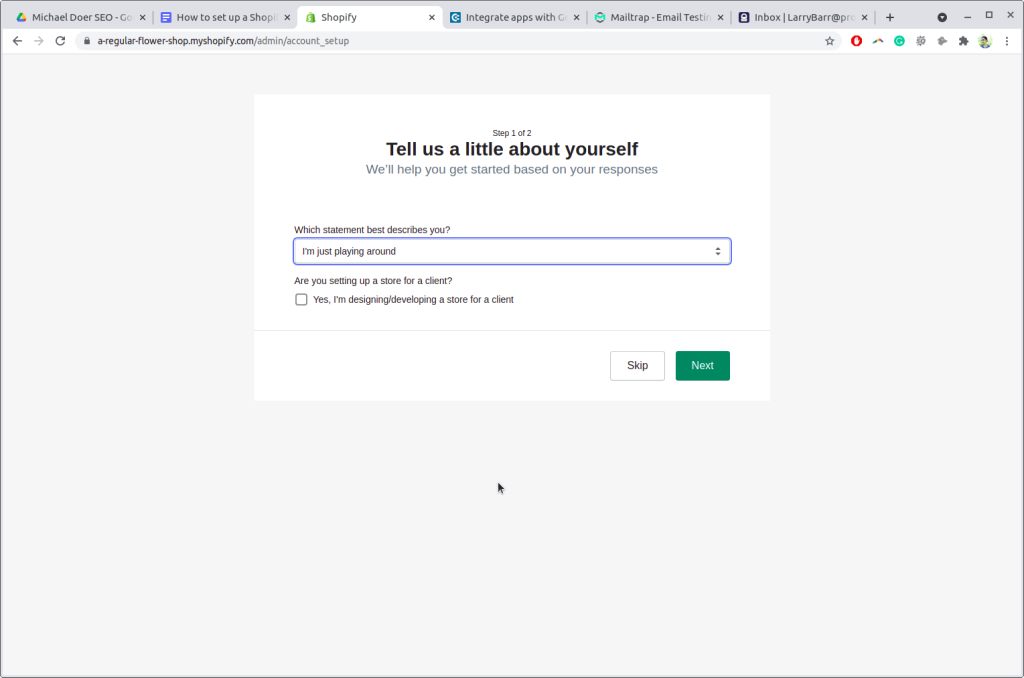
Name your store
As you’re setting up the account, the form will prompt you to name your store. You have probably already picked a stellar name for your business, so that won’t be a problem. If you’re starting a Shopify dropshipping business and don’t really care about the name, feel free to use Shopify’s Business Name Generator.
Until you connect a domain to the store, you’ll get a free Shopify subdomain. If you name your store A Regular Flower Shop (like we did for the purpose of this explainer), your URL will look like this:
a-regular-flower-shop.myshopify.comAfter choosing whether you already have a business or are trying to start a new one, you’ll have to enter some personal details.
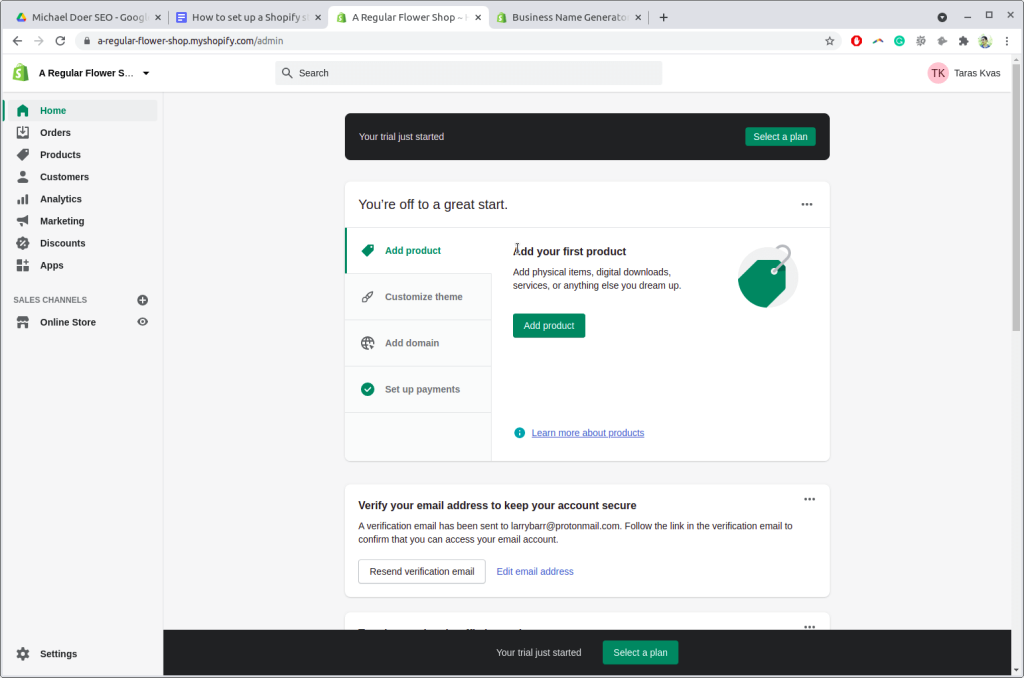
With that done, you’re in the admin panel of your newly minted website. It already exists, but lacks products and pages.
Add key pages
When you enter the shop, you’ll be prompted to do a quick set-up and add some products.
But it’s better to start with the basics instead. Add the most important pages for your business: Contact, About Us, and Privacy Policy. The latter is required by Google if you want to run AdSense ads.
Thankfully, Shopify has a free privacy policy generator that adheres to all guidelines. All you have to do is provide your address and email, and you’ll get a free copy like this:

Next, go to Sales Channels > Online Shop > Pages in your admin panel and create a new page. Set the name of the page to “Privacy Policy”, copy and paste the free template you just got from Shopify, and fill in the blanks.

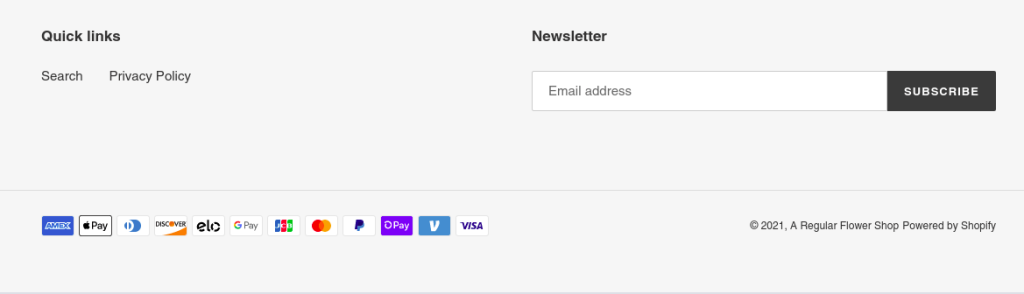
With that done, click “Save”, and add it to the navigation bar. You can go to the Navigation tab or just click the prompt above the page editor. Just make sure to copy the URL of your page. Now go to the Footer Bar and click “Add Menu Item”.
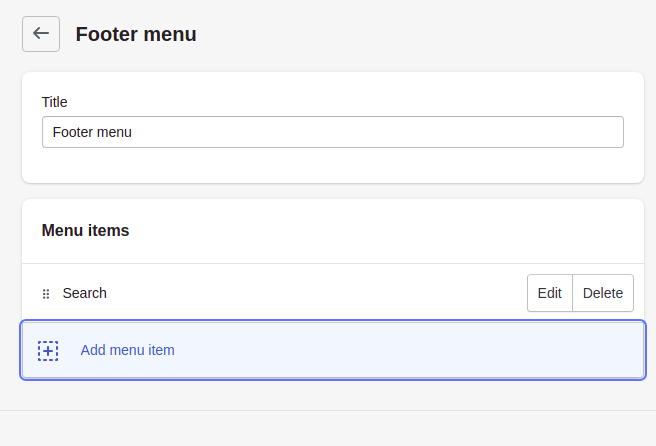
Give it the same name and paste the URL. Now your footer bar should look like this:
Now do the same for the Contact page and About Us page, but place them in the main menu that shows up on the top half of the website. If you’re stuck with the About Us page, draw some inspiration from some of the best on the web.
Add products
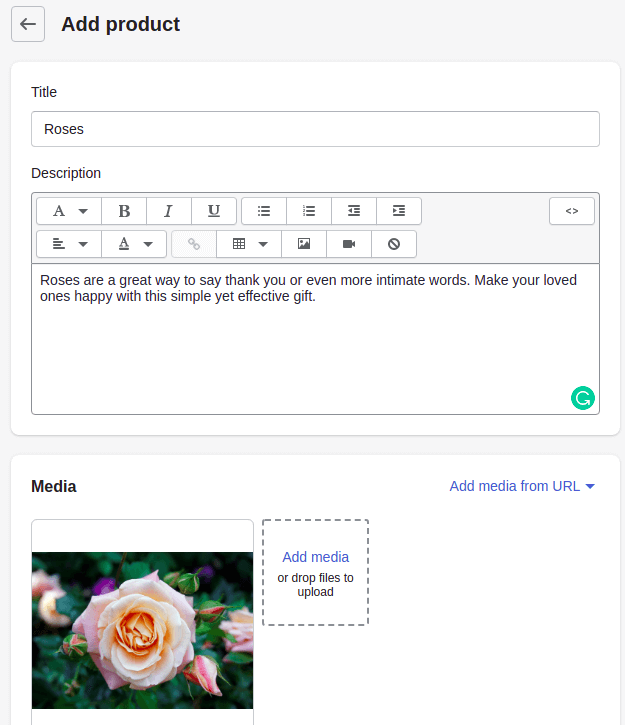
The boring part is over, so let’s add some products to your new store. Go to Home and click “Add product”. You’ll be redirected to a page editor with several features you haven’t seen when creating pages previously.
Start by giving your product page a name and writing a brief description. If you aim at ranking in SERP, you’ll need to do some research and add a couple of keywords to that text, but for now, just describe the product.
Then add a photo or several photos. Don’t just take a photo off the web, like we did for the purpose of this explainer, though. It’s best to provide your own high-quality photos. This way, the customer can see exactly what they’re going to receive and you will have far fewer returns.
The next step is setting up the pricing. If you already know how to price your products, go ahead and type in the number. You can also type in the cost you’re paying per item to make analyzing your profits easier.
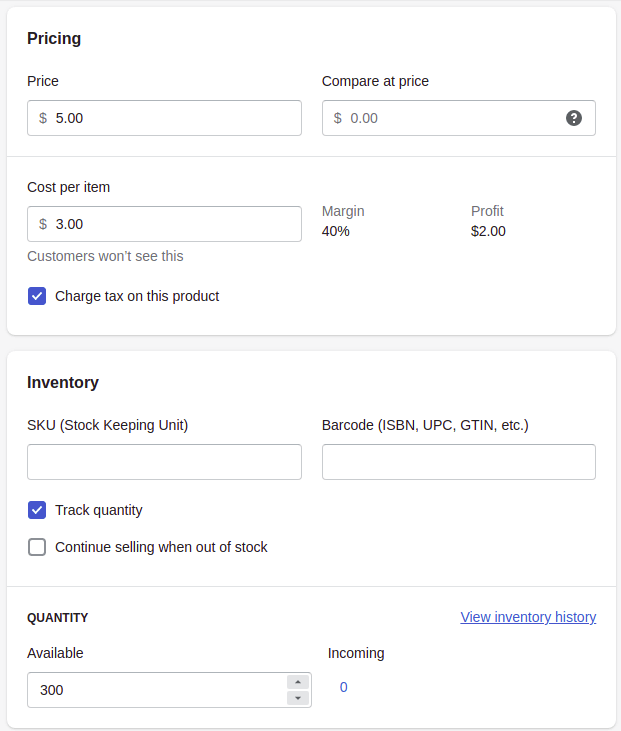
Shopify also makes keeping your stock in order easy. All you have to do is enter the quantity you have on hand, and Shopify will automatically track it. You don’t necessarily need the SKU, but it’s best if you set up a system for keeping track of your items.
You can use any system for generating SKU codes, and there are plenty of free ones on the web. Leave the “Barcode” field empty if your wares don’t have one. If they do, look up the code and enter it.
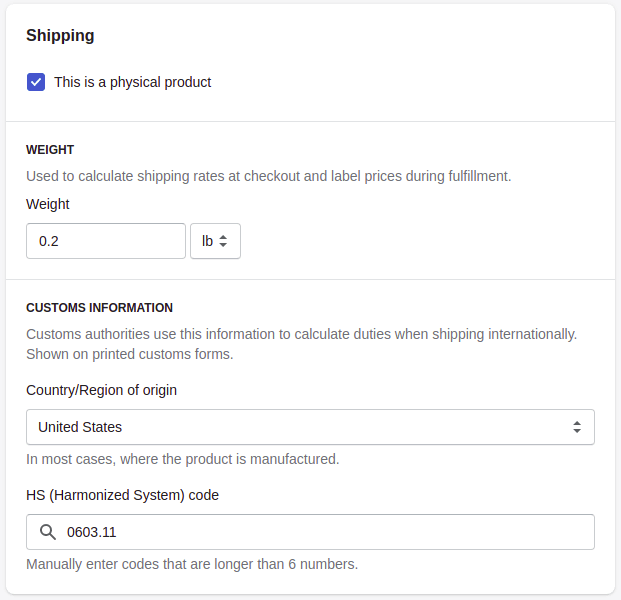
Next, you need to fill in some basic shipping information for products that are not digital. Put in the approximate weight, country of origin, and the Harmonized System code. You can see your code suggested by Shopify if you start typing in your product. However, it’s always best to search for the HS code for your specific product just to be sure.
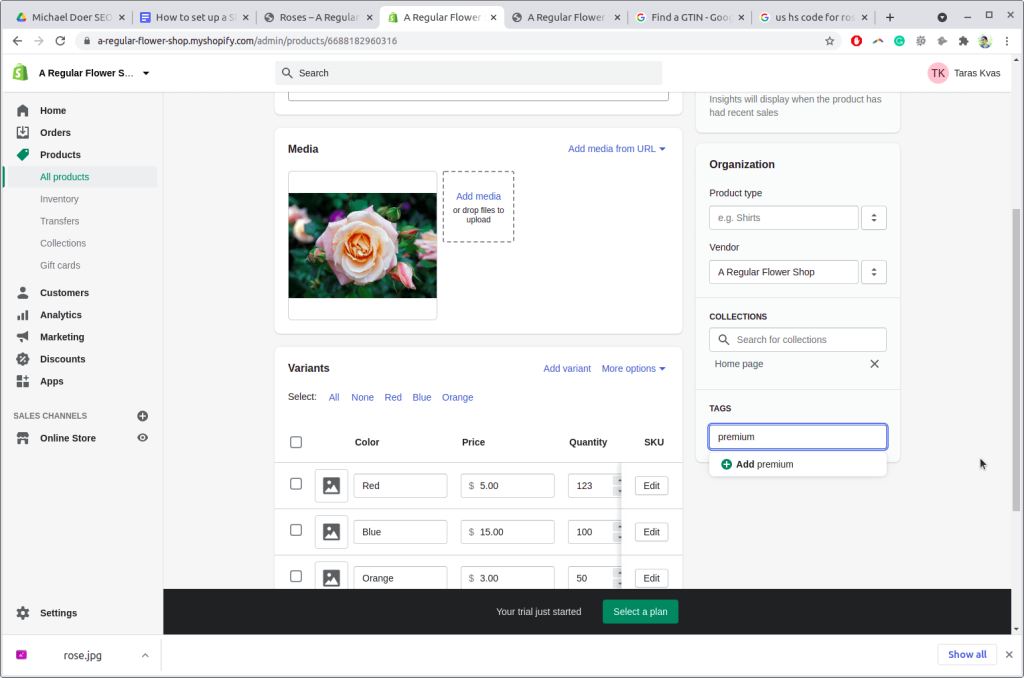
The last step is creating variants of the product. If your product comes in different shapes and sizes — shoe size or flower color, for example — you can manage it in a single page instead of creating different ones. Add categories to the product and set the price and quantity for each.
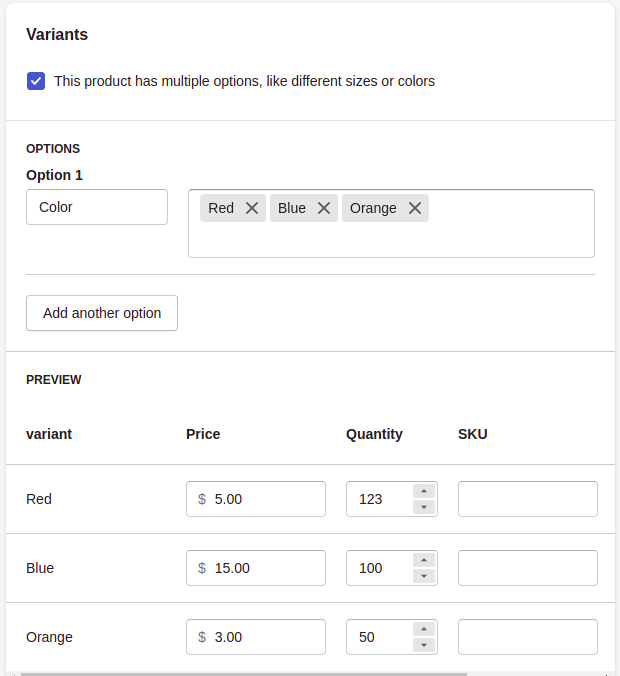
With that, your first product is complete! Change its status from Draft to Active, click “Save”, and add as many products as you want.
Add collections
When you’re done adding the products, create some collections. Group similar products on one page to help your customers find what they need more quickly. Go to Products > Collections and add a new one.
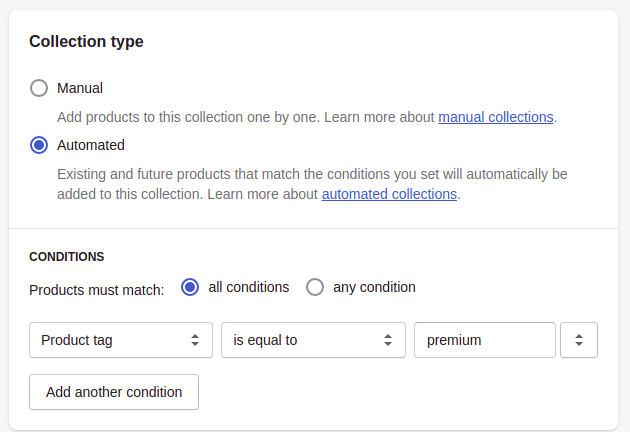
You have the option to add products manually, but for now, let’s stick to the automated option. Choose a product tag that will be featured in this collection and add this tag to your products if you haven’t already.
Repeat this step to create as many categories as you want.
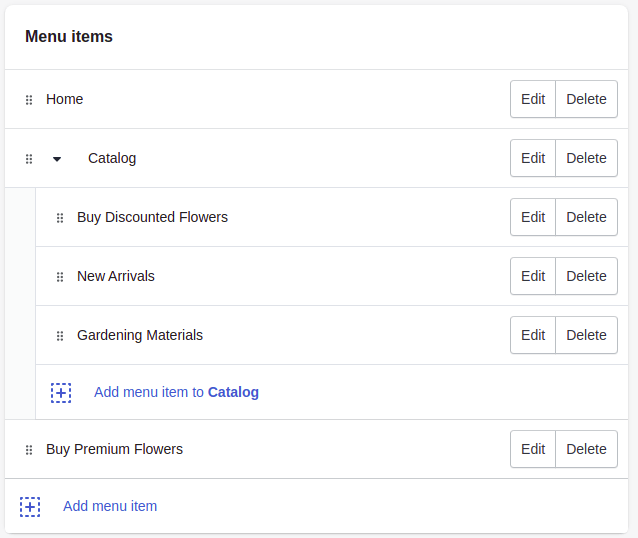
When you have several categories, they already exist on the website, but the user can’t get to them without a link in the navigation menu. Let’s add your new collections to the main menu.
Go to Online Store > Navigation > Main menu and add a new menu item.
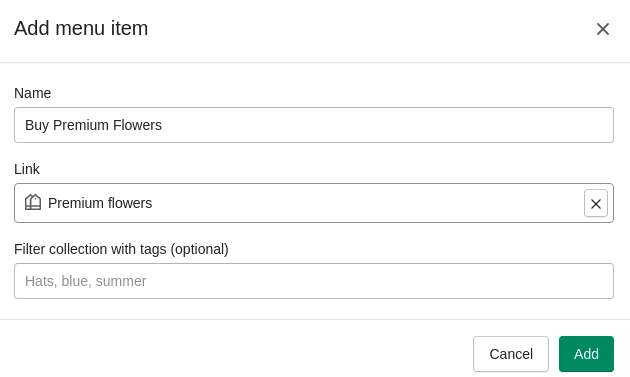
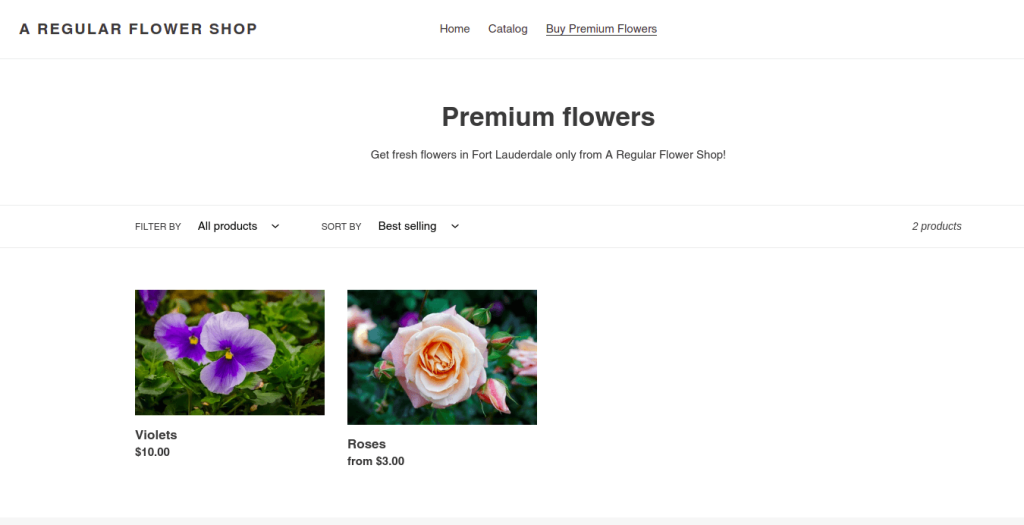
Add a category to that menu item and click “Save”. When you view your website, it should look like this:
Now, you shouldn’t add too many items, as the usable space on the navigation bar is limited. Instead, create drop-down lists in already existing menus. Go to the Main menu tab in your admin panel, create a new item, and drag and drop it to the existing one, like this:
Choose a theme and customize your store
Once you’re done with all the steps above, you have 80% of the work done. You have created the main components of the website already – you just lack the polished looks and the main page to finish the website.
Go to Online Store > Themes to browse themes and customize your website.
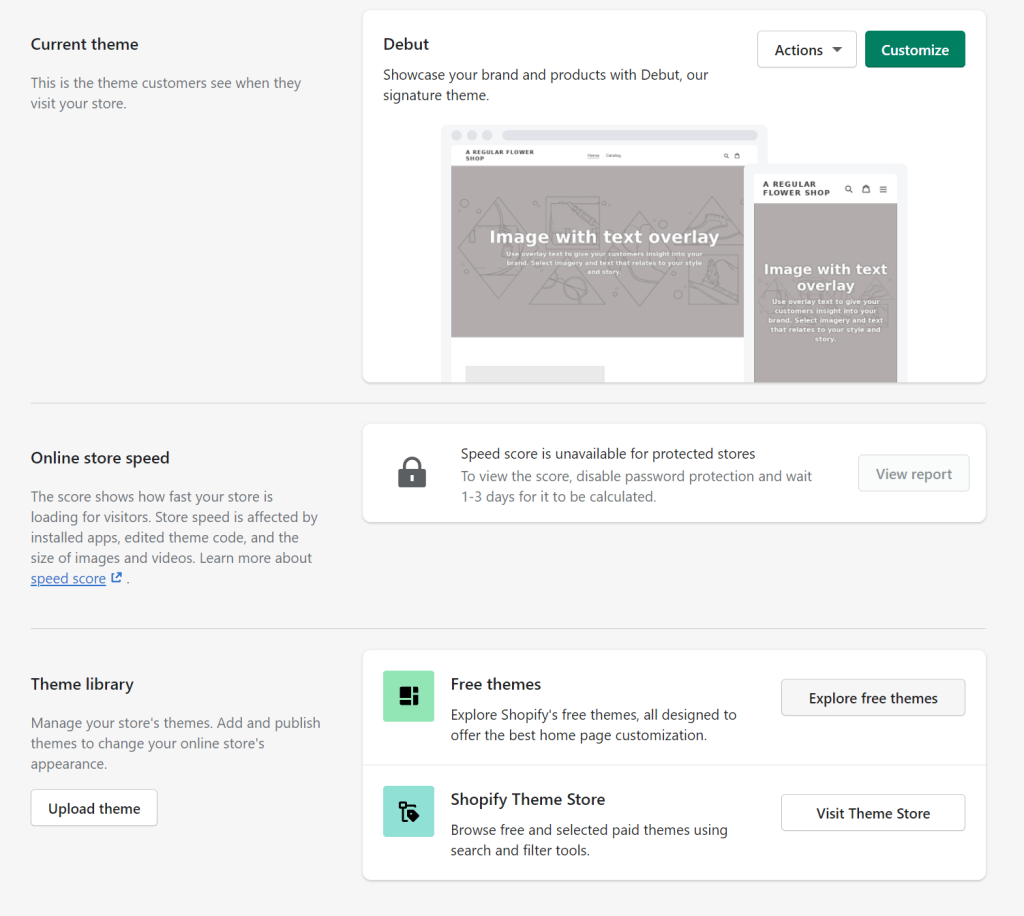
If you want to change the theme, now is the right time to do this. Scroll down to the bottom of the page and browse the free or premium themes. You don’t have to do this right now though – the free theme you have can stay there until you’re done setting up sales channels.
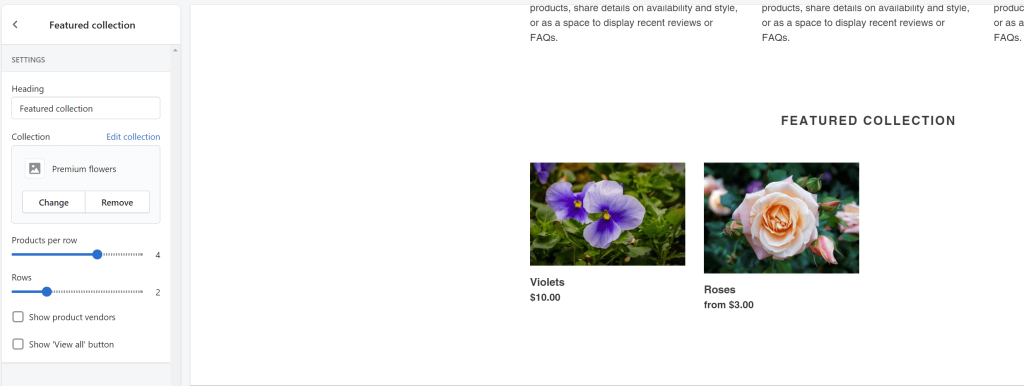
Next, click on “Customize” to enter the theme editor. Here, you can change individual pages or elements of the footer or header. You can also add or delete elements on the main page or any other page.
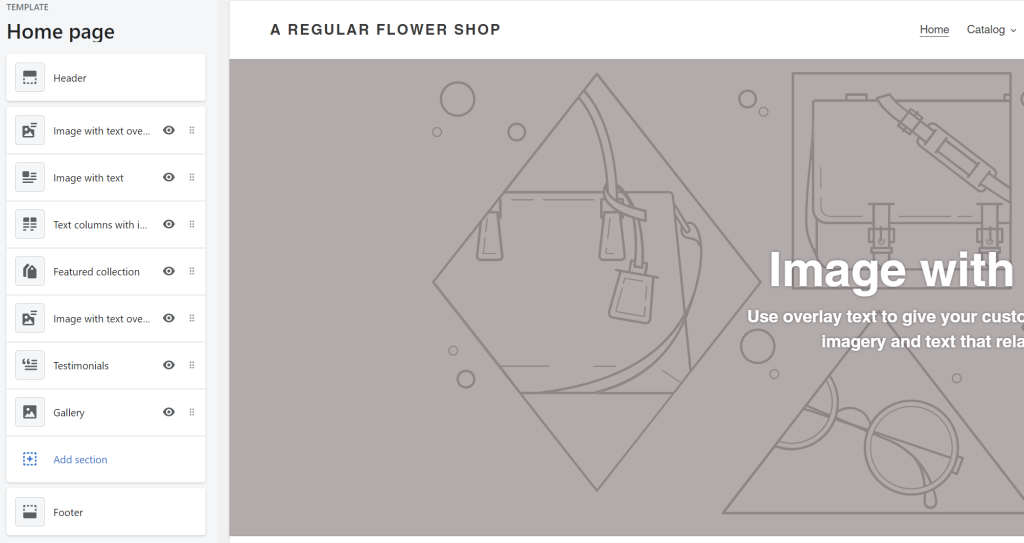
To start editing the element, click on it in the menu on the left side of the screen. Some page elements are dynamic and will update with the website. For instance, you can go to the Featured Collection element and choose a collection to display on the home page. It will automatically add new products as the chosen collection expands.
If you need to change the fonts or brand colors that appear across the whole website, it’s best not do this individually for every element, but in the theme settings.
Scroll down to the Theme Settings and go to Typography, Colors, or any other setting to change it across the whole website.
Customize the checkout page
To finalize your new Shopify store, customize the checkout page. Go to Theme Settings > Checkout and open the checkout page in your editor to see the changes appear live. Tweak a few things like background color or imagery until you like it, then go to the next step.
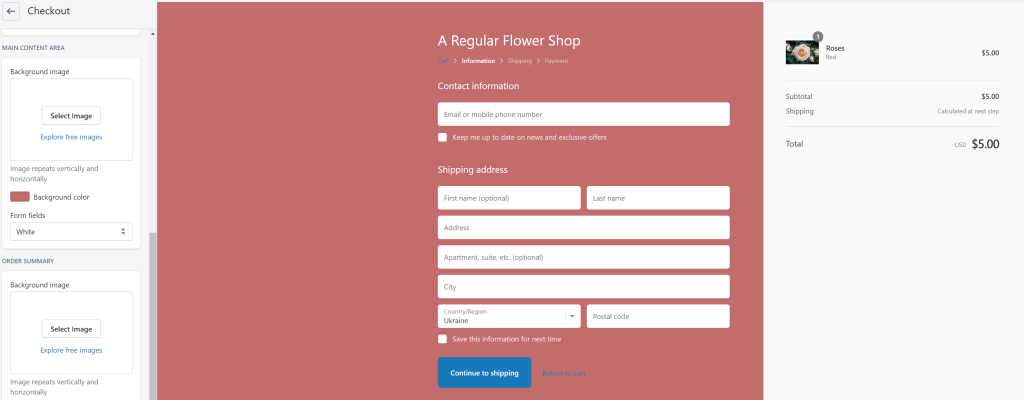
Go to Settings > Checkout in the admin panel or click the prompt you see in the page editor. When you’re new to the platform, you probably won’t be needing to implement complex scripts. For now, you can finish this stage by enabling tipping or requiring customers to only check out via email to make marketing to them later easier.
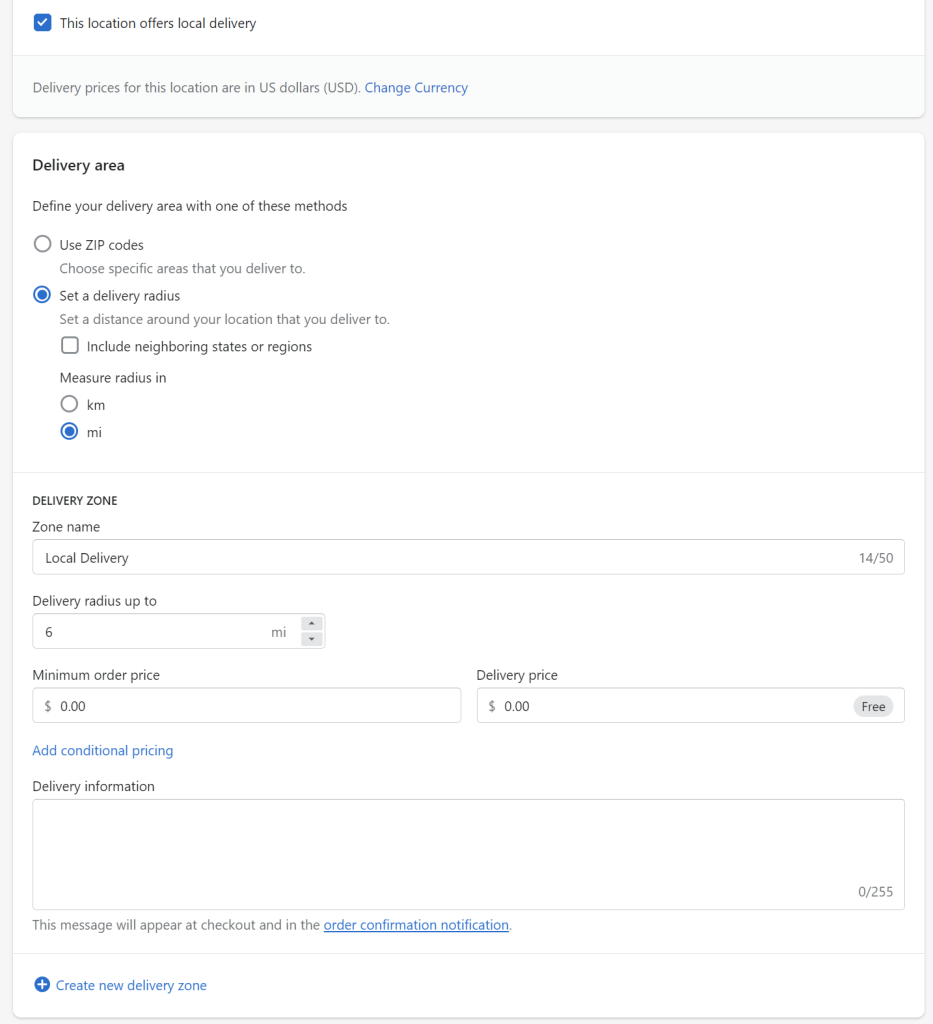
Set up shipping
Go back to settings and choose Shipping. Here, you can set up your shipping options, add third-party delivery companies that you work with, and add the dimensions of your custom packaging if you have that option.
If you offer local pickup or local delivery, this is the place to add those options.
Set up taxes
Next on our list is taxation. Go to Settings > Taxation to set up how you collect taxes for your state. Check with your local IRS department to see whether you need to collect sales tax on the type of product you’re selling, and enter your tax identification information into the settings.
Connect payment gateways
We’re almost done with setting up your first Shopify store. This is the last thing you have to do to make sure the store works as intended. However, there are several steps that are not necessary, but highly advised.
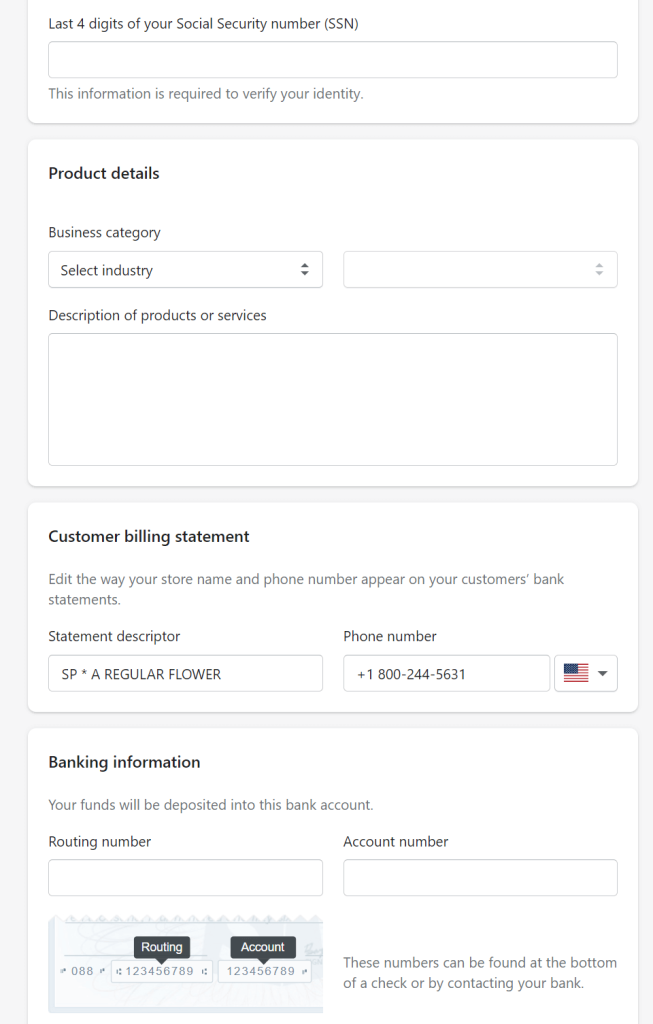
Go to Settings > Payment to connect methods of receiving payments. First, you’ll need to click “Complete account set up” and add some details about yourself and your business.
Here, you’ll enter your name and address, the last four digits of your SSN, your banking information, and a couple of other details.
When you’re done with that, feel free to connect a third-party payment processor if you work with one or alternative payment methods like cryptocurrency. Test how the system works by placing a test order. Go to the Home tab in your admin panel, scroll down, and place the order.
With this done, you’re free to launch your shop into existence! However, we highly advise that you go through with the following four options as well. They’ll make sure your Shopify store has the edge over the competition.
Add sales channels
If you already have a Facebook or Instagram shop, you can link them to your Shopify store. Go to your admin panel and click on the plus icon next to the Sales Channels. Add the social media you have, such as Facebook or Pinterest, and provide some details to integrate ads.
Register a domain
Do you already have a domain name you got from GoDaddy or another registrar? Connect it to your shop by going to Sales Channels > Online Store > Domains. If you don’t have one yet, you can purchase one directly from the admin panel by clicking on the dedicated “Buy” button in that section.
Shopify doesn’t charge an additional fee on top of what the registrar charges you, so it’ll be the standard $14 per typical .com domain. When you buy it, it will automatically connect to your store.
You don’t have to do this, but without a registered domain, your store will run on a Shopify subdomain. This doesn’t look as good and may turn some picky customers away.
Connect analytics
Shopify has a good analytics system that reports on your sales, taxes, and profits, but as an entrepreneur who wants to get ahead in online commerce, you want as much data as you can.
Go to Sales Channels > Online Store > Preferences and enter your Google Analytics code and Facebook Pixel for better tracking. You can find both of those in your Google and Facebook business accounts.
Also, if you want to run custom Shopify analytics, you can easily export Shopify data for further analysis. For this, use Coupler.io, a data integration platform with AI analytics support. It allows you to schedule data exports from Shopify to Google Sheets, Excel, data warehouses (connect Shopify to BigQuery), create dashboards, and analyze data in AI.
As your business grows to multiple storefronts or selling locations, Coupler.io also works as a multi-location reporting tool that consolidates cross-store data into unified dashboards.
Try it yourself for free! Select the destination you need in the form below and click Proceed.
Connect Shopify apps
Your store is already great as it is, but you can always make it even better by adding some apps from the Shopify marketplace. Go to Apps on your admin panel to discover what they have in store.
The Apps library is extensive. There are apps for referral programs, monthly budget calculation, email list building, social media advertising, upselling/cross-selling, and more.
Some good picks are a countdown timer to benefit from the fear of missing out on discounts and a review app that lets customers talk about their experiences with your store. This will surely build trust with the customers who follow.
Launch your store
Congratulations! You’ve now successfully created your first Shopify store. Start your path to success by opening it to the public and start running ads to your potential customers. Right now, the shop is password-protected and only visible to you or your employees.
Go to Online Store > Preferences, scroll do the bottom of the page, and disable the password. You’ll need to pick a plan and pay Shopify first. When you do, you’re all set to start selling.
How to set up your Shopify store: before you start
The whole process of setting up a shop in Shopify will take you anywhere between 30 to 60 minutes depending on how much you already know about the business you’re starting. However, the whole planning process may take days if not weeks.
If you want not only to start selling on Shopify but be successful in this line of work, you need to do some planning beforehand. Here are the most important steps of this process:
Make a business plan
The first stage of planning is choosing the product you’re going to sell and how you’re going to sell it. It can take anywhere from one day to several weeks as this is the most important factor that determines success.
Apart from choosing the main product of your store, you also need to give some thought to your audience and the marketing channels you’re going to use to promote your business. Another thing to think about is your workflows — how you’re going to handle the orders and ship them.
How to legally set up a Shopify store
When you know how your business is going to work, it’s time to tackle the legal structure. You may want to register an LLC or a corporation, but that’s not required to run a Shopify store – you can do it as a sole proprietor.
Generally, you only need an SSN or SIN to set up all the legal details of a Shopify store. Read IRS guidance of self-employed individuals or contact your local authorities for more information.
Still, if you decide to proceed with an LLC, you can choose a service provider to help you with these administrative tasks. For example, operating in the US, you can rely on LLC formation services like Northwest Registered Agent, ZenBusiness, etc.
Also, keep in mind compliance with data privacy laws. Check if you fall under GDPR or CCPA, and add a consent banner to your Shopify store to avoid fines for noncompliance. You can use a cookie consent manager to make a customizable banner so your consumers can set their cookie consent preferences.
Register a business name or a DBA
If you do run your store as a sole proprietor, you may want to register a business name or a DBA (doing business as). The odds are you’re not going to operate the store under your own name and will want to give it a name. This is only legal when you file for a DBA.
However, if the name of the business has a combination of your name and the service you provide, like James Kirby’s Treats, you don’t need to do this.
Acquire a license if you need one
Does your state require businesses in your line of work to get a license? If it does, you’ll have to acquire one before you start selling your products or services. Otherwise, you may face heavy fines.
File for a tax ID (optional)
If your state requires businesses to collect sales tax on the type of product you’re selling, you may need to get a sales tax ID before starting operations. You can create the store anyway, but you won’t be able to accept payments and sell goods.
In most states, you can check whether you need any additional paperwork and file it electronically.
FAQ for setting up a Shopify store
Is setting up a Shopify store free?
You can play around with the looks of your Shopify store for free, but you do need to purchase a subscription plan if you want to make the store public and start selling. The price varies from $29 to $299 per month. You’ll also want to purchase a domain – the average price is $14 per year.
How to set up a Shopify store for dropshipping?
Dropshipping is a great business model, especially for someone who doesn’t have a whole lot of budget to start. Shopify has a lot of custom solutions for dropshippers, and you can connect with other established Shopify stores to sell their products at a mark-up. To do this, you need to follow our guide to set up a store and check out dropshipping apps on the Shopify marketplace.
What is the best product to sell on Shopify?
Experience shows that Shopify stores that deal in home decor and kitchen utensils tend to turn a profit. Hobby supplies like custom bike modifications and parts are selling well too.
However, the best product to sell on any platform is the one you know a lot about and can consult your customers.
How to start a successful Shopify store?
That’s a tough question to answer. The main thing is to choose the right product to sell, have a great marketing plan, and make sure your store looks great.
How to make a Shopify store live?
When you first create the store on Shopify, it’s password-protected and only visible to you. To make it visible to the public, go to Online Store > Preferences, scroll to the bottom of the page, and click on “Disable Password”. However, you need to choose a paid plan and purchase it first.
Is working with Shopify profitable?
Working with Shopify may not seem as profitable as it actually is since it charges transaction fees. However, since setting up a store on Shopify is way cheaper than developing an e-commerce store from scratch, it ends up being cheaper in the end.
What Shopify apps do I need?
You don’t really need any apps to start selling, but they can make your store better. Start by adding an app that allows customer reviews on the website or a countdown timer to increase discount sales.
What is the best way to legally run a Shopify store?
You can register a business and file for an EIN, but you don’t need to if your business is small or medium. You can run your Shopify store as a sole proprietor and use your SSN or SIN for tax purposes. However, you may need to file for an EIN if you have employees.
Check with the local authorities or let the IRS do the work they’re paid to do and call their office to ask what’s the best way to go about it.
