Running an ecommerce store on Shopify (or any other platform) inevitably generates lots of data about orders, customers, products, and more. As the traffic grows, you may find it easier to export orders and analyze them elsewhere, for example, in Google Sheets. Doing so is also handy if you wish to create a backup of your data, move it to another platform, or make bulk edits to thousands of records at once.
How to export Shopify orders automatically with Coupler.io
Thanks to the automatic data refresh functionality, Coupler.io allows you to build auto-updating reports in spreadsheets and live dashboards in data viz tools. Let’s see how to use this data integration platform to export Shopify orders in three steps.
1. Collect your Shopify orders data
Select the destination for your Shopify data in the form below and click Proceed. In our example, it’s Google Sheets, but you can choose another, of course.
You’ll be prompted to create a Coupler.io account. You can do this for free.
Then, proceed with creating the data flow and connecting your Shopify account. You’ll need to enter your shop name in the format shop-name.myshopify.com.
Pick Orders as a Data entity if you’re interested in a general import or Orders with line items if you also need information about the products in a cart (names, SKU, weight, etc).
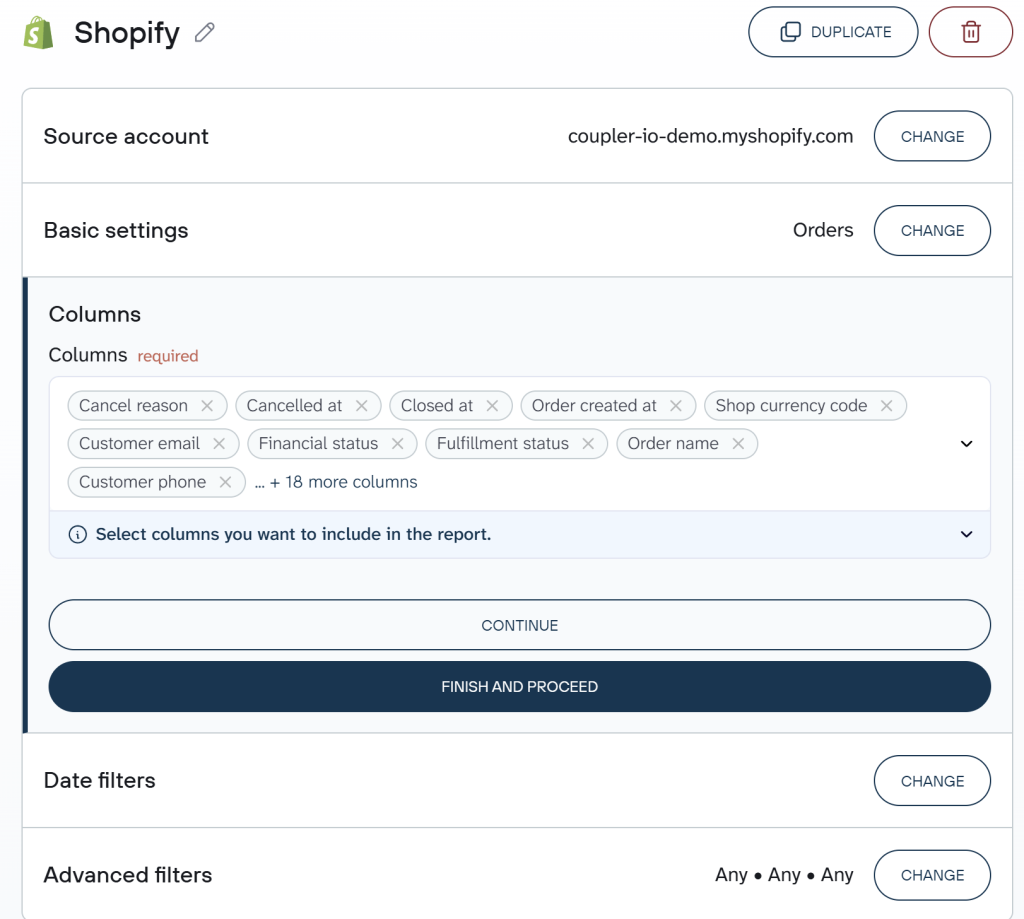
2. Organize your Shopify orders data set
Now, you can check and organize the data set that you are going to export. Coupler.io allows you to
- Manage columns – hide those you don’t need, change their order, rename and rearrange columns.
- Sort and filter your data – for example, filter your orders data by status, changed or created date, or even use the Filter ID.
You can also blend data from several Shopify accounts if you connect them as additional data sources. All this allows you to export a clean and analysis-ready dataset.
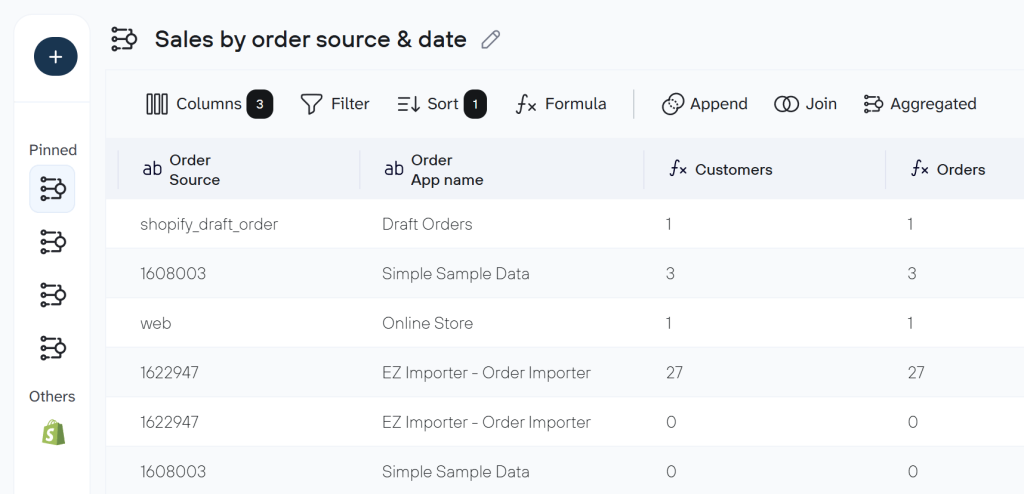
Coupler.io also provides data set templates for Shopify that have these transformations and aggregations already configured by Coupler.io’s analysts. For example, you can get a ready-to-use order report, such as sales grouped by financial status, fulfillment breakdown, or profitability with COGS, with no hassle. Just create a data flow from a template and choose the one that fits your requirements.
3. Load data and schedule refresh
After this, follow the instructions to connect your destination app account and specify where to transfer your Shopify orders data.
In the next step, you can automate exports of Shopify data on a schedule. Toggle on the Automatic data refresh and configure the frequency and other time preferences for your automatic data flow.
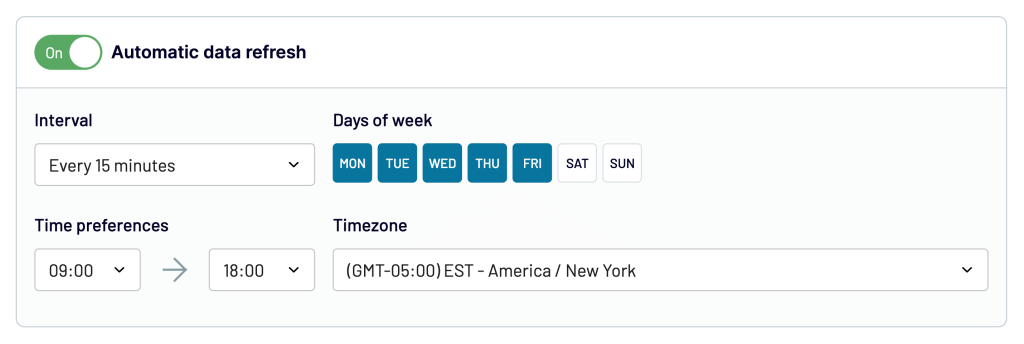
Eventually, click Save and Run and see the results of exporting data from Shopify. After that, the next scheduled import will refresh data automatically according to the preferences you specified.
Get insights into your Shopify orders with a ready-to-use dashboard
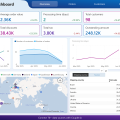
Exporting order data is just the first step. To actually act on it, you need to see patterns such as which countries generate the most refunds, which products sell fastest, and where your fulfillment process slows down. Coupler.io offers free dashboard templates to track orders on Shopify and turn your exported Shopify order data into visual reports with filters, breakdowns, and automated refresh.
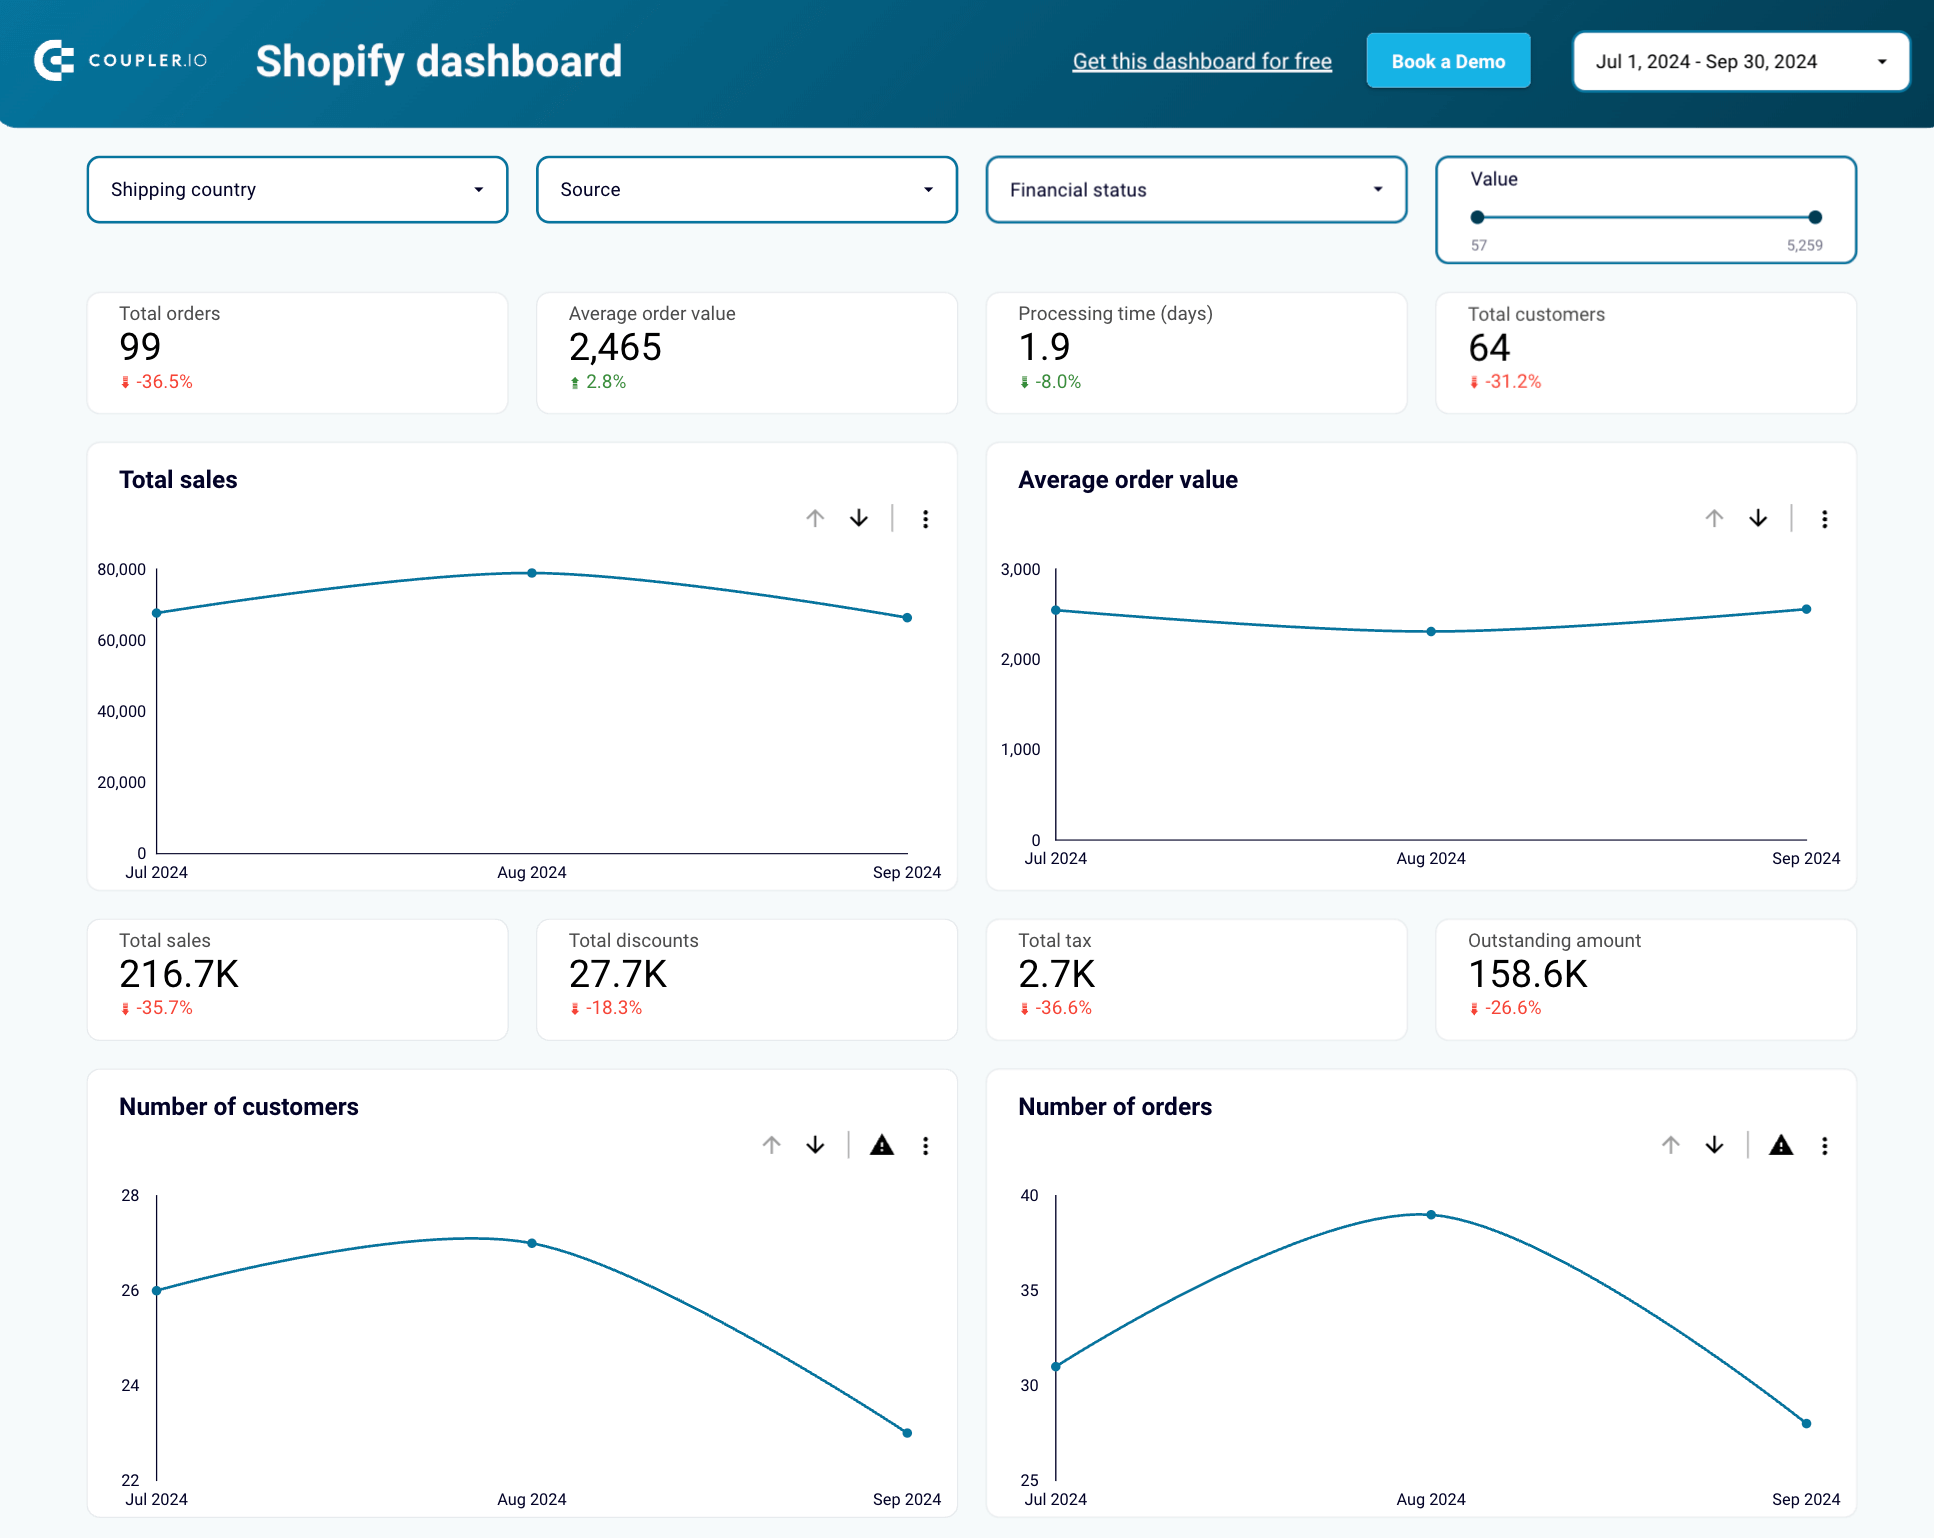
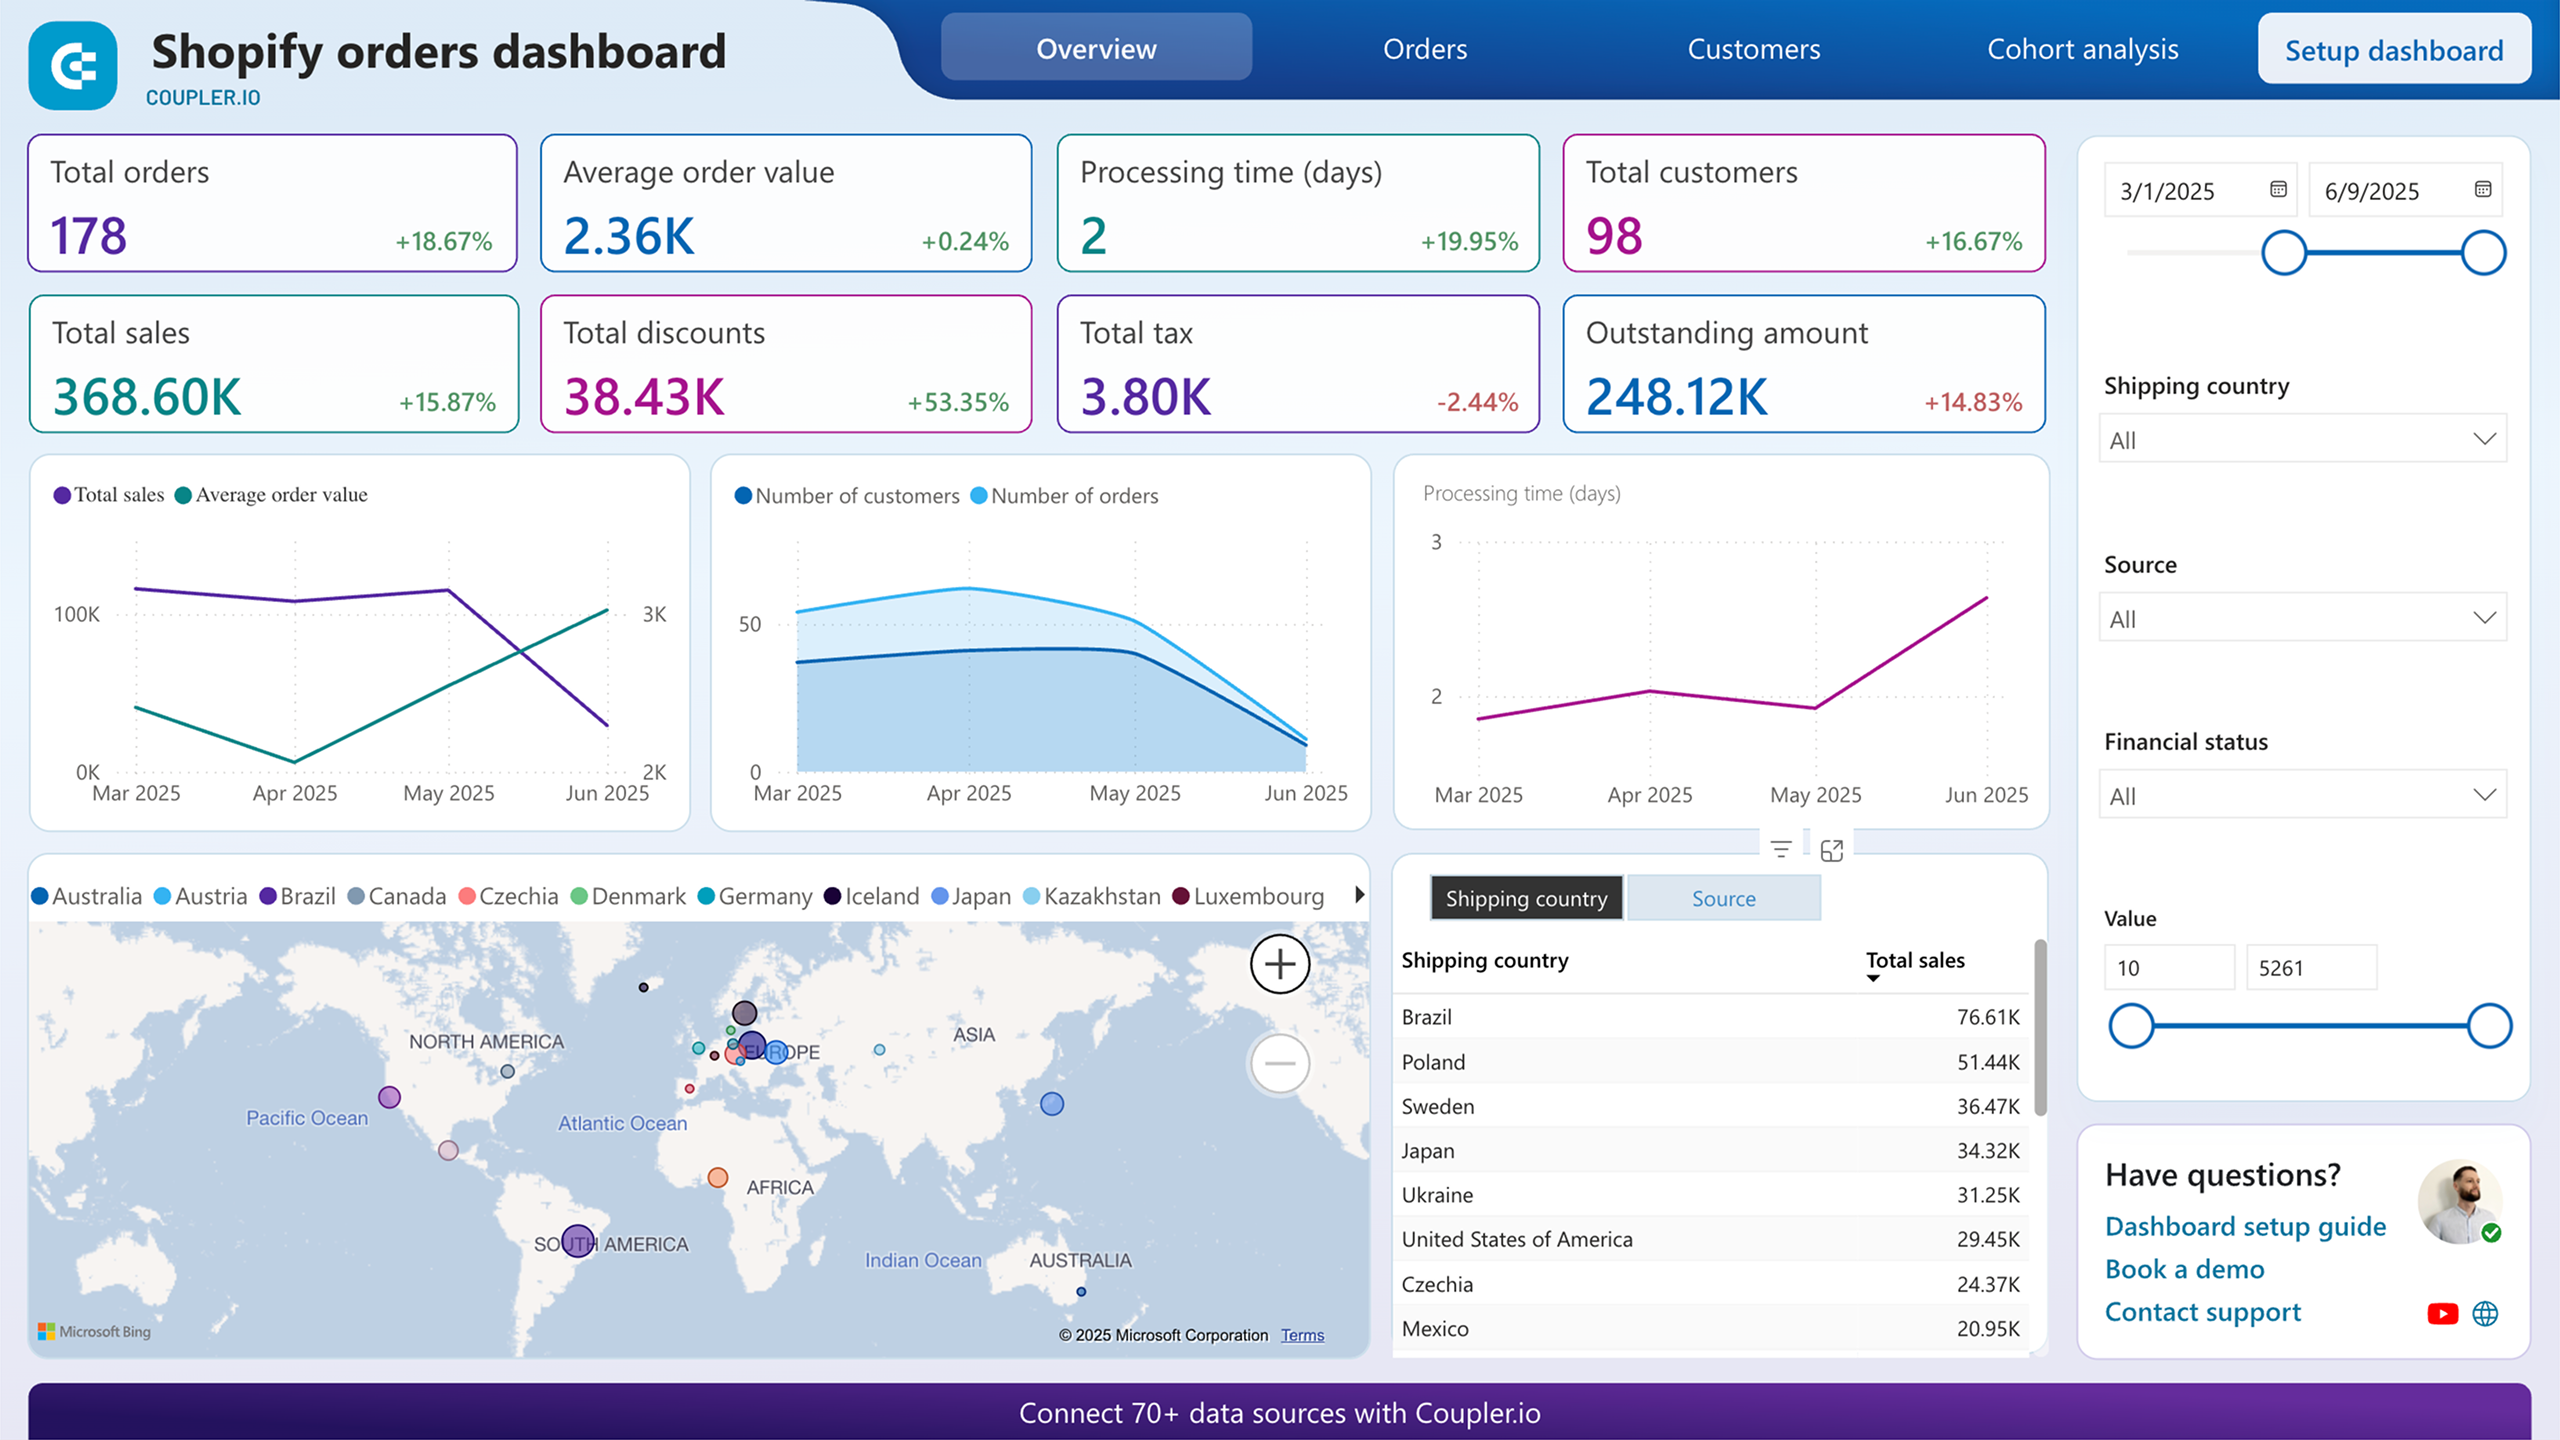
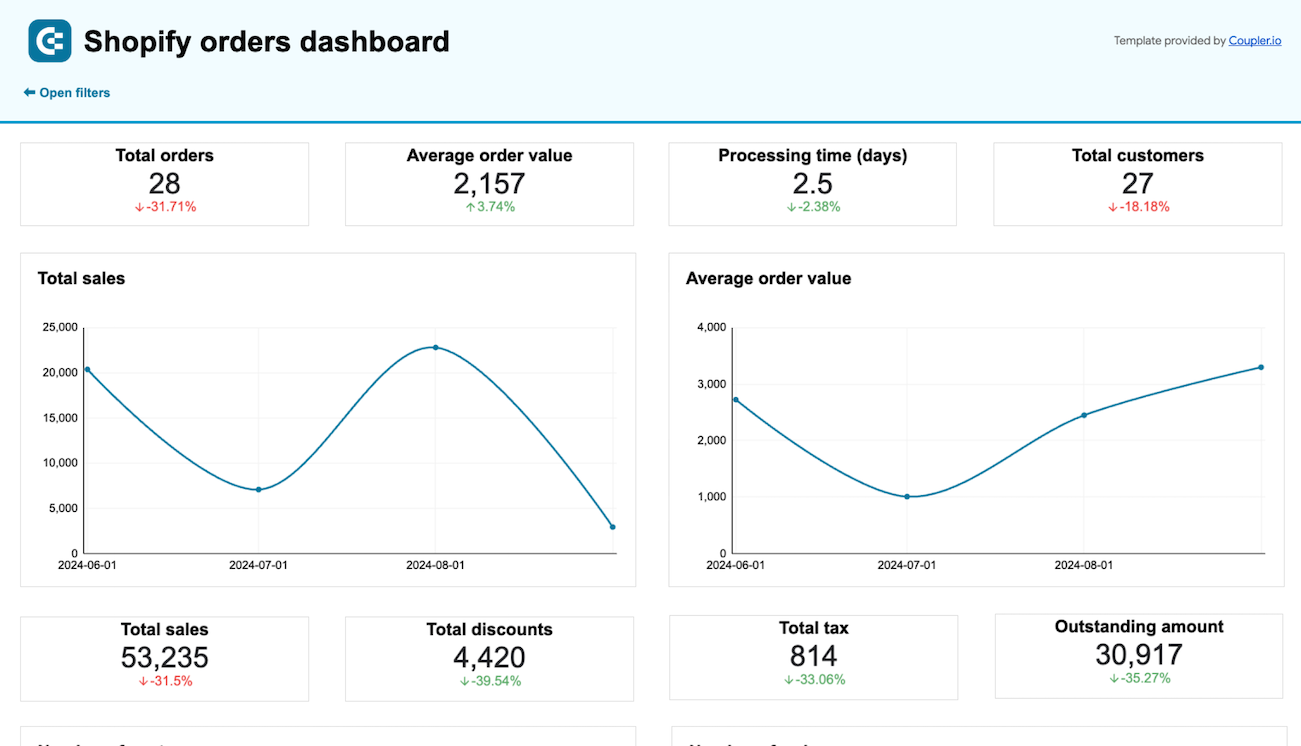
Shopify orders dashboard
The Shopify orders dashboard puts your entire order flow on a single screen — revenue, fulfillment statuses, geographic distribution, marketing sources, and product performance. Instead of exporting CSVs and building pivot tables manually, you get an interactive report where every chart responds to filters.

What insights you can get:
- Geographic order breakdown. Filter orders by shipping country to see revenue, order count, and status distribution per region. Use this to evaluate whether shipping to low-volume countries is worth the logistics cost, or to spot regions with unusually high refund rates.
- Financial status tracking. Isolate pending, refunded, and voided orders to unblock payment issues. Cross-reference these with geography or specific products using the Top selling items chart to find correlations behind blocked purchases.
- Order value segmentation. Use the value slider to group orders by price range and discover dependencies — for example, whether high-value orders cluster in specific countries or come from particular marketing sources.
- Channel attribution. The Source filter shows which acquisition channels drive the most orders and revenue, giving you a clear signal on where to increase or cut your marketing spend.
- New vs. returning customer cohorts. The second page of the dashboard breaks down sales and order volumes by new and returning buyers, so you can measure how well your store retains customers over time.
The Shopify orders dashboard is available as a free template in Coupler.io, Looker Studio, Power BI, and Google Sheets. Each is equipped with an automated Shopify connector for scheduled data refresh.


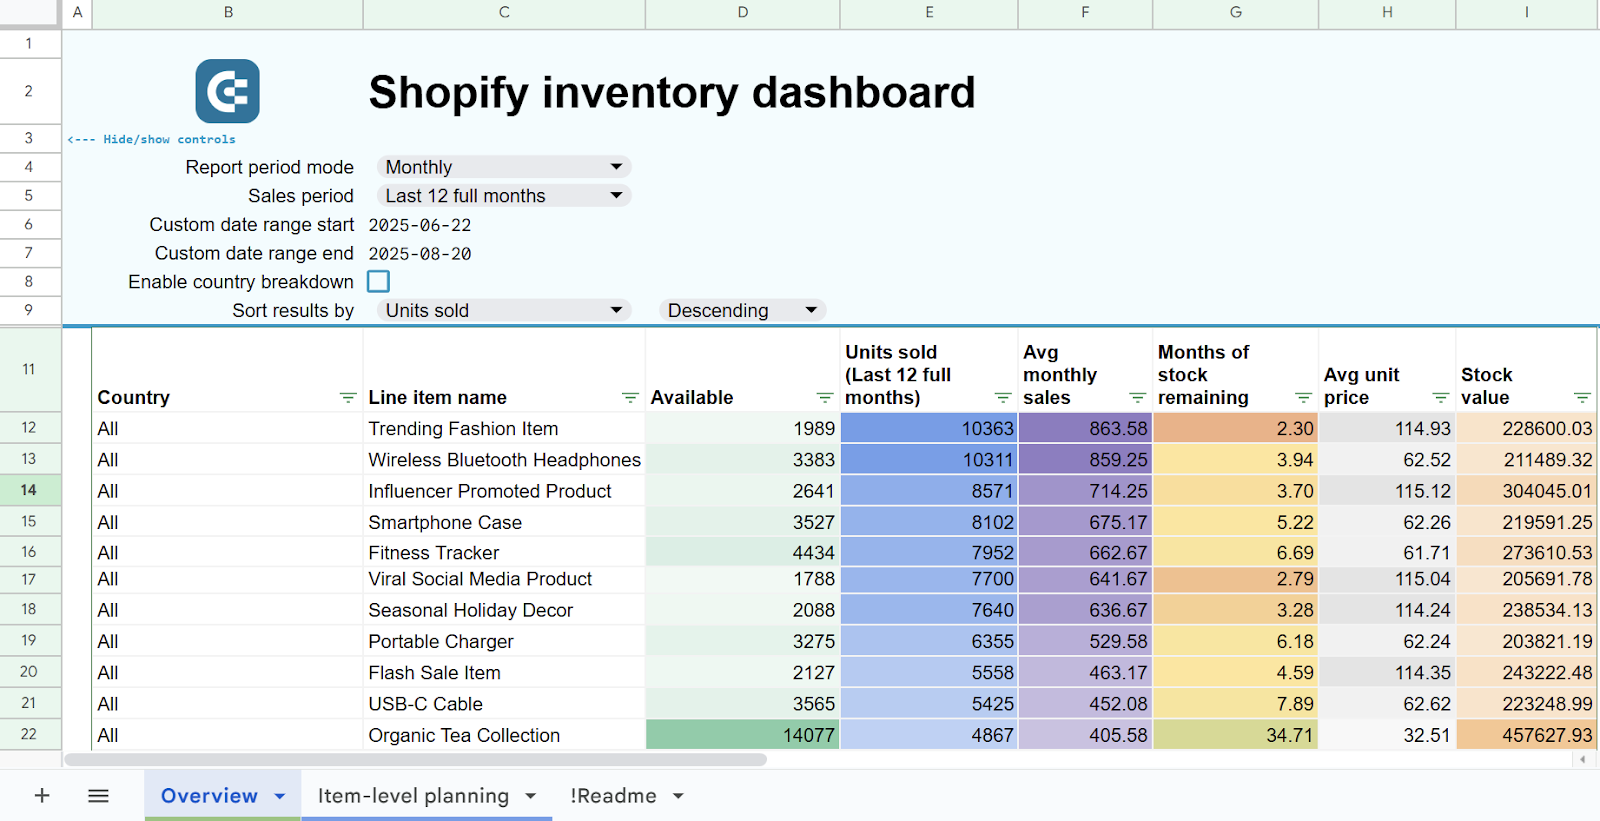
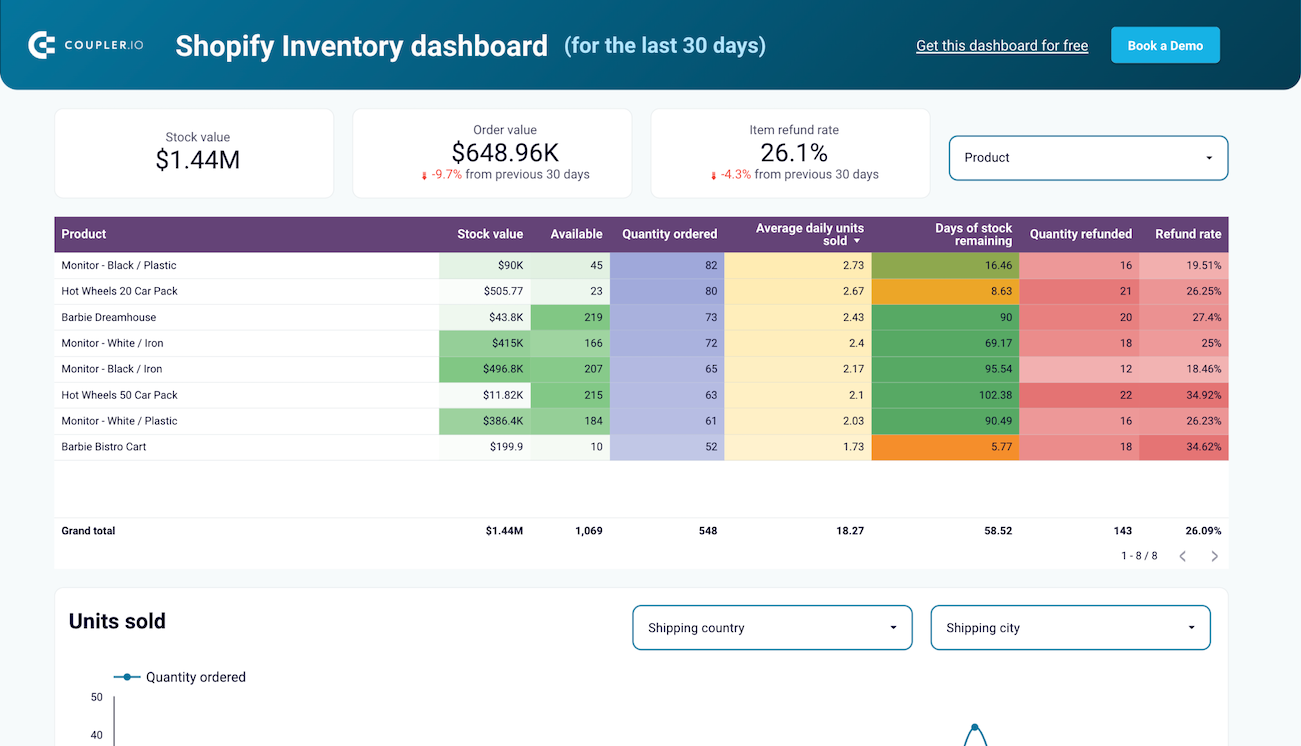
Shopify inventory dashboard
If you’re exporting order data to understand what’s selling and what’s sitting on shelves, the Shopify inventory dashboard takes that analysis further. It combines inventory levels with order patterns and return rates across all your store locations, giving you a report that Shopify’s native interface doesn’t offer. For instance, it includes a SKU-level table with a “Days of stock remaining” calculation to predict shortages before they happen.
Inventory dashboard template for Shopify
 Preview template
Inventory dashboard template for Shopify
Preview templateWhat insights you can get:
- SKU-level inventory performance. View every product’s stock value, availability, order volumes, and daily turnover rates in one table. Unlike Shopify’s built-in reports, this dashboard lets you see inventory data broken down by product name and SKU.
- Stockout forecasting. The “Days of stock remaining” column estimates how quickly each product depletes based on current sales velocity. Use it to time reorders, avoid lost sales from out-of-stock items, and prevent cash flow issues from overstocking.
- Return rate analysis by geography. Identify which shipping countries generate the highest return rates. With this data, you can investigate root causes, evaluate return shipping costs, or decide to limit sales in problematic regions.
- Daily order volume trends. An interactive timeline chart reveals sales patterns and seasonality. It also serves as a check on your advertising effort, if order volumes stay flat despite increased ad spend, something in your campaign setup needs attention.
- Multi-location stock balancing. Compare inventory levels across all warehouse locations to spot distribution imbalances. This is especially useful if you ship from multiple countries and need to prevent a situation where one location runs dry while another sits on excess stock.
This dashboard is available as a template in Google Sheets and Looker Studio with automated data refresh.
Other Shopify dashboards worth exploring
Beyond order and inventory Shopify analytics, Coupler.io provides additional Shopify dashboard templates that cover traffic analysis, conversion funnels, and marketing performance. These dashboards pull data from Google Analytics 4 and advertising platforms alongside Shopify, so they require connecting those additional accounts during setup.
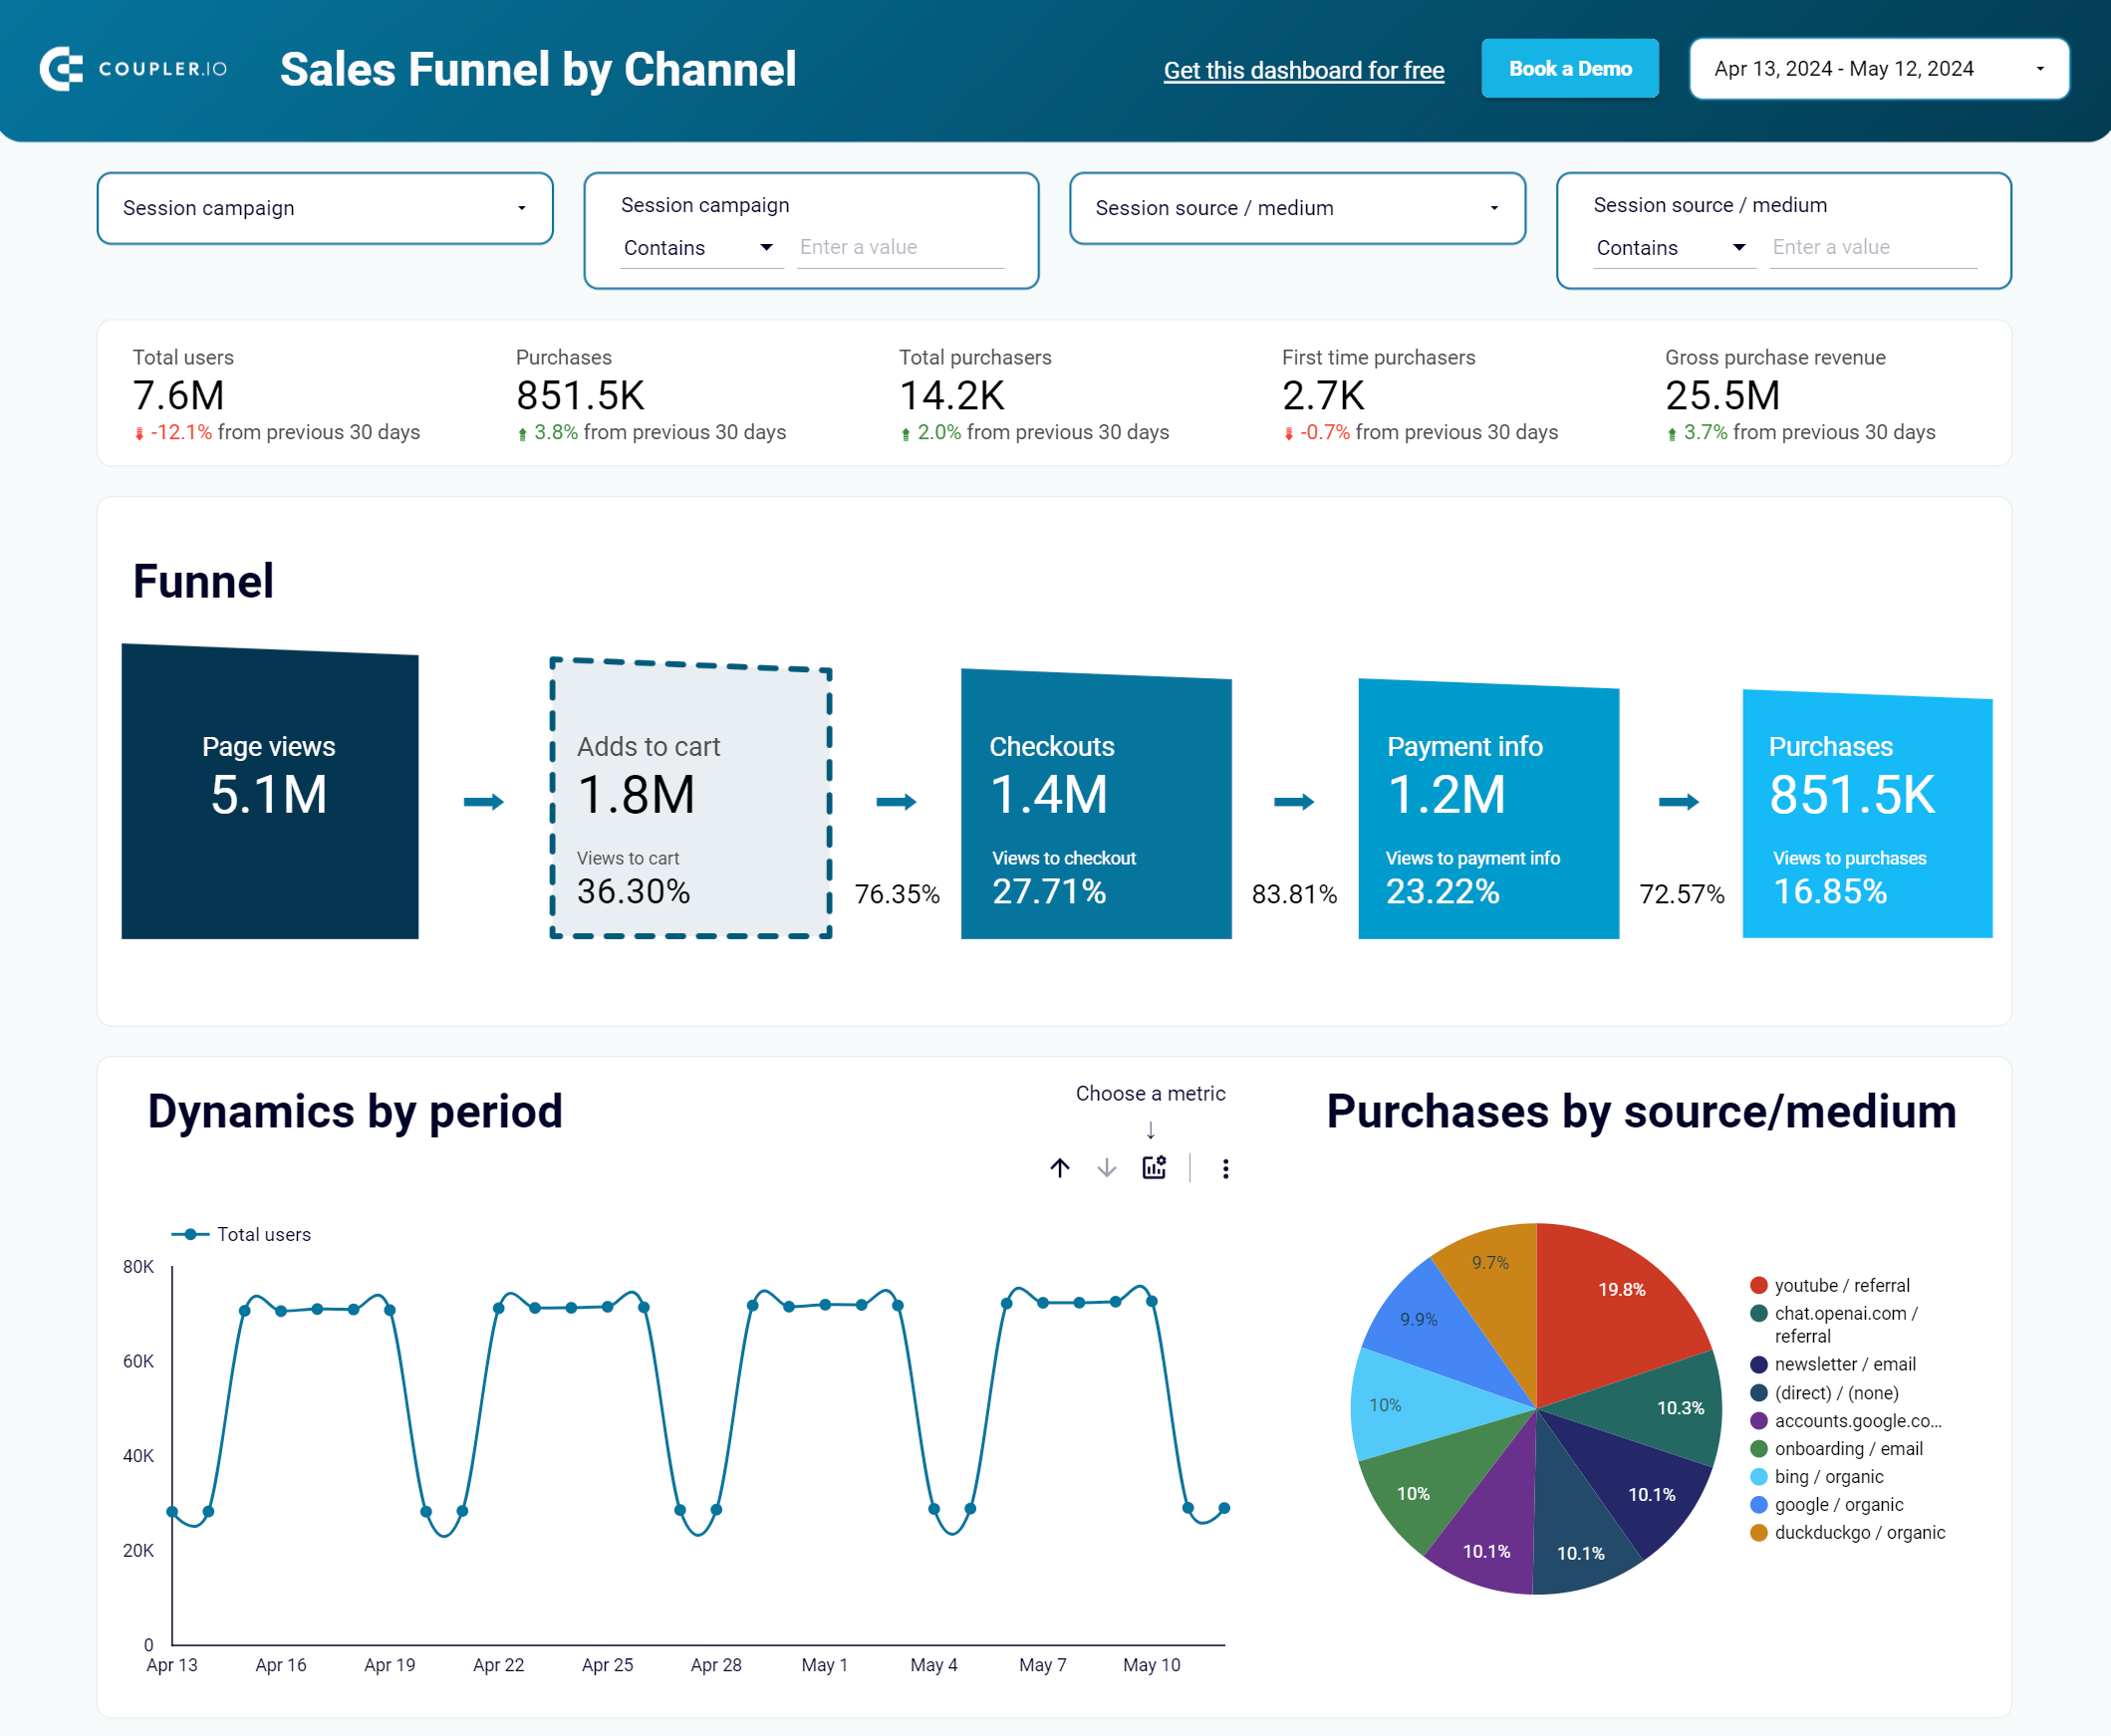
Shopify sales funnel dashboard maps your store’s conversion process from page views through add-to-cart, checkout, and purchase using GA4 data. It breaks down funnel performance by individual products, countries, and traffic channels — helpful when you want to understand not just how many orders you get, but where in the buying journey potential customers drop off.

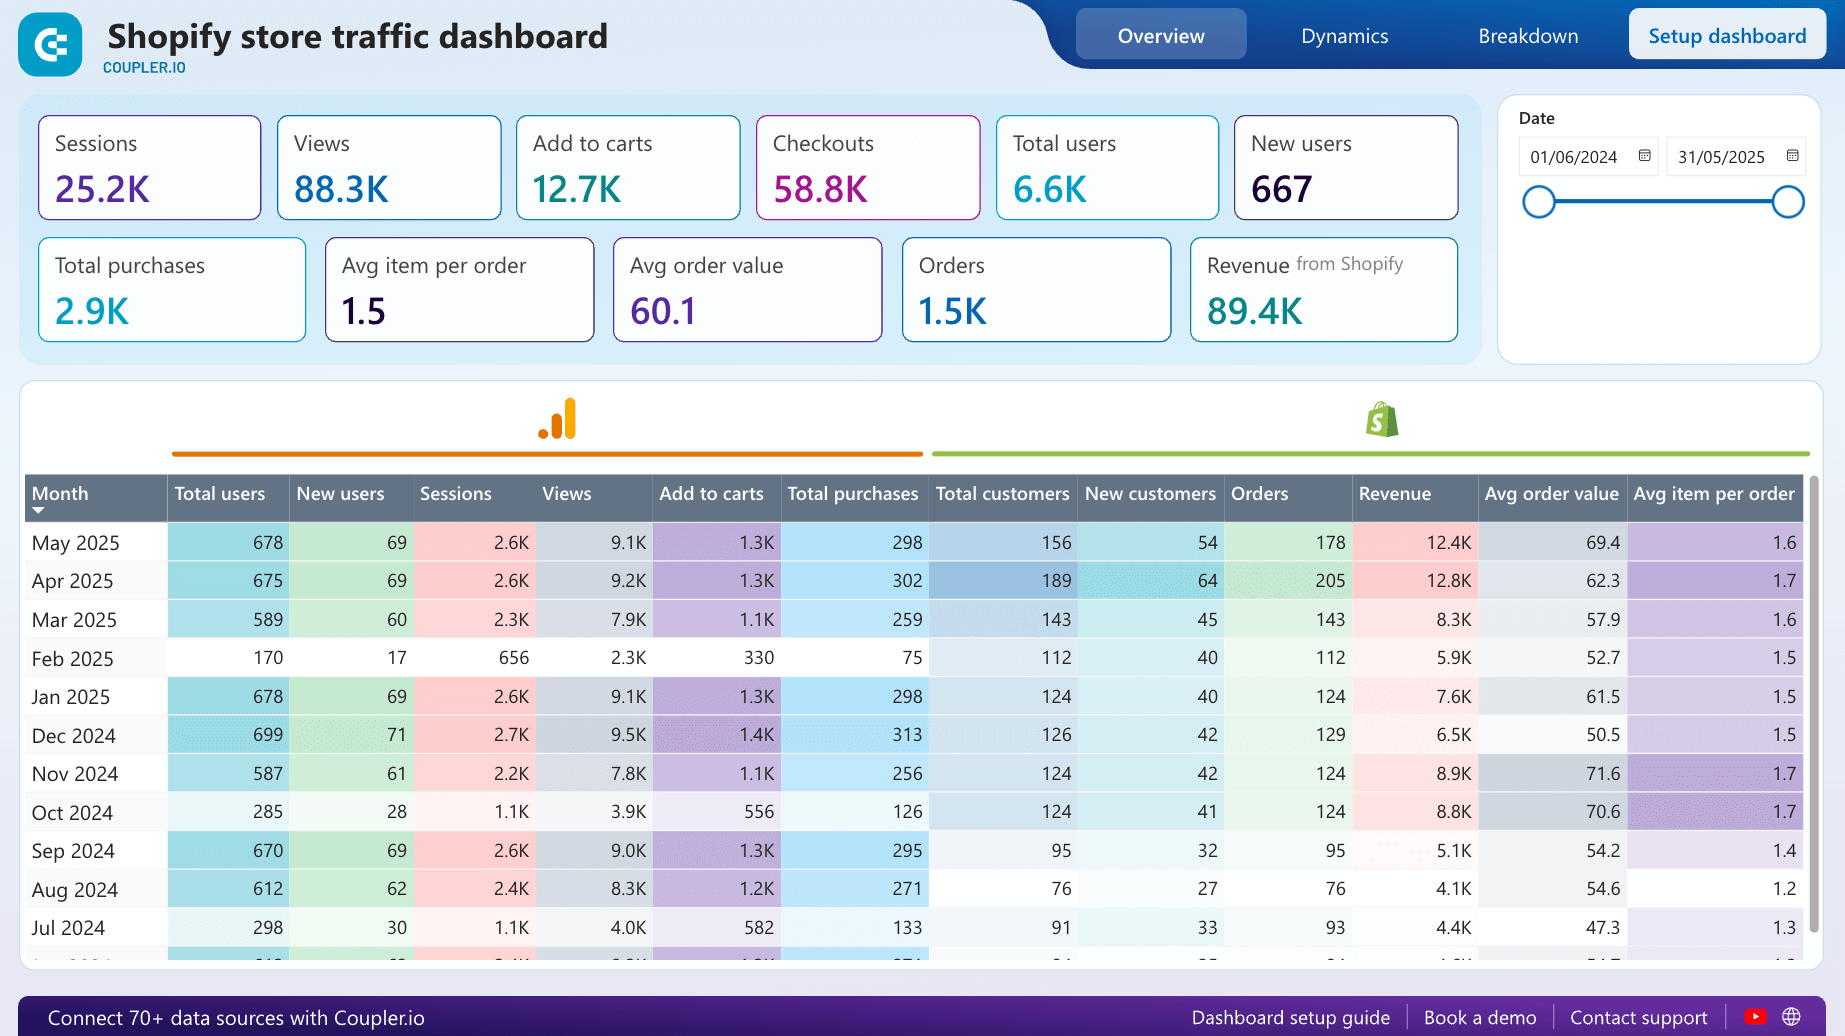
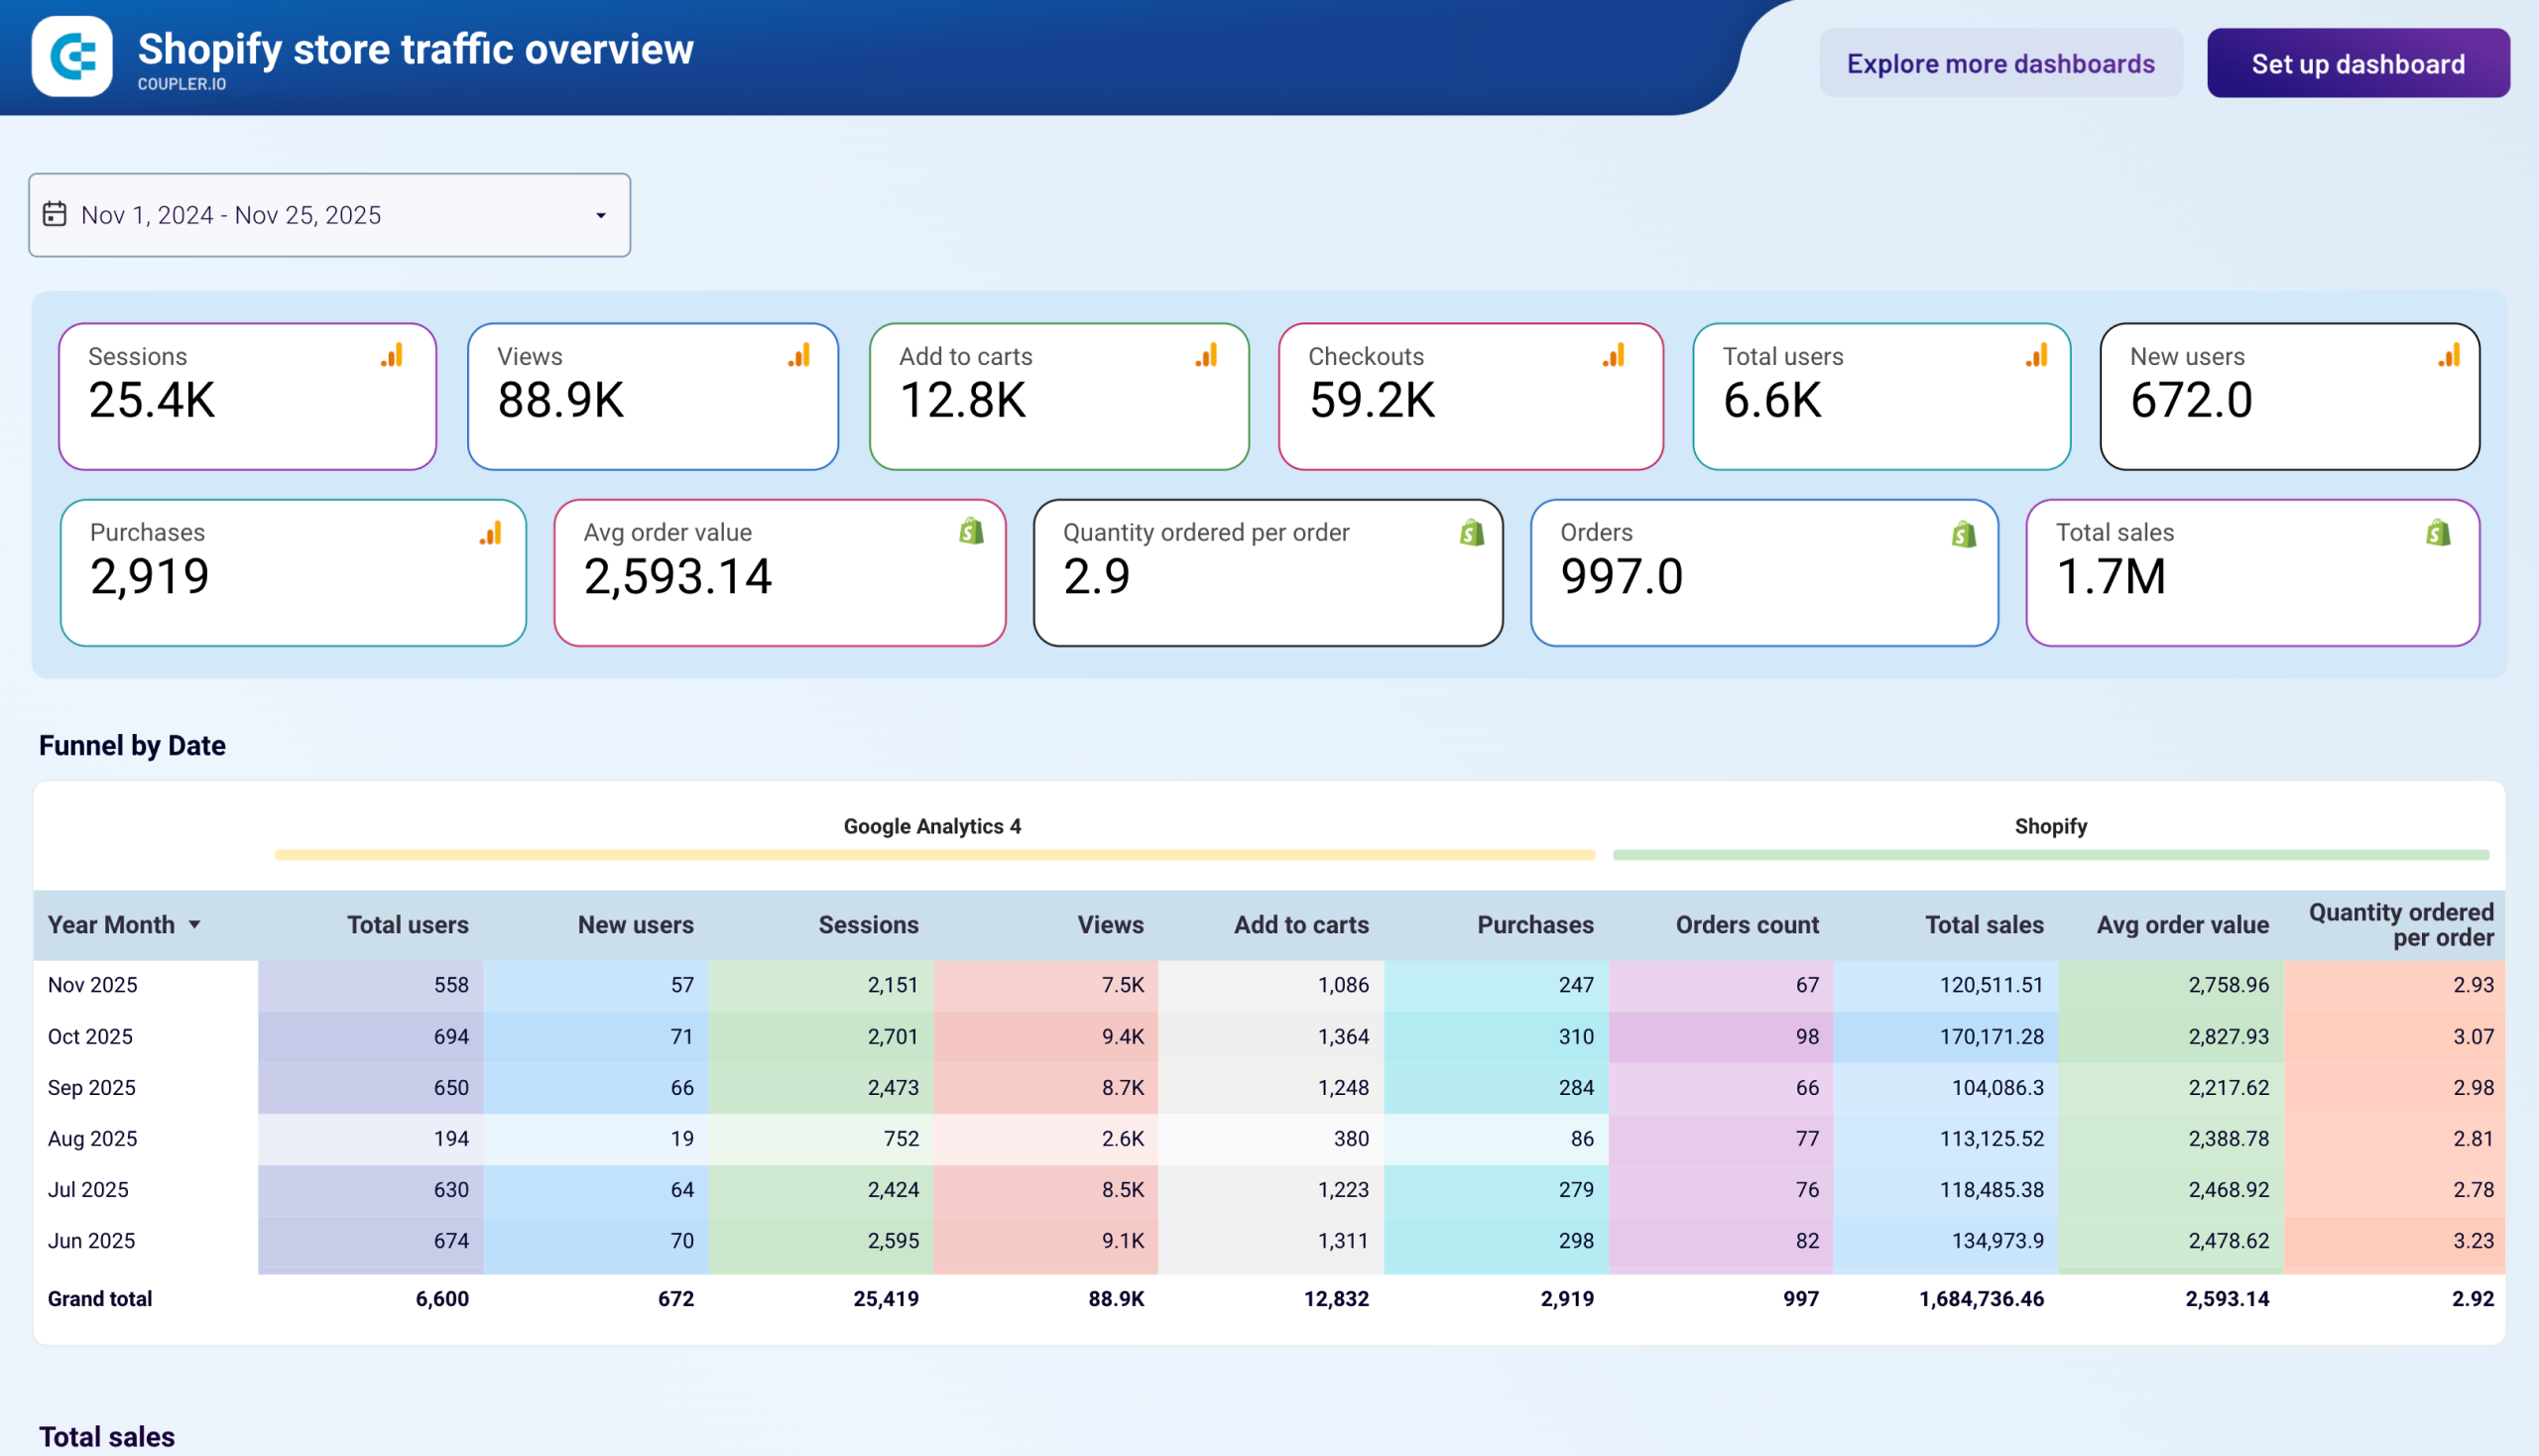
Shopify store traffic overview dashboard merges GA4 session data with Shopify sales metrics on one screen. It answers how website traffic translates into actual purchases by tracking users from their first visit through to completed orders, with breakdowns by traffic source, top-selling products, and geographic heatmaps.

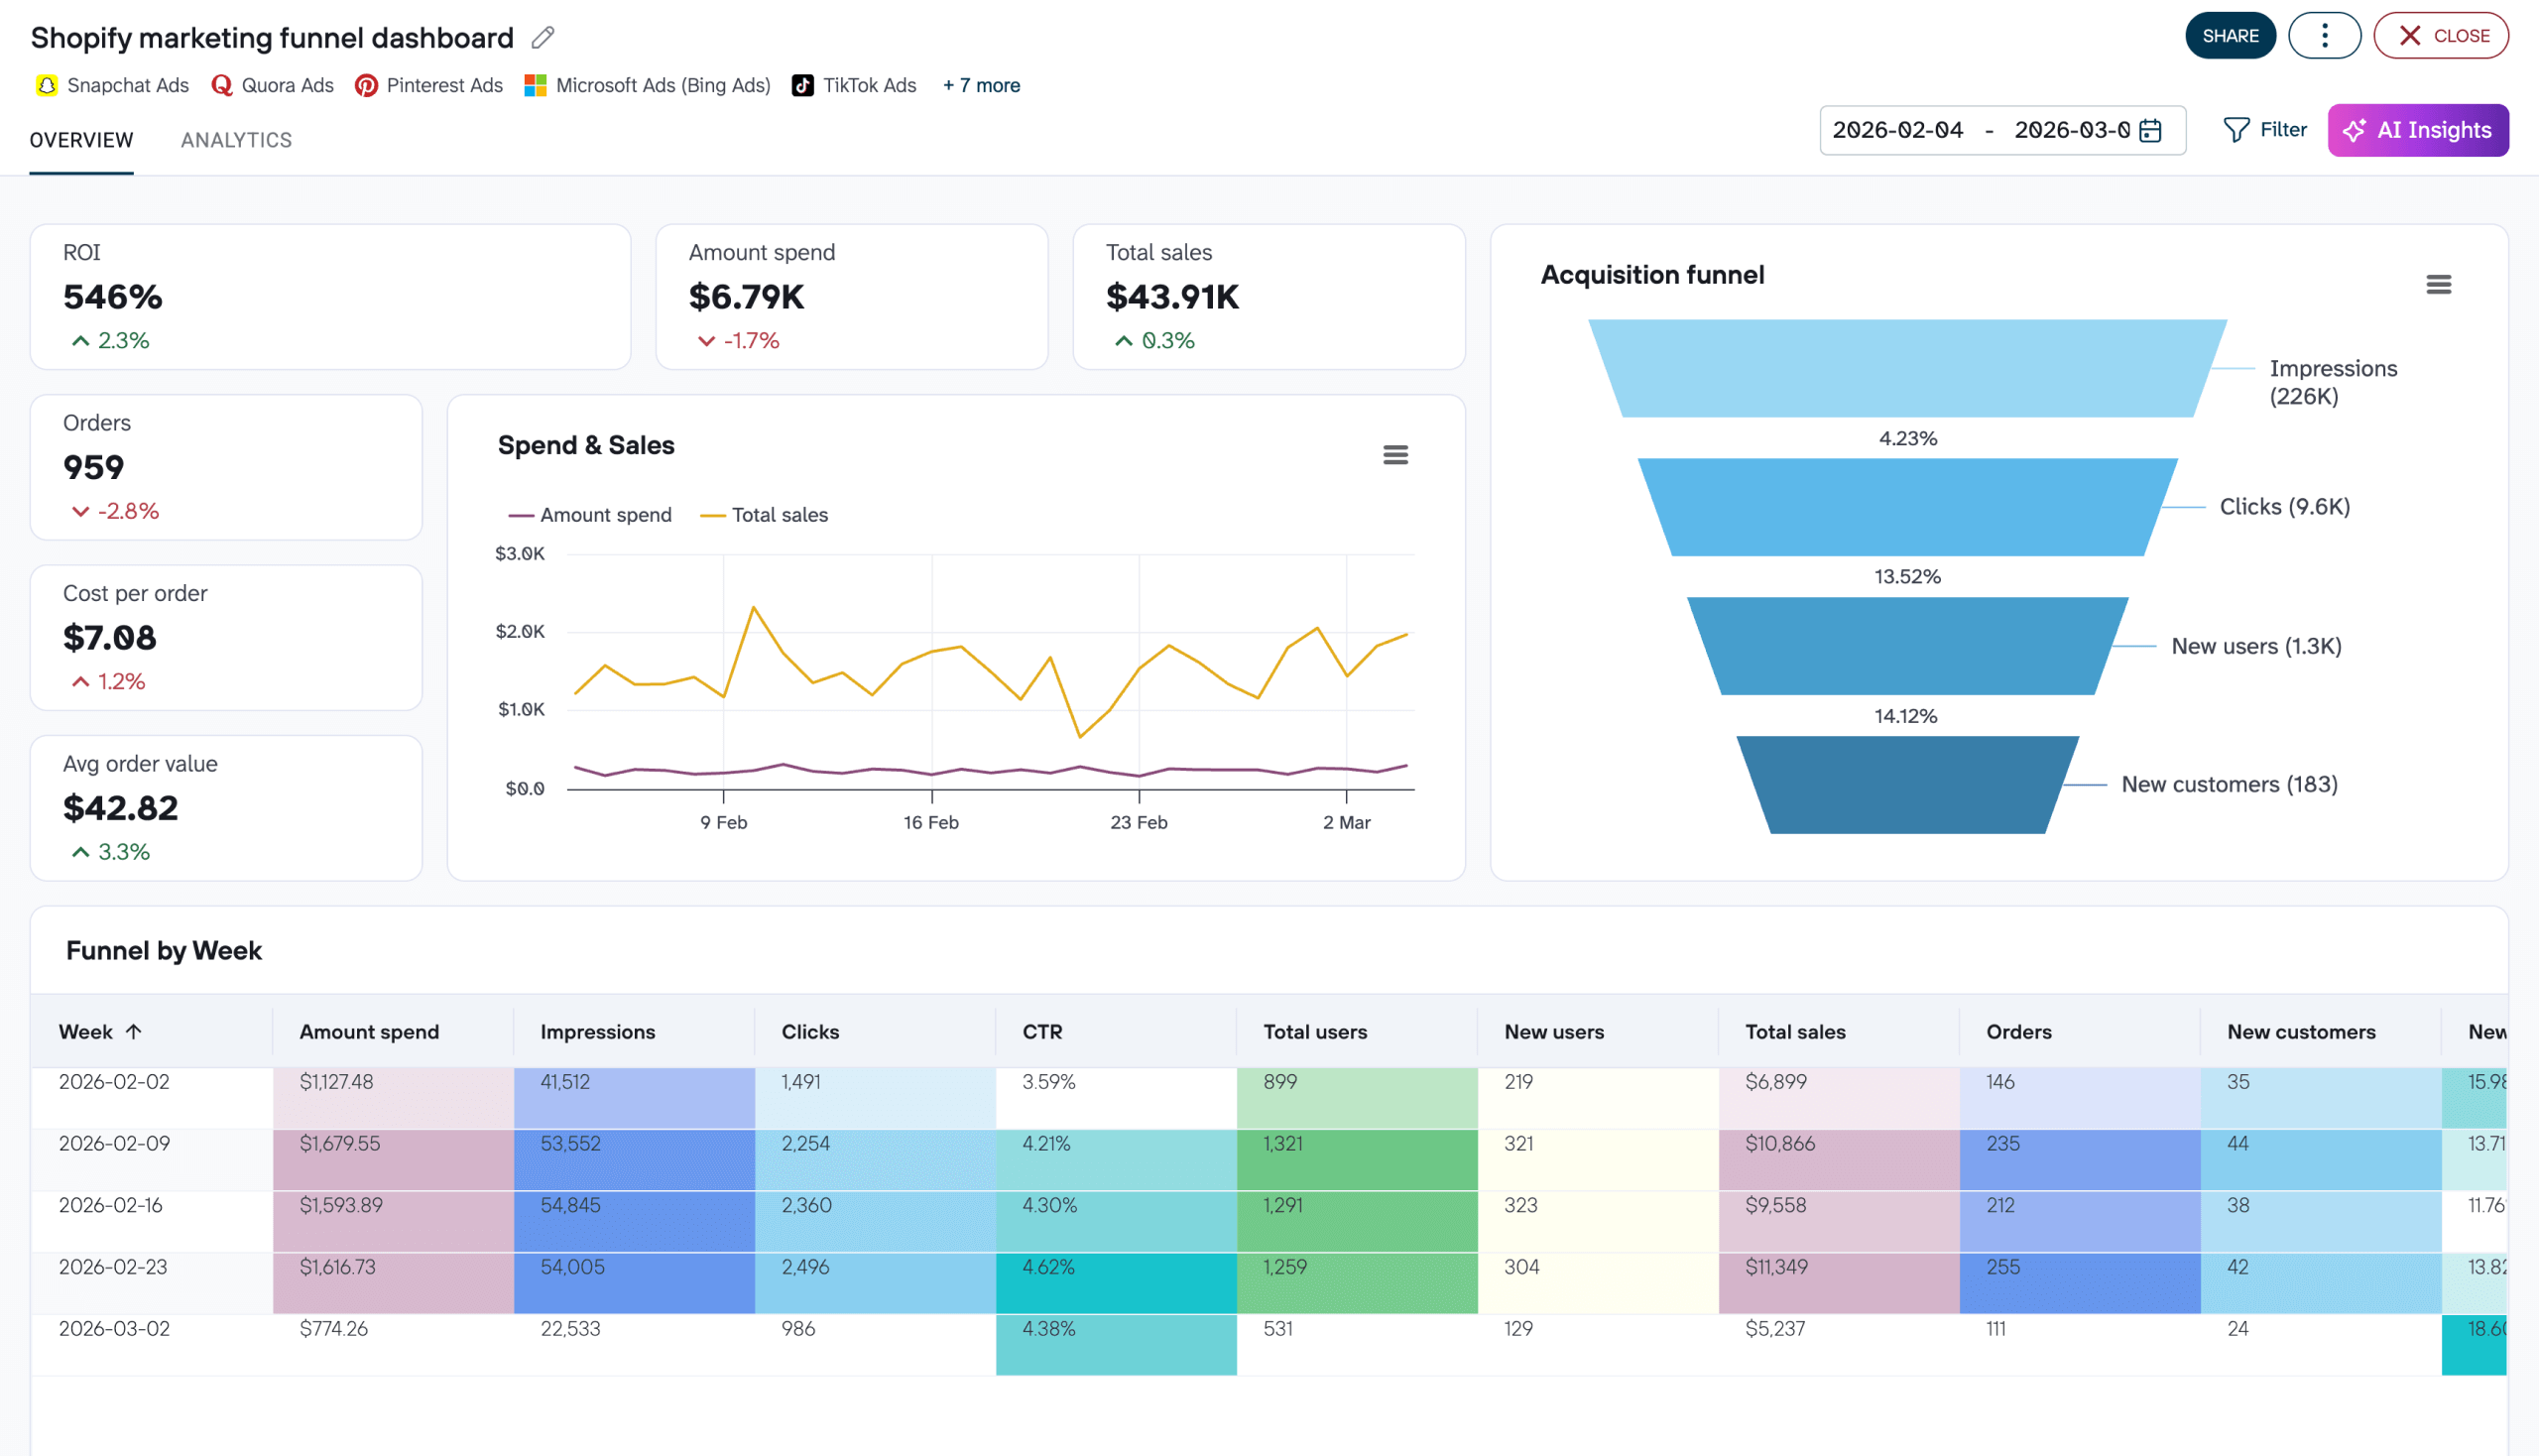
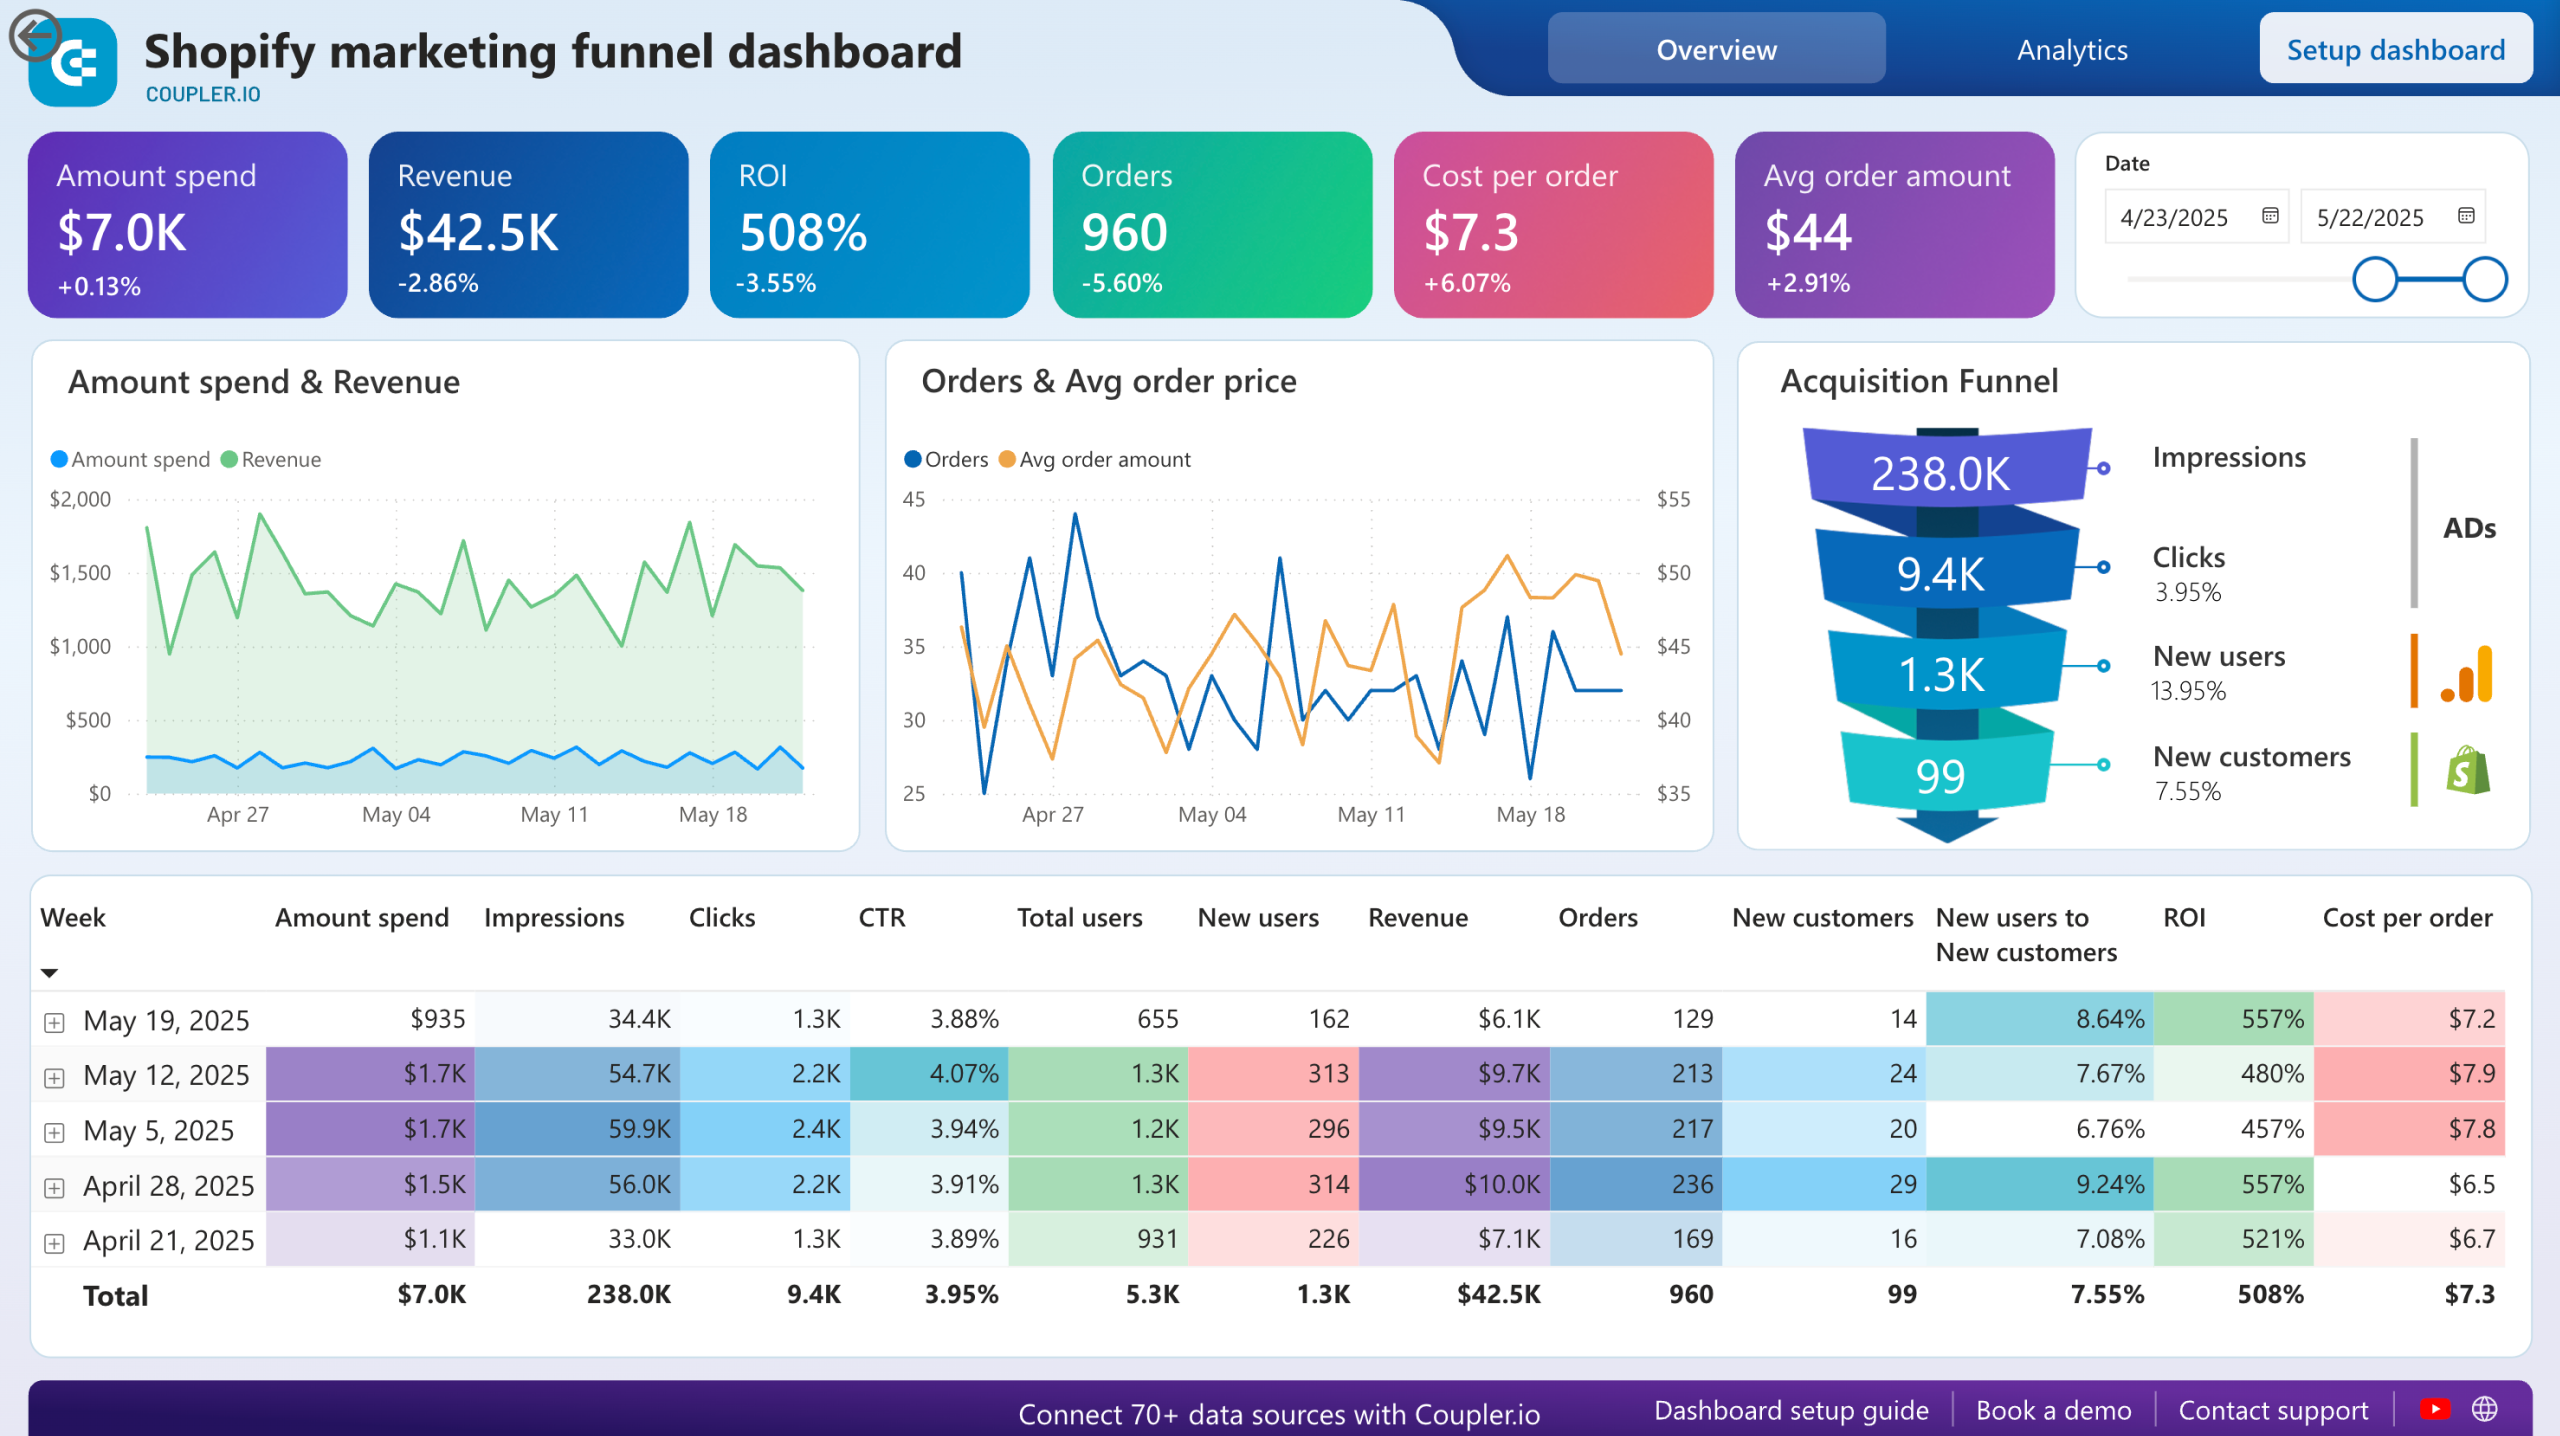
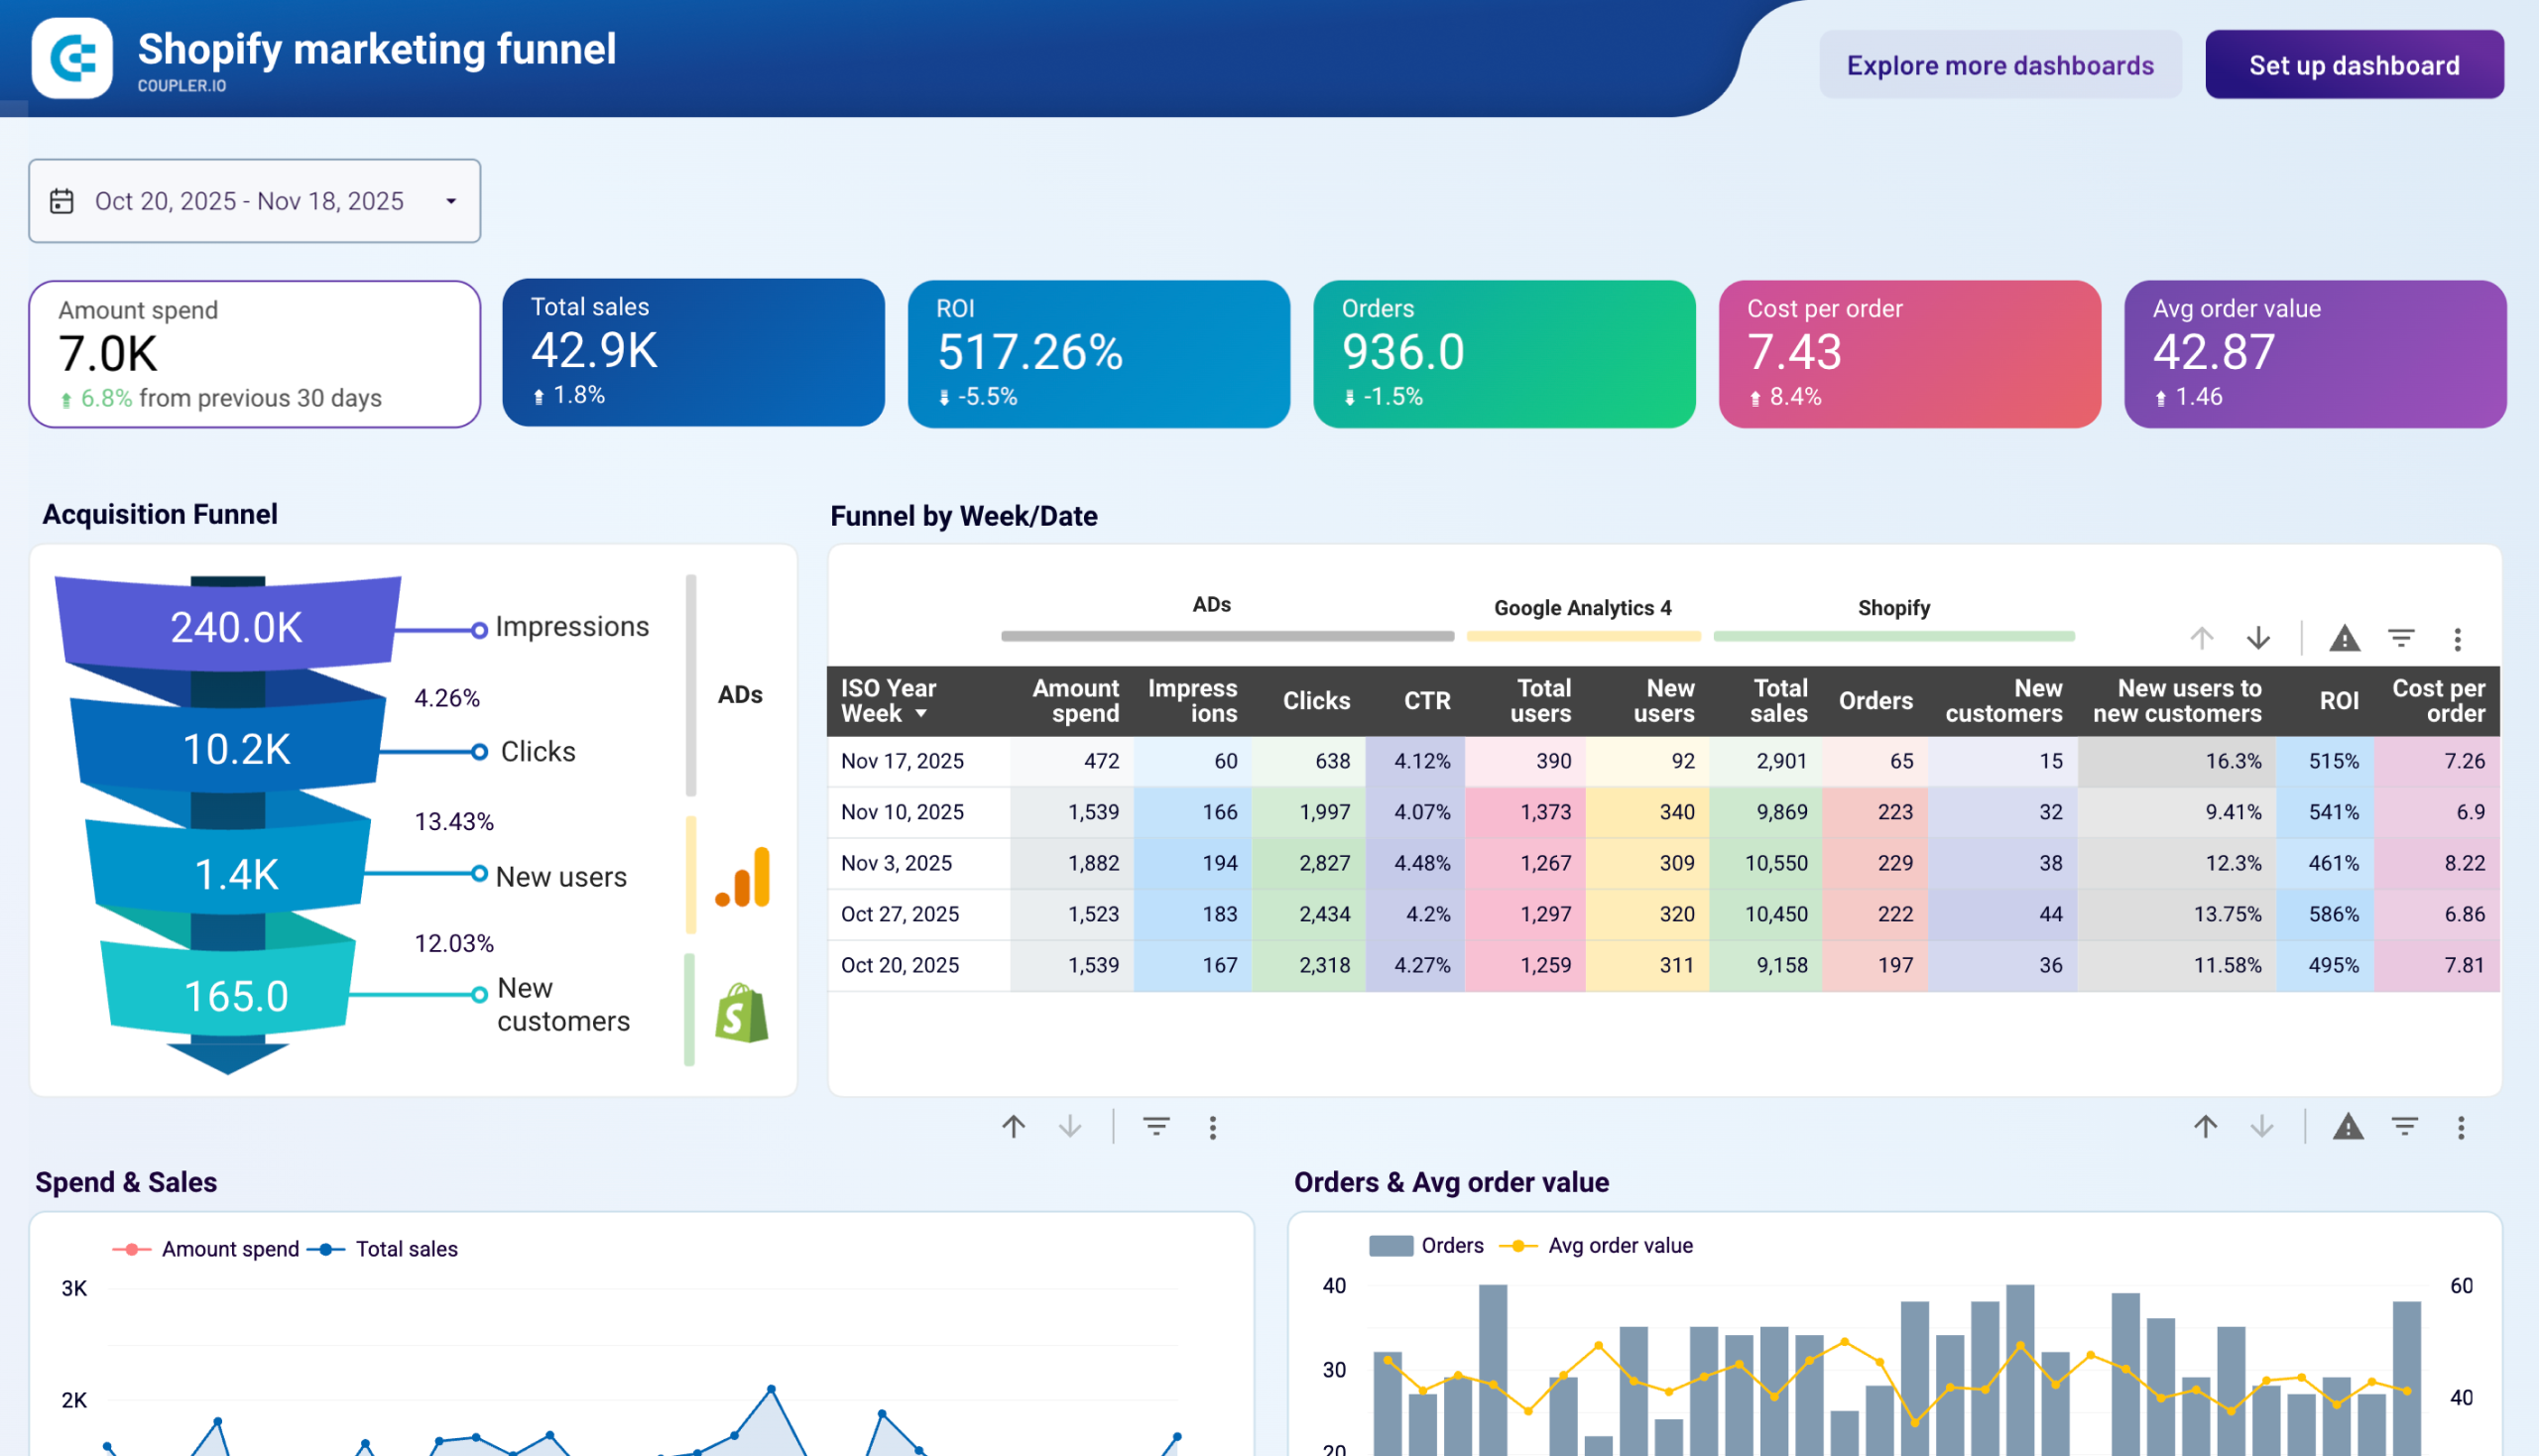
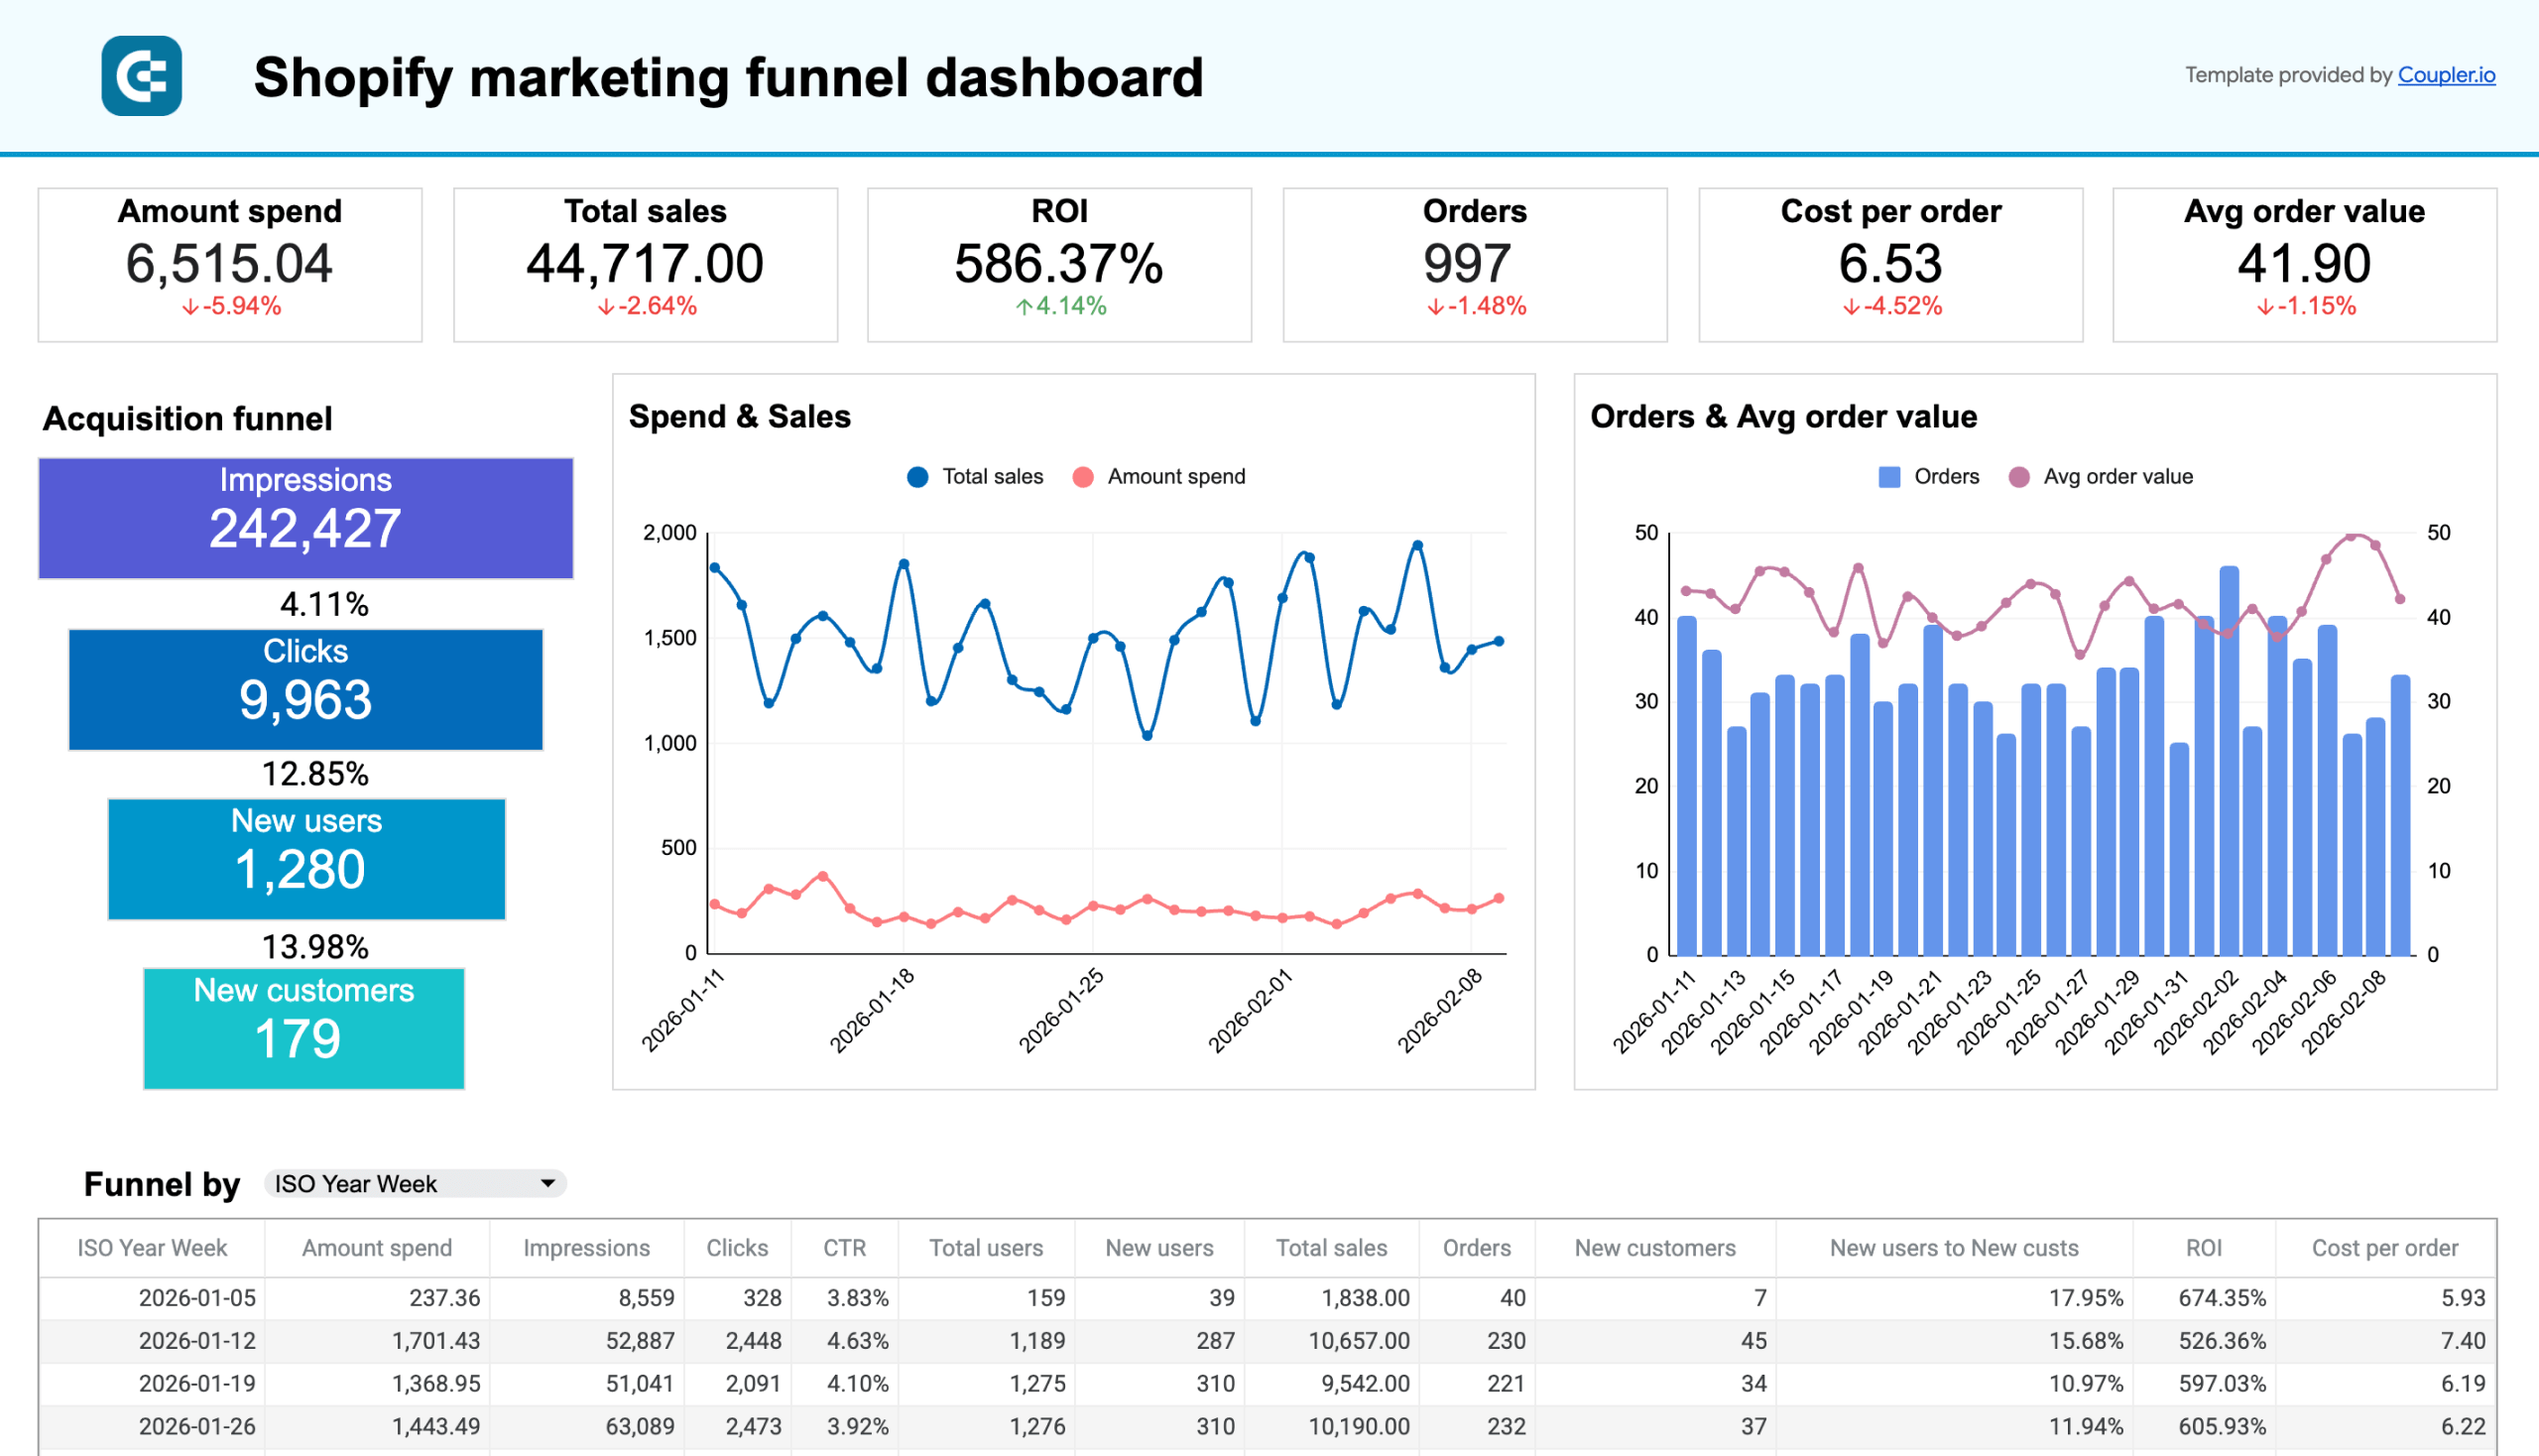
Shopify marketing funnel analytics dashboard unifies data from advertising platforms (Facebook Ads, Google Ads, and others), GA4, and Shopify into a single acquisition report. It visualizes the full journey from ad impressions to new customers and tracks spend-to-revenue ratios, making it useful for store owners who run paid campaigns and need to see how ad dollars connect to actual Shopify orders.


Follow the instructions to connect your Shopify account, and enjoy the pro-level dashboard. Try this and other ready-to-go Shopify dashboards provided by Coupler.io. For more on this topic, see our article about Shopify analytics.
Get order reports with pre-built metrics
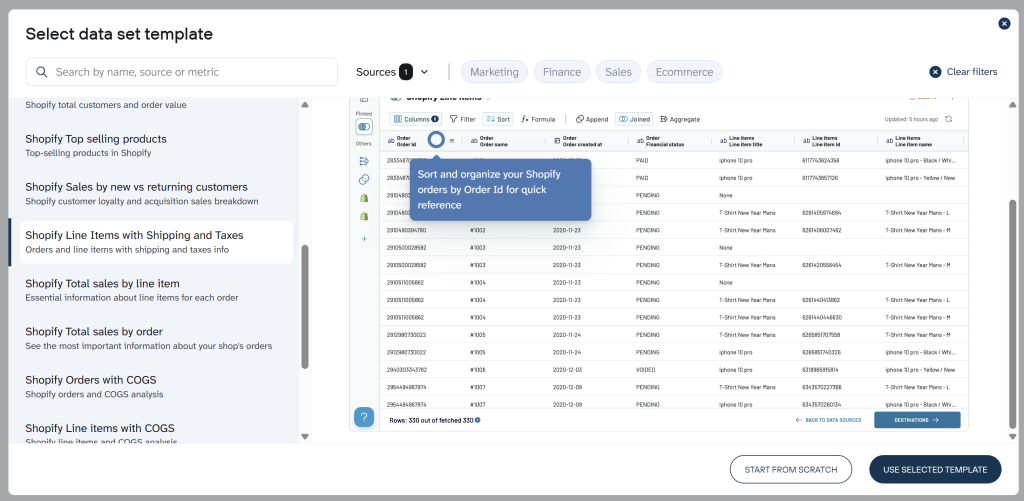
The steps above show you how to export raw order data and transform it yourself. But if you’re after a specific type of order report, say, sales broken down by financial status or fulfillment performance over time, you can save significant effort by using a data set template.
Data set templates are pre-configured report setups built by Coupler.io’s data analysts. They come with the right metrics, aggregations, and calculations already in place, so you get a clean, structured report instead of raw order rows.
Here are the Shopify order-related templates available:
- Total Sales by Order — each order with net items sold, returns, net sales, taxes, total sales, gross sales, and discounts. The go-to starting point for any order analysis.
- Line Items with Shipping and Taxes — full detail on every line item including unit price, shipping charges, and tax breakdowns. Useful for financial reconciliation and tax reporting.
- Orders with COGS — order data enriched with cost of goods sold, gross profit, and gross margin. Essential if you need to understand profitability, not just revenue.
- Sales by Order Financial Status — orders grouped by payment status (paid, pending, refunded, etc.) with weekly and monthly trends. Helps you monitor cash flow and spot payment processing issues.
- Sales by Order Fulfillment Status — orders grouped by fulfillment stage to evaluate operational efficiency and delivery timelines.
- Order Processing Time — measures how long it takes to process orders, with average processing time across daily, weekly, and monthly views.
- Sales by Billing Location — geographic breakdown of orders with avg order value, customers, taxes, and shipping charges per country.
- Sales by New vs Returning Customers — revenue split between first-time and repeat buyers across multiple timeframes.
To use any of these, create a new data flow in Coupler.io and click Start with template instead of configuring the source manually. Search for the template you need, connect your Shopify account, and your order report will be ready to load to any destination.

Automate Shopify orders data export with Coupler.io
Get started for freeOther ways to export Shopify orders
In addition to Coupler.io, which automates Shopify orders and other data export to Looker Studio, Google Sheets, Excel, and so on, there are other options to do the job.
- Export data manually from Shopify as a .csv file
You have probably come across the manual method as the Export button on nearly every page is impossible to miss. Shopify has built-in functionality for exporting data as .csv files. This format is widely supported in both cloud-based tools (including Google Sheets and Google BigQuery) as well as desktop clients (MS Excel, Apple Numbers, and many others).
- Automate data extraction by using Shopify’s Rest APIs
In particular, you can use Order APIs to move orders data to external destinations, either as a one-time activity or, more commonly, as a recurring process.
Exporting via Order APIs may sound a lot more technical because it’s an activity that often requires developers. Engineers can indeed use Shopify API to extract data at will, but this option is not suitable for users without a technical background. For details on how to get the most out of this method, please consult the API documentation.
Different cases of exporting orders from Shopify
And now, let’s explore several common scenarios with the Shopify Google Sheets integration that involve more custom imports – those that pull only specific data or offer even more data fields than the regular imports.
How to export unfulfilled orders from Shopify?
It may be very useful to have all unfulfilled orders in one place. Of course, you have them available in the Shopify dashboard, very easy to filter from all the others.

But when more of those pile up, getting a regularly updated list in a spreadsheet will make tracking the progress a lot easier. This functionality is natively supported by Coupler.io’s Shopify importer.
Hit the Edit button on the importer we set up earlier or create a new importer for Shopify and the destination of your choice. In the Source settings, go to Advanced settings, and select unfulfilled in the Order fulfillment status menu.
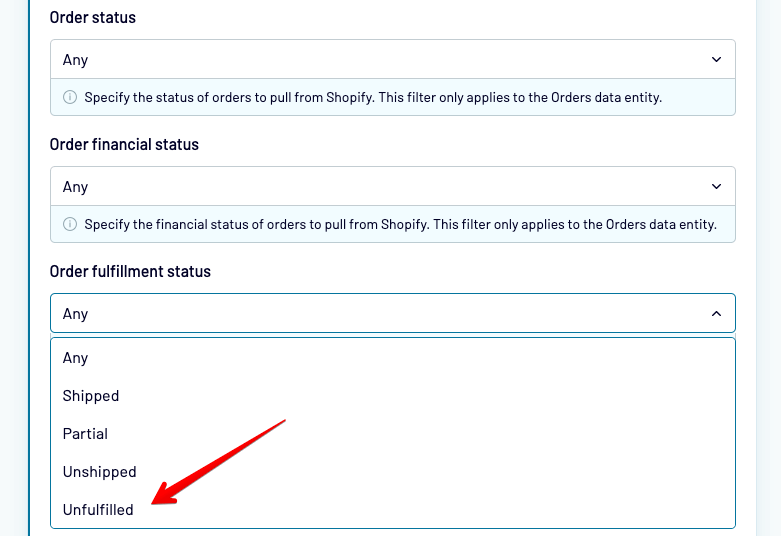
In the meantime, make sure that your private app has at least read permissions for Fulfillment services.
Then, run the importer, and it will pull only unfulfilled orders into your spreadsheet.
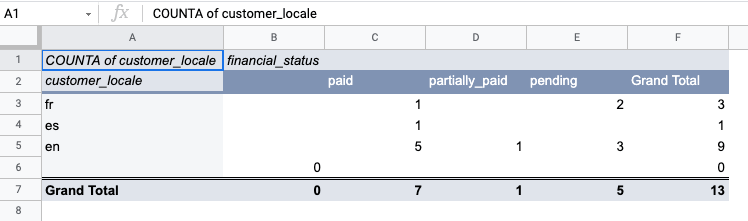
How to export Shopify orders by language?
Sorting orders by the language of the buyer’s browser/system may be helpful from a marketing standpoint – when analyzing your client’s behavior and personalizing their next visits, for example. In the data you export, you’ll be looking at the property named customer_locale.
The simplest way of filtering orders by language is with the spreadsheets tool itself. For example, export all data with a Shopify to Google Sheets importer. Then, go to Data -> Pivot Table. Select all the populated columns as the range.
- In Rows, select the column containing customer_locale.
- In Columns, you may add some other data you want to simultaneously. For example, we chose to see the financial_status for each customer_locale.
- In Values, select the function COUNTA, which will sum up the number of orders for each customer_locale.
In our case, the pivot table looks as follows:
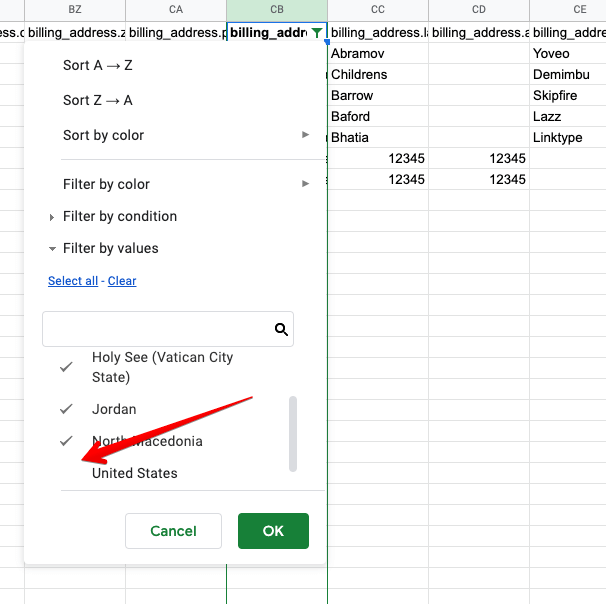
How to export international orders from Shopify?
This is also done most easily in the spreadsheet itself. Export all orders and simply set up filtering for the column billing_address.country. In Google Sheets, select the column in question, and then Data -> Turn on filter. In the filter settings, deselect your home country, and domestic records will be hidden from the list. You can, of course, build also another pivot table to count the number of orders for each country.
How to create an archive of Shopify orders?
Coupler.io is particularly helpful for creating an archive of your orders. When setting up a Shopify importer, you can toggle on the Automatic data refresh.
There, you can decide how frequently the data should be updated (every hour, day, or month), on which dates, and at what time. An importer set up this way will run automatically at specified times, updating the data in your spreadsheet with each new import.
Automate data export with Coupler.io
Get started for freeYou can create Shopify archives also for orders with line numbers, products, and customers.
How to export metafields of Shopify orders?
Unfortunately, metafields are not exported with orders, whether you export manually or run the automated importers. There is, however, an alternative way to pull metafields without any coding.
Note that you won’t be able to export metafields of multiple orders at once. It’s not a bug but more of a current limitation of the Shopify platform. It doesn’t only apply to orders but also to products, clients, and any other entities. It has been raised within the community multiple times but, so far, with no effect. If it works for you, try using tags, or notes instead that you’ll be able to export with orders the usual way.
To export metadata associated with a particular order, you need to create a Shopify custom app.
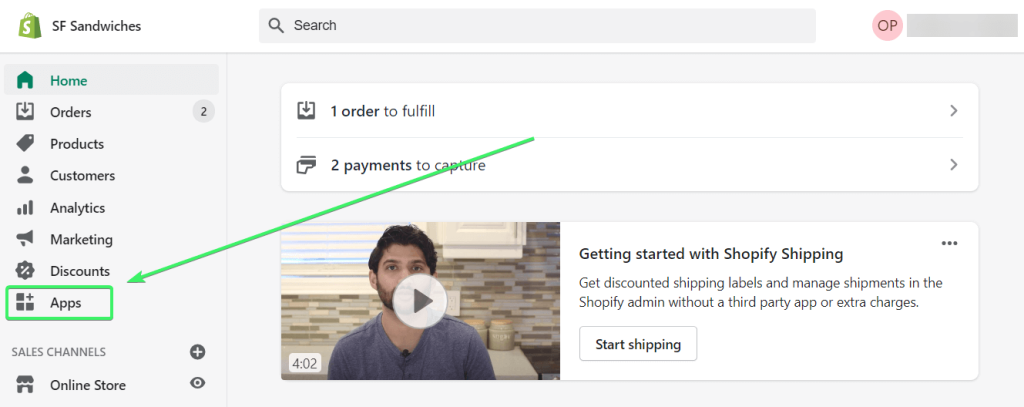
- Go to the Apps menu of your Shopify store.
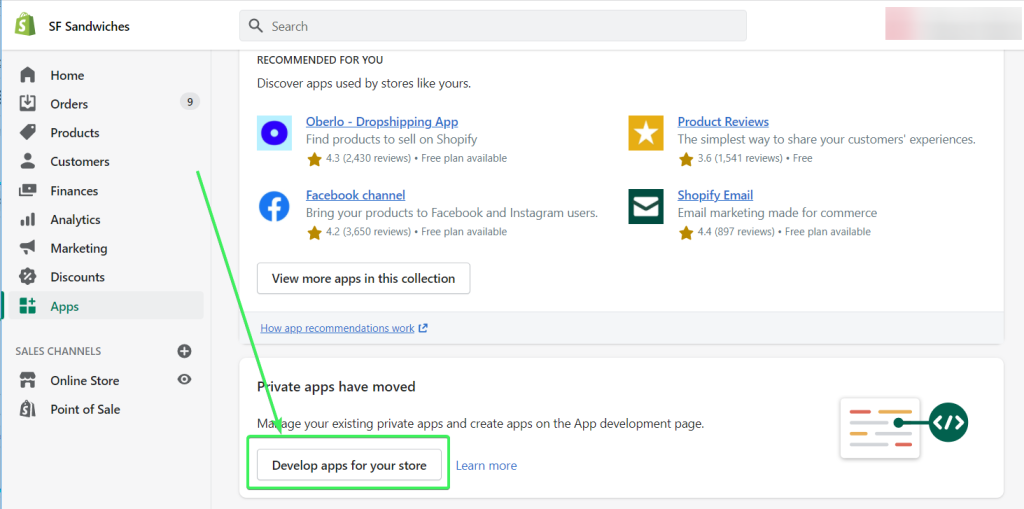
- Click Develop apps for your store (former Private apps).
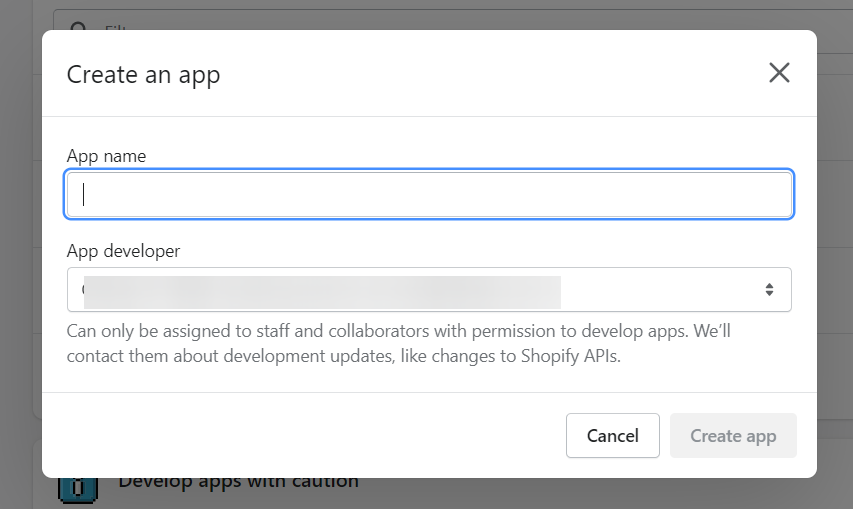
- Click Create an app.

Note: If you haven’t created any private or custom apps before, you may be asked to enable app development.
- Name your app then click Create app.
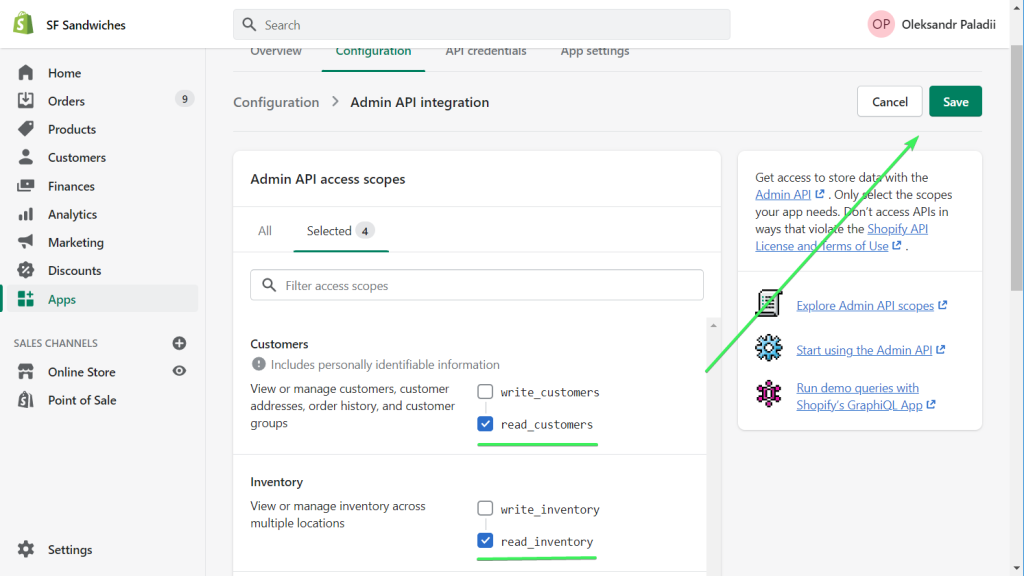
- Once the app is created, click Configure Admin API scopes.

- Check the read scopes for:
- Customers –
read_customers - Inventory –
read_inventory - Orders –
read_orders - Products –
read_products
- Customers –
Then click Save.
- Click Install app.
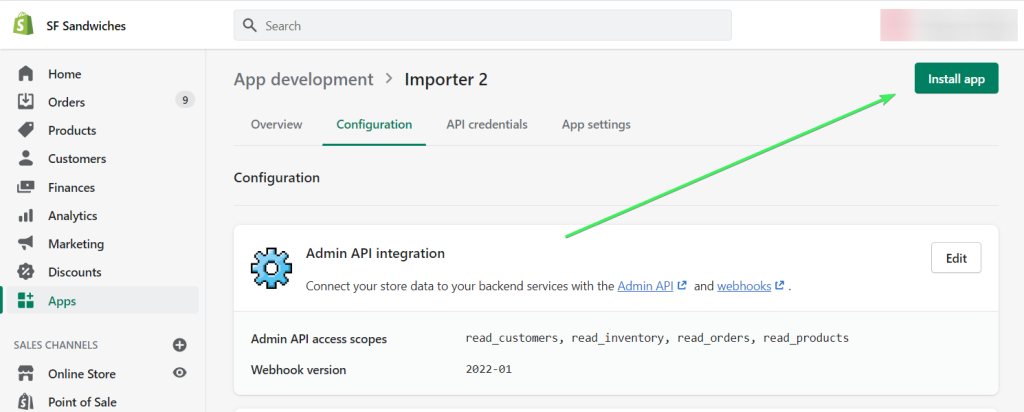
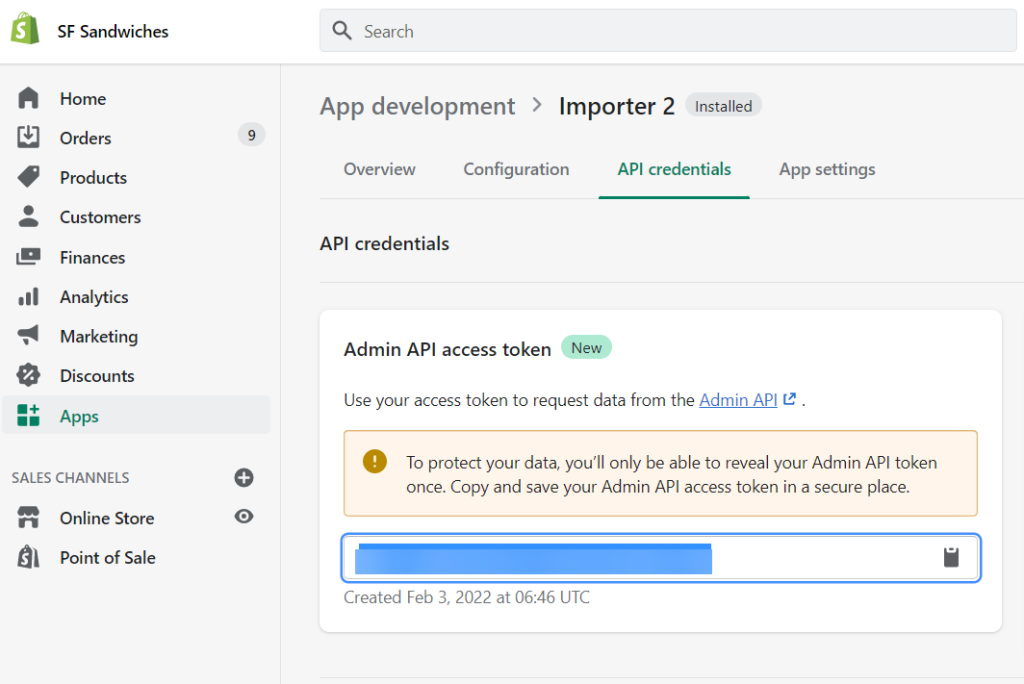
Find your Shopify API token in the Admin API section. We’ll need it later.
Now you are ready to set up your Shopify integration to export products data.
- Click Proceed in the form below where JSON is preselected as a source and Google Sheets is a preselected destination.
Proceed with the setup as follows:
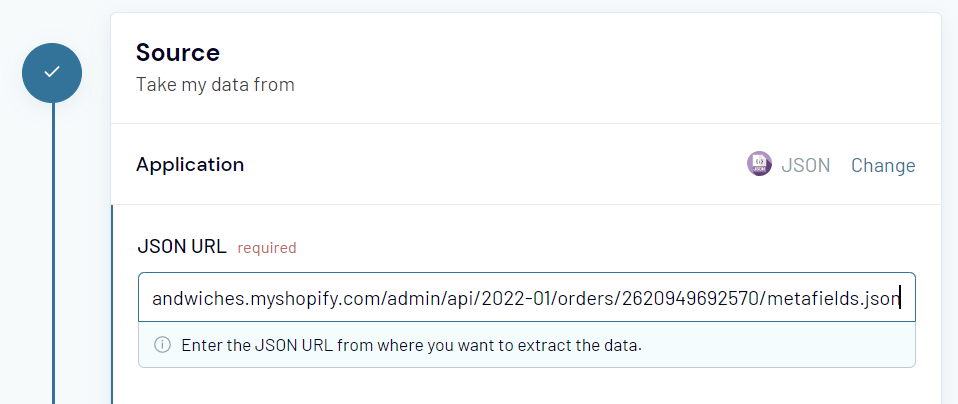
- JSON URL – use the following URL:
https://{store_name}.myshopify.com/admin/api/2022-01/orders/{order-id}/metafields.json
{store_name}– enter your shop name{order-id}– enter the ID of the order for which you want to export metafields
You can find the order ID in the URL bar of your browser when you select the order.
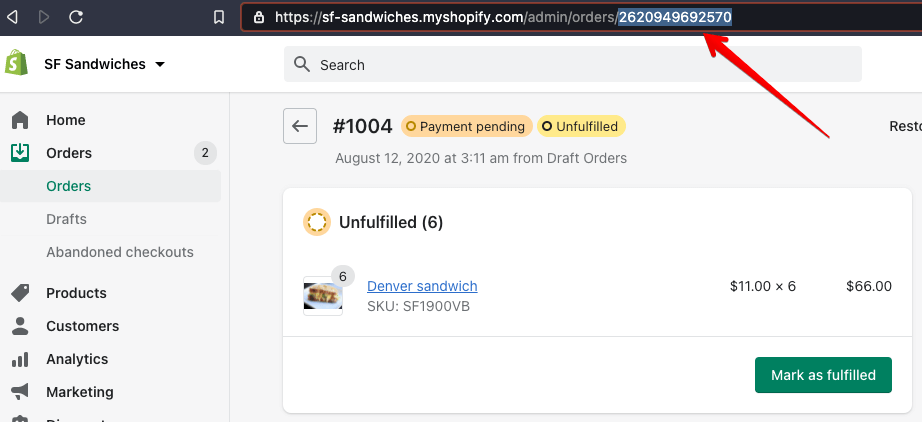
So, your JSON URL should look like this:
https://sf-sandwiches.myshopify.com/admin/api/2022-01/orders/2620949692570/metafields.json
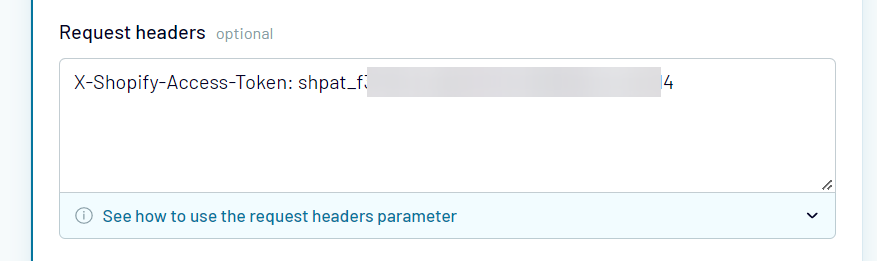
- Request headers – specify your API access token using the following HTTP header:
X-Shopify-Access-Token:{your-api-access-token}
- Path – Enter the metafields string to select nested objects from the JSON response.

Now you can proceed to the next steps: destination and schedule.
The final action is to click the Save and Run button, which results in pulling your Shopify metafields data to Google Sheets.
How to export Shopify orders with code?
Rather than run a dedicated importer, you can also query Shopify API to get the desired data about your orders or, for example, to update orders in bulk. Each request you can send is pretty well covered in the Orders API documentation.
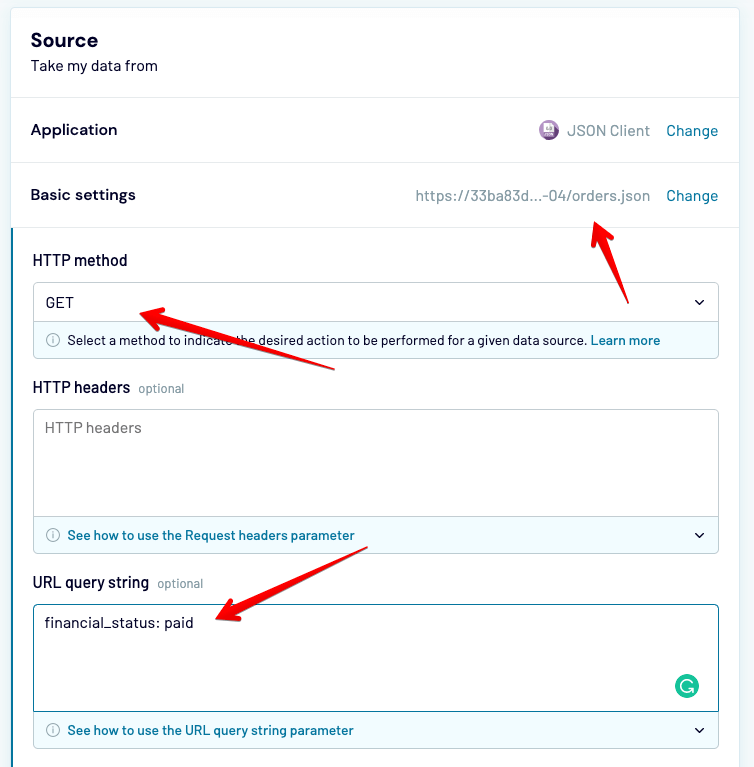
To perform any action, you’ll need to find your JSON URL. Copy it from the settings of your private app, the same as we did in the previous chapter. It will look as follows:
https://33ba83de89c4b7068cf537463d6805d1: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@shop_name.myshopify.com/admin/api/2021-04/orders.json
The most basic thing would be to get all orders. Do it by adding ?status=any to the end of your GET request.
You can also use Coupler.io once again to execute these queries, with the more generic JSON client importer. As you set up the Source, insert your Example URL as JSON URL, select the type of request, and insert the criteria into the URL query string field as shown in the example:
How to export order with tracking number?
To get information about tracking number of your orders, you need to select Orders fulfilments as a data entity when setting up your importer with Coupler.io.

Once the data is exported from Shopify, find a respective column named fulfilments.tracking_numbers.0 that will contain the required information.
How to export Shopify orders with pictures?
It could be handy to get all the order details along with the picture of the purchased product. Sadly, product pictures are not a part of Orders API and, as such, can’t be pulled together with orders. You’ll need to make two separate calls, one to Order API, another to the Product API.
Before you continue, make sure that your private app has at least the read access to Products and Products listing.
How to export Shopify orders manually?
If you opt for a .csv export of Shopify orders, the process is very simple.
- Navigate to your orders page and hit the Export button in the top-right corner.
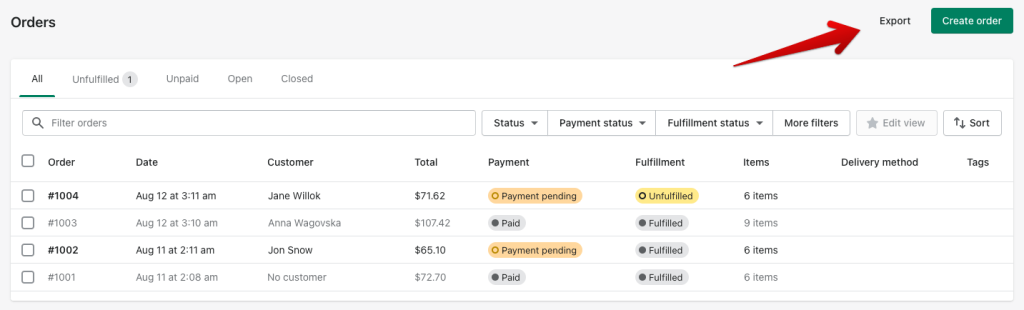
- Here, decide on the range of orders you want to export. If you’re exporting into a dedicated spreadsheets tool (as we are), you may want to opt for the CSV for Excel, Numbers… option that is selected by default. Plain CSV files are more suitable for exporting into other types of tools – for example, to a CRM or a support client.
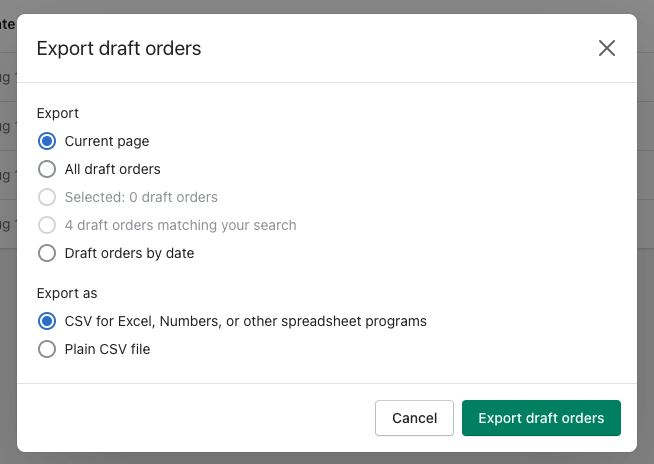
- A file will be downloaded or emailed to you shortly if you’re exporting data about more than 50 orders.
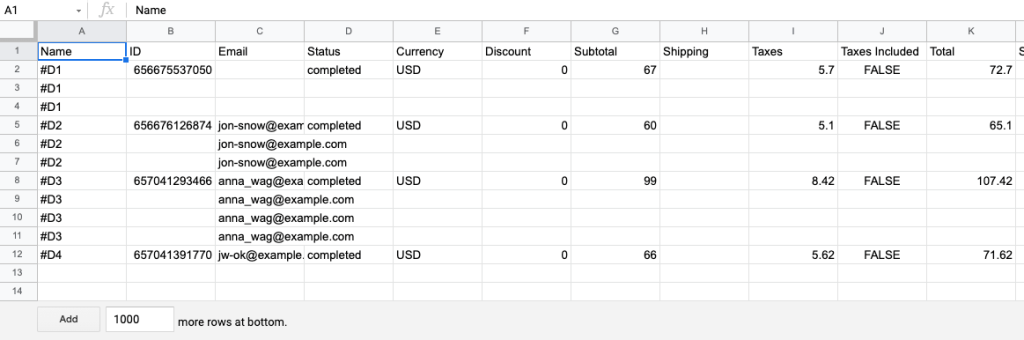
- Now import it into the program of your choice. For example, if you import into Google Sheets, open a new spreadsheet, select File -> Import, and drop a freshly downloaded file. Select the desired options (the default options are probably okay for starters) and hit the Import data button.

- After brief processing, your orders will be imported into your Google Sheets file.
The limitations of manual exports
Interestingly, the order data exported with a .csv file and via an API isn’t precisely the same. Neither is incorrect by any means – both sources are equally reliable. The difference is that export performed via API are more detailed and may be necessary if you wish to dig deeper into, for example, how customers find you or what drives their buying decisions.
To give you an example, some fields missing from .csv reports are:
- Reason for cancellations
- Discounts and taxes applied (.csv file contains only the totals for both)
- The referring site and the first page a user visited on entering your store
- Date and time when the order was processed or updated
- Customer’s currency
Why the differences? We can’t speak for Shopify, but it’s fair to assume that the size of exportable files is the reason here.
Large Shopify order exports may take a considerable amount of time. Shopify itself estimates that, for example, a .csv export of 400,000 orders may take about four hours. Consequently, if all available data fields made their way into the exported file, the process could double or even triple in time. At that point, new orders would have likely flown in, possibly making the export already outdated.
If you’re curious about exploring the differences, we’ve got something for you. Our data analyst compared each of the 185 fields exportable from Shopify with Coupler.io importer with the contents of a .csv export and things you can find in the Shopify dashboard. Find them in this spreadsheet.
Make the most out of your Shopify data
Knowledge is power. There’s a lot of data about your orders that you can easily pull into the destinations of your choice. You may find it easier to view them this way, rather than jumping between pages in your Shopify dashboard, not to mention any sort of manipulation you can perform.
Thanks for reading!