Data export to CSV (comma-separated values) sounds simple at first. But then you end up doing it weekly and stitching together files from different apps, until your report is outdated by the time you share it.
Below, I broke down actionable, real-world methods to export data to CSV, from quick manual pulls to fully automated pipelines. Find the method that fits your workflow, so you don’t waste your time on out-of-place workarounds and always have fresh data at hand.
Choose the right method to export data to CSV
The best method depends on how often you need fresh data, whether you’re pulling from one source or many, and how much technical setup your team can handle. Some methods work well for quick one-off extracts, while others are built for automated pipelines that keep your data consistently up to date. Here’s a glance at each method and where it fits right.
| Export method | Best for | Automation | Technical effort |
| Coupler.io | Scheduled exports from 400+ apps with various data transformations, blending options, dataset templates, and AI analytics | ✅ Yes | Low |
| Manual export from your data sources | One-time data extracts from a single app when no recurring updates or transformations are needed | ❌ No | Low |
| Automated export natively supported in the source | Recurring exports from source apps that have native scheduling built in (e.g., Salesforce) | ⚠️ Limited (only some apps support it) | Low |
| Custom API integration | Full control over data management and transformation logic | ✅ Yes (requires setup) | High |
If you need to export data on a schedule and combine records from multiple sources, Coupler.io is the most user-friendly option, regardless of your technical background.
Export your app data to CSV with Coupler.io
Get started for freeHow to export data to CSV using Coupler.io
Coupler.io is a data integration and AI analytics platform. It lets you collect records from over 400 business apps, organize and structure datasets, and load data to CSV. You get a link that you can paste into your browser to download the file or put into your destination app for integration. On top of this, Coupler.io provides dataset templates, AI analytics, and more. It takes only a few clicks to export data to CSV.
Get started for free. Choose a source app from the form below and hit Proceed:
Next, sign up for Coupler.io (no credit card required) and follow the steps below. 👇
Step 1: Collect data
Connect your source app account by following the in-app instructions. Then, select the specific data entity, i.e., the type of data you want to integrate into CSV, from the dropdown list. Complete the remaining required settings and proceed.
Coupler.io also lets you connect multiple sources in a single data flow. You can merge records from different data entities and accounts within one app, or across various apps.
Step 2: Organize your data
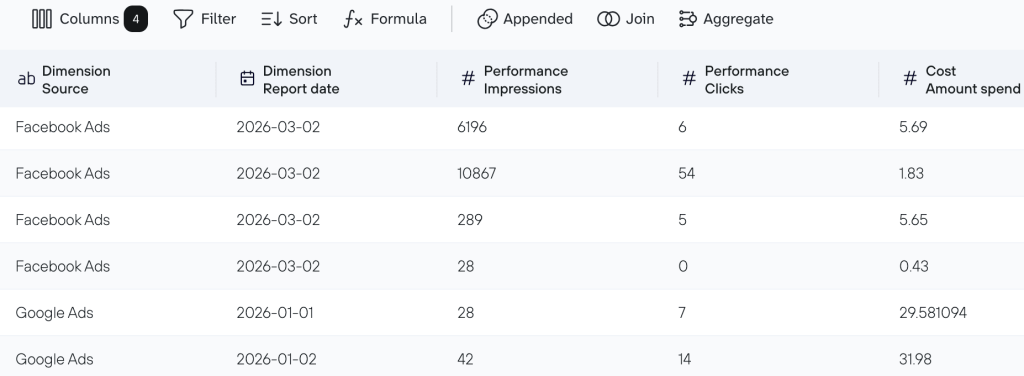
Data from sources often comes with extra details that aren’t immediately useful or don’t match your reporting requirements. To make it an analysis-ready dataset, Coupler.io lets you perform the following transformations:
- Filter – Keep only the records relevant to your analysis, e.g., show only closed-won deals from the last quarter or display campaigns with a CTR above 2%.
- Sort – Arrange rows by order value, sign-up date, or churn risk score to prioritize what matters most.
- Hide or remove unwanted columns – Drop internal IDs, system timestamps, or raw API fields that add noise without adding value.
- Rename or rearrange columns – Standardize headers and column order for a clearer, more consistent dataset.
- Aggregate – Gain snapshots of your data using functions like sum, avg., count, min., or max., e.g., to calculate total ad spend per channel.
- Add calculated columns – Build custom metrics on top of your raw data, such as gross margin per product or cost per acquisition by campaign.
- Combine data sources – Merge records from multiple data entities, accounts, or apps to get a complete view of your business performance.
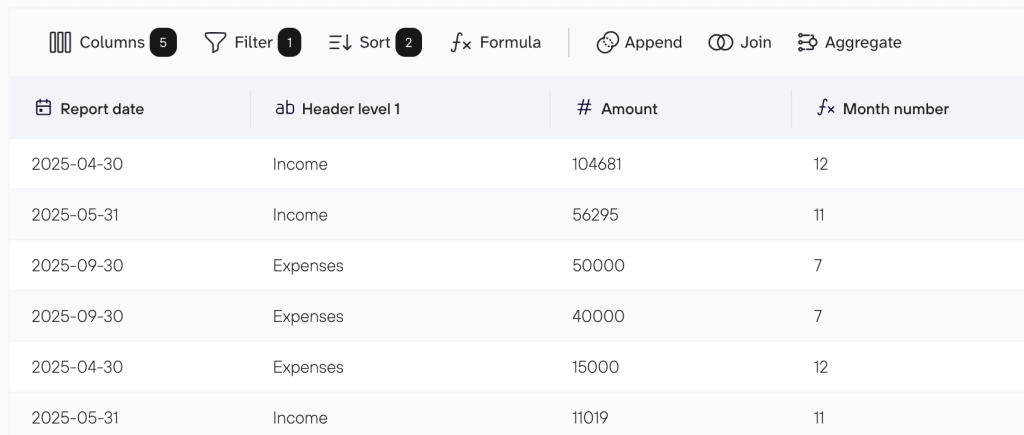
This step is optional, but it helps organize your data for reporting. Then, proceed to load your data into the destination.
Step 3: Load data to CSV and automate it
Click to generate the CSV integration URL. Next, copy the link and run your data flow.
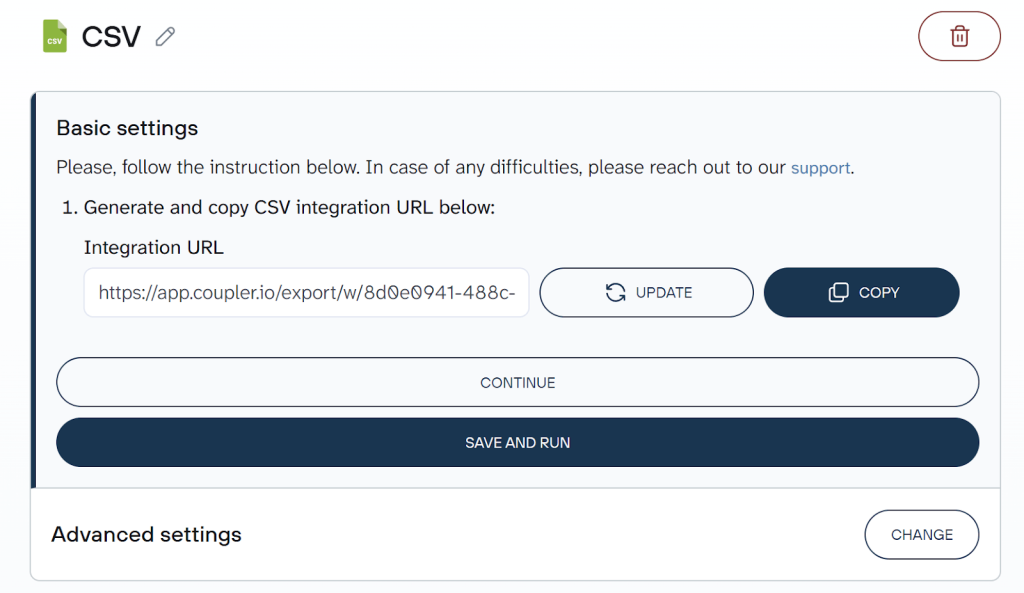
Now, you can open this link in a browser to download a text file with your exported data. Alternatively, paste this link in a destination app for integration.
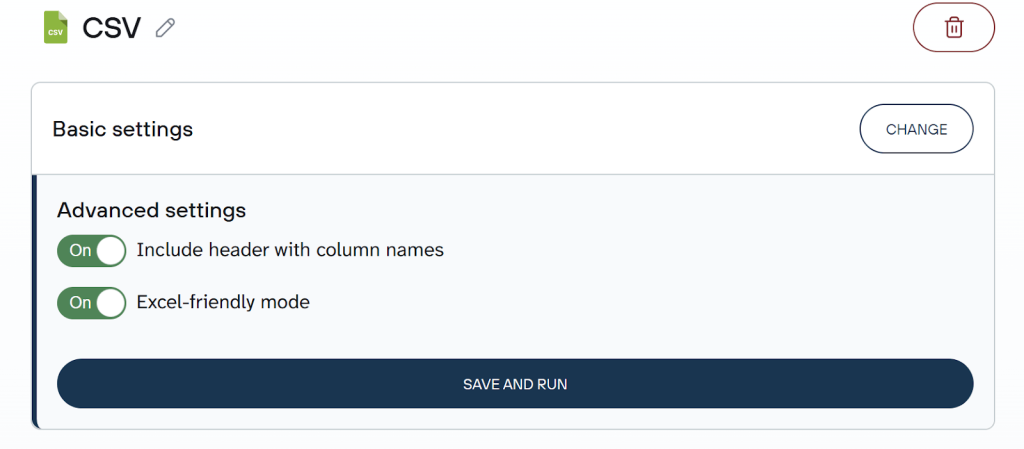
Then you’ll find two advanced settings:
- Include header with column names – Turn this on to make it easy to identify your data: the first row of your file will contain your column names. If you turn it off, the file skips straight to the data rows with no labels. This setting is on by default, and you should keep it that way unless the app where you’ll work with your data requires raw rows without headers.
- Excel-friendly mode – Enable this when you’ll work with the CSV in Excel and need accented letters, currency symbols, and non-Latin characters to display correctly. If you’re using non-Excel tools, you may want to keep this mode off to avoid compatibility issues.
If you use your CSV integration URL in a destination and want to keep your records up to date, turn on automatic data refresh. Then, select the desired interval (days or hours) and set the appropriate time zone. By default, data refreshes daily, but you can increase the frequency up to every 15 minutes for near real-time reporting.
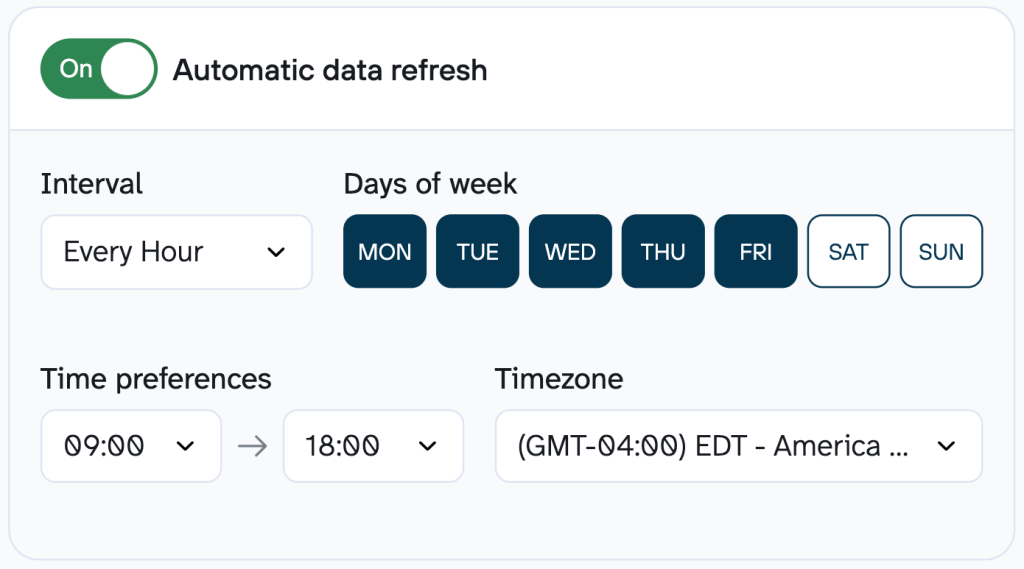
Make sure you click to save and run. Only then will your automation be active.
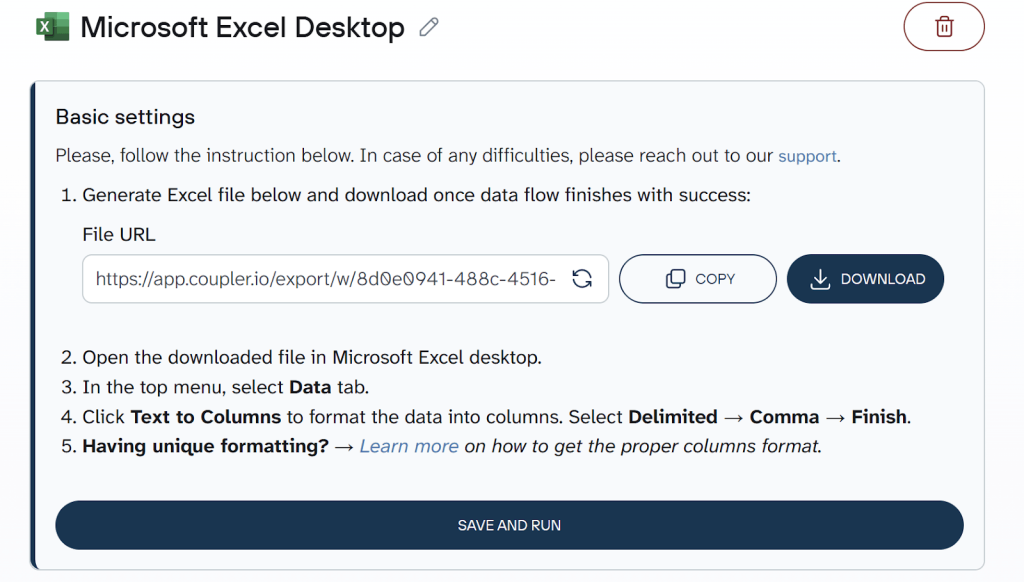
If you’d rather skip copying a URL into your browser, select Microsoft Excel Desktop as the destination in Coupler.io instead of CSV. The only difference is that, in addition to generating a link you can open manually, Coupler.io lets you download the CSV file directly to your device.
Bonus: Analyze data with the AI Agent
Once a CSV lands in an Excel worksheet, Looker Studio report, or another destination, you’re already one step removed from your source data. If something looks off, you have to go back to the raw data and dig manually to sort out the problem. That slows decisions down and puts you at risk of acting on unvalidated data.
Coupler.io’s AI Agent lets you catch those issues early. It works directly on top of the data you’re about to export. So you can ask questions, spot anomalies, and confirm the data is accurate, all before the CSV is created.
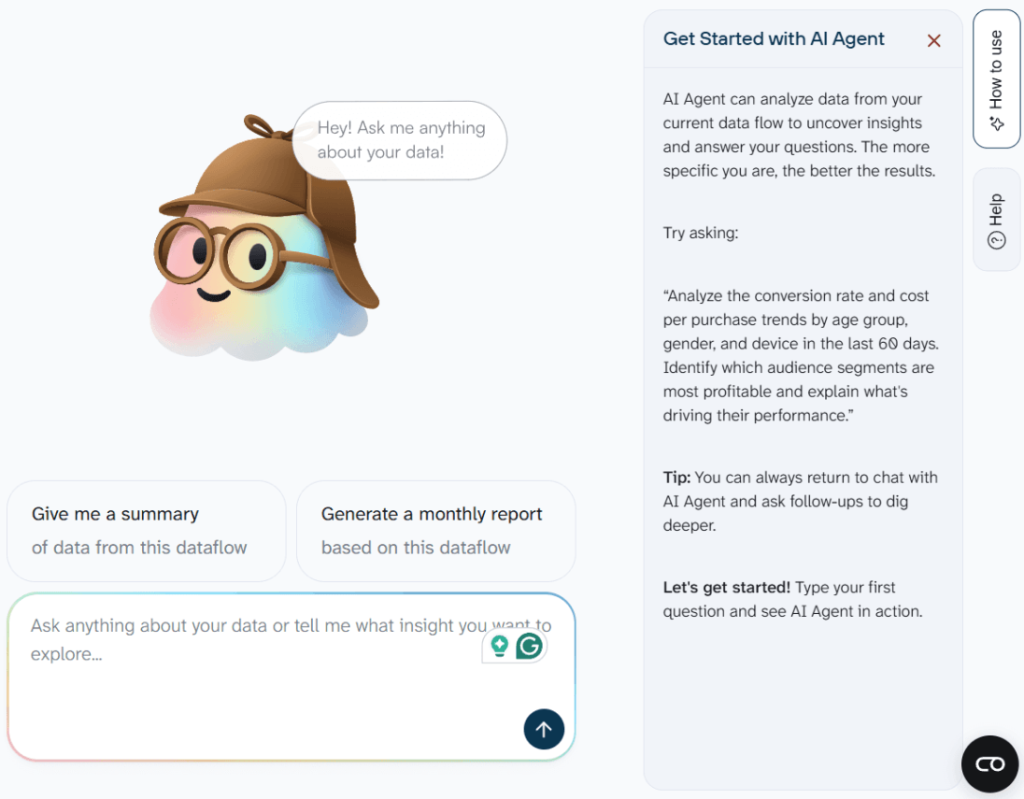
Below are example scenarios where this makes a difference:
- Validate e-commerce sales data. You’re pulling order data from Shopify to load it to a CSV for your finance team’s monthly reconciliation. Before export, you ask the AI Agent: Are there any orders with a total of zero or negative values? This way, you catch a batch of incorrectly recorded returns before they end up in an accountant’s spreadsheet.
- Review ad performance data. Imagine you’re collecting figures from Google Ads or Facebook Ads to export this data to CSV for a BI tool. Before the CSV is generated, you ask: Which campaigns had the highest cost-per-click but the lowest conversion rate this week? Instead of discovering the issue after your report is already built and shared, you identify the underperforming campaigns at the source and flag them for review.
- Audit CRM data. Suppose you’re extracting a snapshot of HubSpot or Salesforce data ahead of a quarterly sales meeting. In that case, you can ask the AI Agent: Which deals marked as closed-won have no recorded close date? Next, you clean up data quality issues all before the CSV ever reaches a slide deck or pivot table.
Data integration and AI analytics with Coupler.io
Get started for freeFrom where can you export data to CSV?
Coupler.io lets you export data from 400+ source apps across the following categories:
- CRM: HubSpot, Salesforce, Pipedrive, Intercom, GoHighLevel.
- E-commerce: Shopify, eBay Finance, WooCommerce, Revolut Merchant, Chargebee.
- Email: Mailchimp, Klaviyo, Braze, ActiveCampaign, SendPulse.
- Finance & accounting: Stripe, QuickBooks, Xero, Zoho Billing, Braintree.
- Marketing: Google Analytics, Amplitude, Google Search Console, Serpstat, Segment.
- Paid advertising: Google Ads, Meta Ads, Microsoft Ads, Snapchat Ads, TikTok Ads.
- Social media: Facebook, LinkedIn, Instagram, YouTube, Vimeo.
- Project management: Microsoft Teams, Google Tasks, Jira, Trello, Notion.
- Time tracking: Clockify, Toggl, Harvest, BambooHR, TimeTonic.
- Surveys: Google Forms, Jotform, Trustpilot, Typeform, Paperform.
- Spreadsheets, databases & data warehouses: Google Sheets, BigQuery, Excel, Redshift, Smartsheet, and more.
Blend data across sources
When your data lives across different source apps, you’d normally export one CSV per source. Then you’d spend time manually merging them, fixing mismatched columns, and hoping nothing breaks. The more sources involved, the messier it gets.
With Coupler.io, you can integrate data from multiple sources before exporting it to a CSV, creating a single, clean file that’s ready to use immediately.
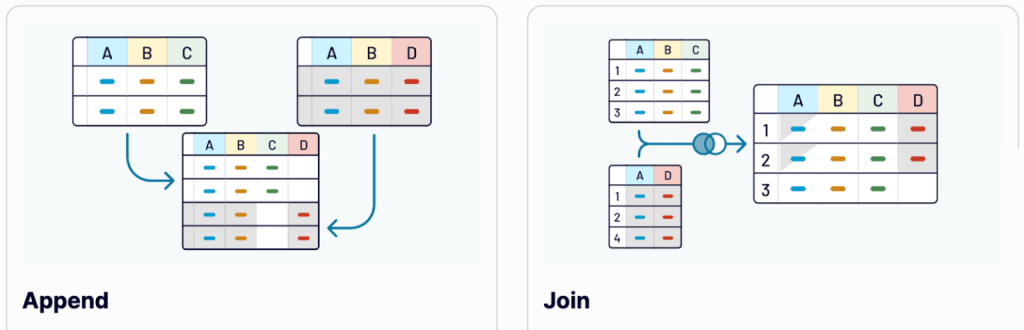
Once you’ve collected data from several source applications through Coupler.io, you can blend it using one of two modes – Append or Join:
- Append – Creates a dataset where data from one app is placed below the data rows from another app. Columns with identical names are matched and combined, while unmatched columns are included as-is.
For example, use Append to blend data for the performance analysis of campaigns on both Facebook Ads and Google Ads. Instead of downloading two CSV files and copy-pasting rows together, you have the ad results stacked into one file.
- Join – Combines data using the left join key. This keeps all records from your main dataset and adds only the matching elements from other sources. Columns that don’t meet your specified conditions are excluded.
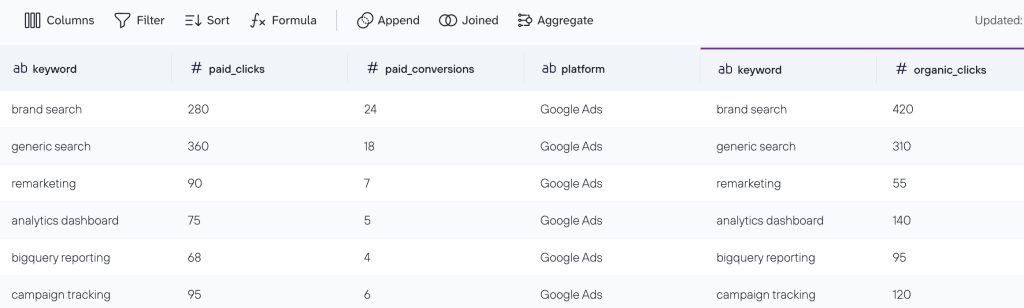
For instance, use Join to enrich your Google Ads keyword data (paid clicks, conversions) with organic clicks from Google Search Console. No more need to match keywords by hand. You get a single enriched file where every keyword carries both its paid and organic performance data.
Dataset templates to get structured data into CSV
Coupler.io’s data transformations let you organize data for CSV integrations. But if you want to skip setting up metrics, calculations, and aggregations, dataset templates are the way to go. Each template is a ready-made package of data sources, transformations, and report views, prepared by Coupler.io’s data analysts.
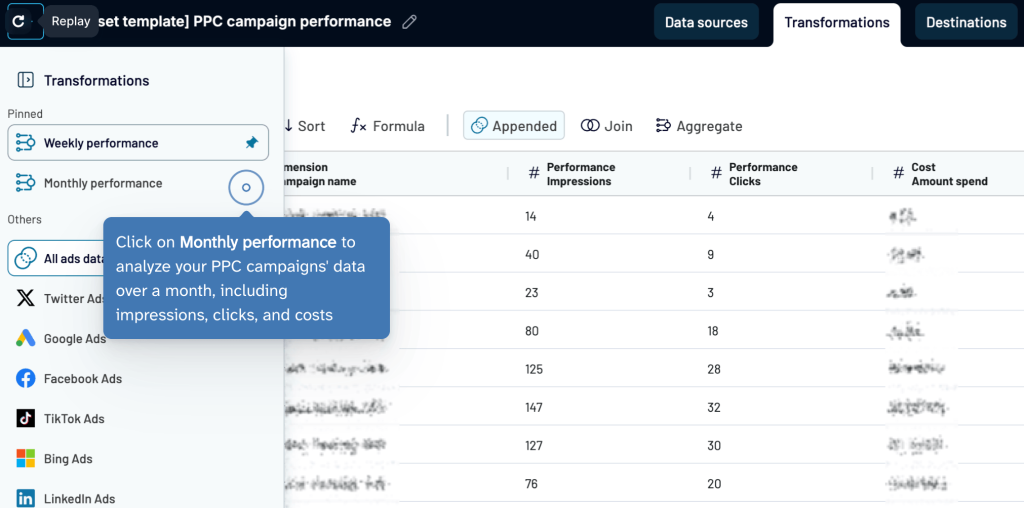
Simply connect your accounts, and the template automatically turns your raw data into a neat, structured report table that you can export to CSV.
Check out some examples across different domains:
- PPC Campaign Performance – Unifies campaign data from Google, Meta, LinkedIn, TikTok, and other ad platforms into a single view, with weekly and monthly roll-ups to compare cost efficiency and engagement trends across channels.
- GA4 Landing Page Performance – Pulls landing page metrics like new users, bounce rate, and key event rate from Google Analytics 4 into one structured view, with aggregations for weekly and monthly trend analysis.
- Meta Post Engagement – Extracts per-post engagement metrics from Facebook Page Insights into a clean, column-filtered dataset. So you can quickly identify top-performing content by likes, comments, and shares.
- HubSpot Deals with Contacts and Companies – Joins deal pipeline data with contact and company details from HubSpot. This helps you track deal stages, forecast revenue, and connect opportunities to real people.
- Xero Bank Summary This/Last Month – Organizes bank account activity from Xero into a report covering opening balances, inflows, outflows, and net cash movement. Unnecessary columns are removed for a cleaner financial snapshot.
Alternative to exporting data to CSV: Connect the source to the destination with Coupler.io
Imagine you export your data to CSV, not because you want a file but need those records somewhere else: a spreadsheet, a dashboard, or a database, and CSV is just the only bridge you know. However, it often creates unnecessary friction. You load data to CSV, save the file, import it to the destination, and repeat the whole process next time the data updates.
Coupler.io eliminates this friction by connecting source apps directly to destinations. Instead of generating a CSV and moving it around, you set up a data flow once and let it run. Data in the destination stays updated automatically, on whatever schedule you choose.
The destinations Coupler.io supports include:
- Spreadsheets/workbooks: Google Sheets, Microsoft Excel (online & desktop).
- BI tools: Looker Studio, Power BI, Tableau, Qlik Sense.
- Data warehouses and databases: BigQuery, Snowflake, PostgreSQL, Redshift.
- AI tools: Claude, ChatGPT, Perplexity, Gemini, etc.
Export data from 400+ sources to CSV and other destinations
Try Coupler.io for freeHow else can you export data to CSV?
While Coupler.io automation is the go-to option for data export to CSV, there are other ways to do it. Each method has its own strengths, but also comes with limitations worth considering, so let’s walk through them one by one.
Manual export from your data sources
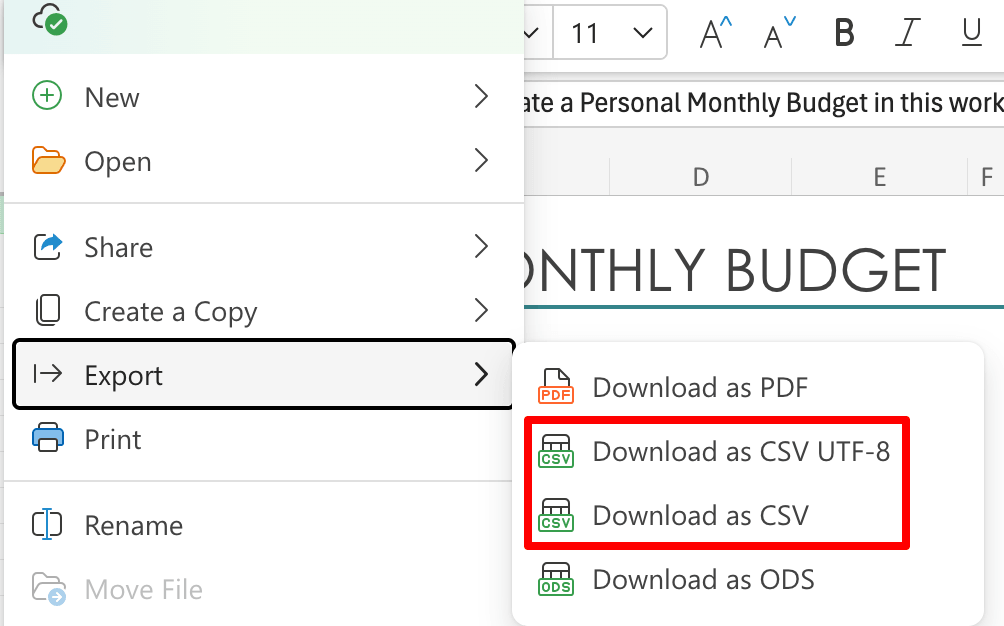
Manual export is the most straightforward way to get your data into a CSV file. Most business apps (CRMs, ad platforms, e-commerce tools, and spreadsheets) have a built-in export button that lets you download a snapshot of your data on demand.
How it works: You navigate to the relevant section of your app (e.g., a contacts list, a campaign report, or an orders table), apply any filters you need, and download data as CSV. The file is saved to your device and is ready to use immediately.
This method can be useful when:
- You need a one-time data extract without any recurring updates
- The dataset is small and doesn’t require transformation
- No technical setup or third-party tools are available
Limitations:
- Entirely manual: every new export requires repeating the same steps
- No automation or scheduling: data goes stale as soon as it’s downloaded
- Time-consuming when working with multiple apps or large volumes of data
Automated export natively supported in the source
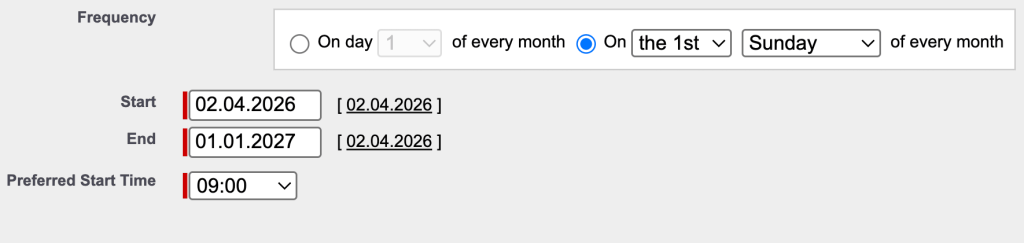
Some apps, such as Salesforce and RMS Cloud, offer native scheduled exports. The app automatically generates and delivers an exported CSV file at a set interval without any manual action after the initial setup. This feature is built directly into the source app and doesn’t require a third-party platform.
How it works: Inside the app’s settings, you configure an export schedule and/or specify a delivery method. It’s typically an email attachment or a download link sent to a designated address. The app generates the CSV automatically at the chosen time and delivers it to you.
This method can be useful when:
- You need recurring exports from a single source app
- The data structure is simple and requires little to no transformation
Limitations:
- Native scheduling is a feature that only some apps offer
- Data transformation options are minimal or absent
Custom API integration
This export option is about writing scripts or programs to pull data directly from a source application’s API. It offers the highest level of flexibility and works with virtually any data source that exposes an API.
How it works: You send requests to the source app’s API endpoints and retrieve structured data, typically in JSON format. You then write logic to parse, transform, and flatten that data into a tabular structure before passing it to its destination.
How you handle that last step, however, depends on where the data needs to go:
- If your destination only accepts CSV imports, save a retrieved dataset as CSV and deliver it manually. This works for legacy tools, finance systems, or platforms that restrict API access to higher-tier plans, where CSV upload is the only viable option.
- If you can access both source and destination APIs, skip CSV entirely and build a direct source-to-destination integration. This way, you keep data continuously updated without generating intermediate files nobody asked for.
- If your destination supports an intermediary that’s easier to write to programmatically than a direct integration, use it. For example, with Looker Studio as a destination, it’s better to push data from your source API into Google Sheets and then connect Sheets to LS natively. This is far simpler than building a custom Looker Studio Community Connector, which requires learning Google’s connector framework.
This method can be useful when:
- The source tool doesn’t offer a native export method and isn’t supported by any data integration platforms
- You want full control over what data is extracted
- You need to apply complex transformation logic
Limitations:
- Requires programming skills and knowledge of APIs
- Setup and maintenance effort varies depending on API complexity, data volume, etc.
- It can become difficult to scale or maintain without proper infrastructure
Common challenges when exporting raw data to CSV
CSV exports seem like a reliable way to move data around. But once your data needs to stay consistent or your workflows grow more complex, problems appear quickly. Here’s what I usually see go wrong and what you can do about it. 👇
Data goes stale immediately
A CSV is a snapshot of your data in plain text format at a particular moment. The file is already out of date the moment something changes in the source, e.g., a new deal closes, or a payment comes in. For use cases tied to active campaigns, open sales pipelines, or daily revenue tracking, a static file doesn’t meet the need. And regular re-exports turn into a recurring manual task that quietly eats up time.
Solution: With Coupler.io, you can schedule automated data refreshes, so your reports always reflect changes in the source each time you download a CSV file in your browser. Alternatively, if you integrate a CSV URL into your destination, your records are constantly updated.
Row and file size limits
Most apps cap CSV exports at a fixed number of rows, often somewhere between 10,000 and 50,000, regardless of how much data actually exists. If you’re working with multi-year order histories or a full CRM contact list, you’ll hit that ceiling before you have the complete picture. As a result, you either split export across multiple files and stitch them together manually, or simply work with incomplete CSV data without realizing it.
Solution: Coupler.io handles larger data volumes and can route directly to destinations like BigQuery, which aren’t constrained by spreadsheet row limits.
Inconsistent formatting across exports
When you load raw data to CSV from multiple source apps or even from the same app at different times, the formatting is rarely consistent. Column names shift, date formats vary by locale or platform, currency fields include symbols that break formulas, etc. This turns a straightforward data merge into a half-day cleanup job.
Solution: Coupler.io’s transformations let you standardize data structure and formatting before exporting to CSV, so your dataset is instantly ready for analysis or reporting. Or you can use a prebuilt Coupler.io dataset template that fits your business needs, with data transformations already set up.
Manual re-uploads break downstream workflows
When a CSV feeds into a destination app, you must re-upload the file every time the data needs refreshing. One missed upload means a report is showing outdated numbers to a stakeholder who has no reason to suspect anything is wrong. The more downstream apps depend on the file, the more re-upload steps are required, and the more points of failure exist.
Solution: Coupler.io solves this in two ways:
- Integration URL method: You use a CSV URL generated in Coupler.io and paste it into the destination tool. Coupler.io refreshes the data on your set schedule, so the destination tool always reflects up-to-date records.
- Direct pipeline method: You skip the CSV file format entirely and build a direct pipeline from source to destination. Coupler.io supports 15+ destination apps, including spreadsheets, BI tools, data warehouses and databases, AI tools, and more.
Export data from 400+ sources on a schedule
Try Coupler.io for free