Journal entries in QuickBooks are records of financial transactions flowing in and out of your business. They provide a timely narrative of your business’s financial standing and help make plans for possible business scaling, expansion, new hires, etc.
You may have different reasons for exporting journal entry data from QuickBooks. One of them is to track money that you put in or take out of your business, or that flows between your different accounts. Another reason is to use this data for reporting or analytical purposes, like building a custom dashboard or blending data with information from other sources. Ultimately, you might just want to share this data with multiple users or stakeholders.
In this article, we will demonstrate all the ways of exporting journal entries from QuickBooks, including the one that allows you to automate this process on a schedule.

Automate QuickBooks Online data export with Coupler.io
Get started for freeHow to export journal entries from QuickBooks Online
There are two native ways to export journal entries from QuickBooks Online. The first is with the help of the Gear icon, and the other is from the Reports page. Both options enable you to export data into Excel, while from the Reports page, you can also export data to PDF.
If you want to repeat this process regularly, on the desired schedule, we suggest you consider automating QuickBooks data export with Coupler.io. It is a reporting automation and data integration platform that enables users to turn raw data into insightful reports. You can have the exported data refreshed on a very tight schedule, like every 15 minutes, without any involvement from your side. You will need to set up the QuickBooks connector only once, and then, QuickBooks data will be loaded to spreadsheets (Google Sheets, Microsoft Excel), data warehouses (BigQuery, PostgreSQL), and more. This way, you can automate reporting or analytics without any coding.
How to export entries from QuickBooks to Excel on a scheduled basis
To get started with Coupler.io, select the needed destination app for your journal entries data in the form below and click Proceed.
Coupler.io also provides QuickBooks Reports as a source app. This option is good for exporting QuickBooks reports such as Balance Flow, Cash Flow, Vendor Balance, or Transaction List.
Step 1. Collect data from QuickBooks
- Connect your QuickBooks Online account, then select the source data to import. In our case, this is JournalEntry.
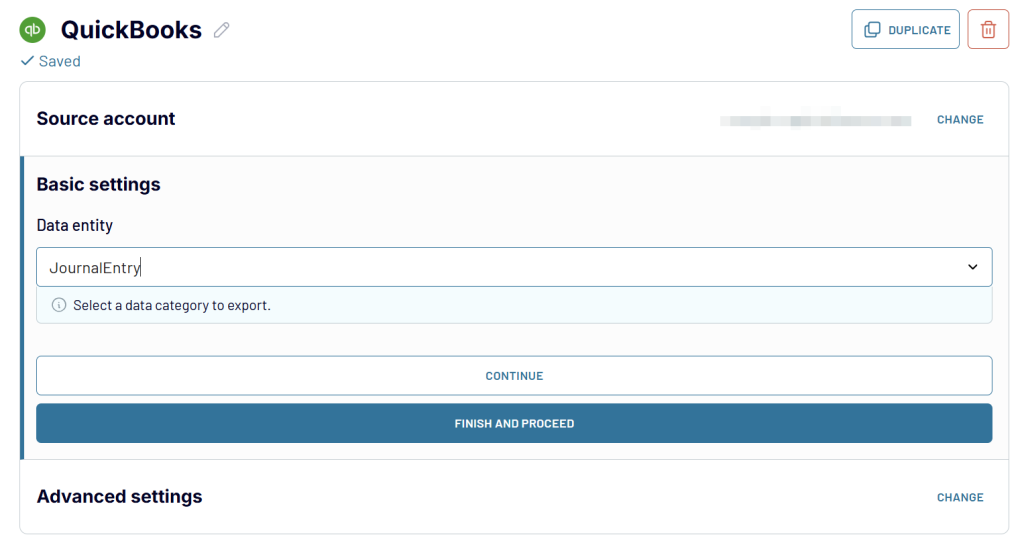
Step 2: Organize data
Coupler.io offers you to organize your data before loading it into the selected destination. This step is optional, so you can skip it. However, check out the options you have in this interactive form.
Step 3: Load data and schedule refresh
Proceed to the configuration of the destination app. Follow the in-app instruction to load data to the selected destination.
For this example, we’re running the QuickBooks export to Excel in this example. At the same time, you can connect QuickBooks to BigQuery or Google Sheets.
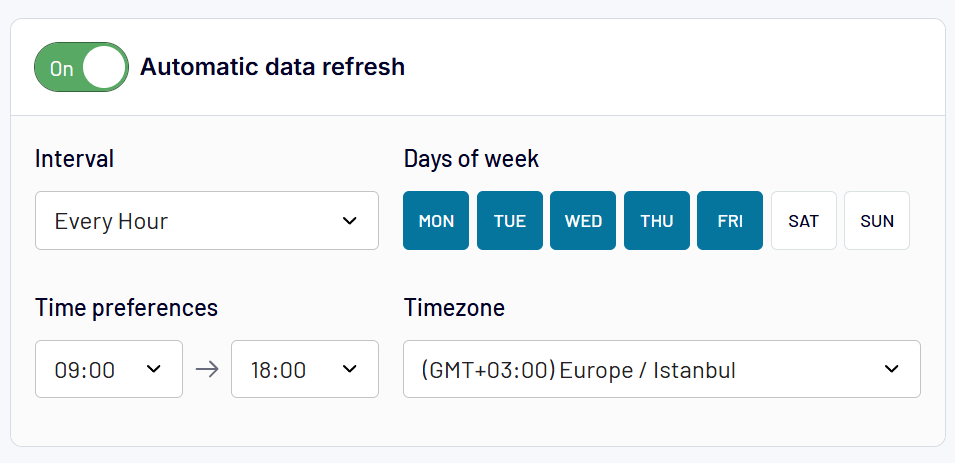
To automate data export, toggle the Automatic data refresh button and schedule the day, time, and timezone. Then click on Save and run.
Benefits of automated export of journal entries from QuickBooks
The manual way to export QuickBooks to Excel works best for a one-time export, for example, if you need to move the data in another app. Besides, QuickBooks only supports two formats for export – Excel and PDF. This limits your options since you may need to use other destinations for your data.
The automated exporting option, especially the one provided by Coupler.io, allows you to schedule the export of data at a custom schedule, such as every day or every hour. For more frequent data refresh, QuickBooks integration supports 30- or 15-minute frequencies. This lets you eliminate manual routine, which is not only time-consuming but also inefficient from the general workflow optimization.
The ETL tool helps you save valuable time, eliminating the need to repeat tedious, recurring tasks. Furthermore, it improves the quality of your exported data, enabling you to share the most updated spreadsheet with your team anytime.
How to export QuickBooks journal entries manually
Export journal entries from the Gear icon in QuickBooks
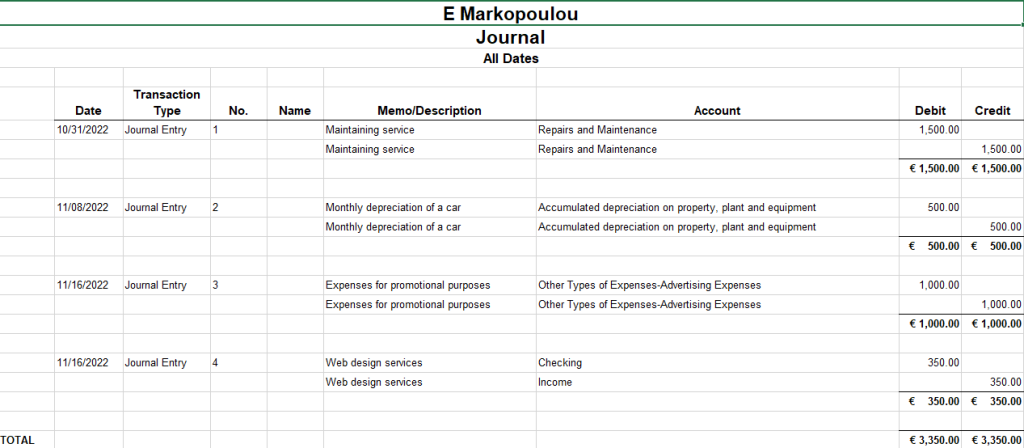
If you export journal entries from the Gear icon, you’ll be able to export information like Date, Transaction Type, Name, Memo/Description, Account, Debit, and Credit.
Once you log in to your QuickBooks Online:
- Click on the Gear icon in the top right corner
- Then, click on Export data under the TOOLS option.

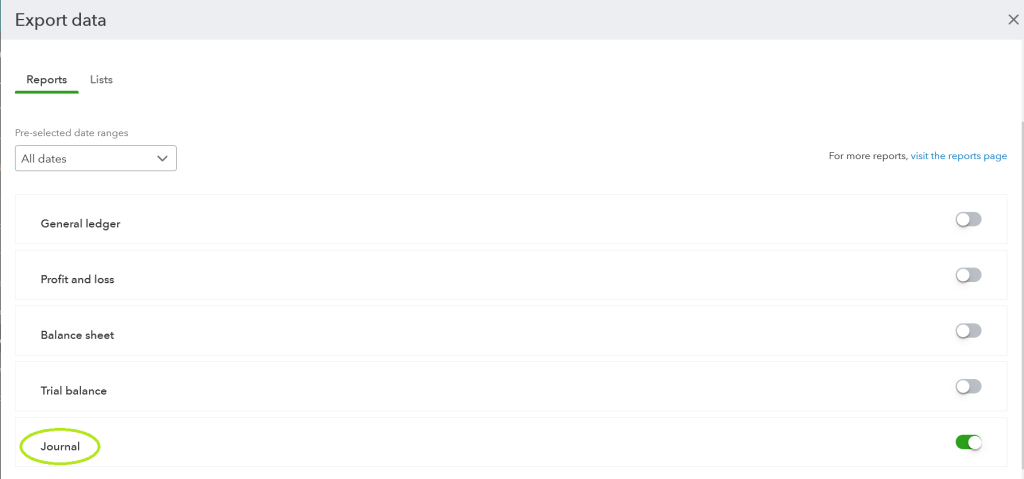
QuickBooks will then open up a child window calling you to toggle four different buttons depending on the type of Report you wish to export. Make sure you turn on Journal and switch off all other buttons.
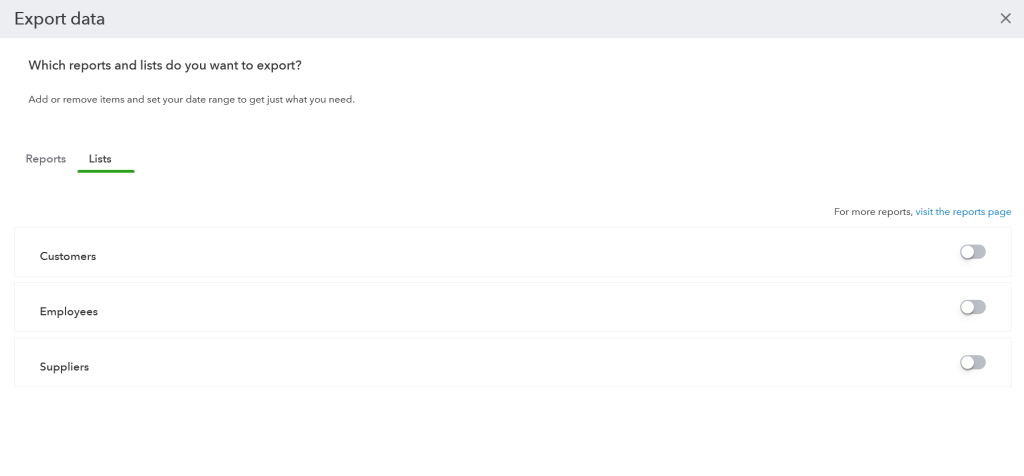
Also, click on the Lists option to remove items you don’t want to export.
Here is what the exported data looks in Excel:
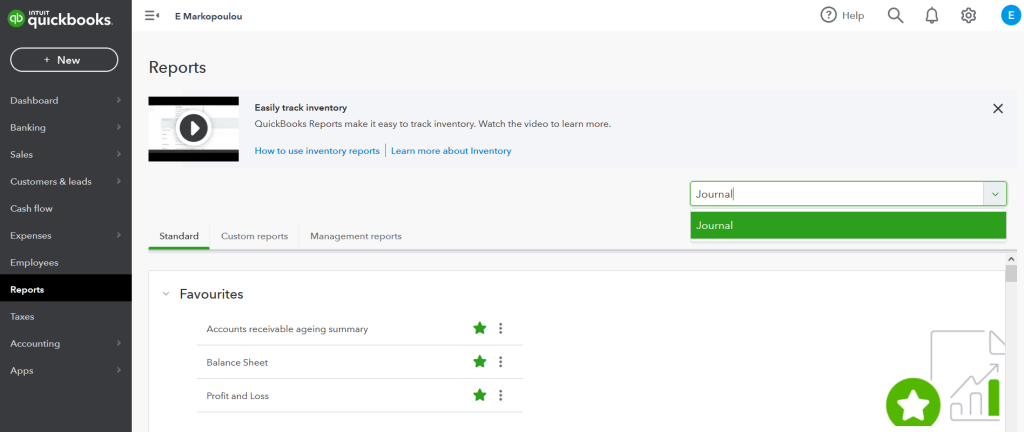
Export journal entries from the Reports page in QuickBooks
Through the Reports page, you can export journal entries to Excel or PDF and set more bespoke criteria for your data exports.
- Go to Business overview and then select Reports.
- Then search for the Journal Report as depicted below.
Click the Customize button on the right-hand side and select the criteria for your export. Then hit Run Report.
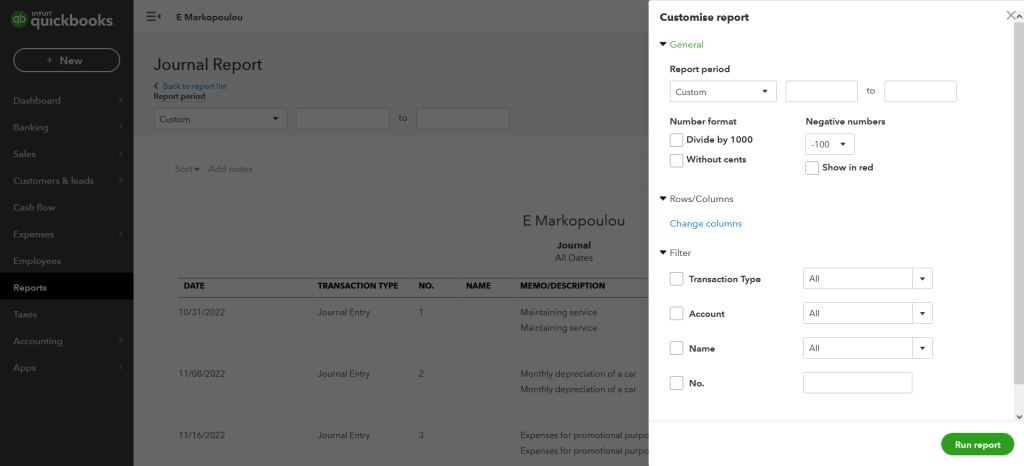
Alternatively, you can select the dates for a particular period you want to export for journal entries on the Journal Report page. In addition, you can edit the journal entries before you export them.
Select the Export icon next to the Print icon, then choose Export to Excel or Export to PDF.
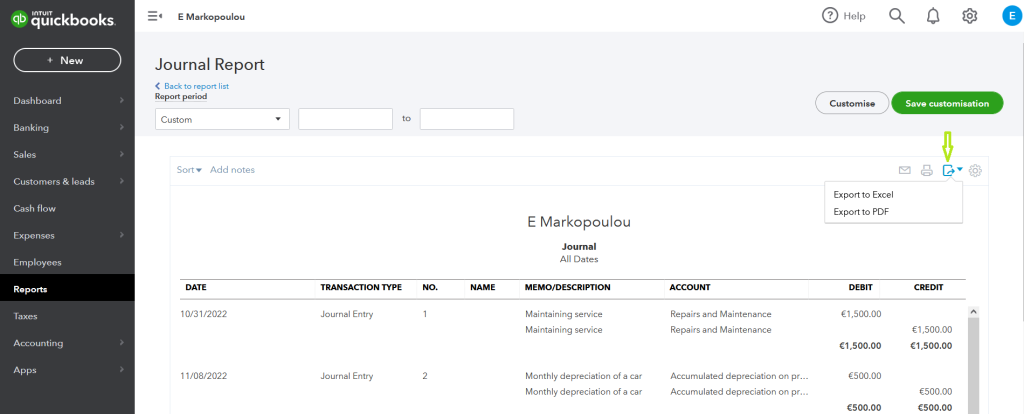
Here is what the exported data looks in Excel:
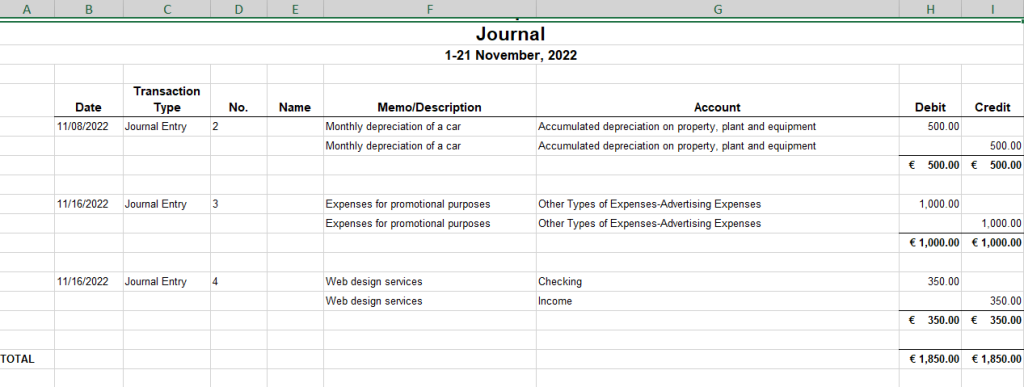
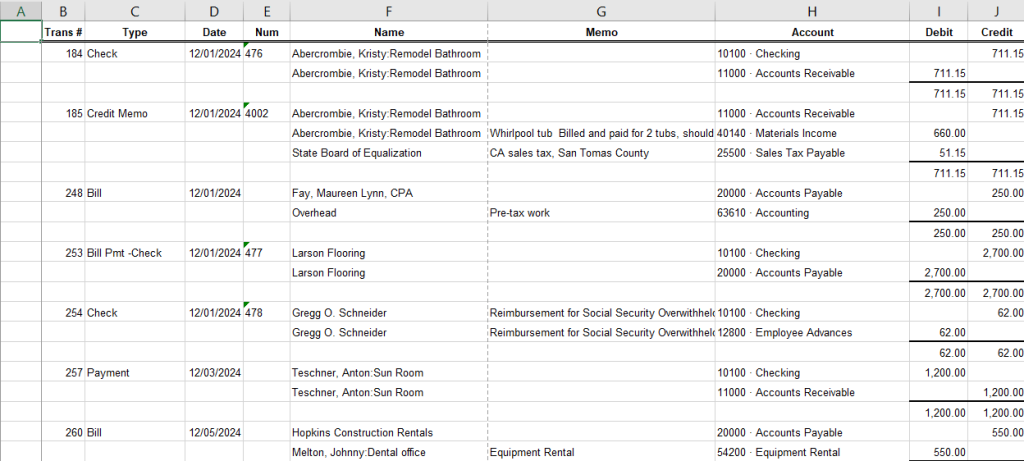
Export journal entries from QuickBooks Desktop
QuickBooks Desktop allows you to analyze journal entries in Excel. You can save reports as Excel workbooks or CSV spreadsheets.
Here is how to easily export journal entries from QuickBooks Desktop:
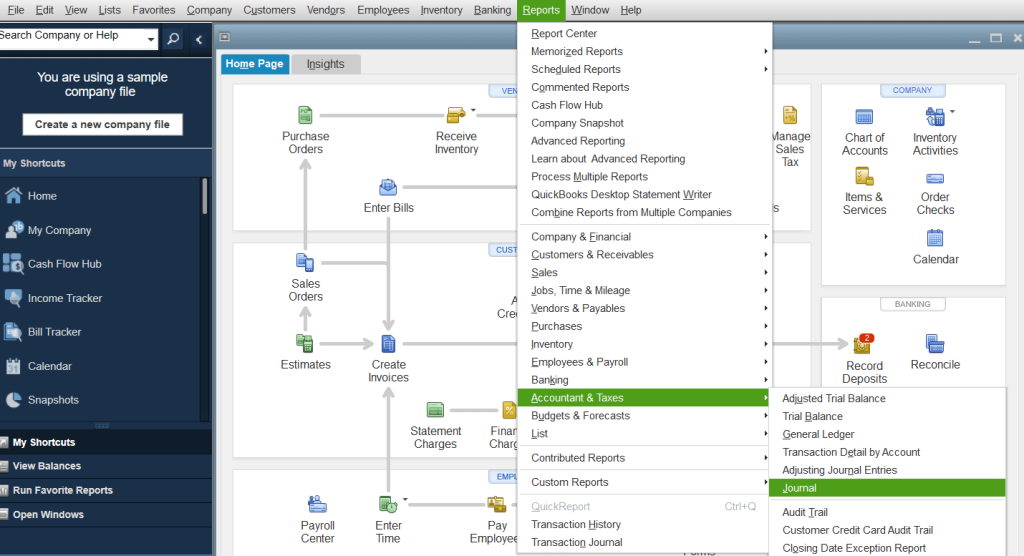
- Head to the Reports menu, and then choose the Accountant & Taxes option
- Hit the Journal option
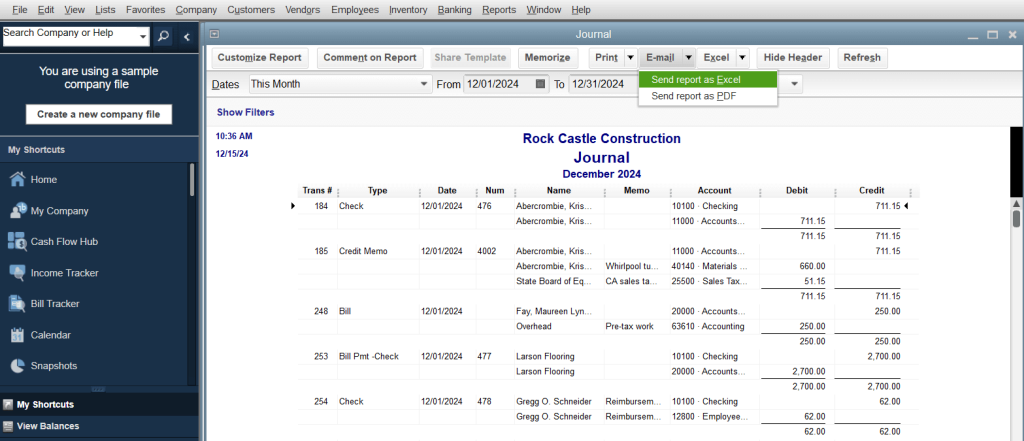
- Sort the journal entries by the Dates drop-down menu
- Click on the Excel drop-down
- Choose the Create new worksheet. Alternatively, you can update an existing worksheet, or create a comma separated values file
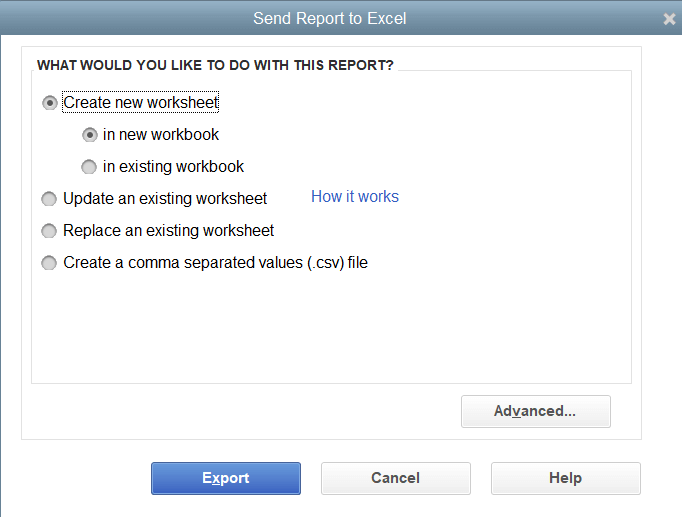
- Hit the Export button
Here is what the exported journal entries from QuickBooks Desktop will look like in Excel:
Export journal entries from QuickBooks – Recap
If you don’t keep an eye on your journal entries, you might deem that your business possesses more or less debt or be more or less profitable than it actually is. As a result, this could make you make decisions based on false information, leading to negative implications.
Journal entries offer an accurate record of all your financial transactions. But going through every transaction daily can be a hassle. With modern tools like Coupler.io, exporting journal entries frequently can be automatically executed, minimizing the potential for error.
Automate QuickBooks data export with Coupler.io
Get started for free