Mailchimp is a powerful SaaS marketing tool that collects and stores a lot of valuable data such as contact information, campaigns, and so on. Being able to easily recover the data in case of any unfortunate event is critical for business. You never know when something might go wrong, so it’s always a good idea to back up your Mailchimp data.
Whether you’re a new or regular user of Mailchimp, making sure your data is stored securely is crucial. For users, it is important to understand the difference between Mailchimp disaster recovery backup (which is maintained by Mailchimp automatically) and Mailchimp account backup.
If something happens at Mailchimp’s primary data centers, a disaster recovery backup will allow the company to restore its whole platform. However, it can’t be used to recover data for specific accounts. So, creating and updating the backup copy of Mailchimp data for individual users is their own responsibility.
In this article, we will cover the different methods you can use to back up your Mailchimp account and which one is ideal for you depending on your needs.
Mailchimp backup methods
The reality is that, apart from unpredictable events such as malicious attacks and software glitches, human errors can cause loss of data as well. Such mishaps can occur anytime – for example, you can accidentally delete an entire audience while editing a list or completely remove a subscriber from a segment. Even worse, you can lose all related historical data of a signup form if you delete a field while editing it.
The downsides of losing valuable data are significant. For this reason, implementing Mailchimp backup plans is important. When it comes to creating an account backup, you can take a couple of different approaches.
The first method is exporting different data types or all of your data directly from the Mailchimp platform. The second approach is using backup tools that automatically export the data to a secure location of your choice.
Let’s take a deeper look at both methods and understand their advantages and disadvantages.
Back up Mailchimp: native method
Mailchimp allows you to generate and save backups of your account so your data is always safe. You can export your account data, including your templates, marketing emails, and reporting information, and save it in a location other than Mailchimp. Later, if you have to recover your data, it can be re-imported from the exported file, with the exception of campaign reports.
With the native method, you can back up Mailchimp in a downloadable zip file format. The following types of data will be contained within your zip file:
- lists (including subscribed, unsubscribed, and cleaned addresses);
- campaign reports (including aggregated data for opens and clicks);
- subscriber-level campaign reports (either for the most recent 20 campaigns or for the past 60 days, whichever is higher);
- geodata for each campaign;
- HTML files for templates;
- and HTML and txt files for campaigns.
However, on top of the time and effort you need to put in to perform these manual backups, the Mailchimp backup procedure can only be carried out once every twenty-four hours.
Back up Mailchimp automatically
Automating your Mailchimp backup can provide an extra layer of protection from accidental mishaps. With automation tools, you can schedule your backups – this allows you to save your data on a consistent, regular basis to minimize the risk.
Additionally, it will help you save a substantial amount of time because you won’t have to manually go through the backup procedure each time your data is modified.
Furthermore, keeping several copies of data gives you the security of being able to automatically restore to a period before any data corruption or malicious attack occurred.
There are no significant downsides to this approach for you other than the cost of subscriptions.
Some of the popular Mailchimp backup tools are:
- Coupler.io
- ListLockr
- Skyvia
- Rewind
All of these Mailchimp backup tools offer you the convenience to schedule data transfers at your preferred time, as well as reliability and security.
Creating Mailchimp backup automatically
In this example, we will explain how to back up your Mailchimp data using Coupler.io, a reliable data analytics and automation platform.
In particular, it offers a data integration solution that can export data automatically from 70+ data sources, including Mailchimp. The solution can also automatically keep the exported information up to date, which makes it a good choice for creating and maintaining backups.
Besides this, Coupler.io provides data analytics consultancy services for advanced data management, such as building pro-level dashboards, business analytics, blending Mailchimp data with the imports from other apps, and more. This might be useful if you export data not only for backup purposes, but also for building custom reports, analyzing your metrics, and extracting actionable insights.
Now, let’s see how to create a Mailchimp backup and keep it up to date automatically with Coupler.io.
1. Extract your Mailchimp data
First, sign up to create an account on Coupler.io for free. You don’t need to provide any payment information.
Select Mailchimp as a data source and specify the preferred destination app. This can be Google Sheets, Excel, BigQuery, Looker Studio, or Power BI. At the moment, we will create a Mailchimp – Google Sheets integration.
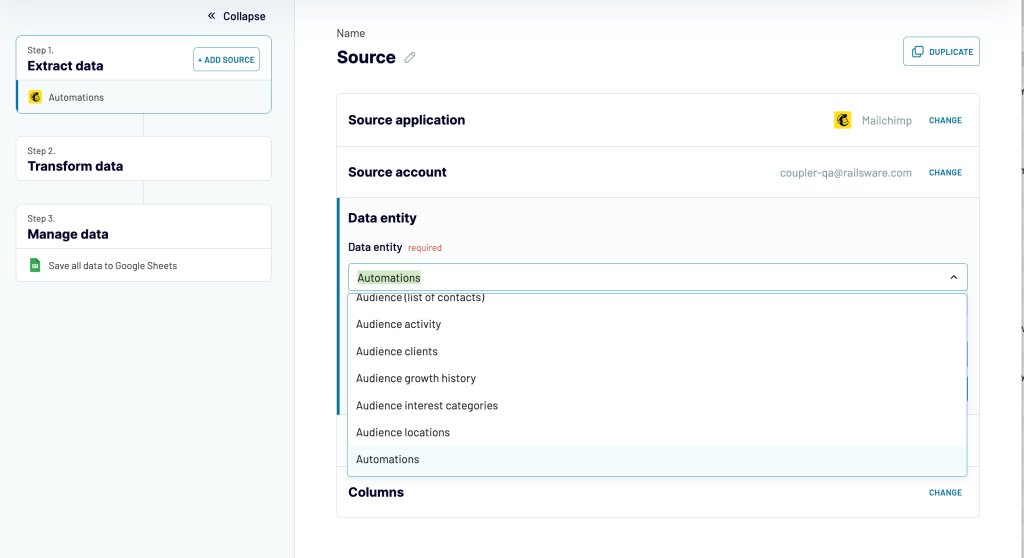
Then, you need to connect your Mailchimp account and choose the data type. You can use Coupler.io to back up various Mailchimp data entities, including campaigns, campaign reports, lists of contacts, audience lists, automations, etc.
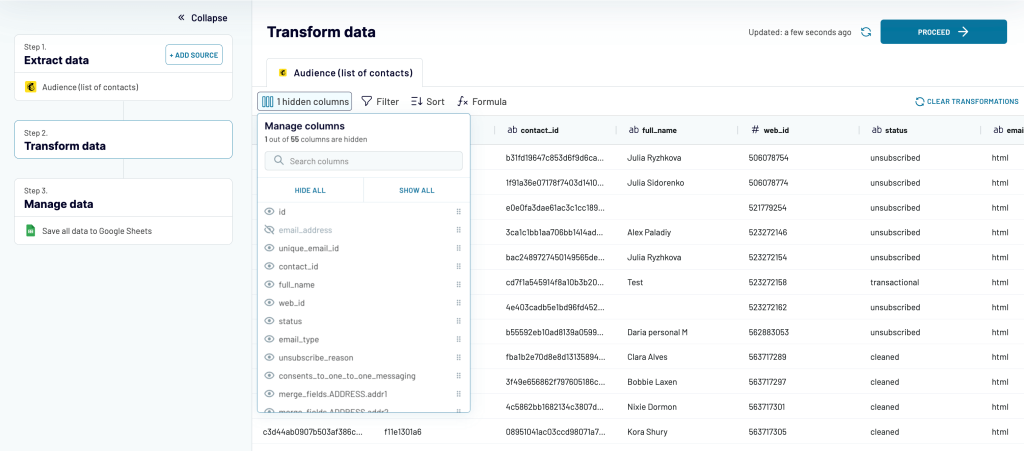
2. Preview and transform your data
Next step brings us to Coupler.io’s data transformation module. Here, you can preview your data before exporting it and make various edits and adjustments.
For instance, you can:
- Hide columns you don’t need
- Rename and rearrange columns
- Add new formula-based columns
- Filter and sort data
- Blend data from several accounts or apps
Then, connect the destination app account.
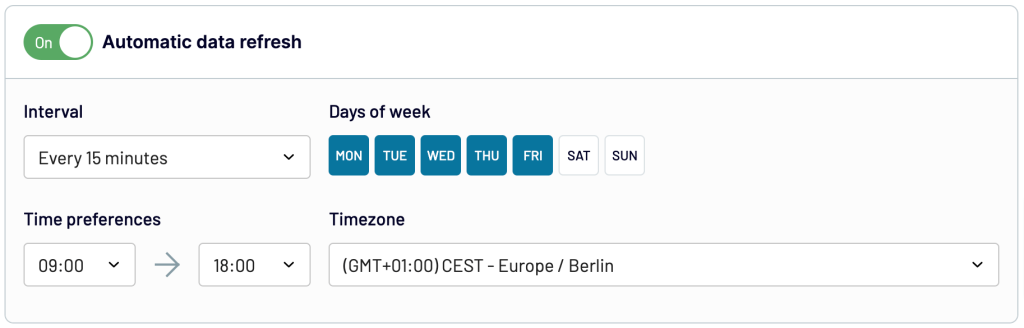
3. Schedule updates and manage your data
The last step allows you to choose how often you want the data imported and updated. With this functionality enabled, the app will automatically update your project details on the schedule you choose which is ideal for Mailchimp backup.
These instructions can also be used to transfer data from Mailchimp to Excel or to other apps.
You can see that using Coupler.io to back up Mailchimp data is far more efficient than doing it manually. With this method, you can conveniently and regularly export data such as campaigns, reports, audiences, and more.
Additionally, Coupler.io can also automatically update a spreadsheet with the latest data from your Mailchimp account. As a result of these features, you will be able to work faster and generate more extensive reports with this integration.
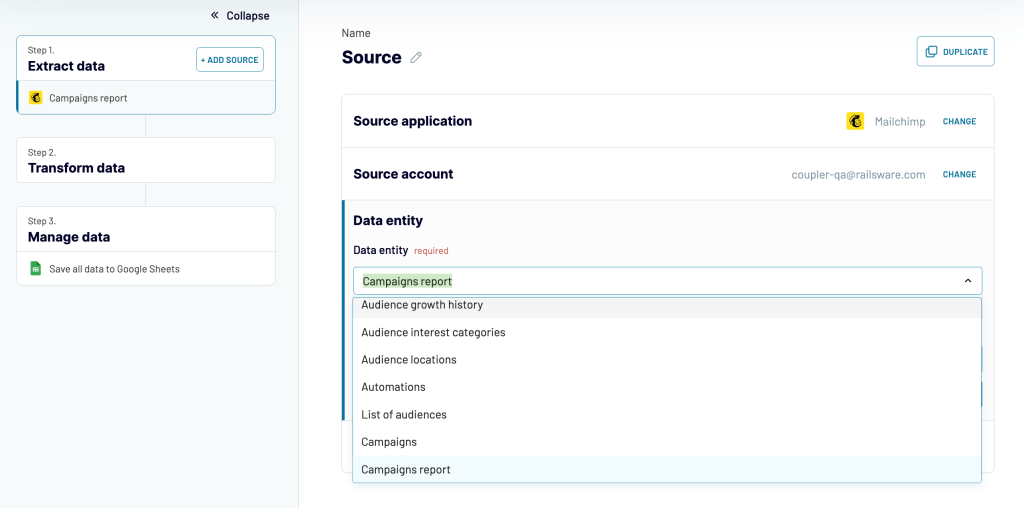
How to back up Mailchimp campaign reports
You can back up your Mailchimp Campaign reports automatically with Coupler.io. You can follow the same detailed procedure described in the section above. But, in the “Source” section, you’ll need to choose “Campaigns report” from the data entity drop-down menu.
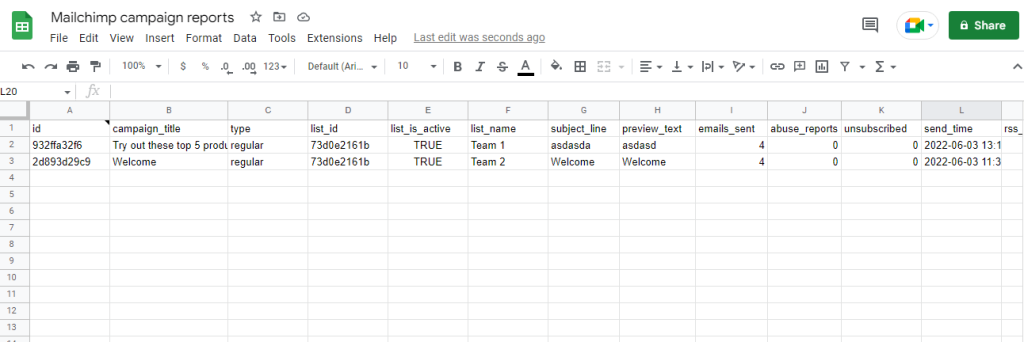
Continue with the rest of the steps explained earlier. After processing, the spreadsheet file will be filled with your campaign reports data. Here is an example of what the final result might look like.
Setting up Mailchimp backup: native method
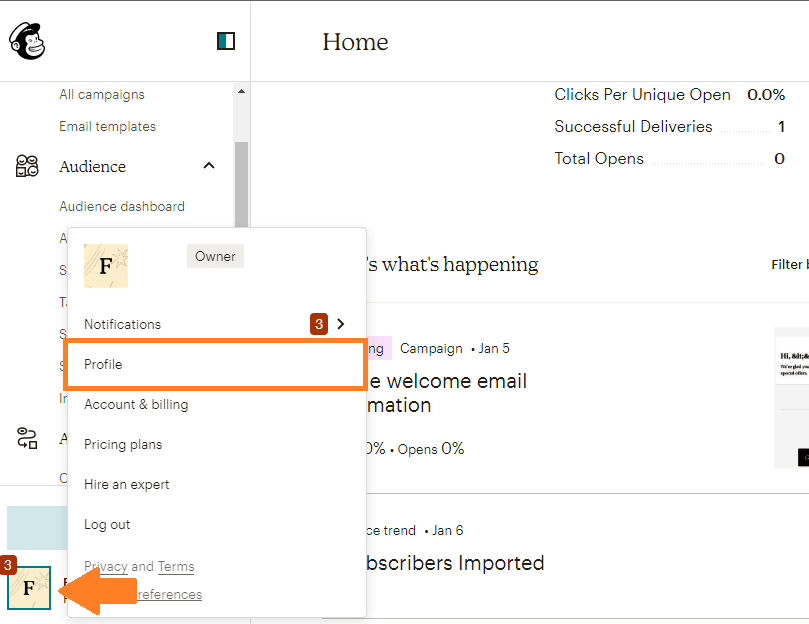
First, click on your profile picture in the bottom right corner. Then select “Profile” from the drop-down list. This will take you to the account page.
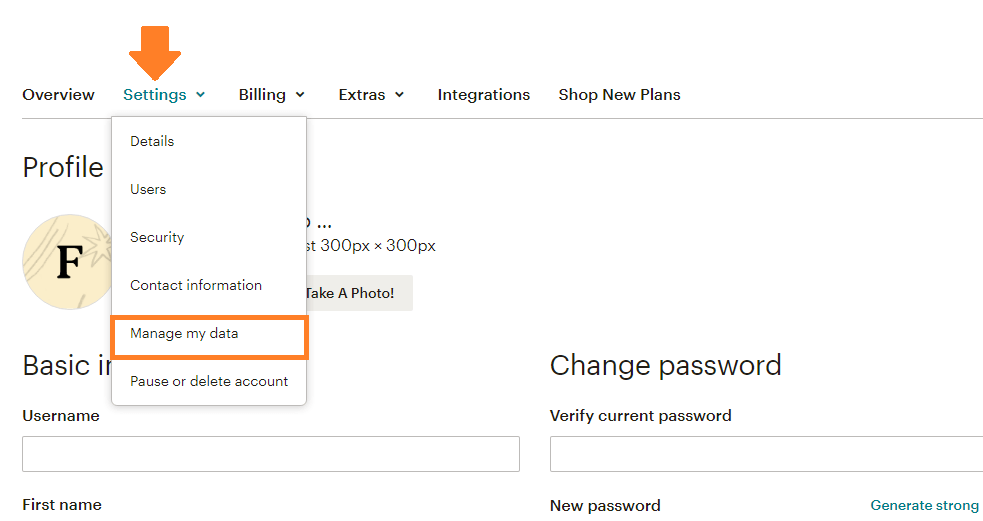
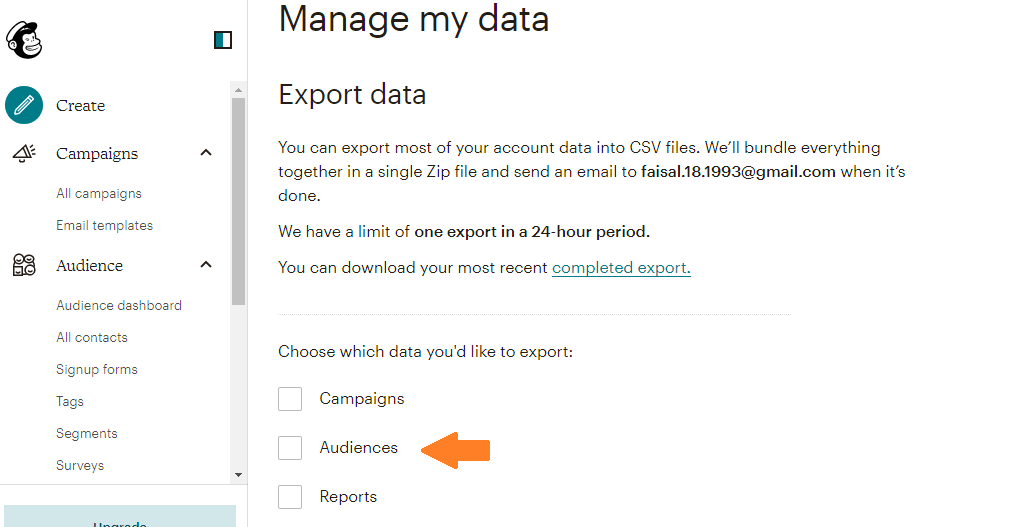
Here, click on “Settings” and then choose “Manage my data” from the drop-down menu.
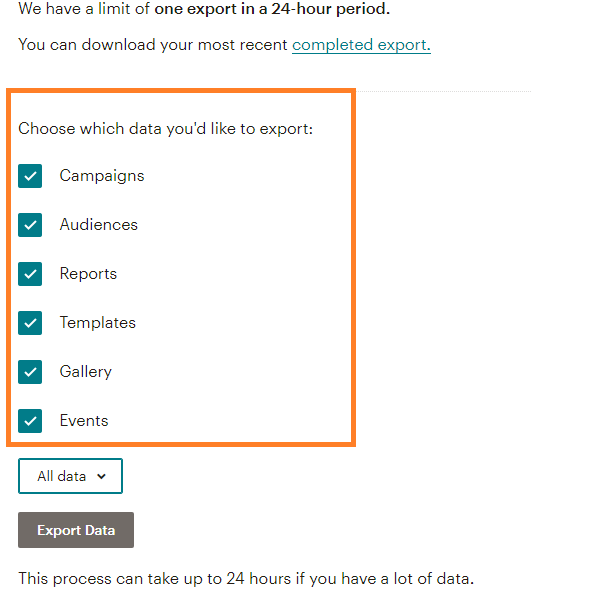
Now, select the data you want to export in your backup file by marking the checkboxes. We will be selecting all of the data entities for this example.
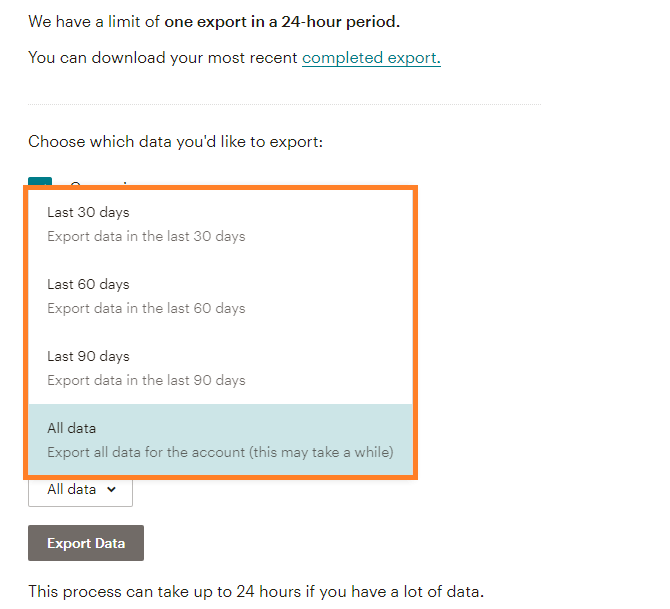
Next, click on the “All data” button and choose the time period. In this example, we’ve decided to back up all of our Mailchimp data. We’ve added options to export data from the last 30, 60, or 90 days as well.
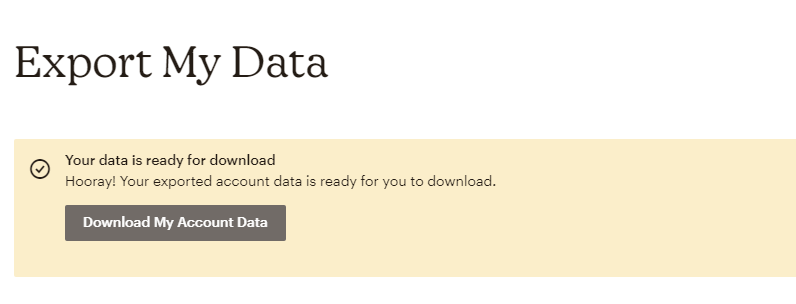
After selecting, click on “Export Data”. After processing, all your data will be bundled together in a zip file to download. When your backup file is ready, you’ll receive an email containing the link to your “Export My Data” page.
Click to navigate to the page and then click on “Download My Account Data”. Alternatively, you can also choose to download the file from your “Manage my page”.
How to back up lists in Mailchimp
If you only want to back up lists in Mailchimp, you can do so using the same methods that we described earlier. For the native method, you will need to check the “Audience” tab.
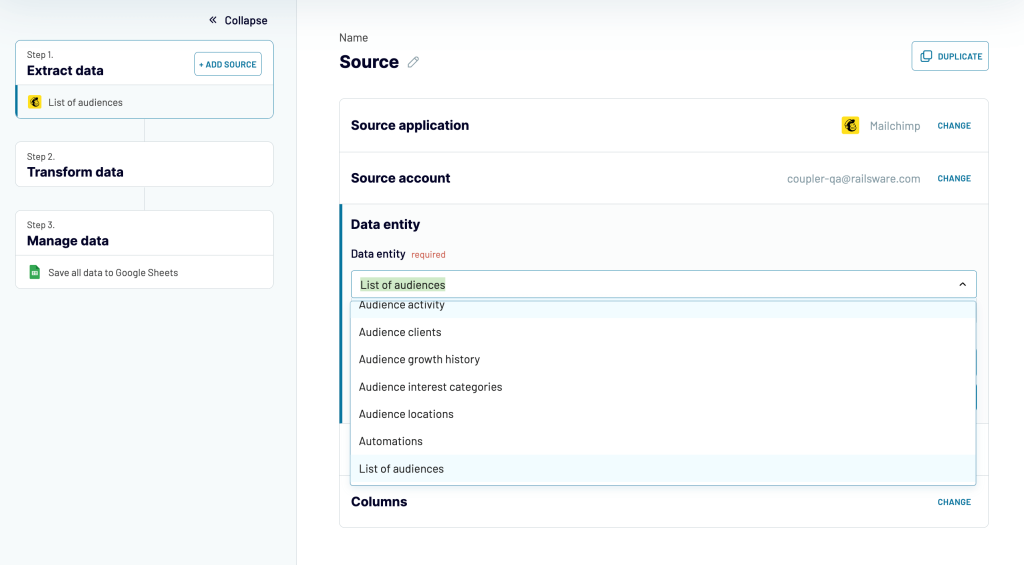
For the automated export, you can also use Coupler.io Google Sheets integration or Excel integration to back up your lists on a schedule without any manual effort. We’ve already explained how to do this in the Creating Mailchimp backup automatically section. You will just need to select the “List of audiences” data entity when setting up the importer.

How to back up Mailchimp workflow
Most of your tasks on the site will include either creating or editing a campaign or a template. Keeping numerous copies of them safe can ensure that your current marketing efforts are not lost in the event of a mishap.
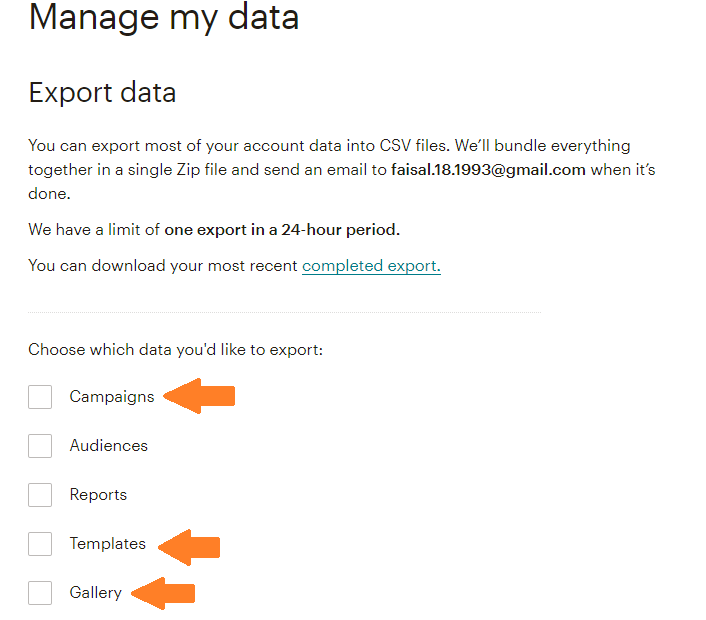
To back up your Mailchimp workflow with the native method, you will have to export three different data types (Campaign, Gallery, Templates).
Go to your “Manage my data” settings page, following the steps we described earlier. Next in the export data section, you will need to checkmark “Campaigns”, “Templates”, and “Gallery” data types and click “Export Data”.
After downloading the backup zip file, you’ll find a campaign folder containing HTML and text files for your templates and campaigns.
Now let’s see how you can back up your Mailchimp workflow with Coupler.io.
Simply select “Automation” data entity and all of the active automation data will be exported.
How to back up Mailchimp audience
There are a few different ways to back up Mailchimp audience data. If you want to back up all of your audience members, you can use the list method we explained earlier. However, if you want to back up a specific audience, you can do so using a different native method.
First, navigate to the audience dashboard. Click on the “Manage Audience” button and then select “View Audiences” from the drop-down menu.
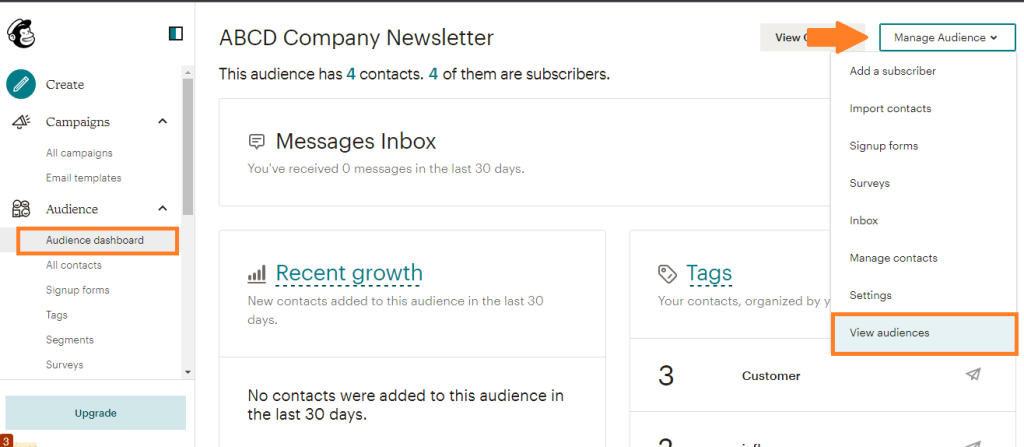
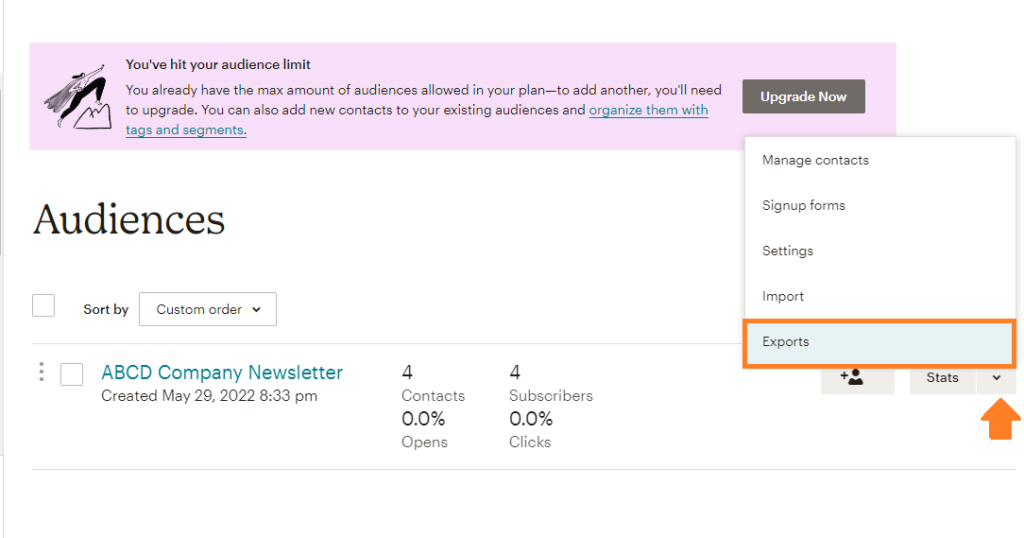
Here, you’ll see the different audience lists you’ve created. We have only one audience named “ABCD Company Newsletter” created at the moment, so we’ll only export that.
Click on the arrow icon on the right to open the drop-down menu and then click on “Exports”. This will automatically take you to the Audience export page.
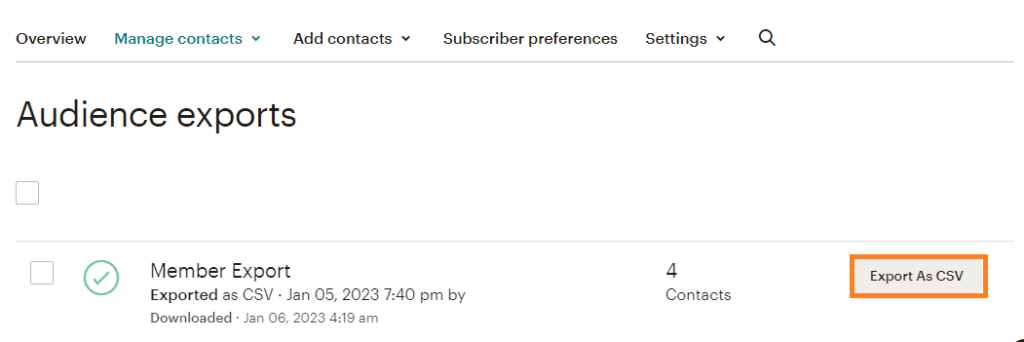
On this new page, you’ll see an “Export as CSV” button in front of the audience export you just created. Click on the button to download the backup file.
Coupler.io offers you a better alternative if you want to export the audience and related data from Mailchimp to Excel or Google Sheets more frequently. It allows you to automate this process and export different audience data entities such as audience activities, audience growth history, audience interest categories, etc., which you can use for analytical purposes as well.
How to back up Mailchimp Contacts
You have two native options when creating Mailchimp backup for contacts. The first one is to extract your contact data in the lists. We’ve already covered this method before. But if you want to back up a specific Mailchimp contact separately, you can use the second option described below.
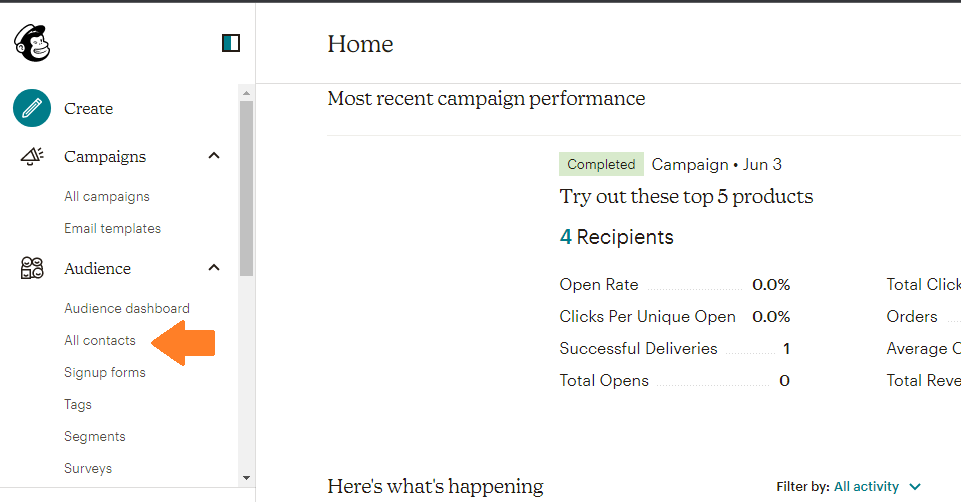
Navigate to the all contacts page from the sidebar.
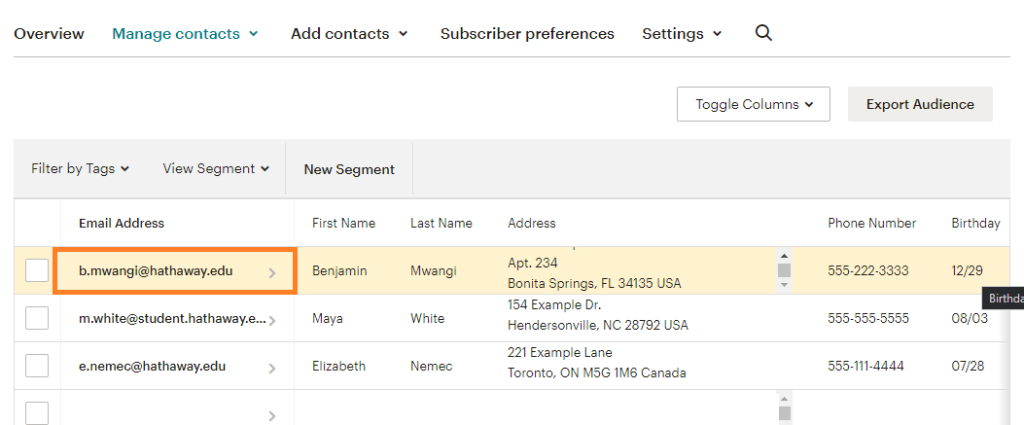
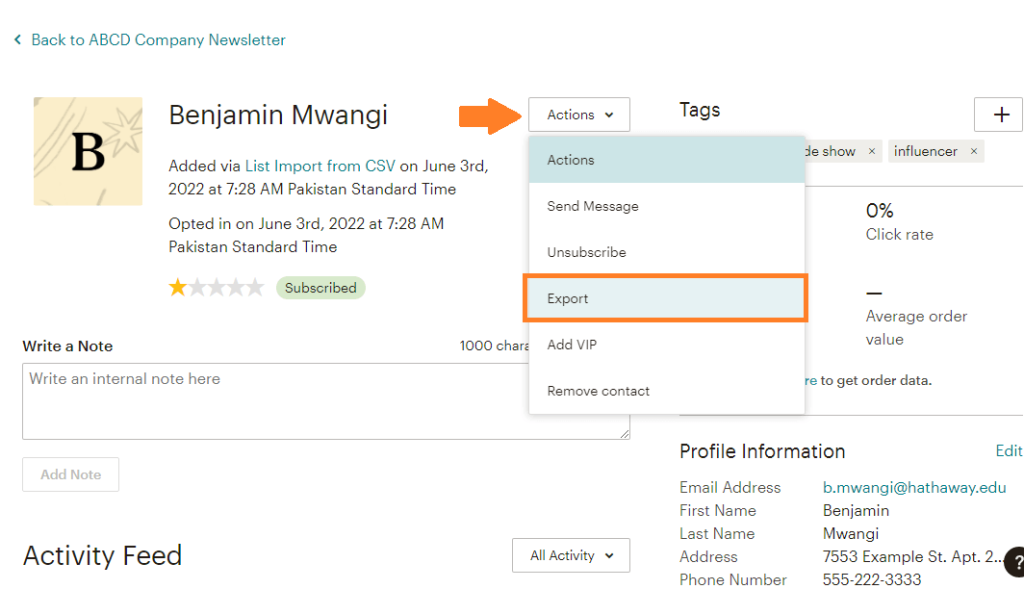
You will have your entire contact list in front of you. Now, click on the email address of the contact you want to export. This will open the contact’s profile page. Let’s back up the contact named “Benjamin” for this example.
Now we are on the contact profile page, click on the “Actions” button and select ‘Export” from the drop down menu.
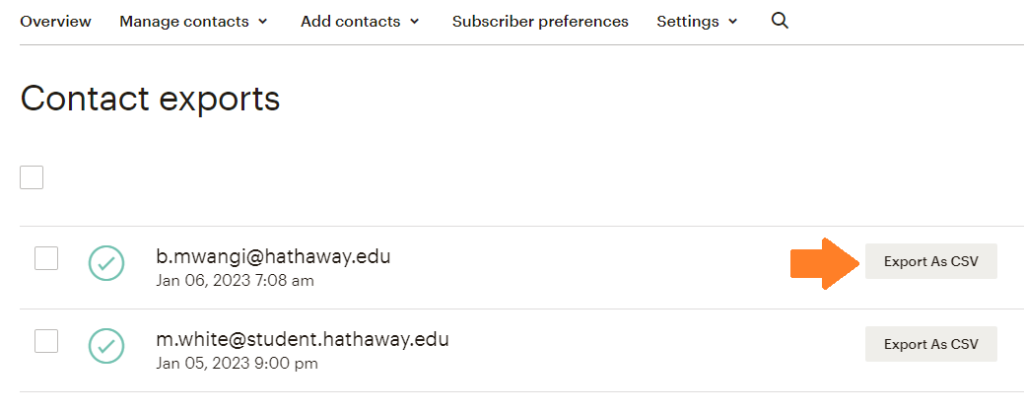
You get redirected to the contact export page where you’ll find the contact you wanted to copy. Here you will need to click on “Export as CSV,” and a zipped backup file of that contact will be downloaded to your system.
Alternatively, you have the option to automatically export all of your Mailchimp contacts with Coupler.io. To do this, you have to follow the same procedure as you did for other data entities. We’ve already explained how to do so in the previous sections.
You will only need to change the data entity to the “Audience (lists of contacts)”.

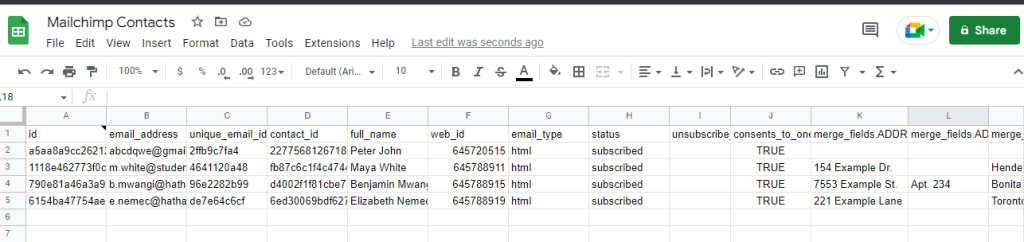
Here is an example of how your contacts will look.
Is Automating Mailchimp backup worth it?
The primary purpose of the Mailchimp backup is to keep an extra record of the data in case the original is lost. Data corruption, hostile attacks (viruses, malware), and unintentional deletion are only some of the human-caused events that can lead to unpredictable data loss. By regularly making copies of your Mailchimp data, you can help your company to bounce back from any unforeseen setback.
It is crucial to back up the data on a separate medium to avoid any loss or corruption. Automation can allow you to regularly create multiple backups for your data without putting in the time that is required with the native method.
Fortunately, you can streamline the process by using automation software, such as Coupler.io, to back up your MailChimp account. Furthermore, you’ll have the option of performing in-depth analyses of your data to gain a more nuanced comprehension of your business operations.

Automate Mailchimp data export with Coupler.io
Get started for free