If you’re a frequent Excel user, you’ve probably come across these issues: you need to merge multiple worksheets from your sales department into one master sheet to simplify your analysis. You might also want to combine multiple sales spreadsheets into a single workbook. The copy-paste feature is effective for small data sets with identical structures. But for large data sets, errors are inevitable. So what tools or commands can you use to easily merge Excel files? Read this guide to find out.
How to merge Excel sheets
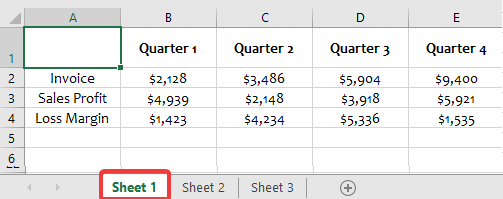
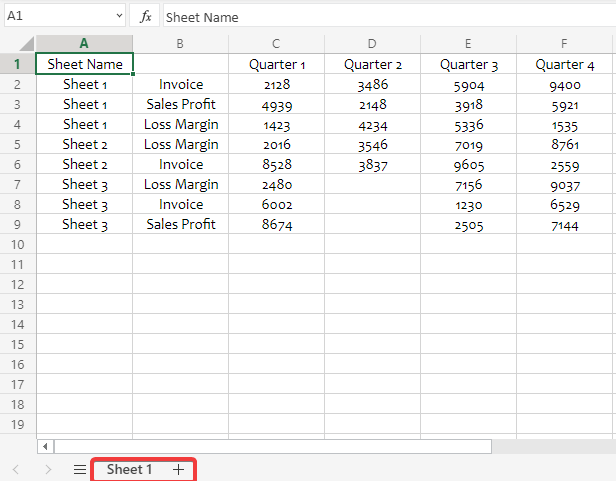
How would you merge the three Excel sheets (Sheet 1, Sheet 2, and Sheet 3) below?
Excel doesn’t actually have a built-in function to merge sheets. You can either manually copy sheets or merge them using Coupler.io. It is a reporting automation solution that can import and combine data from 60+ data sources automatically on a schedule.
Let’s see how to merge data from the above three sheets using Coupler.io.
Step 1: Collect the data
We selected the source and destination as Microsoft Excel in the form below. Click on Proceed to get started.
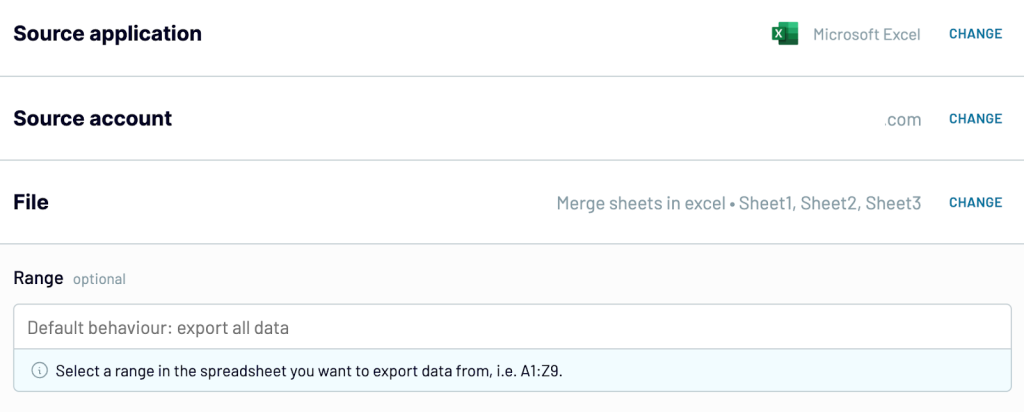
In the source settings, connect your Microsoft account, select the Excel file and the 3 sheets you want to merge.
Step 2: Transform data
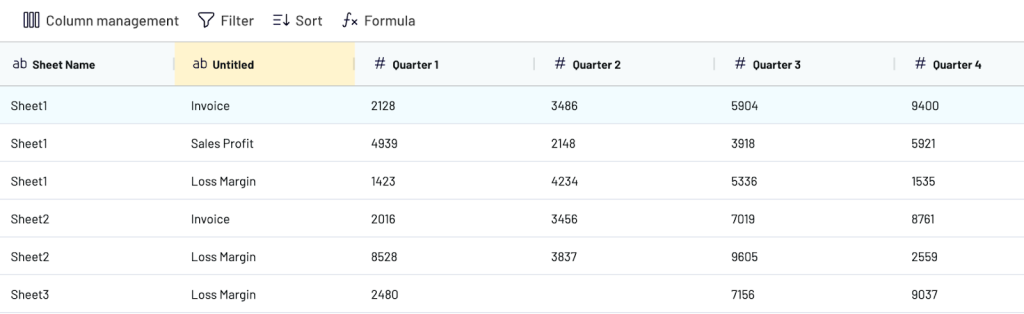
In this step, you’ll see a preview of the merged data from the 3 sheets. Additionally, you can also organize and transform your data using the following options.
- Rename, rearrange, and hide unnecessary columns
- Filter and sort your data
- Create new columns using custom formulas and calculations
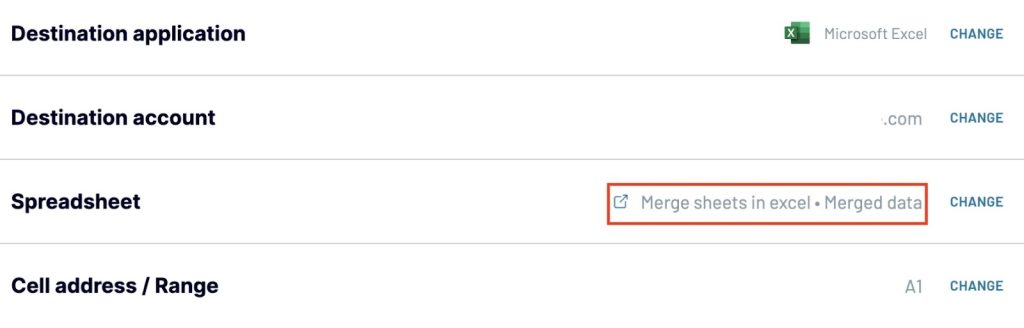
Once the data is ready, go to destination settings. Select the file and Excel spreadsheet where you want to export this combined data.
You can also send this consolidated data to other destinations like BigQuery, Looker Studio, Google Sheets, and more for further analysis and visualization. Check out more integrations with Excel.
Step 3: Schedule transfer
Toggle the Automatic data refresh button. Specify the details of the data transfer – interval, days of the week, time preferences, and timezone.

The combined data from the three sheets looks like this.
Similarly, you can also combine multiple Google Sheets into one.
Merge sheets using name patterns
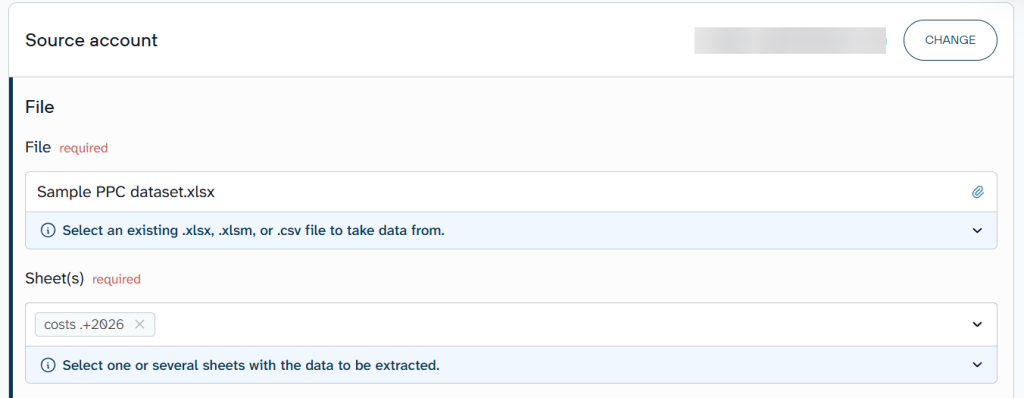
If you plan to add more worksheets over time and they follow a naming pattern, you can use a regular expression instead of selecting each sheet individually. When new sheets match your pattern, they’ll be automatically included in future imports.
For instance, let’s say you have monthly ads budget reports named costs Jan 2026, costs Feb 2026, costs Mar 2026, and so on. Rather than listing each one manually, apply the pattern {sheet-name}.+:
In this example: costs .+ 2026
You can apply regular expressions to various naming scenarios. Below are the most frequently used patterns:
Match all sheets:
- Pattern:
.*
Match sheets by year:
2021.+matches: 2021-01, 2021-02, 2021-03, etc.202.+matches: 2020-12, 2021-01, 2021-02, 2022-03, etc..*202.$matches: Dec 2020, Jan 2021, Feb 2021, All 2020, 12-2020, 01-2021
Match sheets by name prefix (starts with):
sales data.+matches all sheets with names that start with sales data
Match sheets by name content (contains):
.*sales data.*matches all sheets with names that contain sales data anywhere
Match sheets by name suffix (ends with):
.*sales datamatches all sheets with names that end with sales data
Merge Excel sheets without duplicates
Excel doesn’t provide a built-in function to merge sheets and remove duplicates in one click. However, you can either copy-paste sheets or consolidate them using Coupler.io and then use the Remove Duplicate command to remove duplicate entries.
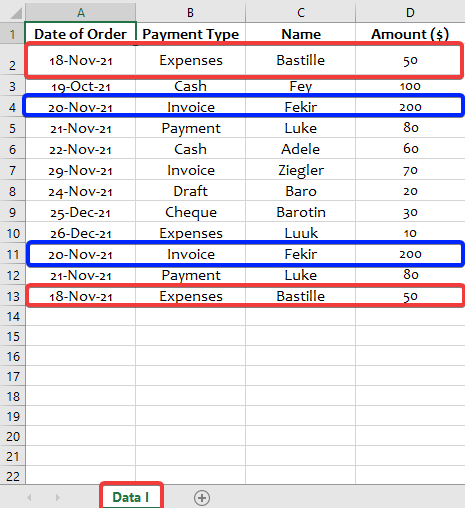
For example, let’s remove duplicate entries (that is, the red and blue cells) from the Data I sheet below.
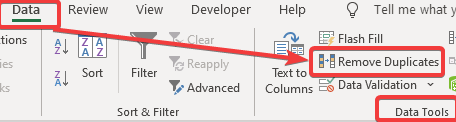
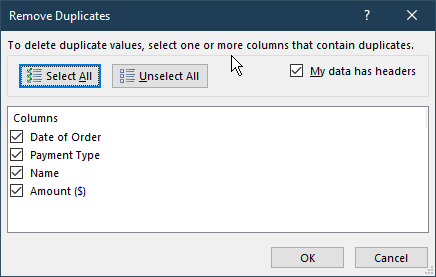
- To remove the duplicates in the merged data, go to Data tab => Data Tools => Remove Duplicates.
- In the Remove Duplicates box, untick the My data has headers option to remove duplicate headers. Then, use the Columns section to tick or untick the columns that contain duplicate values (in our case, we ticked all the columns). Click OK.
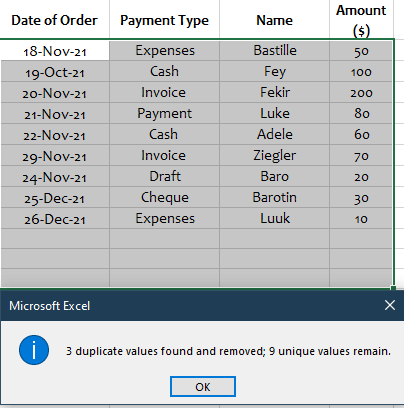
- Click OK on the box that notifies you of the number of duplicates removed. As you can see in the image below, 3 duplicate values were removed, and we’re now left with unique values.
How to merge two Excel sheets based on one column
You can do this with two methods.
- Using Coupler.io
- Using Power Query
Let’s see how these methods work and which one is best for you.
Method 1: Coupler.io
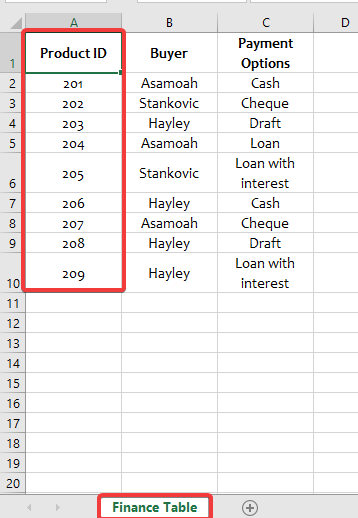
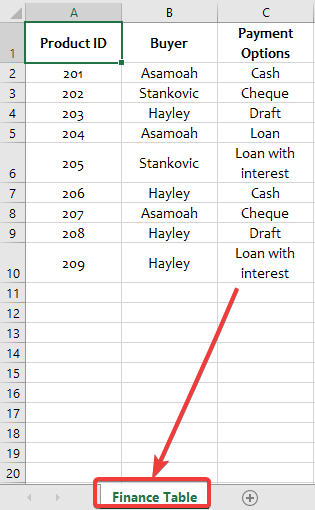
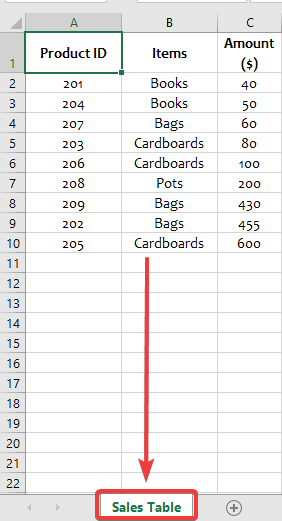
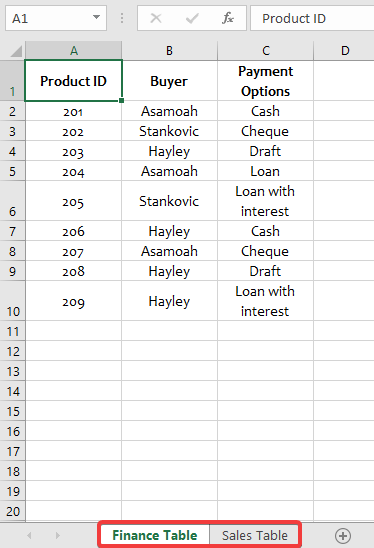
Suppose you have two Excel sheets in the same file with sheet names, Finance Table and Sales Table. You want to merge the data from these two tables based on the column ‘Product ID.’
The source and destination are preselected in the form. Click on Proceed to continue.
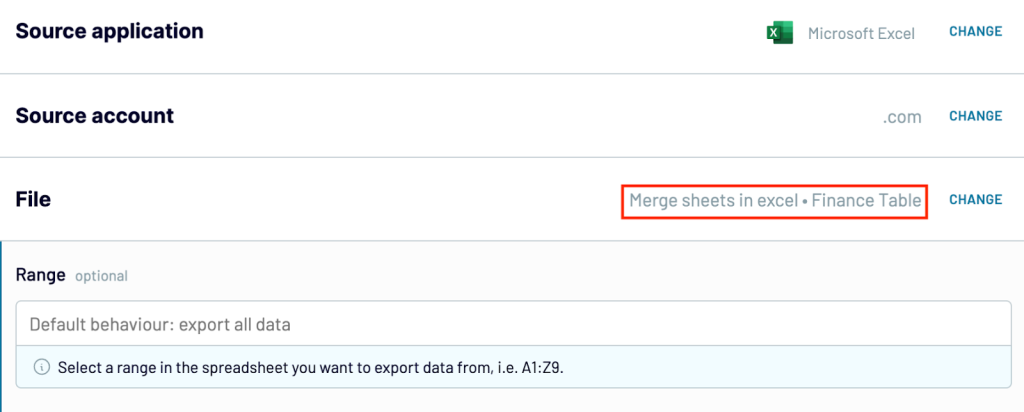
In the source settings, connect your Microsoft account, select the Excel file and the sheet you want to combine. In our case, we chose the sheet ‘Finance Table.’
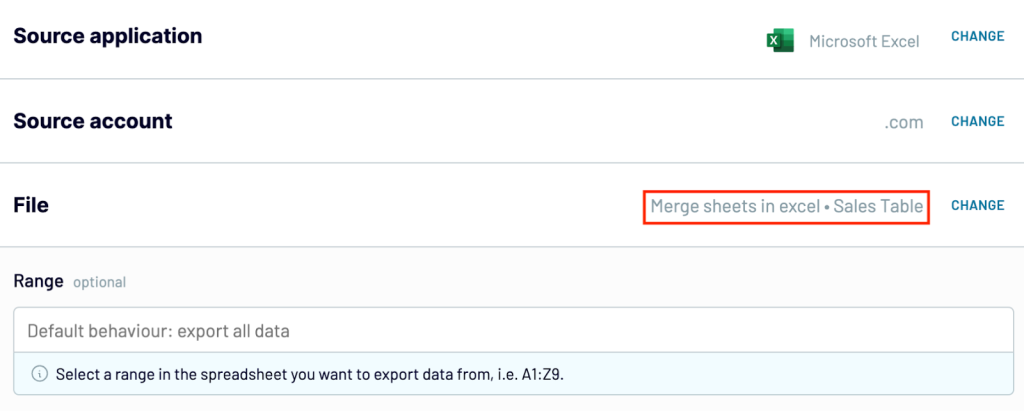
Click on Connect one more source. Select the source app as Excel, connect your account, and select the second sheet ‘Sales Table’ from your Excel file.
After connecting the Excel sheets, move on to the next step. Here, you’ll see two options.
- Append – Combine data from multiple sources with similar structures where columns are matched by name.
- Join – Merge data from multiple sources with different structures using a unique identifier column.

Select join and specify the key column as ‘Product ID’ in both sheets.
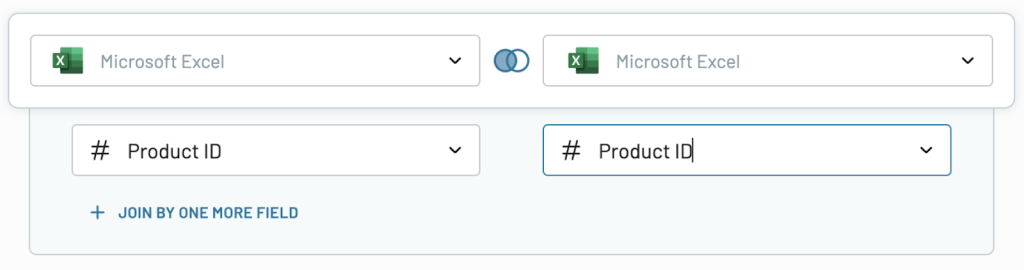
Once you proceed, you’ll see a preview of the joined data from the two Excel sheets based on the key column ‘Product ID.’
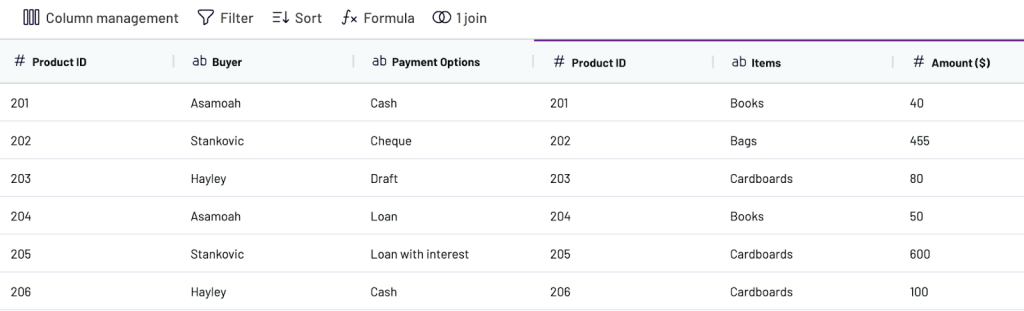
Specify where to load the data in the destination settings. Once you run the importer, you can see the merged data from two sheets (Finance table and Sales table) based on the column ‘Product ID.’
Method 2: Power Query
You can use Power Query to merge Excel sheets based on a common column. Power Query is available as a free add-in on Excel 2010 and 2013, while it’s a built-in feature from Excel 2016 onward.
Let’s merge two sheets (Finance Table and Sales Table) with a matching column (Product ID) as seen in the screenshots below:

Step 1: Create Power Query connections
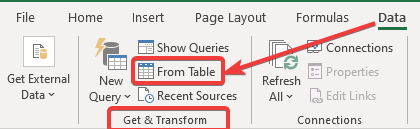
- Before merging our sheets, we need to create separate Power Query connections for our Finance Table and Sales Table sheets. Let’s start with the Sales Table sheet. Select the cell you want to merge. On your Data tab, go to the Get & Transform section and click From Table.
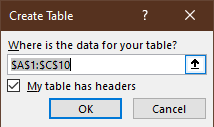
- From the subsequent Create Table box, tick or untick My table has headers. For this tutorial, we’ll leave it ticked because our Table has headers. Then click OK.
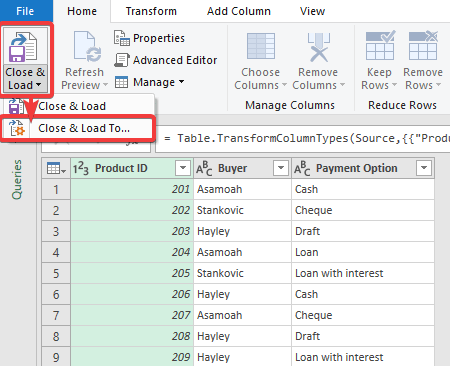
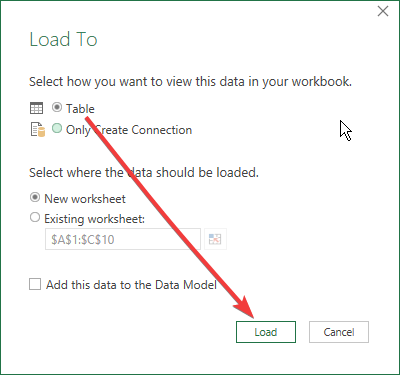
- From the resulting Power Query Editor, click on Close and Load. Select Close and Load To… from the drop-down list.
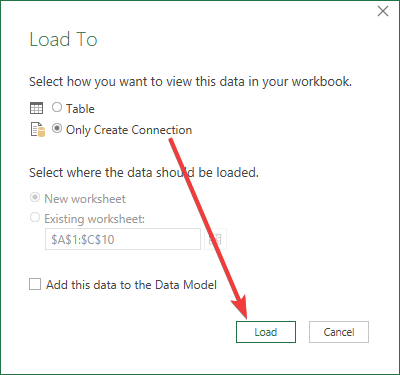
- From the Load To dialog box, select Only Create Connection. Click Load.
- A Workbook Queries box will open on the right-hand side of your Excel workbooks with the name of your table/range. Repeat the same process for other tables (in this case, Finance Table).
- After creating a separate connection for the Finance Table sheet, the Workbook Queries box should contain both connections as shown below:

Step 2: Merge the sheets
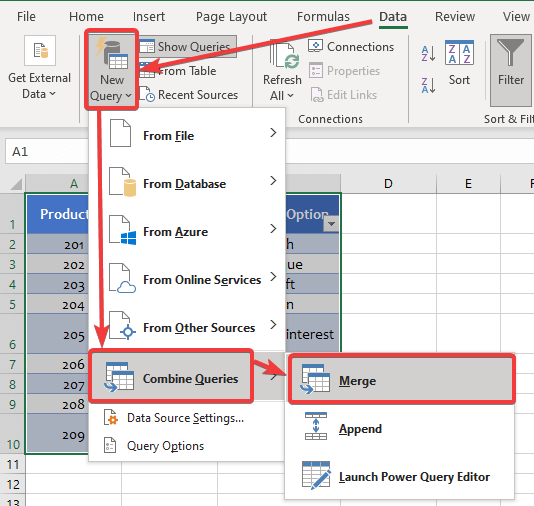
Select a sheet, go to Data => New Query => Combined Queries => Merge as shown in the screenshot below:
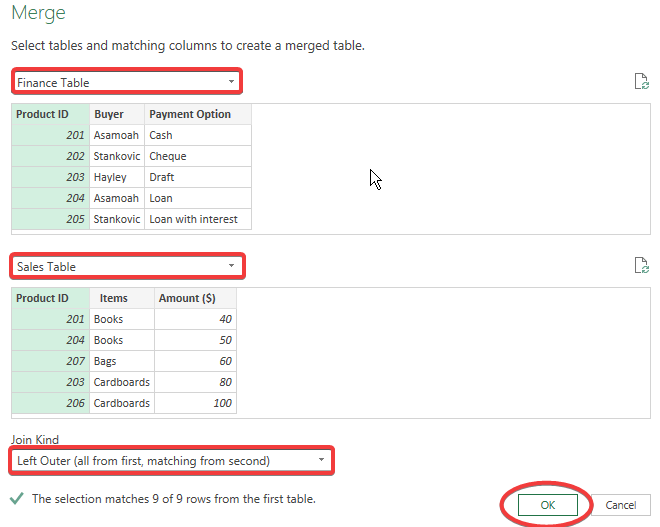
- In the Merge box, add Finance Table and Sales Table to the first and second drop-down lists, respectively. In both tables, select the matching column (in this case, Product ID). Once you select the matching column, it’ll turn green.
- In the Join kind box, leave the default option as is. Click Ok.
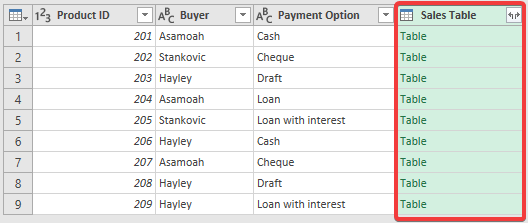
After completing the Merge steps, the Power Query Editor will add an extra column (Sales Table). But the extra column contains only Table. In the next steps, we’ll show you how to fix it.
Step 3: Fill-up the Sales Table
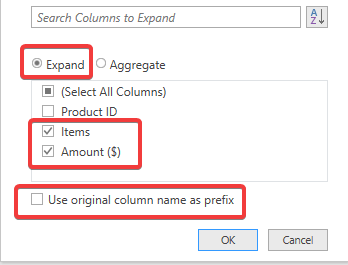
- Click on the two-sided arrow beside the Sales Table. From the subsequent dialogue box, select the column(s) you want to copy from your second table (in this case, Sales Table).

- From the dialogue box shown below, keep the Expand box ticked. Select the column(s) you want to add from the second table. In our case, we selected Items and Amount ($). Untick the Use original column name as prefix box if you don’t want the column to be prefixed with the table name where it’s derived from. Click OK.
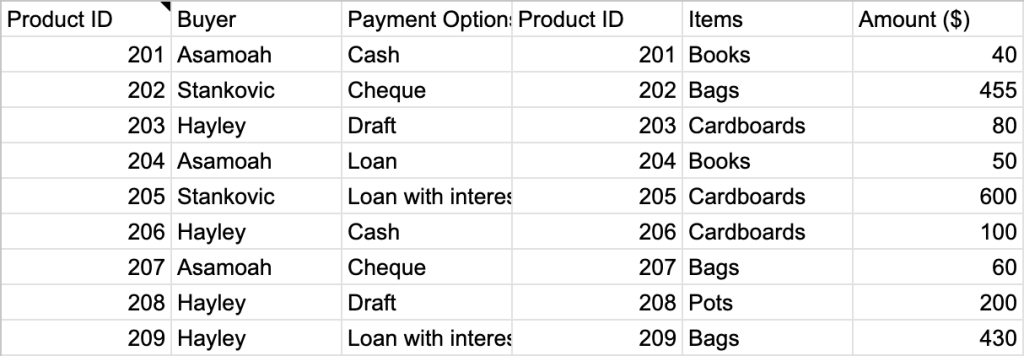
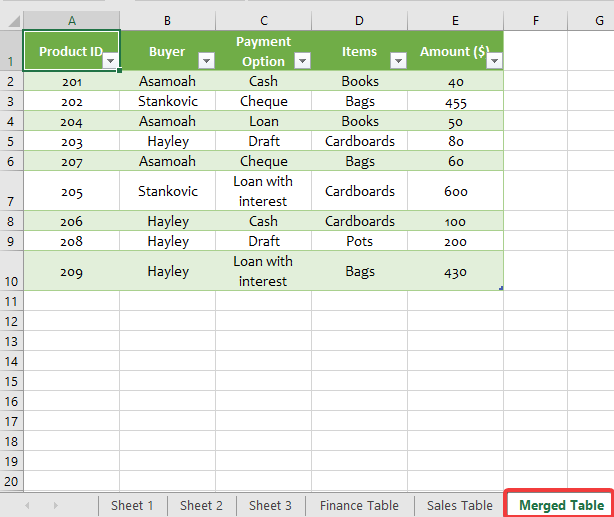
After merging, your new table will contain records from both tables.

Step 4: Import the merged data to Excel
- On the Power Query Editor box, select Close and Load To… from the Close and Load drop-down list. From the Load To box, click on Table and choose whether to save your table as a New worksheet or an Existing worksheet (we saved the table as a new worksheet). Then click Load.
In Excel, our merged table will appear this way in a single sheet:
Merge Excel sheets from different files
Merging sheets from different files can be quite tricky, especially when you’re dealing with large data sets. This is where Excel macros come into play. Macros are codes used to automate tasks in Excel. The Visual Basic for Applications (VBA) is one way to generate Excel macros. For instance, we’re going to use the VBA code to merge sheets from different Excel files.
For ease of access, we advise that you compile your Excel files into the same folder. Here are snapshots of the Excel files we’ll be merging.
Step 1: Insert macro to workbook
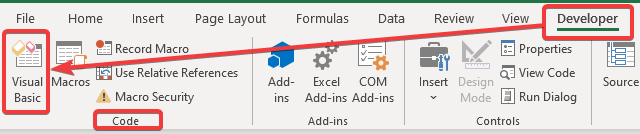
- On your new workbook, Go to the Developer tab => Code => Visual Basic to open the Visual Basic Editor (VBE). Alternatively, you can use Alt + F11 on Windows (or Fn + Opt + F11 if you use Mac), to open the VBE.
- Once the VBE box opens, right-click on the worksheet you want to merge and insert the following code:
Sub mergeFiles()
    'Merges all files in a folder to a main file.

    'Define variables:
    Dim numberOfFilesChosen, i As Integer
    Dim tempFileDialog As FileDialog
    Dim mainWorkbook, sourceWorkbook As Workbook
    Dim tempWorkSheet As Worksheet

    Set mainWorkbook = Application.ActiveWorkbook
    Set tempFileDialog = Application.FileDialog(msoFileDialogFilePicker)

    'Allow the user to select multiple workbooks
    tempFileDialog.AllowMultiSelect = True

    numberOfFilesChosen = tempFileDialog.Show

    'Loop through all selected workbooks
    For i = 1 To tempFileDialog.SelectedItems.Count

        'Open each workbook
        Workbooks.Open tempFileDialog.SelectedItems(i)

        Set sourceWorkbook = ActiveWorkbook

        'Copy each worksheet to the end of the main workbook
        For Each tempWorkSheet In sourceWorkbook.Worksheets
            tempWorkSheet.Copy after:=mainWorkbook.Sheets(mainWorkbook.Worksheets.Count)
        Next tempWorkSheet

        'Close the source workbook
        sourceWorkbook.Close
    Next i

End Sub
- To run your macro, select the Run/Sub Userform (F5) on the code window as shown in the image below. Alternatively, press F5.

- From the desktop explorer, select the Excel files that you want to combine your sheets from. For this tutorial, we decided to compile our Excel files (Finance Table and Sales Table) into the same folder (Personal Library). Then click Open.

We’ve successfully merged Excel sheets from different Excel files into a new workbook.
Using VBA to merge multiple sheets is not a walk in the park. Therefore, you can always use Coupler.io to do this. It lets you merge data from different files without coding and organize data on the go.
What’s the best option?
Excel macros are perfect for merging Excel sheets from different files for users who know how to code. All you need to do is write the proper piece of code and run it on demand. Power Query is also quite useful to merge Excel sheets with common columns.
But if writing code is not your cup of tea and you do not want to juggle between different tools to merge Excel sheets, then Coupler.io is your all-in-one no-code solution. You combine multiple Excel files and sheets automatically on a custom schedule.
Lastly, before choosing a merging option in Excel, ensure you consider the structure, content, and volume of your data. Now, go on and Excel! ?