How to Connect GA4 with Google Data Studio (Looker Studio)

One of the significant changes in GA4 is the revamped reports, where metrics like bounce rate and behavior metrics are removed. And these changes can be a huge blocker for those who rely on Google Analytics reports alone to analyze their website/app performance.
Luckily, Google Data Studio (formerly Looker Studio) can be a valuable tool in overcoming your reporting challenges. All you need to do is connect Google Analytics 4 with Looker Studio to customize your reports with better visualization options and make data-driven decisions for your business.
Methods to connect GA4 with Google Data Studio (Looker Studio)
There are primarily two ways to connect Google Analytics 4 with Looker Studio – Looker Studio’s built-in connector and partner connectors. Let’s take a closer look at each option to understand their pros and cons so you can make an informed decision.
1. Looker Studio built-in connector
This is the most direct way to connect GA4 with Looker Studio. You just need to select the Google Analytics connector from the data source menu, authorize Looker Studio to access your GA4 account, and select the property and view that you want to connect.
While it is easy and free to use, Looker Studio slows down when you add several data sources or create calculated fields, as it needs to run multiple operations to return the data for dashboards. As a result, creating cross-channel dashboards and calculating custom metrics on Looker Studio’s side can be difficult with this method.
2. Partner connectors
Partner Looker Studio connectors are a good option to overcome the above-mentioned limitations of the free Looker Studio built-in connector. Coupler.io, Piwik Pro, and Two Minute Reports are some of the third-party solutions available.
These connectors are excellent as they let you integrate with many apps, as well as blend and transform data before transferring it to Looker Studio. Moreover, they also make debugging easier than with a built-in Looker Studio connector. Even though partner connectors come with a monthly subscription cost, they are worth considering if you want to expand the functionality.
How to connect GA4 with Looker Studio using the partner connector by Coupler.io
Coupler.io is an all-in-one data integration platform and AI analytics to turn raw data into insightful reports. It lets you seamlessly connect Google Analytics 4 with Looker Studio and create custom GA reports for clients. Only three steps are required.
Step 1. Extract your GA4 data
Click Proceed in the form below with the preselected source (Google Analytics 4) and destination (Looker Studio) apps. You’ll be offered to create a Coupler.io account for free.
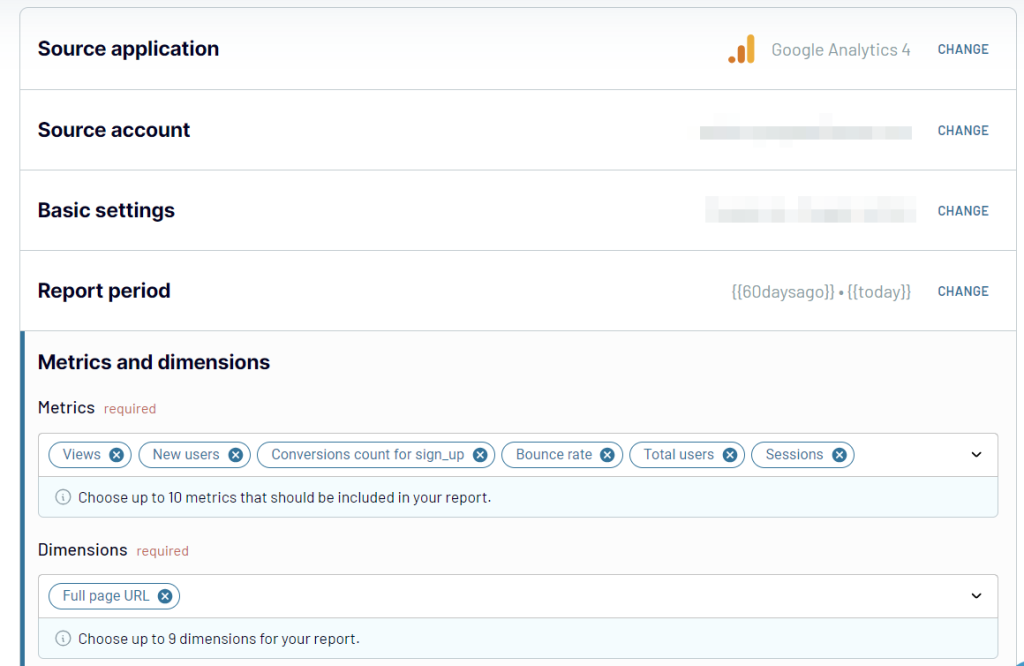
Then, follow the wizard instructions to connect your GA4 account and specify data types you want to extract. In particular, you can specify such parameters as:
- Dimensions – You can choose up to 9 dimensions to include in the report, like ad source, interests, etc.
- Metrics – You can choose up to 10 metrics like active users, ad costs, CPA, etc.
- Report period – As this is an auto-updating report, fixed dates would not work for setup as a filter. You can use macros in Coupler.io imports.
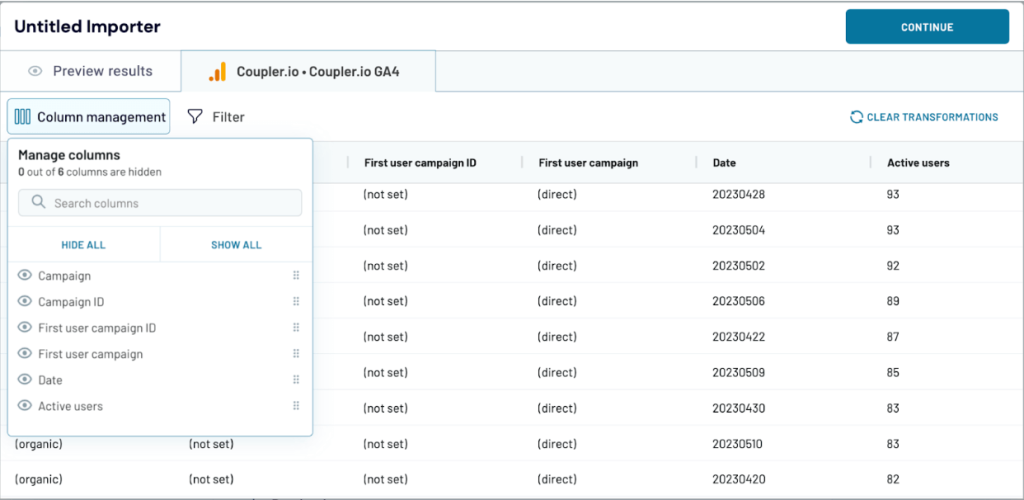
Step 2. Preview and transform your GA4 data
Coupler.io lets you view and transform the GA4 data before it is loaded to Looker Studio. You can rename, rearrange, and merge columns, as well as hide the columns you don’t need, add new ones, and even calculate custom metrics for them. It’s also possible to sort and filter your data, as well as combine data from several GA4 accounts or several ad apps into one dataset. All this allows you to send to Looker Studio clean, analysis-ready data.
Step 3. Load data and schedule refresh
Once your GA4 report is ready, follow the instructions to connect Looker Studio and load data.
Now, let’s set up a schedule for automated updates. You can select your preferred update interval, from once per month to every 15 minutes.
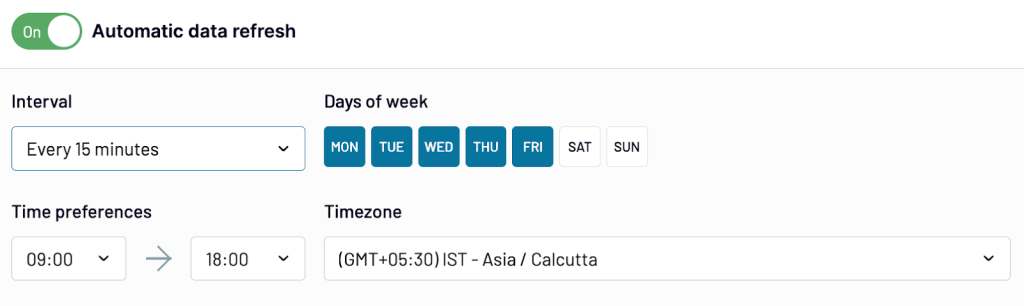
Click Save and Run to finish the setup of the connection between Google Analytics 4 and Looker Studio.
Now, you can start working with your data in Looker Studio and build your custom data visualization. It’s also recommended to check out the ready-to-use report templates for Google Analytics by Coupler.io.
Ready-to-use report templates for Google Analytics in Looker Studio
You can use GA4 report templates by Coupler.io for free and avoid the need to build reports from scratch. Simply connect your data source using the built-in Looker Studio connector and the report will be populated with your data. Check out the templates designed for Google Analytics 4 data in Looker Studio.
Web analytics report
This web analytics dashboard template pulls data from GA4 and presents your website’s traffic, engagement, and user activity in a single-page layout. It lets you compare acquisition channels on volume and engagement quality, monitor key event completion rates, identify your strongest geographic markets, and evaluate landing page performance.
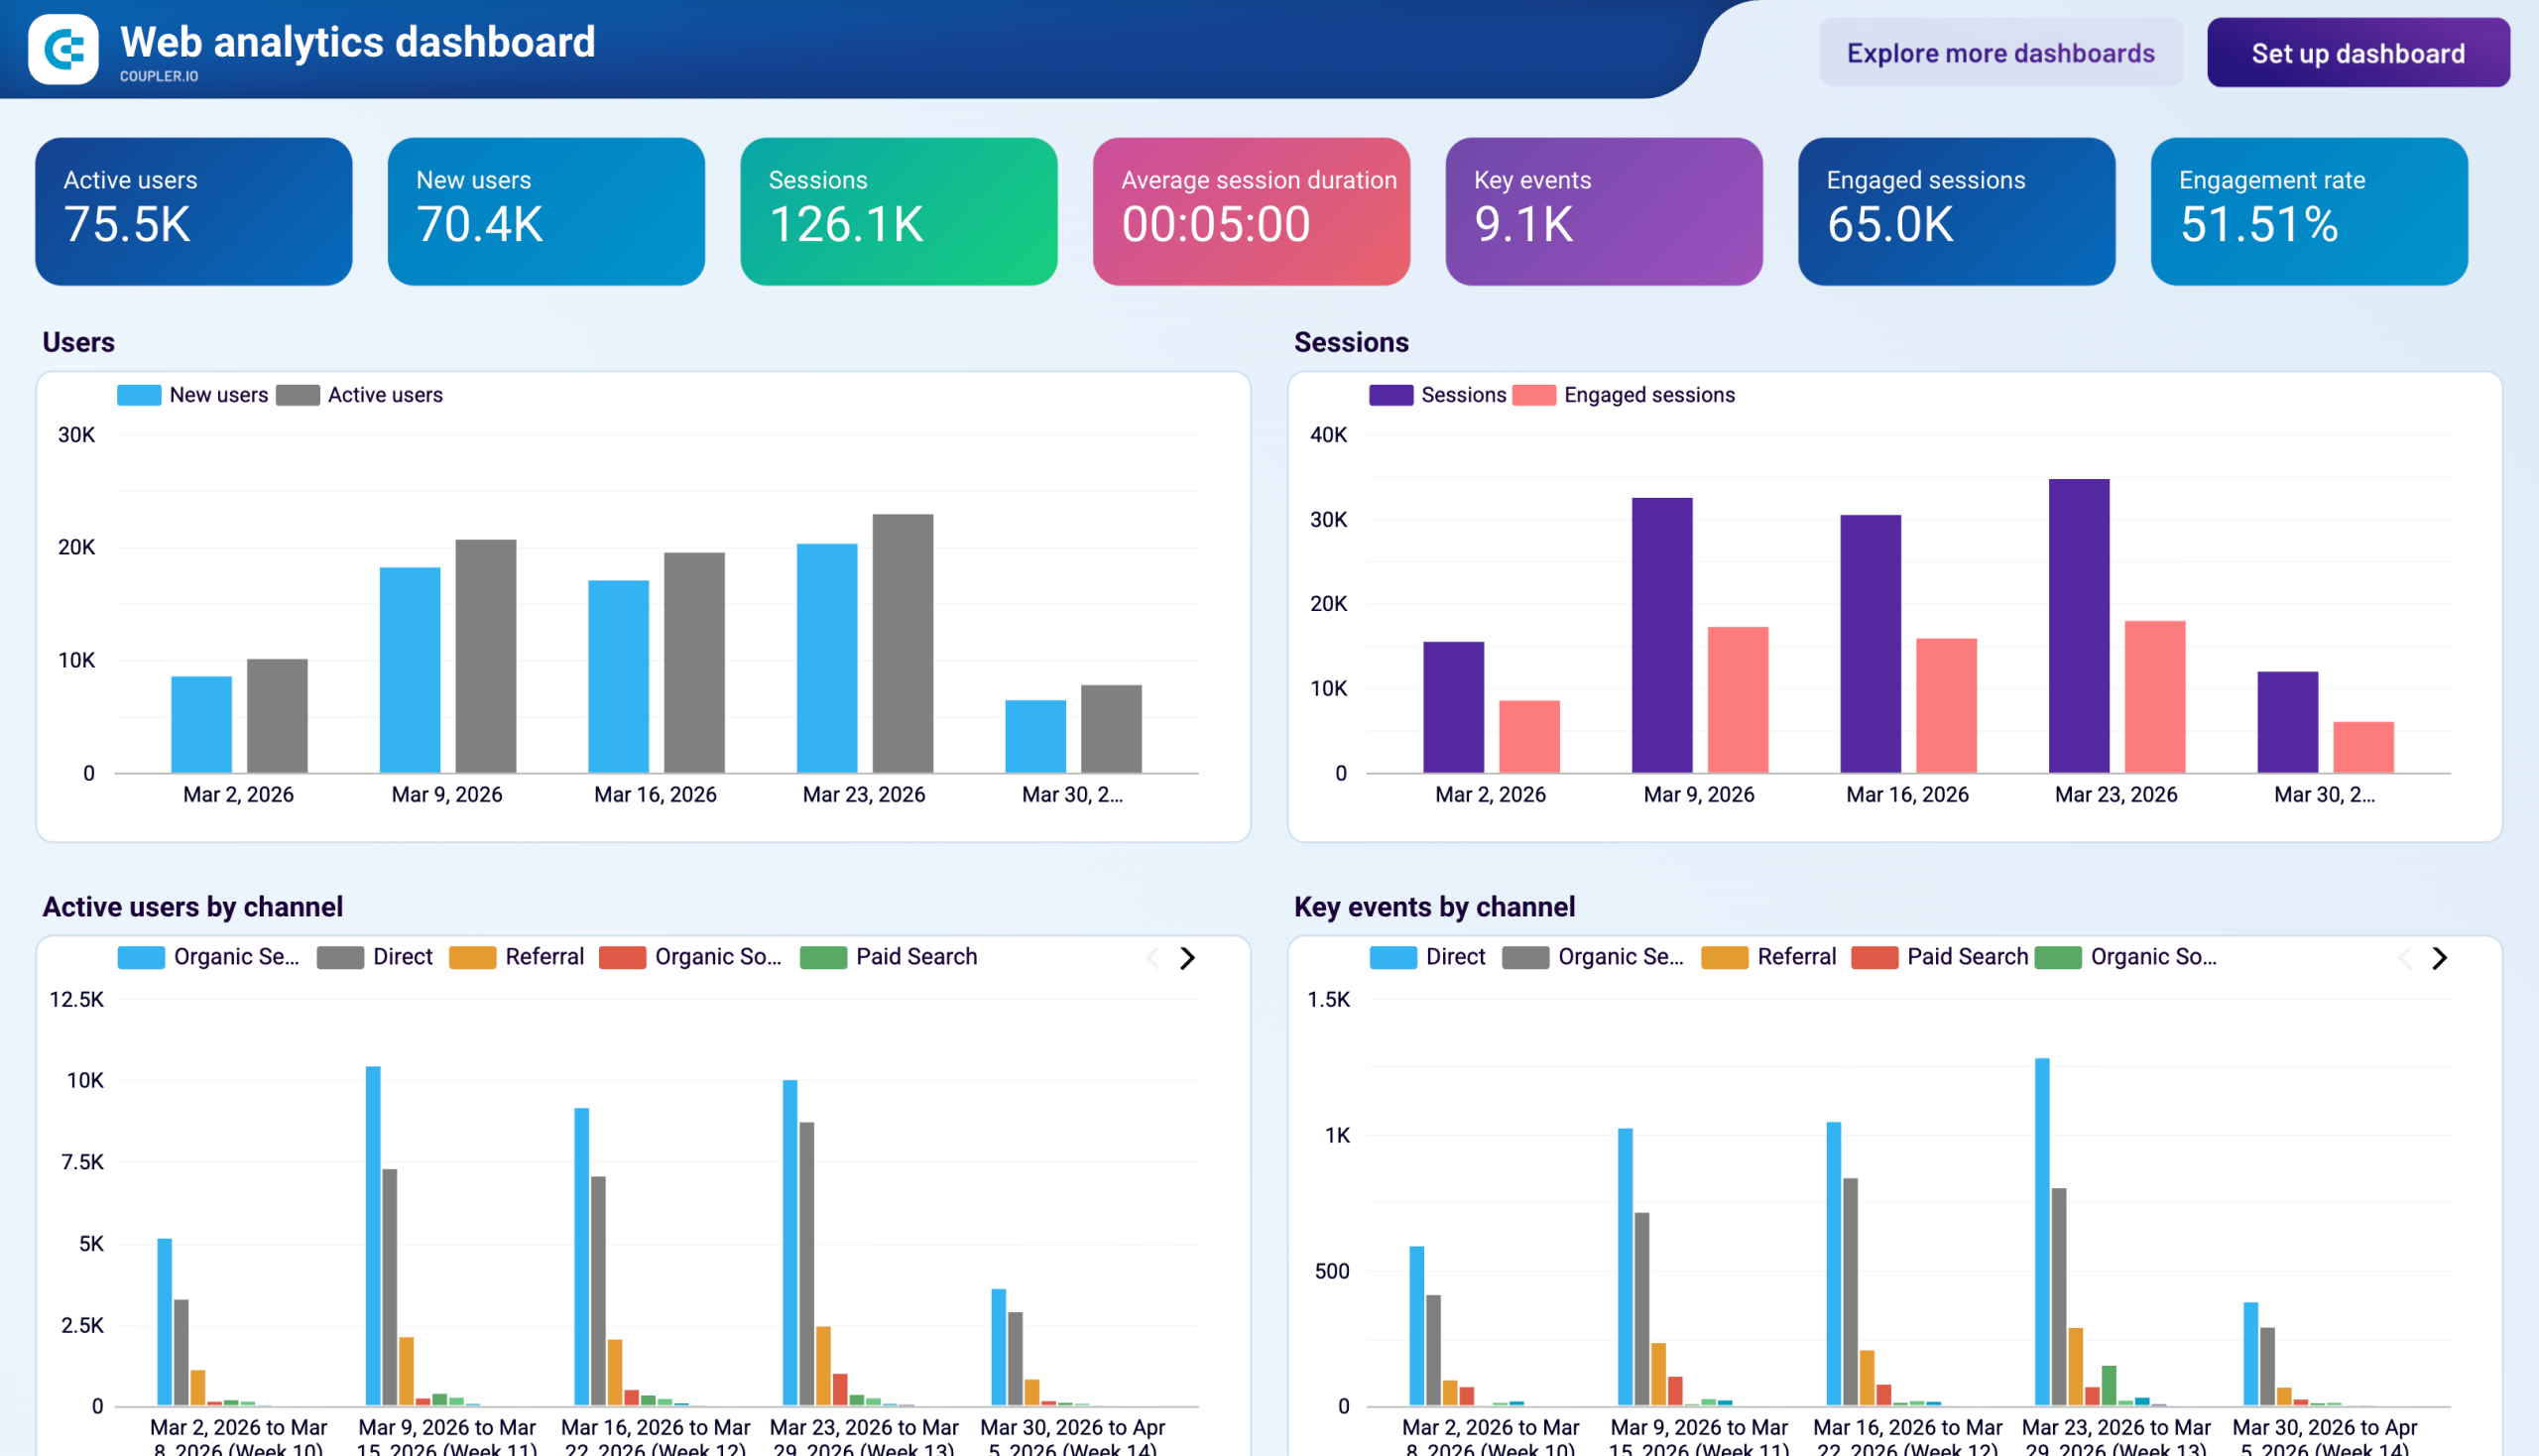
To start using the dashboard, connect your GA4 account following the enclosed instructions.
Google Analytics report for multiple properties
This report template is a convenient solution to track the performance of multiple GA4 properties. The information from your properties is collected in one place, so you can monitor how your traffic performs in one report instead of many.
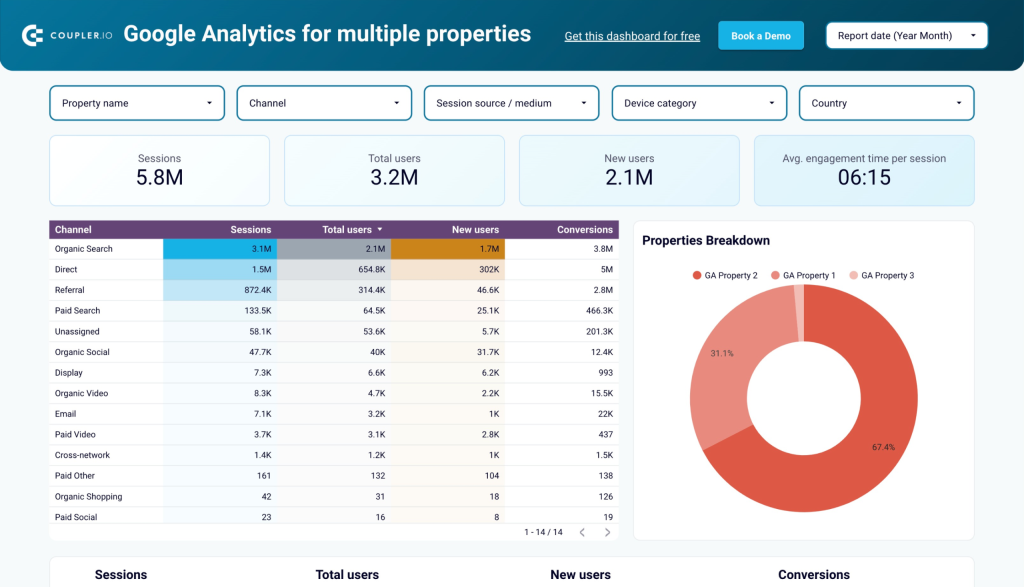
You get an overview of sessions, new users, conversions, and other essential metrics that you can filter by property. You only need to connect your GA4 account and select the needed properties to start using the dashboard.
GA4 key event insights dashboard
This GA4 dashboard provides a focused view of key events—purchases, sign-ups, and downloads. It helps analyze how users complete critical actions and which traffic sources drive the most conversions.
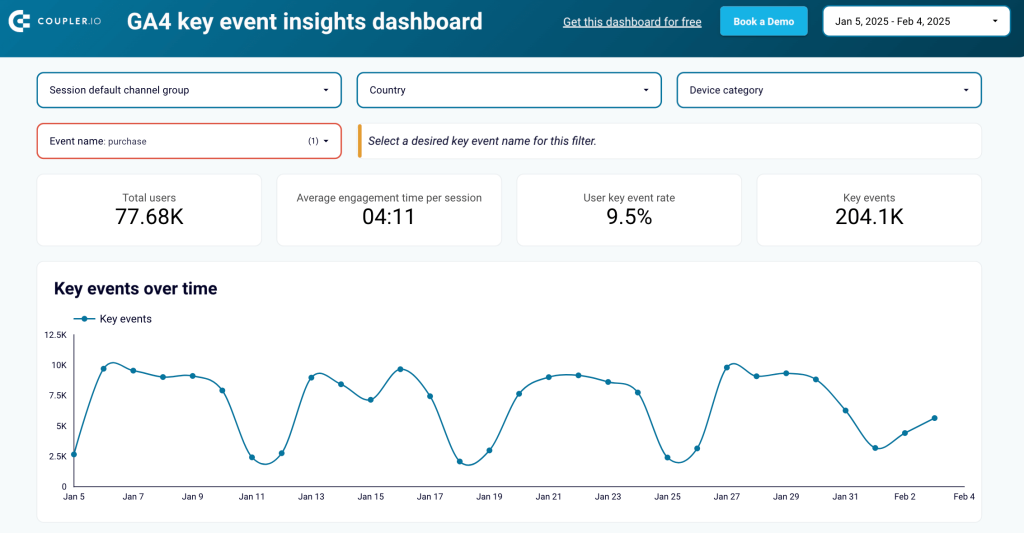
With this report, you can track engagement trends over time, compare conversion performance across devices, and identify the regions generating the most key event users. These insights make it easier to refine marketing strategies and improve user experience. To use this report template with your data, simply connect your GA4 account and the dashboard will be ready to use.
Website traffic from YouTube – performance analysis report template
If you have a website and post video content on YouTube, then consider including this report in your reporting toolbox. It allows you to monitor the traffic coming to your website from YouTube.

With the GA4 dashboard, you can evaluate how your videos perform. This includes the number of users they brought to the website, how many purchases and revenue these users generated, and more. Thanks to the built-in Coupler.io connector, you can set up the template and load GA4 data to it in a few minutes.
It’s just a tiny selection of GA4 dashboard templates you can find in Coupler.io. There are also predesigned solutions that combine GA4 data with information from other sources like Google Analytics PPC dashboard, or GSC + GA4 dashboard, and so on.
How to connect Google Analytics 4 with Looker Studio using GA4 native connector?
As mentioned before in the article, using GA4 native connector is the most direct way to connect Google Analytics 4 with Looker Studio. It is easy to implement the process even if you are a complete beginner. Just follow the step-by-step instructions, and you will be good to go!
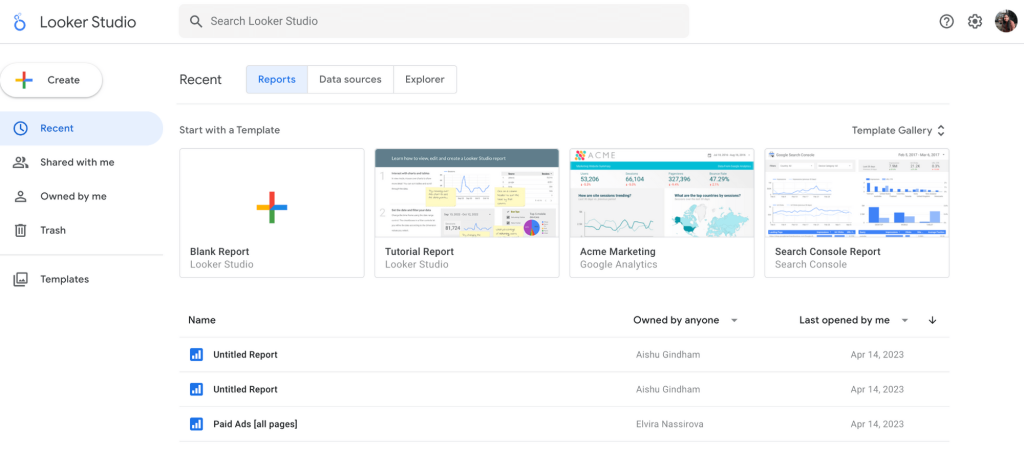
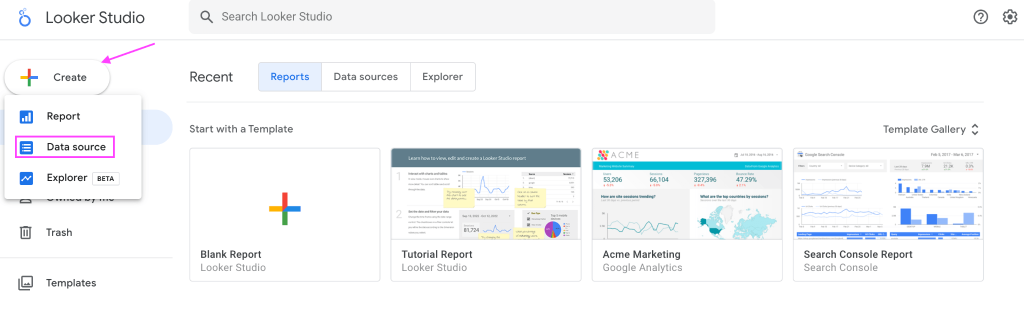
Step 1: Log in to your Looker Studio account with your Google account credentials. You will land on the Looker Studio homepage, as shown in the image below.
Step 2: On the top-left of the Looker Studio homepage, click on the ‘create’ button and select ‘data source’ from the list of options.
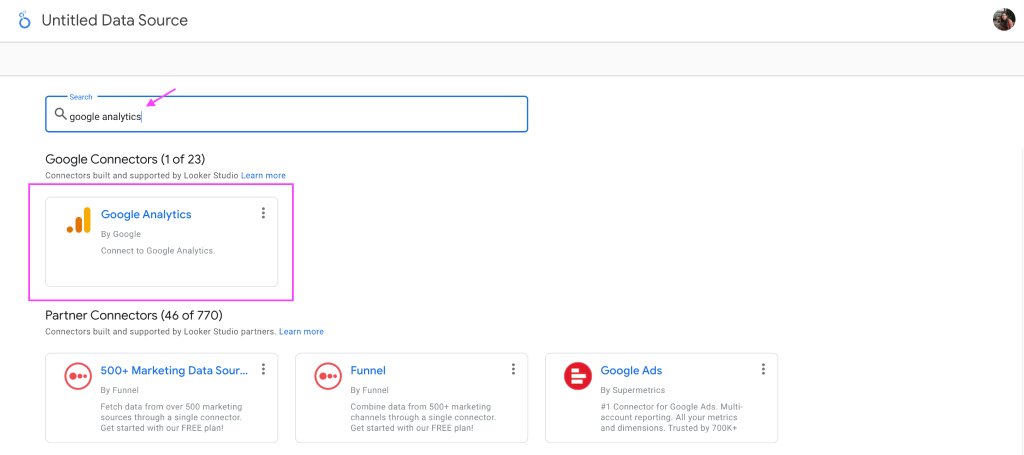
Step 3: Select ‘Google Analytics’ from the list of Looker Studio connectors.
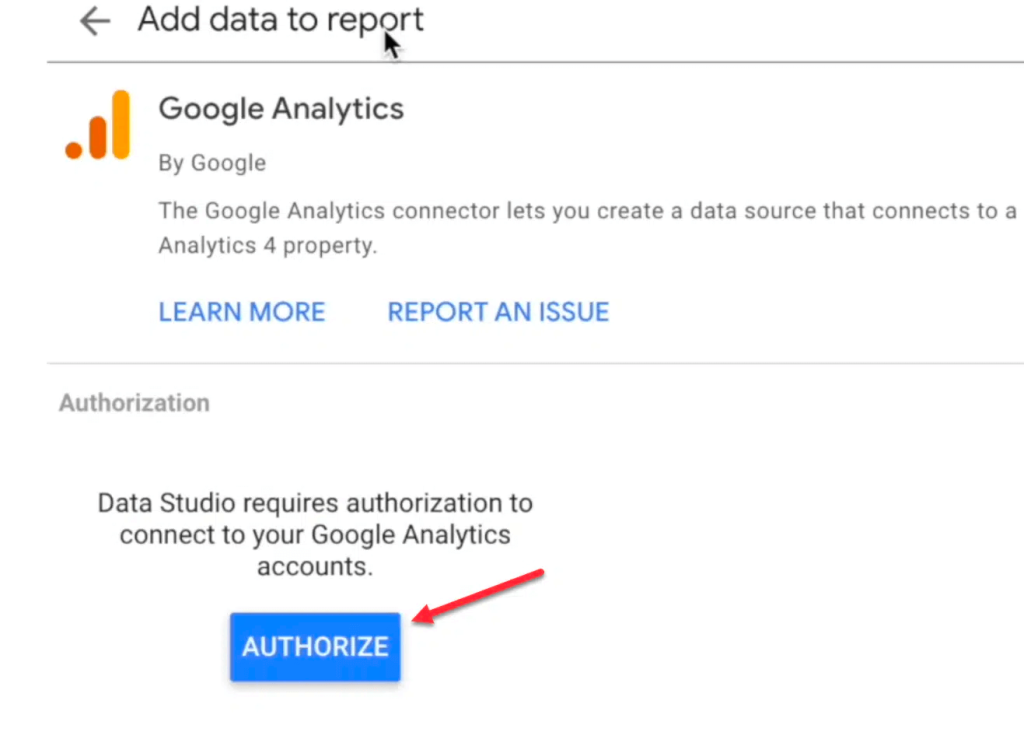
Step 4: After selecting the native in-built Google Analytics connector on Looker Studio, you will be asked to authorize to access Google Analytics data from Looker Studio.
Click on ‘Authorize’
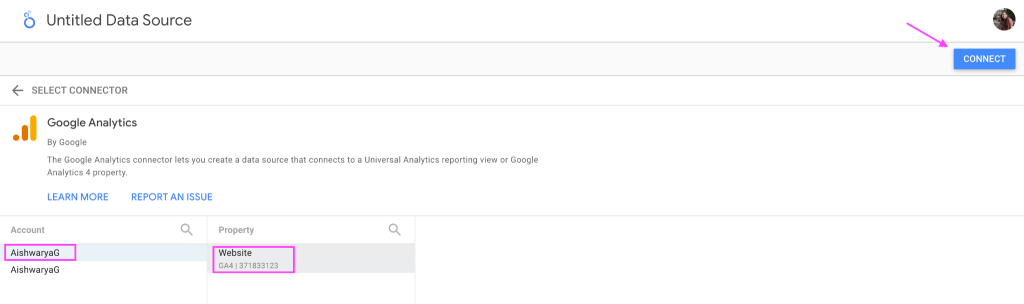
Step 5: Select the GA account and property you want to connect with Looker Studio.
Click’ Connect’ to flow data from Google Analytics 4 to Looker Studio.
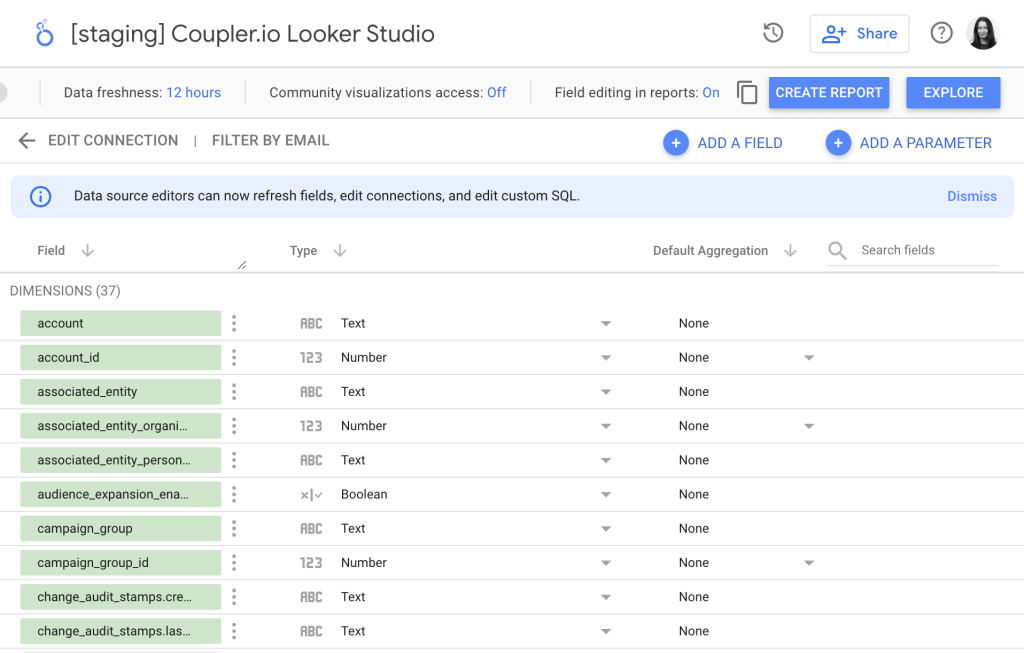
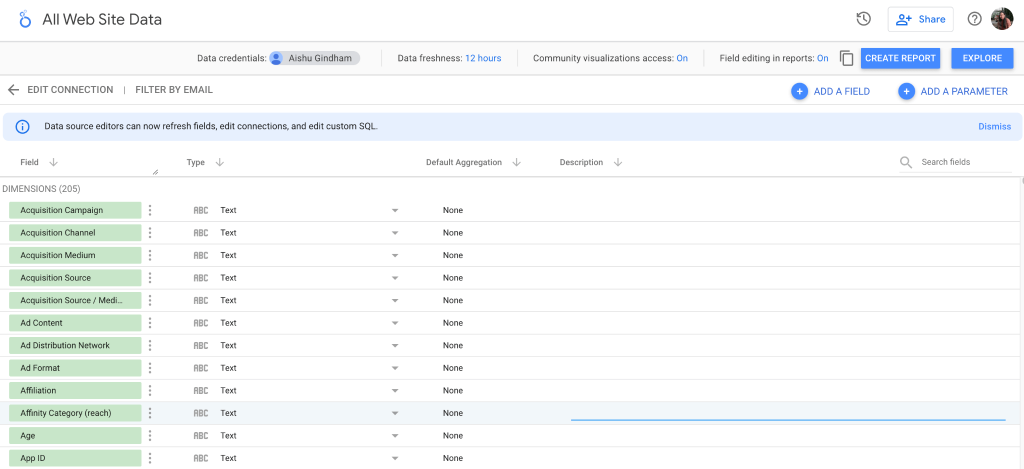
Step 6: After the connection is established between Google Analytics 4 and Looker Studio, you will find the GA4 data, as shown in the image below.
Step 8: You can also specify your preferences for additional settings.
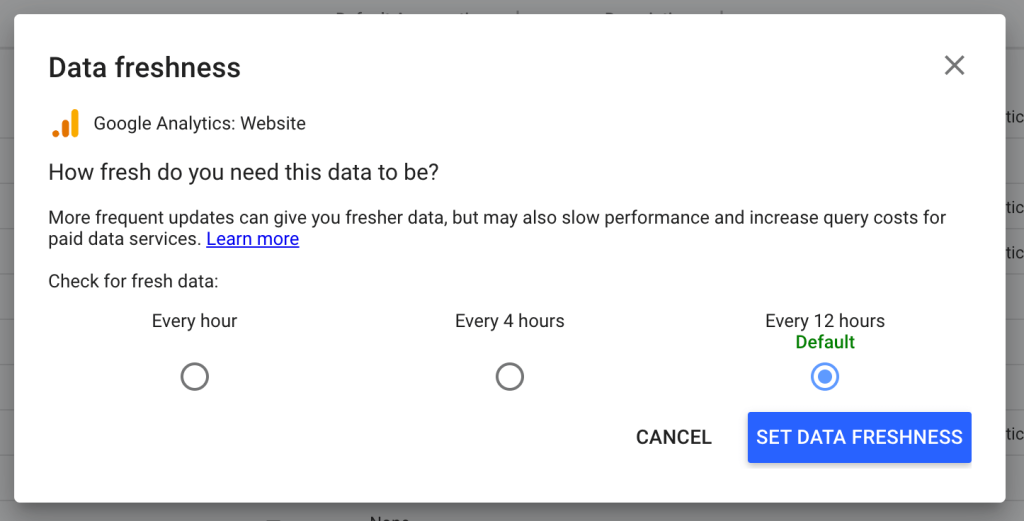
- Data freshness – where you can decide how often to refresh the data. Frequent updates can give you fresh data but result in slow performance. To strike a balance, Looker Studio suggests a 12-hour window to refresh data automatically.
Manual parameter check – You can also run a quick manual check and make any required changes to dimension names, types, and descriptions so that the correct data is reflected in the Looker Studio reports.

Step 9: To create a basic report from the existing data, click on ‘Create Report’ on the top-right of the page.
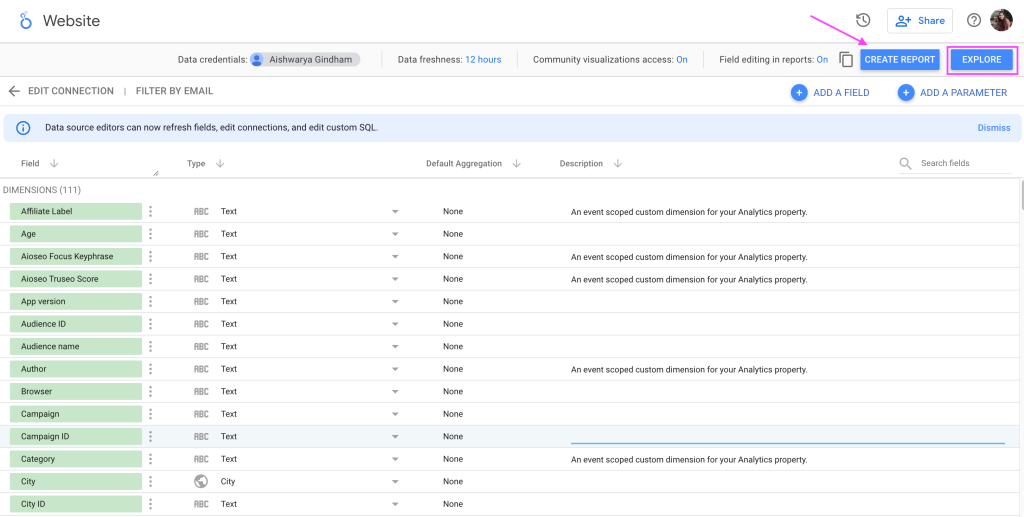
Alternatively, you can also click on the ‘Explore’ button to build your own custom report with multiple visualization options from scratch. Some of the reports you can build are overview reports, user acquisition reports, conversion reports, and more.
But as said earlier, these reports might load slowly with fresh data as we have set our data freshness to ‘every hour.’ To avoid this and load GA4 reports on Looker Studio at a decent speed, it’s better to connect Google Analytics 4 with Looker Studio using a third-party connector.
Connecting Google Analytics 4 with Looker Studio
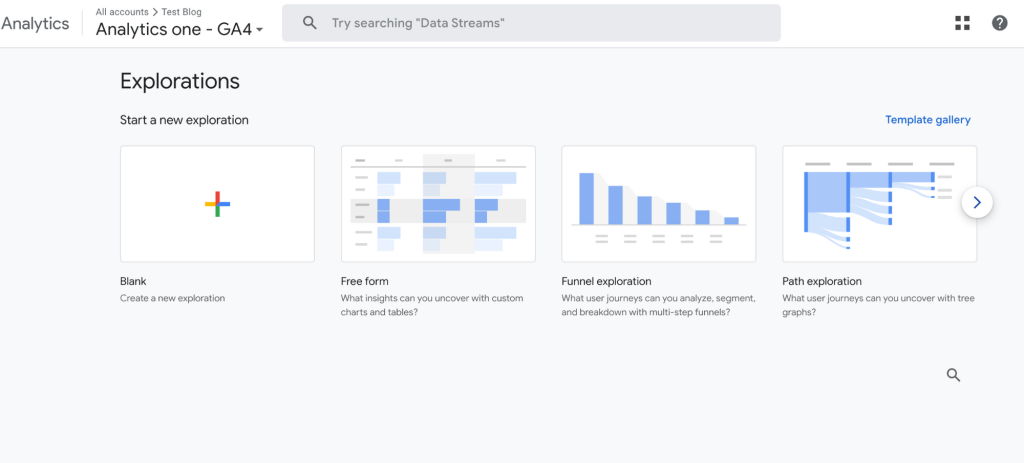
Even though Google Analytics 4 has removed most of the existing reporting features, it did add an additional feature called ‘Explorations.’ Here you can use different templates like free form, funnel exploration, path segmentation, etc., to build custom reports.
But, the flexibility of these templates is currently very limited. So, connecting GA4 with Looker Studio is the best way to go about this.
Below are a few benefits of connecting GA4 with Looker Studio.
- Custom dashboards: Creating custom reports and dashboards that suit your specific needs and goals is the major benefit of connecting GA4 with Looker Studio.
- Segmentation and personalization: You can customize the look and feel of your reports, add filters and segments, compare different date ranges and metrics, and drill down into the details of your data with Looker Studio. This will help you better understand your website and app performance, user behavior, and marketing campaign effectiveness.
- Data-driven insights with machine learning: Looker Studio can leverage the machine-learning capabilities of GA4, like predictive metrics and audiences, anomaly detection, and data modeling features that can help in optimizing your website and marketing campaigns with data-driven insights.
- Integrated analytics: You can combine GA4 data with data from other Google products, like Google Ads, Google Search Console, or Google BigQuery, or from other third-party platforms, like Facebook Ads, Shopify, or Salesforce, to get a more holistic view of your marketing performance and ROI across different channels and platforms.
After realizing the benefits of connecting GA4 with Looker Studio, it’s natural to be curious about the various methods to achieve this for your website/app. So, without further ado, let’s dive into methods for connecting Google Analytics 4 with Looker Studio.
Connect Google Analytics 4 with Looker Studio efficiently
In this article, we have explored two methods to connect Google Analytics 4 with Looker Studio for making data-driven business decisions with interactive dashboards.
Even though the native Looker Studio built-in connector is the most direct and easy way to connect GA4 with Looker Studio, it might not be the best choice when you need to combine data from multiple sources. In this case, you would need to connect each new app to Looker Studio separately, which significantly slows down the platform and reduces the performance of your dashboard.
On the other hand, using an efficient third-party solution like Coupler.io can save time and improve functionality. You can connect GA4 with Looker Studio directly on Coupler.io and even prepare data for visualization on Coupler.io’s side thanks to its ETL functionality.
If you are looking for advanced calculations, the double-step process of importing the GA4 data into a spreadsheet or database first and later connecting it to Looker Studio is also available.

Automate Google Analytics reporting with Coupler.io
Get started for free