QuickBooks is a very versatile accounting app. And yet, with all of its features, sometimes, we find ourselves wishing we had MS Excel to run a couple of calculations or create a custom report.
The good news is, you don’t have to choose one or the other. The app makes it extremely easy to export reports from QuickBooks to Excel. You can benefit from all of the advantages of QuickBooks while still having the ability to do some of the work in Excel.
How to export QuickBooks Online report to Excel in 4 steps
It is super simple to export QuickBooks reports to Excel if you use the online version of QuickBooks. Here’s what you should do:
- Go to Business Overview > Reports (or just find the Reports menu if you are in the Accountant view).
- Select the report you need to export.
- At the top of the report, select Export and click on Export to Excel.
- Save the Excel file.
A lot of reports from QuickBooks Online can be automated. With Coupler.io, you can export select reports from QBO to an Excel workbook and refresh it on a schedule. Automated exports will be discussed in the How to export from QB to Excel automatically section. Below, you can find detailed instructions on manual exports.
Manual reports export from QuickBooks Online
Step 1: In the Business view, go to Business overview > Reports. In the Accounting view, you’ll want to just click on Reports in the menu.
Assuming you’re already logged in, the first thing you should do is go to the Business overview section and choose Reports in the submenu.
Step 2: Locate the needed report.
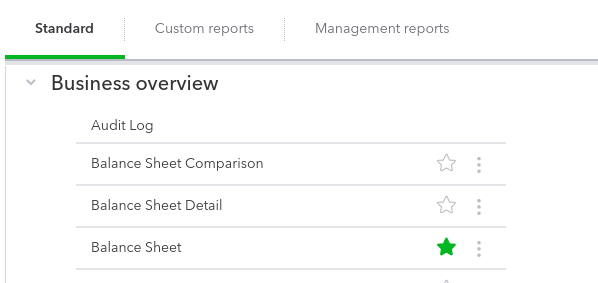
Your next step is to find the report you want to export. You can either scroll through the list of suggested options, refer to the reports you’ve starred, or search the report list. When you’ve found the right report, click on it to open it.
Step 3: Click on the export button.
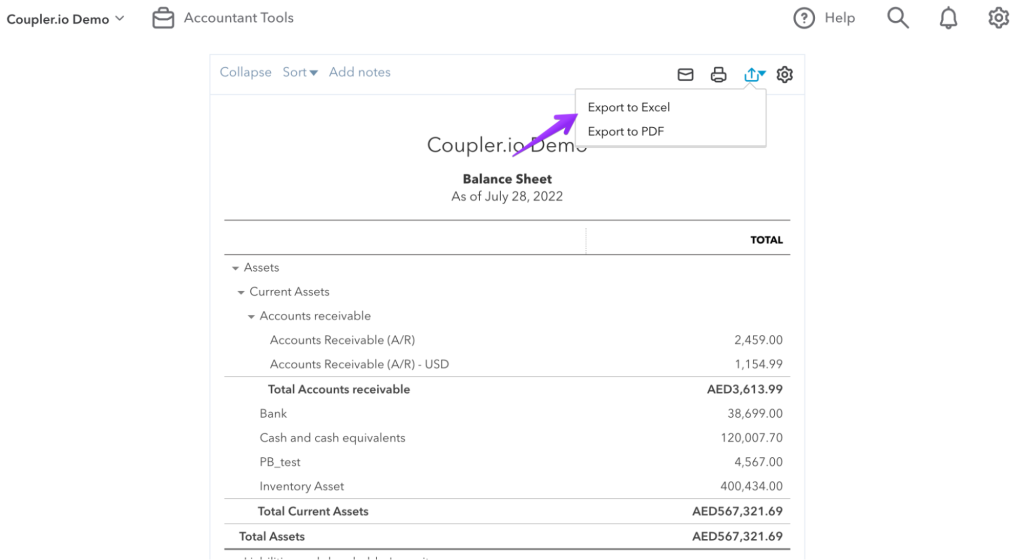
Once you’ve opened the report, look for the exporting button in the top right corner. Clicking it brings up a menu that allows exporting the document in Excel or PDF. Click on the Excel export option and choose where to save the file.
Step 4: Save and review the file.
The last step is to save the file where appropriate and review it if necessary. That’s it. Your QuickBooks to Excel export is complete!
However, there are several additional steps you may have to take depending on your goal. Let’s look into the most common ones.
How to export reports from QuickBooks to Excel including all users
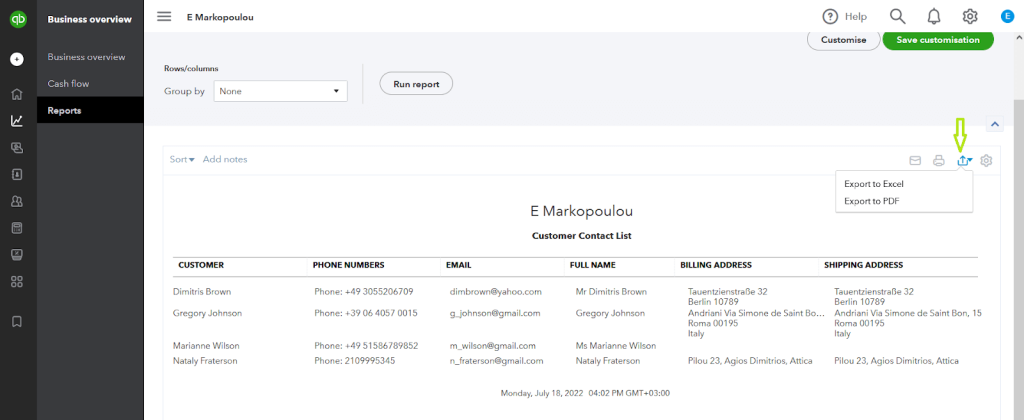
QuickBooks Online offers the ability to export the entire list of customers. You can find it in the aptly named Customer Contact List report in the Reports section. You can export this QuickBooks report to Excel where you can analyze it further.
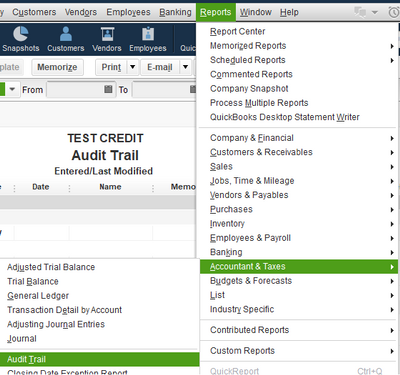
QuickBooks Desktop offers you a more sophisticated view featuring all user activity. To access it, go to Settings > Audit log. The report shows all activity of the users, but you cannot export it. The only option is to print it or save it as a PDF.
An alternative would be to access the Audit Trail report. You’ll find it by going to Reports > Accounts & Taxes > Audit trail. This report shows actions taken by users in your instance of QuickBooks and can be filtered by the user or by the type of action.
Not all aspects of user accounts can be exported in a report, though. User permissions cannot be filed into a report; the only way to see them is by going to the Company tab and looking at a list of users. You can see permissions given to individual users in this tab.
How to export QuickBooks report into an existing Excel spreadsheet
Currently, QuickBooks Online doesn’t have a way to update existing Excel files during export. The only option you have if you don’t have the desktop version is to manually add the exported file as a new worksheet to your existing spreadsheet.
If you do have the desktop version of QuickBooks, you can export the QuickBooks report to Excel and update it during the export.
How to export QuickBooks Online report automatically
Exporting each report you need manually is a lot of unnecessary work. It’s possible to automate this task by using an external tool. Coupler.io, a data integration platform and AI analytics, can do almost any export from QuickBooks to Excel automatically — there are more than 25 reports available.
The QuickBooks data connector only works for QuickBooks Online, though. QuickBooks desktop version is not supported, and there’s no need as the desktop version allows scheduling reports. Since QBO doesn’t support automated exports on its own, Coupler.io is a handy tool to use together with QBO.
Once you set up the export, it will run on schedule and fetch reports without your involvement. You’ll be free to save time on manual exporting and spend it on processing the data from your daily reports.
Here’s what you have to do to automate any export.
- Step1: Sign up for Coupler.io free trial.
If you already have an account, you can skip this step. If you don’t and you want to see how automating an export works, grab a free trial. It lasts 7 days and doesn’t require a credit card to be linked to the account, so it’s an easy way to experiment with automations.
- Step 2: Choose the source and destination for your data.
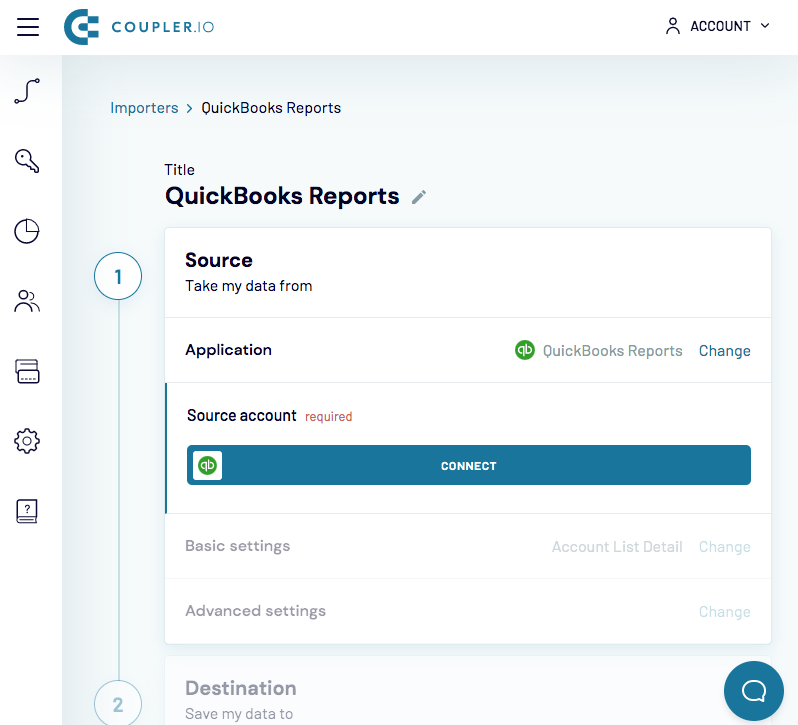
Once you’re logged in, create a new importer. Choose QuickBooks Reports as a source and Excel as a destination app. Alternatively, you can export QuickBooks to BigQuery or Google Sheets.
- Step 3: Connect a QuickBooks account.
Next, you need to connect your QuickBooks Online account. You can do this by going through a series of prompts as you click on Connect during this stage of the setup.
- Step 4: Choose the report you want to export.
Not every report is available for export with Coupler.io. You can choose between over 25 reports that include the most useful ones like Balance Sheet, Cash Flow, and Profit and Loss report, among many others.
Choose the report that you need to export and go to the next step.
- Step 5: Set up additional parameters.
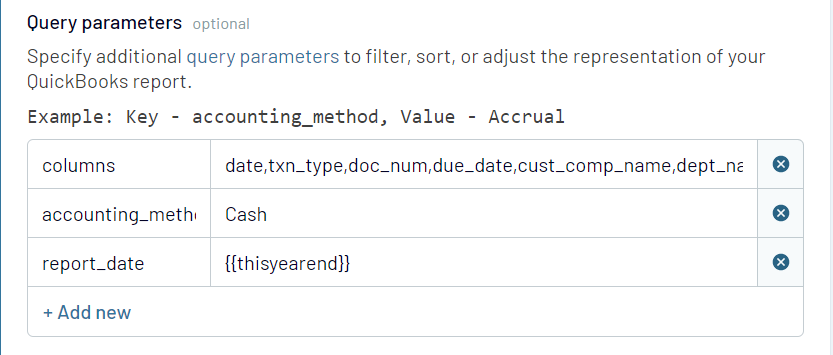
With Coupler.io, you can add a lot of additional parameters to the export. You can select a time period for the report you want to export or change the layout of the report.
If you need a custom report, you can choose what parts of it to display by adding query parameters. The commands allow you to choose select columns, sort the report, or run it on particular dates.
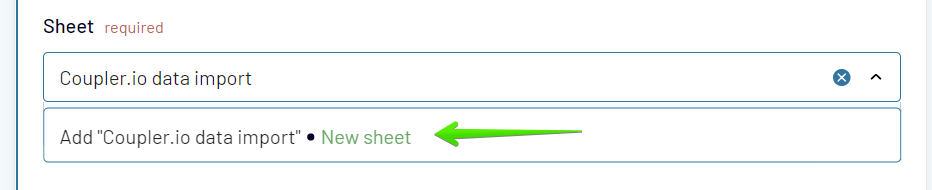
- Step 6: Set up a destination.
Once all the details of the export are put in place, all you have to do is set up the destination. Choose Excel as your destination. After this, you’ll be prompted to link your Microsoft account.
Once you do that, specify the spreadsheet that you want to import data to, and it’s done.
- Step 7: Set up the refresh interval.
The next step is deciding how frequently the Excel data should be refreshed. You can export as often as every 15 minutes, but unless you have a very large volume, that isn’t necessary. Set up a comfortable schedule and go to the next step.

- Step 8: Save and run the integration.
After you have gone through all these steps, all you have left to do is to save and run the integration. Make sure to double-check how the report came out to rule out any inaccuracies.
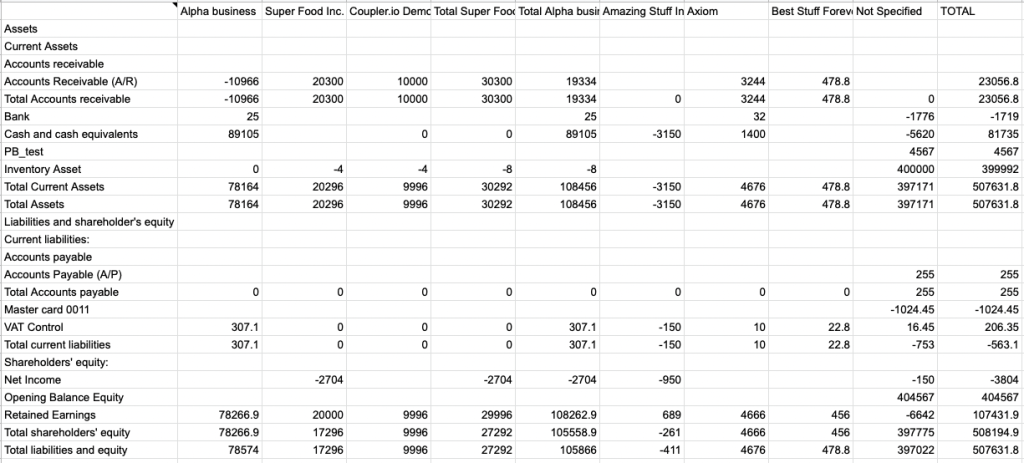
Here’s a sample Balance Sheet export in Excel:
Setting up automation for QuickBooks Online export can be a lengthy process, especially if you need to customize the report, but you only have to do it once. From there, Coupler.io will run the report on schedule, and you can focus on analyzing the data.
Export report to Excel in QuickBooks – troubleshooting
Despite the process of exporting reports to Excel being extremely simple, sometimes, technical difficulties arise. Here’s how to fix the most widespread problems.
QuickBooks export report to Excel not working
In case you’re using the desktop version of QuickBooks, you may find that the export button is greyed out, and you can’t run an export. It may not work if you don’t have a desktop version of Microsoft 365 installed. If you’re using MS Excel from a browser app, your desktop QuickBooks app may refuse to let you export.
Other than that, here are a few things you could try to fix this issue.
- Update both Excel and QuickBooks.
- Repair MS Office suite.
- Reinstall both Excel and QuickBooks.
If the problem is that the report comes out with zeroes instead of your data and the advice above doesn’t help, try going to your Excel instance and updating Protected View settings.
Can’t export QuickBooks Online report to Excel
For users of the online version of QuickBooks, fixing the problem with export may come down to cookies. Sometimes they pile up and interfere with the functions of the web app.
To test whether that’s the case, sign in to QuickBooks Online through an incognito window. If it works fine, proceed to clear the QuickBooks cache in the browser you use to solve the problem.
Report header not showing when exporting QuickBooks to Excel
This issue is not a result of a technical problem, but simply a misunderstanding of the export rules. If you don’t see a header in the report you’ve just exported, go back to your QB Desktop app and start another export. This time, go to the advanced settings.
In the advanced settings, go down to the Printing Options section and toggle on the option to show report headers on print and on screen. By default, it’s set to only show when you print the report. With this option toggled, you’ll always export reports with headers.
QuickBooks Online – exported report to Excel missing lines
A common issue you may run into is having a document that is too large for export. If you are exporting to a CSV file, the report is going to be cut off at 32,770 rows. You can work around this by either creating a new worksheet or exporting it as an XLS file.
In some cases, QBO may be putting different types of data into one column (e.g., mobile and fax numbers). This results in exported reports not having these lines. Unfortunately, QuickBooks does not have a way to fix this issue, and you have to employ a third-party tool to fix the lines automatically.
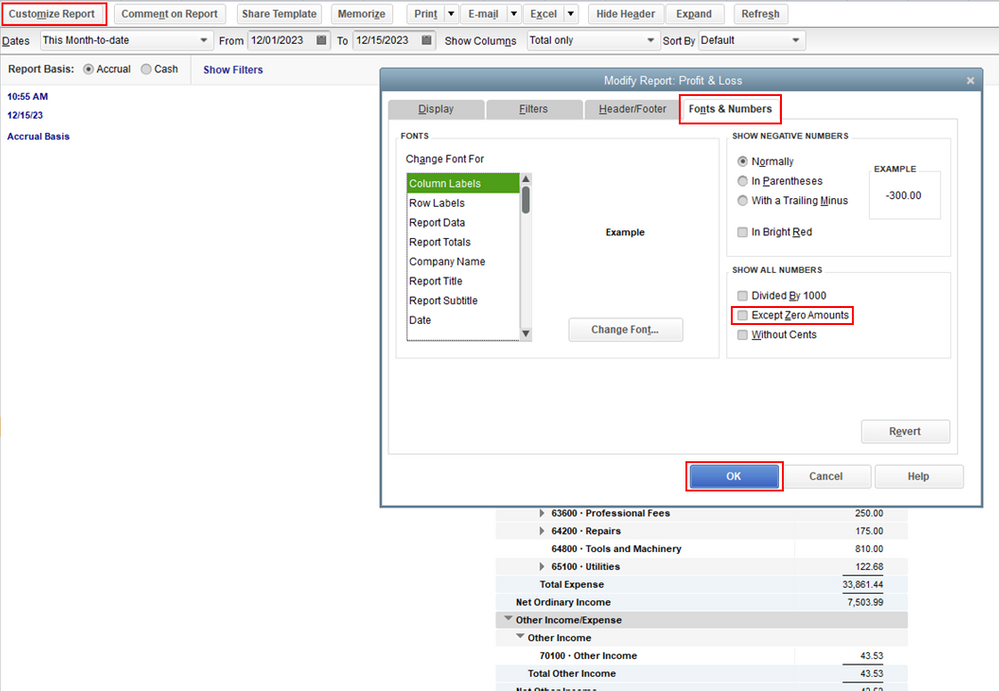
If your QuickBooks Desktop report is missing blank rows, you may fix it by changing the export options. Go to Customize Report > Column Labels, and ensure the “Except Zero Amounts” option is toggled off. When on, this option deletes blanks from the report.
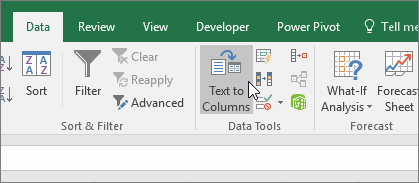
QuickBooks Online – export saves numbers as text
Sometimes, QuickBooks Online reports save numbers as text. You can spot this if the numbers are left-aligned. This used to be a major issue, but now it can easily be fixed in Excel.
Select the data range that is improperly saved, go to the Data tab, and click on Text to Columns. This will change the data format to numbers.
Exporting QuickBooks to Excel the easy way
Despite having some minor issues related to exporting data, QuickBooks remains a great accounting tool. If you want to minimize the time you spend on exports to focus on analysis, use a third-party tool like Coupler.io to automate the process and export report data from QuickBooks to Excel on a custom schedule.
You only have to set up the integration between QuickBooks and Excel once, and then you can forget about doing it manually.