For most project managers, status reporting can be a huge headache. But don’t worry. We’ll give you some best practices for creating a simple yet effective status report. And use the templates we provide to save a lot of your precious time.
Business project status report templates (FREE)
Check out some of the functional yet simple status report templates we have shared below. To get started, please make a copy by clicking File > Make a copy from the menu.
Note: We also suggest you create a separate tab for each status report. Thus, you can compare the project status history in one spreadsheet.
#1. Weekly project management status report template in Google Sheets
Use the following project management weekly status report template in Google Sheets to report a week-by-week snapshot of your project’s progress. This template allows you to enter the overall project status and each key indicator’s status, issues & resolution actions, and risks & mitigating actions.
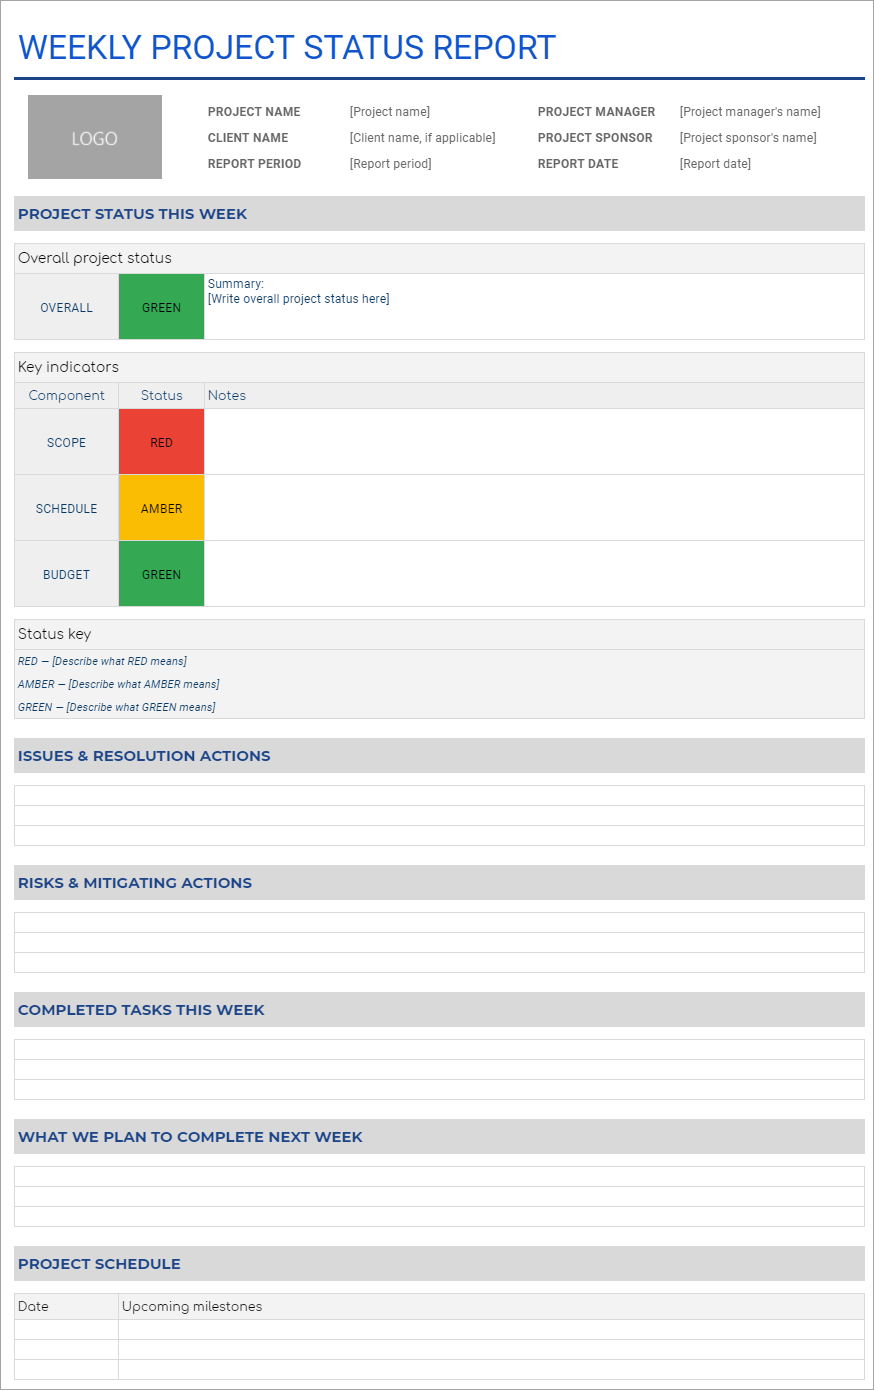
You can also add info about tasks completed this week, plans for next week, and the project schedule.
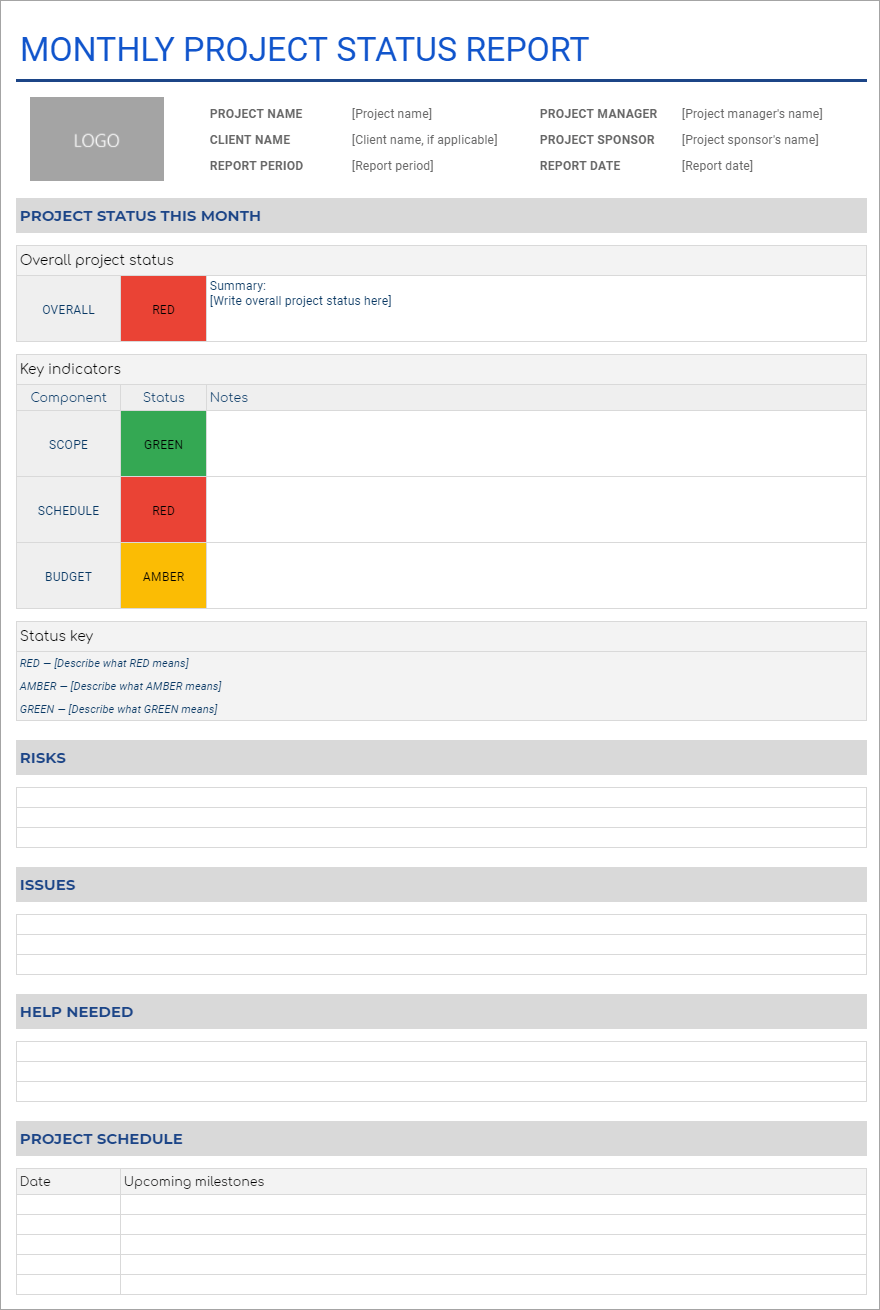
#2. Monthly project management status report template in Google Sheets
Use this template to show the big picture of your project’s health on a month-by-month basis. This template allows you to focus more on the key metrics, any major risks & issues, and the help needed to solve the issues.
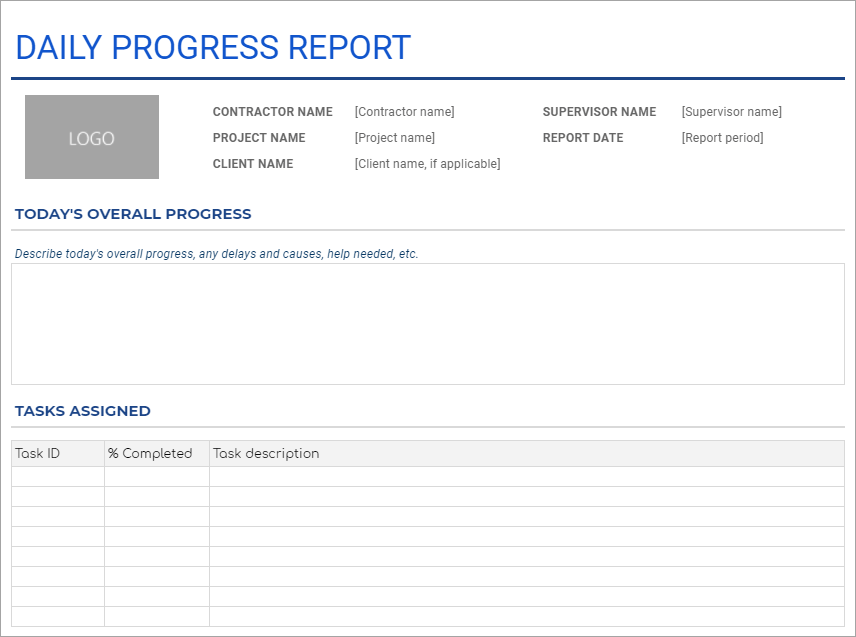
#3. Daily project progress report template in Google Sheets
Use this template to show your daily progress to coworkers or clients. Input today’s overall progress status, delays, and each task you worked on today.
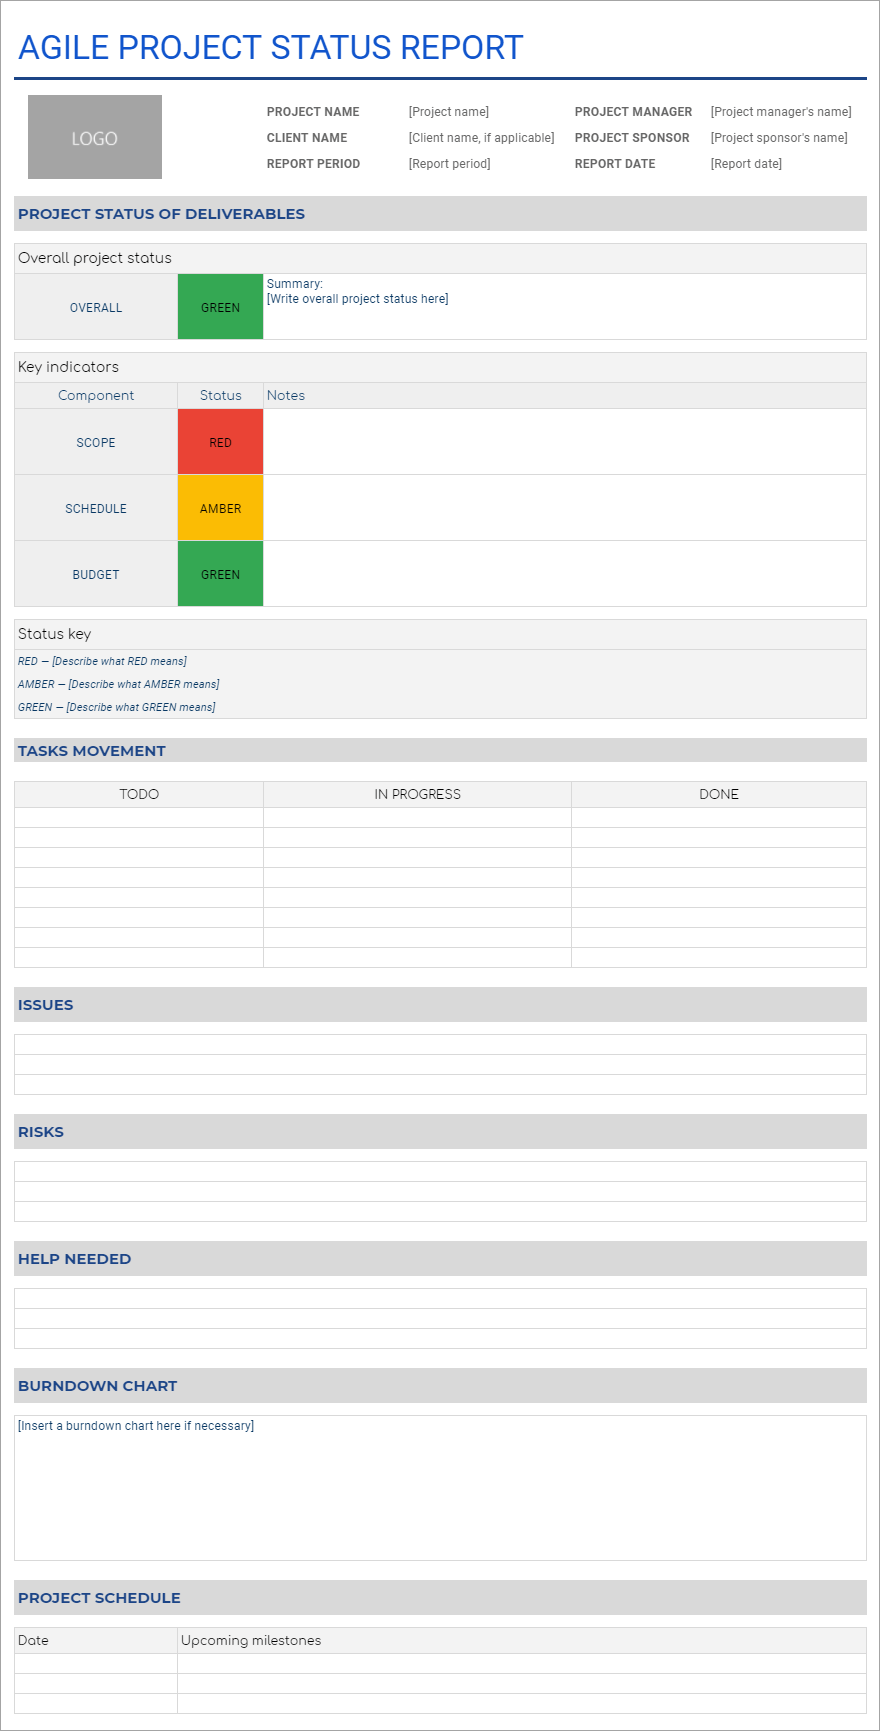
#4. Agile project status report template in Google Sheets
Use this template for reporting the current status of your agile project. Show the overall project status, task movement, risks, and issues. You can also include a burndown chart if necessary.
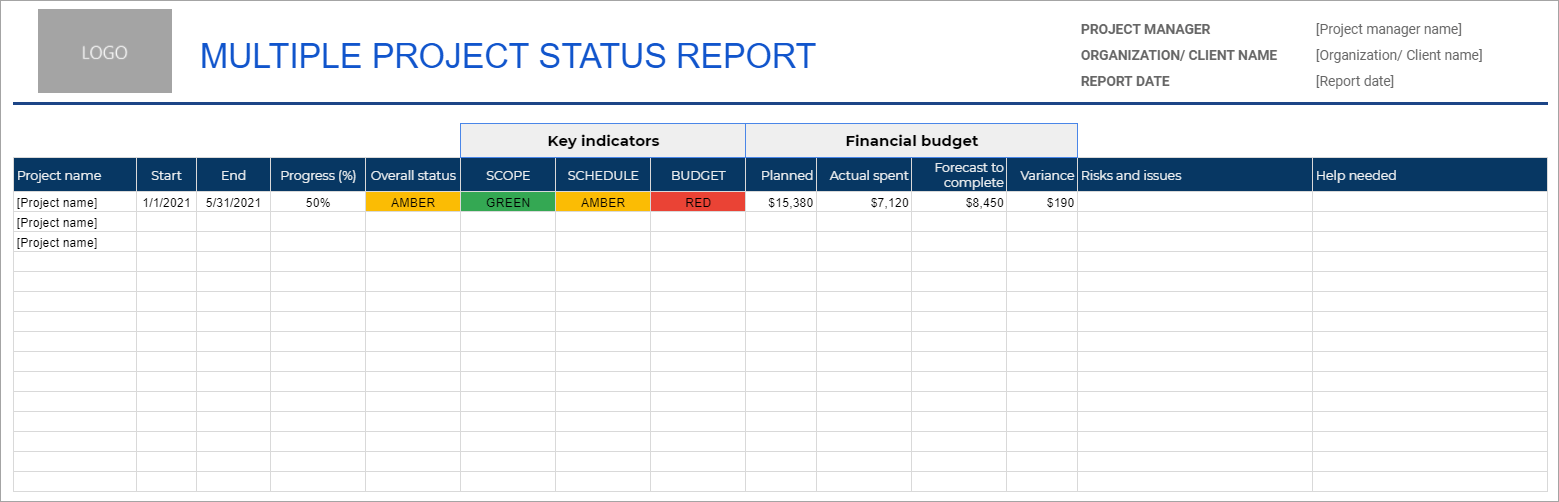
#5. Multiple project status report template in Google Sheets
Use this template to give an overview of the statuses of several projects at once. You can input each project’s overall status, % completed, financial portfolio, risks and issues, and help needed. You can also show the key indicator statuses for each project.
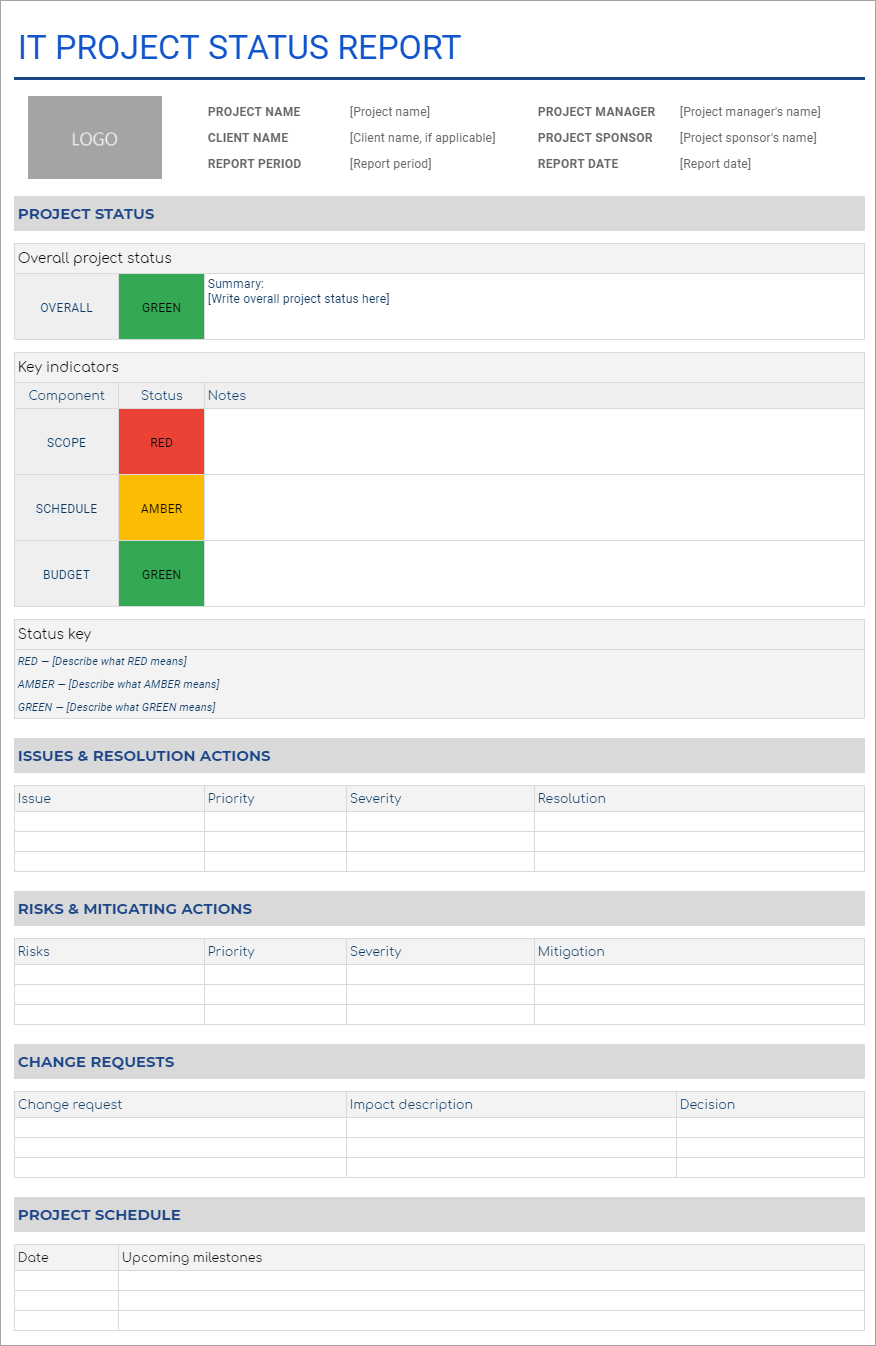
#6. IT project status report template in Google Sheets
Use this IT project status template for tracking your project status, including describing risks and issues in more detail. You can also add change request evaluations and decisions if necessary.
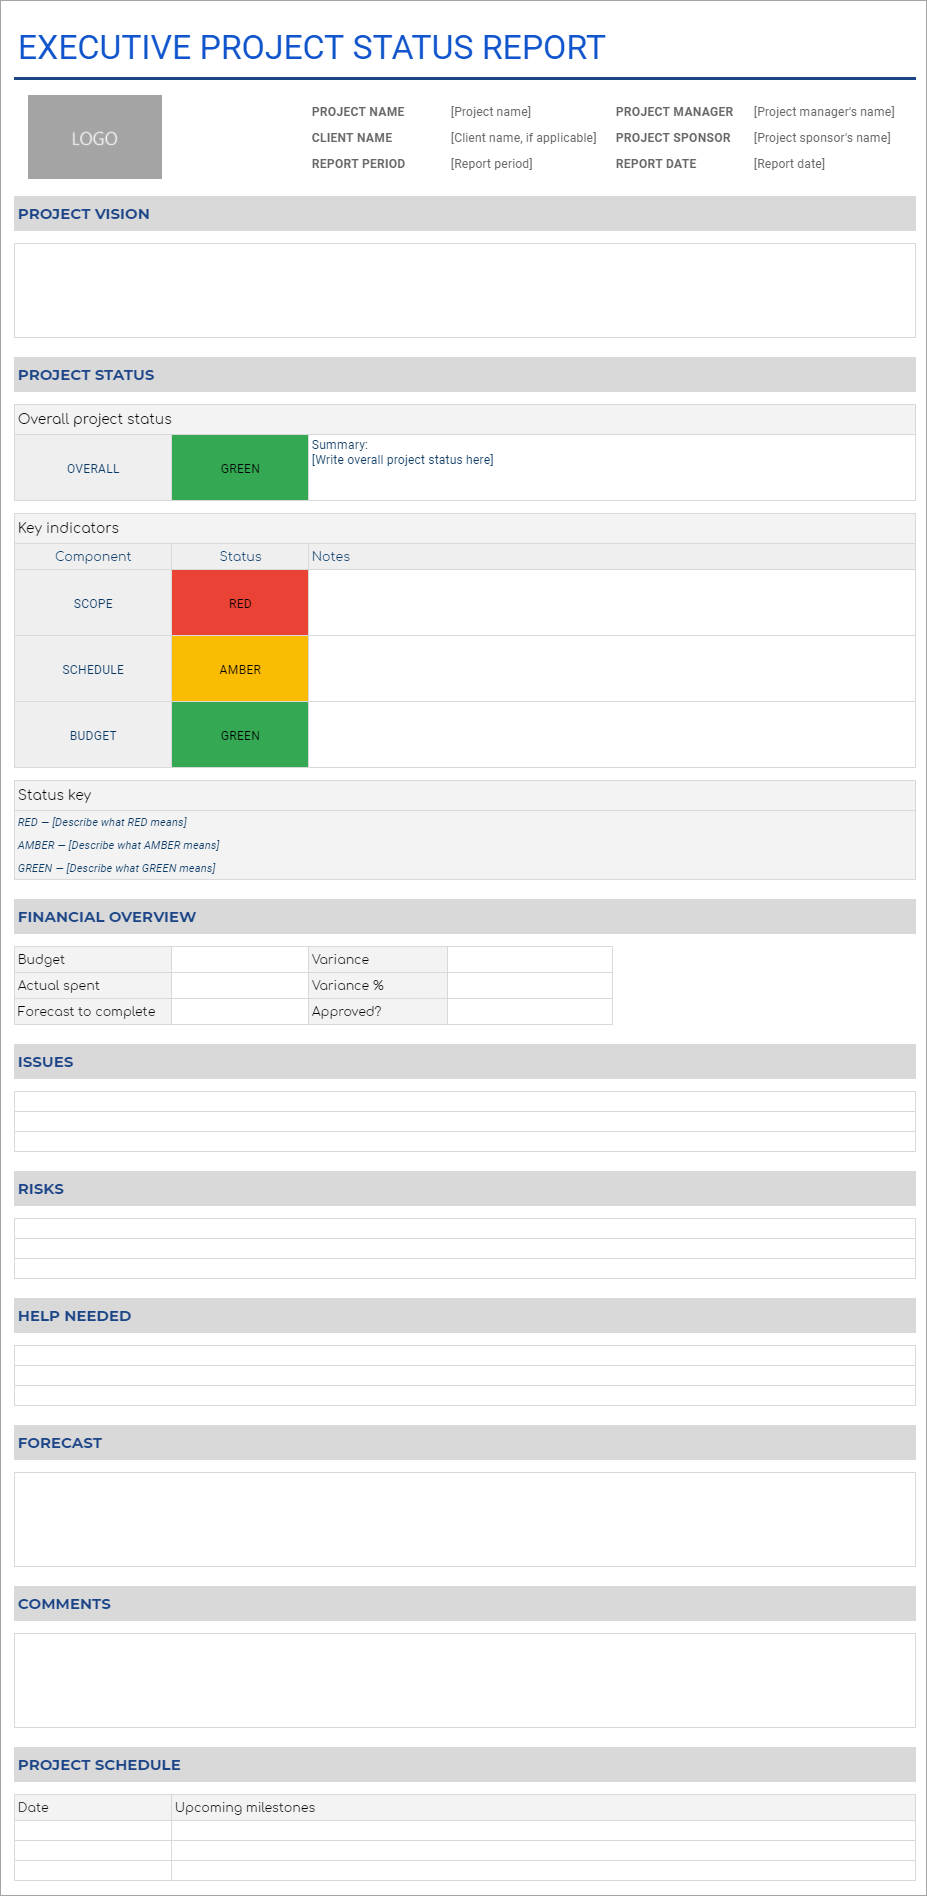
#7. Executive project report template in Google Sheets
Use this executive project report template to provide a high-level summary of your project’s progress. Provide project vision and financial overviews as needed.
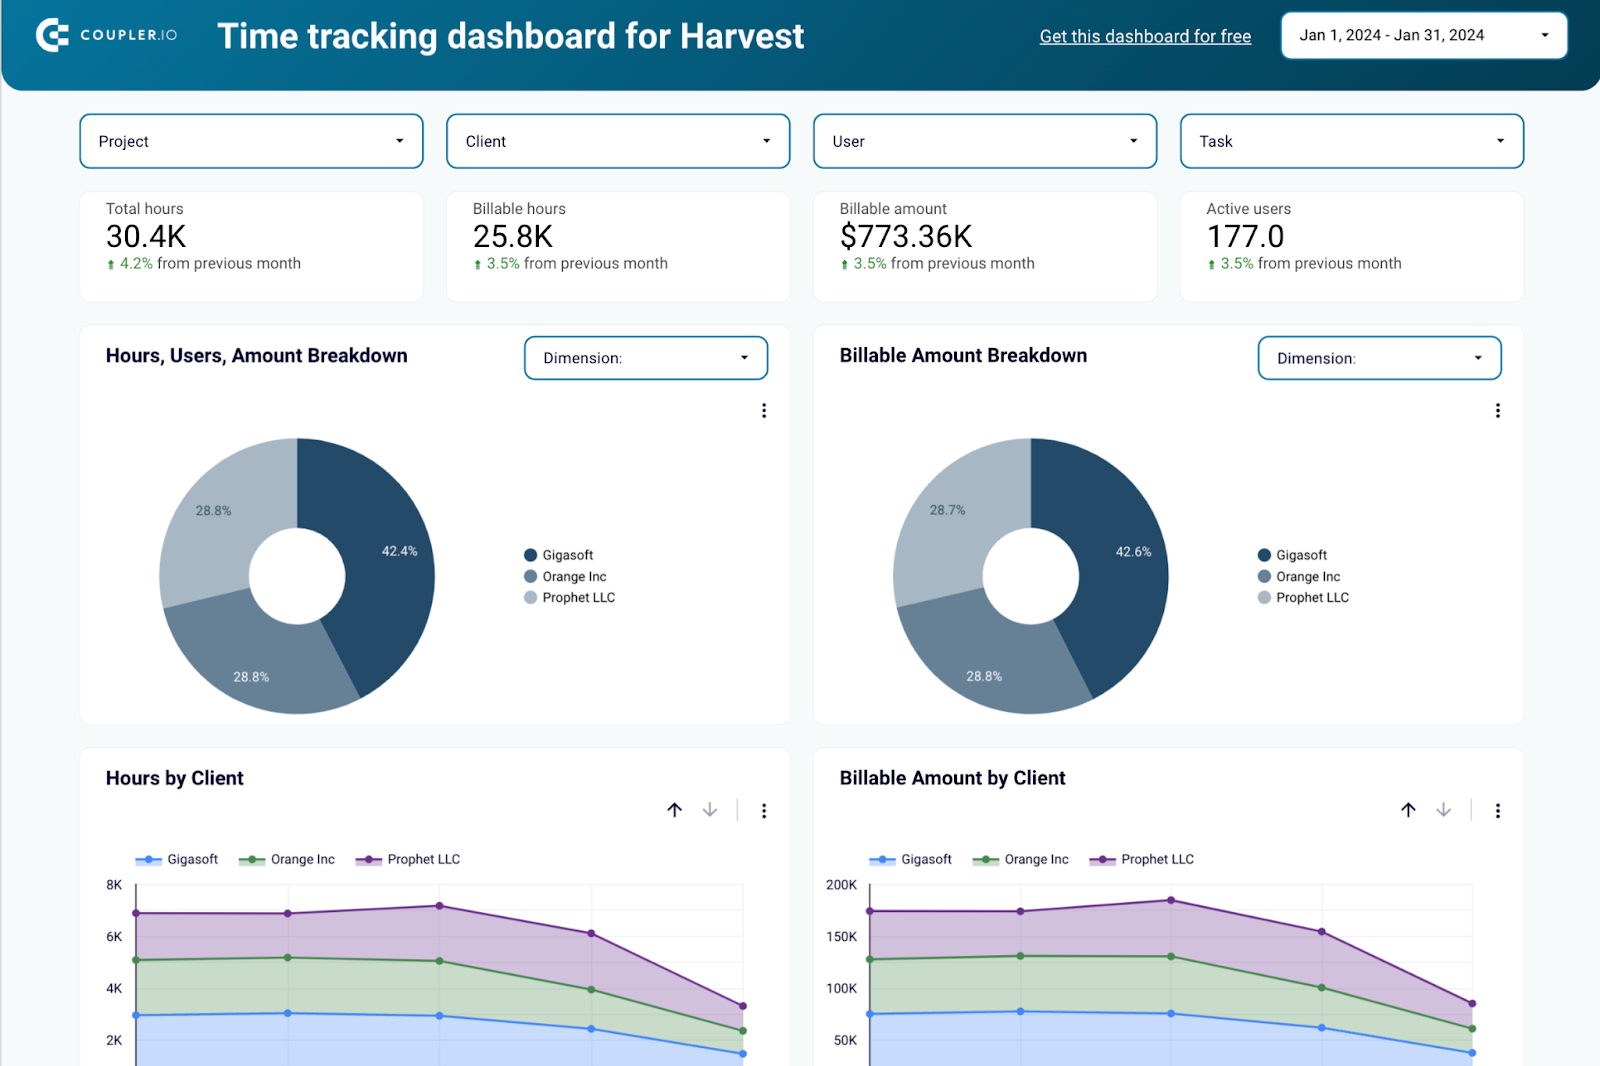
#8. Time tracking dashboard template for Harvest/Clockify
This time tracking dashboard template connects to your Harvest or Clockify account, giving you a clear view of how much time your team spends on different projects. It lets you gauge team productivity and understand why some projects are progressing slower/faster than others. You can even filter by project and task to track the efficiency of specific team activities.
Unlike the previous Google Sheets templates, this one is also available for Looker Studio and Power BI. Take your pick:


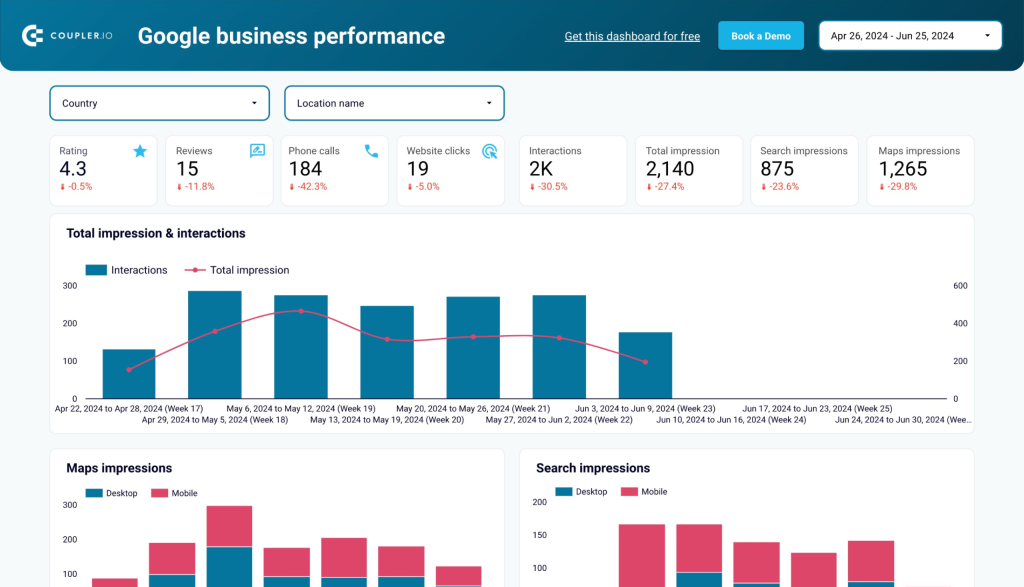
#9. Google Business Profile dashboard template
If you are working on promoting your business online, this Google Business Profile dashboard template may be useful. It lets you monitor trends in audience interactions and search impressions, identify which locations generate the most engagement, and track the high-level performance of your business promo project.
Connecting your Google Business Profile account to Looker Studio only takes a few minutes with Coupler.io. Try it here:
#10. Google Calendar dashboard template
This Google Calendar dashboard template is helpful when you want to understand how you can manage your time more effectively. You can analyze calendar data from the past 12 months, such as the types, organizers, and frequency of meetings held. While it’s not a direct way of reporting on project status, it can help you better allocate your time to a project, or demonstrate to stakeholders why your capacity is currently limited.

The template takes less than 5 minutes to set up in Looker Studio. You can also schedule data refreshes to make your report live.
What is a project status report for?
Simply put, it’s a report that shares all the information required by stakeholders to understand the current project status and major changes. It offers high-level details on the project. And it is usually written concisely in a one- or two-page format.
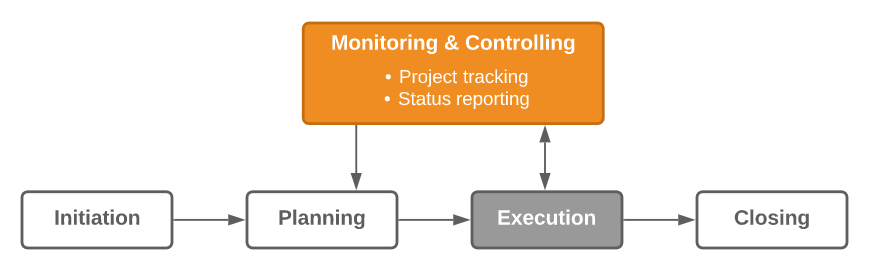
Once your project is in the execution phase, that’s when you need to start monitoring its progress. As a project manager, you have to do some controls to ensure your project executes as planned.
You’ll need to regularly track the project’s progress against the initial plan. And another crucial thing is sending project status reports to stakeholders.
See the following illustration of the five stages of project management:
How often do you need to send a project status report?
Well, usually weekly. But it can vary depending on the requirements. These requirements are commonly set by your project executive (or client if you are client-facing).
You may work on a project with rigorous reporting requirements, including:
- Daily activity reports for the core team
- Weekly project status reports for the project sponsor
- Monthly project highlight reports for the project steering committee
Some projects may only need face-to-face status reporting with the project sponsor. Even so, you still need to know which things you should include in your update. Why? To give them a good idea of how the project is progressing.
How to plan and write a status report for a project
Now that you understand the various forms a status report can take, it’s time to write your report.
Plan your report with two goals in mind: simplicity and functionality. We recommend that you follow the steps below.
Step 1: Gather your data
Collect the information you need to create the report. You may need to gather data from project management tools, CRMs, timesheet apps, accounting apps, project timelines, Gantt charts, even emails.
If you are interested in pulling data from different sources into Google Sheets, Looker Studio, or other BI tools, Coupler.io, can help you. It’s a reporting automation and analytics platform to create project status reports that update automatically. Coupler.io also provides marketing and business report templates designed to kick off your analytics without huge investments.
You can get started for free and create your report from scratch using the following data sources:
- Jira and Trello
- Salesforce and HubSpot
- Harvest, Clockify, and Google Calendar
- Xero and QuickBooks
- and 60+ more
Also, don’t forget to gather all the metrics that indicate the performance of your project. You may need to track your notes, meeting minutes, and emails to see whether there are any new metrics you should add to your report, or any other important info.

Create self-updating project status reports with Coupler.io
Get started for freeStep 2: Determine project status
After you get the data, you need to analyze and determine the project status. Suppose you’re using the RAG method, determine where each metric falls into — whether Red (bad), Amber (issues/risks present), or Green (everything is good).
Tip: Don’t be afraid to code the status as amber and ask for help early. Amber status reporting gives the project manager and team a chance to address issues before they become blockers.
Step 3. Check for additional updates from stakeholders
Check with your stakeholders and see whether they have any additional updates or details to add.
Tip: Encourage stakeholders to report any issues that may impact the project schedule. This can avoid statuses changing from green to red without warning.
Step 4. Plan the outline
Know what information you’ll include and in what order. Different readers may expect different report formats. For example, understand that a report written for a project sponsor may contain additional info that differs from a report written for the core team.
Tip: You don’t have to create a status report from scratch. There are many templates available, so choose one if you’d like to. You can reorder or remove any sections as you want, and you’re ready to begin writing!
Step 5. Write an ugly first draft report
Follow your outline and start writing. Work quickly on your first draft. Don’t worry about an ugly first draft, spelling mistakes, or grammatical correctness. Perfection is not the goal of your first draft. 😉
Step 6. Edit/revise your report
Aim for accuracy and an easy-to-read status report. Check and recheck every section of your report, including:
- The client name, report period, and date of the report
- Accuracy of statuses that indicate the project’s health
- Accuracy of numbers (e.g. if you display the budget or the actual amount spent in dollars)
- Technical jargon that may be unnecessary
- Any spelling and grammatical errors
Show your team and clients that you focus on detail in every aspect of your status report.
Step 7. Send the report
Finally, your project status report is ready to send! Suppose you create the report using Google Sheets. The simplest way is just to share a link to your document. Or, you may print it in a PDF format and distribute it via email, Slack, etc. Another way is to deliver it in a team meeting or a face-to-face meeting.
Step 8. Ask for feedback
Ask your stakeholders whether they understand the report or have any questions about it. In case anything is unclear, ask them to provide feedback. Check-in occasionally to see whether there’s anything you can cut, add, or improve to make your status reports serve them better. 🙂
So what should be included in a project status report?
In your status report, you should provide the information that is required to manage the project effectively. But keep in mind, that a status report should be simple, easy to understand, and should take little time to complete (and read).
At a bare minimum, your status report should contain the following info:
- Project details
- Overall project status
- Risks and issues
- Action items/help needed
And here are some optional items that may be useful to include:
- Project vision
- Forecast
- Comments
- Summary of works done in this period
- Summary of works planned for the next period
- Upcoming events
- Project schedule/timeline
The project schedule/timeline may cover the following points that let you estimate whether the plan is on track:
- Delays and reasons
- Work in progress
- Manhours/calendar dates plan comparison
- % of used man-hours/budget
- % of used calendar time
- % of budget planned for closed tasks (If you spend half of the budget in the first 10% of the calendar plan -> it is highly probable that you have underestimated the budget. If half of the project is passed, while only 20% of the budget is spent, it is likely that you won’t finish the project on time)
- Tasks
- Completed tasks
- Tasks in progress
- Next up tasks
- New tasks
- Cancelled tasks
- Any MILESTONES changed dates
- Blockers
- Project quality
- Completed tasks vs. bugs found
See the following example of a simple status report that works:
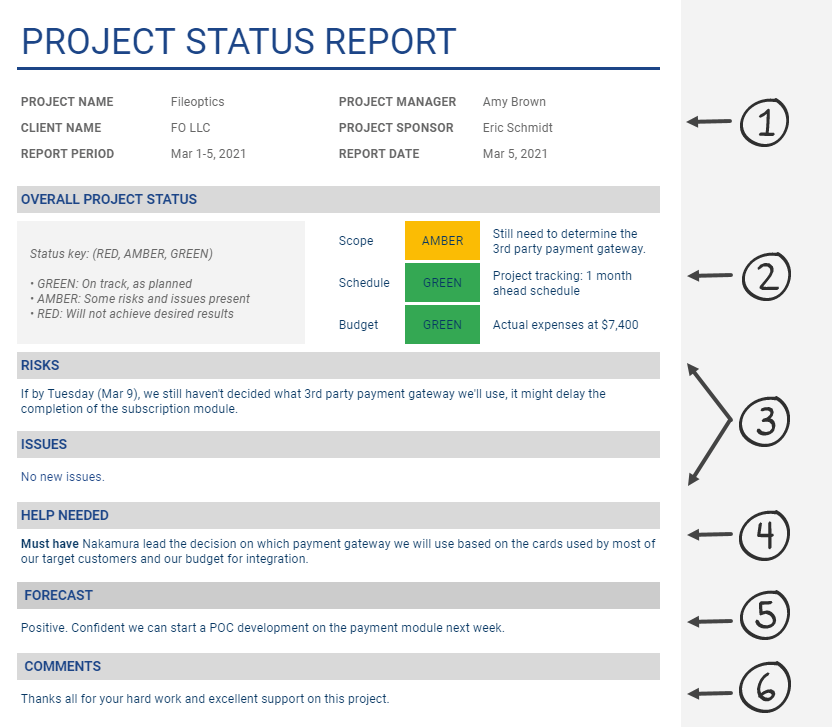
And here are the important highlights of the elements in the report above:
#1: Project details
In this section, add the project’s name and project manager’s name. You can add other details such as report date and client name (if any). An organization may have many project managers and multiple projects. So, distinguish your project and yourself from others.
#2: Overall project status
List your project’s success metrics or KPIs and their statuses based on current deliverables. Below are a few common indicators that will give stakeholders a good idea about the overall project health:
- Scope — Have scope changes been introduced and managed?
- Schedule — Are we on track with the project schedule?
- Budget — Are we within budget? Is there enough budget left?
Also, note that all the stakeholders must agree on the KPIs listed to avoid ambiguity on the “true” status of the project.
A common way to describe statuses is using “traffic light reporting”, also known as RAG because of the Red, Amber, and Green colors. Define what green, amber, and red mean because different people may have different interpretations. Here’s an example:
- Green is on track or as planned.
- Amber (or yellow) for some risks or issues present.
- Red if it looks like you’re not achieving the desired result.
Different types of projects may require a tweak of the definitions.
Note: we suggest you agree on whether red displays undesired difference between actual and initial plan or between actual and reported in previous report plan. Sometimes it is important to see only if something differs from the previous approved state, otherwise you can always see red indicators right from the start of the project.
#3: Risks and issues
List only urgent risks (potential problems that may occur in the next report period) that require management support to approve a necessary response.
Here are a few examples of common project risks:
- The organization is not ready for a planned change
- Key individuals leaving the organization
- Lack of communication between stakeholders
- The project schedule is not clearly understood
Also, list any new and important issues (risks that happened) that are impacting scope, time, and/or budget status.
Note: We understand that the above risk examples may sound ‘childish.’ It was simply to give you an idea of what project risks are. However, every company usually has its own standard for registering and reporting risks. It’s a huge topic and won’t be covered in this article.
#4: Help needed
List any action items needed to solve the issues. This section is critically important. It’s your opportunity to request the necessary assistance to change an amber or red status back to green.
Even if your status is green, you may still need some support to maintain that status.
Tip: Categorize your requests as “Must have,” “Should have”, and “Nice to have”. In most cases, project managers tend to label all support needs as “Must have”. But don’t overuse this classification if you don’t want your stakeholders to ignore your urgency.
Everything can’t always be a priority, right?
#5: Forecast
Use this section to share your vision of where the project is heading.
For example, you may state that the project scope is currently green. However, if needed help is not obtained, the next status report will likely reflect amber or even red status.
#6: Comments
Do you have any pertinent thoughts regarding the project? If so, share them here.
You can also use this section as an opportunity to applaud the efforts of key stakeholders contributing to the project and making a positive impact.
Why is a project status report important?
A project status report uncovers the overall project status, risks, issues, and required action items. Most importantly, it shows whether you’re on track toward your project goals… or not.
Here are some other benefits:
- For project sponsors, the status report is their only window into the state of a project. Also, by reading this report, they can sense whether there is any stress or frustration affecting the team’s morale. Checking people’s feelings is just as important as checking what they’re doing.
- For clients, the status report gives them an idea of whether their money is delivering value or not. If so, it can provide them with confidence and ensure continuity of payments.
- For project managers, by creating status reports, they can overthink the project status and where the project is going. Also, they can ask for help if needed without interrupting the working process of other stakeholders.
Status reporting is critical to a project’s success. As a project manager, you should be able to create a report format that is simple and easy to understand. Moreover, the report should contain the required info and report the “right” status.
Project status report best practices
In agile project management, reporting and keeping project information updated is of vital importance. At the same time, status reporting can consume a lot of your time.
You must complete each section by hunting around for the information located in emails, messenger channels, meeting minutes, tracking tools, and project documentation.
Avoid headaches by following the best practices below:
#1. Use a simple format
It would be best to begin by developing a simple status report format that is easy to understand and takes little time to write (and read). And, unless absolutely necessary, make sure that your project status report stays one or two pages.
Who’s going to read a 10-page status report that includes project history and background? Status reports that are too long risk having your stakeholders gloss over them and miss important details. Or, even worse, not reading them at all.
#2. Use templates
You do not need to re-invent the structure each time. Please take a look at the templates we have shared. So when it comes to status reporting, it should not take more than an hour for you to create it.
#3. Keep your project documentation structured and up to date
Structure and keep all your relevant project control documents up to date. Thus, producing a status report should be a simple copy-and-paste activity followed by a small effort to add some comments.
#4. Always have a status report on the go
Please don’t create a status report in the last hour before you send it. Instead, have an in-progress document that you always update as meetings or other important events happen in real-time. By doing this, you’ll also be prepared if someone needs an immediate status report out of the blue. 😉
#5. Write targeted status reports
Make sure that your report is targeted. Know your audience because that’s the best way for your status report to make an impact and produce results. Different readers may have different interests in what they want to know about your project.
Pros & cons of using project status report templates
Pros
- Save time. Of course, a template is just a starting point, but it can save a lot of your precious time. Instead of wasting time staring at an empty document, why not begin with a template? Besides, you can also focus more on the content instead of the format.
- Help set expectations. If you are a new project manager, templates may give you a good idea of what information is expected by readers.
- Capture best practices. Status report templates capture best practices of what info you should include in your report (and how to structure them).
Cons
- Time may be wasted if you are tempted to fill in every section, while some of it might not be necessary for your project. Also, if you spend too much time modifying the template to try to “fit” your project into the defined format, let it go and start from scratch.
- Templates are not targeted. The wider the audience a status report template tries to cover, the less focused the report becomes. The template might also not cover specific requirements for a certain audience. When using a template, you’ll probably need to tweak it a bit here and there.
Is a template your choice for project status reporting?
Having a great plan is one thing, but turning it into a reality is another. As you start working on delivering the scope, reviewing and reporting on your project’s status is a great way to keep all stakeholders on track with the current status, updates, and changes to the project plan. This adds transparency to the process and lets you get early signs of problems that are brewing, but it does not help you stick to the original plan.
Templates are great to start with. Choose a template you like and the one that seems most suitable for your project. Then, modify it as necessary.
Always ask for feedback on your report. Is there any missing information or any unnecessary sections? Is the report clear enough, and is the format acceptable?
Hopefully, this article along with the templates provided can help you with your project management. Good luck with your project!
