Whether you’re new to Excel VBA or just want a refresher, this tutorial is for you. In 20 minutes (or less!), we’ll take you through the basics of working with VBA code. You’ll learn to write and run VBA code, use the macro recorder, and more! We also give you some common examples when working on VBA Excel. So, buckle up as we’re going to get started! ?
What is VBA in Excel?
VBA stands for Visual Basic for Applications. It’s a programming language used to automate tasks in Microsoft Office products, including Excel, Word, and Outlook. With VBA Excel, you can write code to automate tasks, create custom functions, and even move data between Office programs.
This programming language was introduced with Excel 5.0 in 1993. It might be hard to believe that the Excel and VBA combo has been around for almost 30 years now. And as you can see, we’re still talking about it today! This means that this language is still popular among spreadsheet users—which makes sense considering what it offers and that few other spreadsheet apps can compete with this.
Why is VBA important?
VBA is important because of all the things it can do, but mainly its ability to automate mundane tasks that take a lot of time is particularly useful. As well as that, here are some common uses of VBA in Excel:
- Create custom functions. If you find yourself using the same complex formula over and over again, you can save yourself some time by creating a custom function using VBA.
- Create custom add-ins for Excel. Add-ins are small programs that extend the functionality of Excel. You can, for example, create an add-in that allows you to apply formatting to selected cells, generate random numbers, apply formulas, or anything else you may want to improve productivity.
- Simplify the data entry process. With Excel VBA, you can create custom forms that will simplify data entry and eliminate errors. You’ll be able to enter all information in one place with consistent formats. It’s easier for everyone involved.
- Automate tasks that you would otherwise have to do manually. Automating tedious, manual tasks with VBA Excel code is an easy way to save time and avoid mistakes. Here’s a common example. You might need to frequently update your spreadsheets by pulling data from various sources such as QuickBooks or Xero. However, doing this manually every day can prove costly in both efficiency and accuracy due to human error.
Are there no-code ways to automate workflows in Excel?
If you want to automate such processes without coding, Power Query is one of your best options. However, it’s not always ideal if any of your data sources isn’t supported by Power Query.
In this case, try using third-party integration tools like Coupler.io, which is a solution to import data from different sources into Excel automatically. You can even set up a schedule to refresh your data (hourly, daily, monthly, etc.) to keep it always up-to-date.
Coupler.io allows you to pull data from CRM applications like Pipedrive, time-tracking tools like Clockify and many other apps and sources including Microsoft Excel. Check out all the available Excel integrations to choose the ones you need. So, you basically can automate data flow between your workbooks or even merge Excel files using it.
Excel VBA programming: Before you get started
Before we get started with Excel VBA programming, let’s understand a few basic terminologies and how to open the Visual Basic Editor (VBE).
A few basic terminologies
Here are a few terminologies we’ll be looking at in this article:
- A macro is simply a procedure written in VBA Excel. You can write macros by using the macro recorder or write your own code.
- A module is where you will store your code. Think of it as a blank canvas where you can write whatever you want.
- A procedure is an instruction or a set of instructions. The two main types of procedures are Sub procedure and Function procedure.
- A Sub procedure (or Sub) is a procedure that only performs actions and does not return a value.
- A Function procedure (or Function) is a procedure that returns a value.
How to open VBA editor in Excel
To use VBA in Excel, you first need to open the Visual Basic Editor (VBE) by simply pressing Alt+F11 on your keyboard.
Alternatively, click on the Developer tab from the ribbon menu, then click on the Visual Basic button. If the Developer tab is not visible, see the section below on how to show the Developer tab in Excel.

After the Visual Basic Editor is open, you’ll be able to find multiple sections described below:
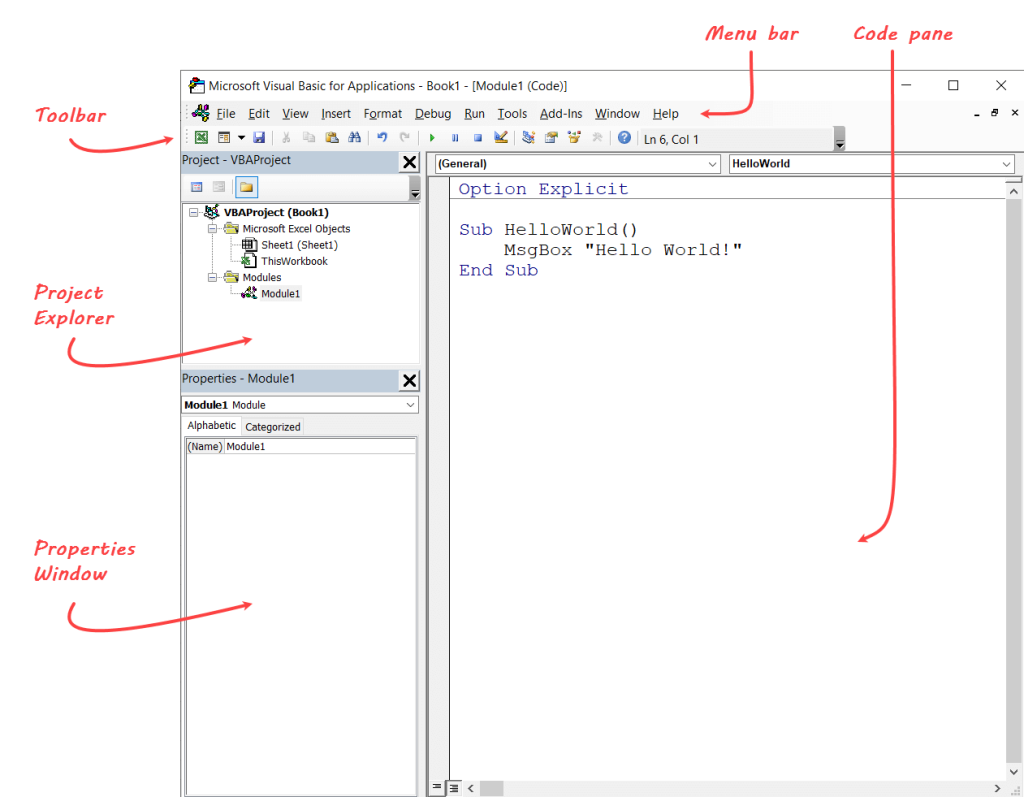
- Menu bar. This is the main menu of the VBE and contains various commands. Many of the commands have shortcut keys associated with them.
- Code pane. This area is where the macro/code can be found. Here are all declaration variables, procedures, functions, etc.
- Toolbar. It contains most of the useful commands that are used while codding. You can customize it by clicking View > Toolbars, then customize as you see fit. Most people just leave them as they are.
- Project Explorer. The Project Explorer Window can usually be found on the top left side of the VBA Excel editor, showing a hierarchical list of open projects. This list contains Microsoft Excel Objects (Sheets and ThisWorkbook section), Forms (all User Forms created in the project), Modules (all macro modules), and Class Modules.
- Properties Window. The Properties Window is where you can set all the properties for all objects from your application. The properties can be sorted alphabetically or by category.
How to show the Developer tab in Excel
The Developer tab is hidden by default in Excel, but you can easily show it if you need to access the features it contains. To do so, here’s a quick guide:
- First, click on File > Options.
- In the Excel Options dialog box, click on Customize Ribbon.
- On the right pane, check the box next to Developer.
- Click OK to save your changes and close the dialog box.
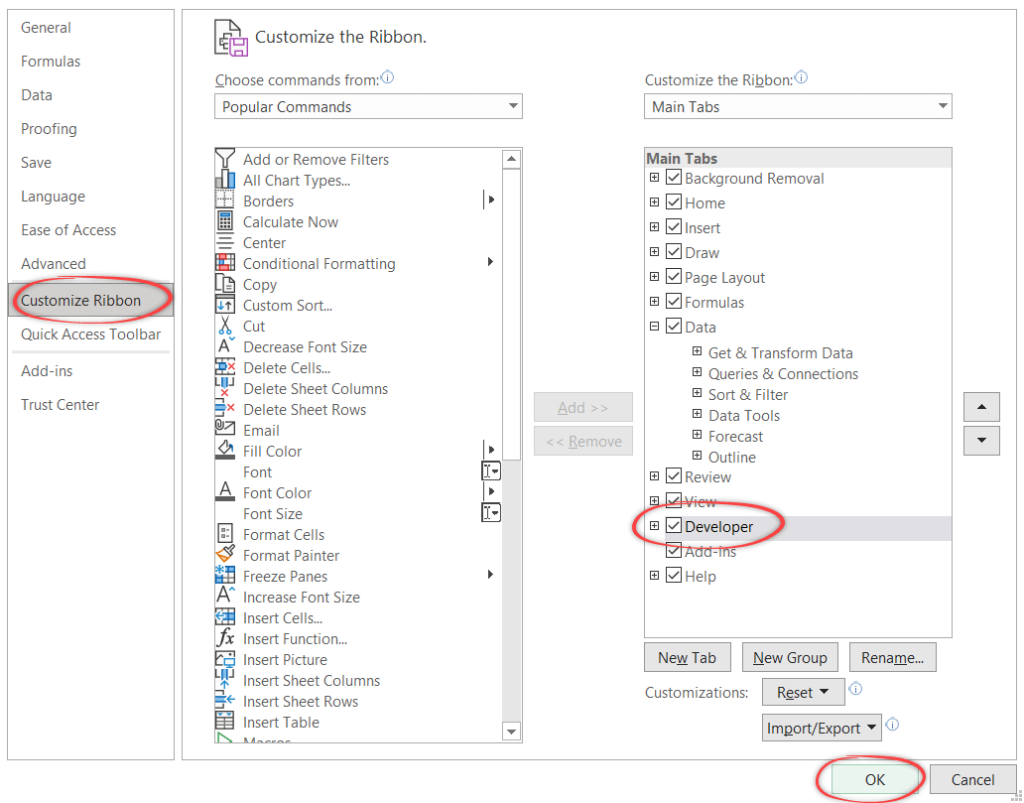
Just that! Now when you open Excel, you will see the Developer tab listed among the other tabs at the top of the window.

How to use VBA in Excel
Most of the code people write in VBA are Sub and Function procedures. So, in this section, we’ll mostly learn about how to write, edit, and run them.
How to write VBA code in Excel manually
To write VBA code manually, follow the steps below:
- Create a new Excel workbook.
- Press Alt+F11 to activate the VBE.
- Click Insert?>?Module in the menu bar.
- Type manually or copy-paste the following code in the editor:
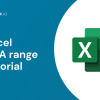
Sub ShowHello()
 MsgBox "Hello, " & Application.UserName & "!"
End Sub

Function ShowCurrentTime()
 ShowCurrentTime = "Current time: " & Now
End Function

- If you want, save the code by pressing Ctrl+S. The extension of the file needs to be XLSM because it contains a macro.
Code explanation:
- The ShowHello() is an example of a Sub procedure. Every Sub procedure starts with the keyword Sub and ends with an End Sub.
- The ShowCurrentTime() is an example of an Excel VBA Function procedure. Every Function procedure starts with the keyword Function and ends with an End Function.
How to run VBA code in Excel
Sub and Function procedures are run differently in Excel. Both can be executed in several ways, but we will cover only a few of them.
To execute an Excel VBA Function procedure:
You can click the Run button in the VBE toolbar or simply press F5 for the same command. Excel executes the Sub procedure in which the cursor is located.
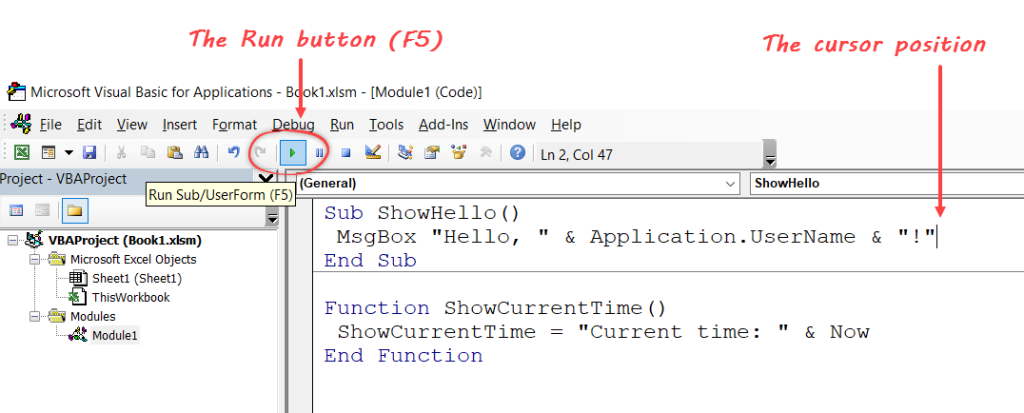
Alternatively, you can execute Sub procedures from Excel by pressing the Macros button in the Developer tab:
To execute a Function procedure:
You can use it in a worksheet or call it from another procedure (a Sub or another Function procedure).
As an example, let’s see how to execute the ShowCurrentTime function by using it as a worksheet formula. To do that, simply type =ShowCurrentTime() in a cell, then press Enter. See the image below:

How to record VBA code in Excel
Another way you can get code into a VBA module is by recording your actions using the Excel Macro Recorder. The result is always a Sub procedure. So, we cannot use this tool as an alternative method of creating functions — they must be manually entered by writing and editing the code ourselves.
Here is the step-by-step for recording a macro:
- Go to the Developer tab and click the Record Macro button.
- In the Record Macro dialog box, enter a name for the macro. Optionally, you can enter a shortcut key, macro location, and description.

- Click OK to start recording.
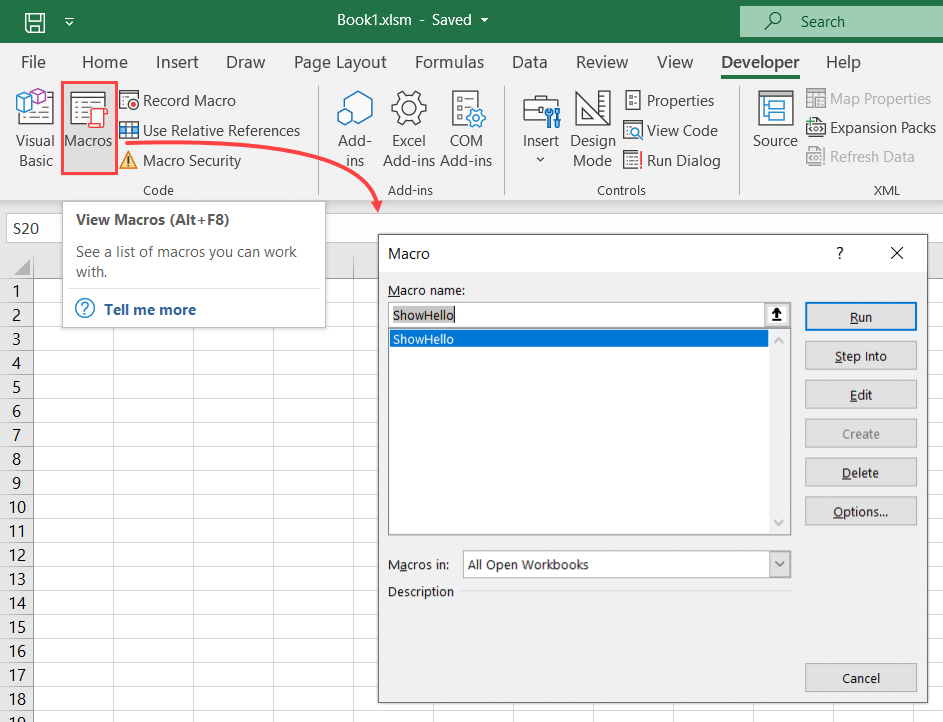
- Perform all the actions that need to be recorded. For example, let’s just enter 1 to 10 from A1 to A10 manually:
- When you finish, click the Stop Recording button in the Developer tab.
How to edit recorded VBA code in Excel
After you record a macro, you may be curious to see what the code looks like. You might even wonder where your recorded macros are stored, right? Well, by default, they’re stored in a module.
So, to view and edit recorded macros, first, you need to activate the VBE by pressing Alt+F11 on your keyboard. After that, double-click the new module created and locate the code you want to edit.
For example, here is the AssignRowNumber macro we recorded previously:
Sub AssignRowNumber()
'
' AssignRowNumber Macro
' This procedure inserts row numbers to cells, 1 to 10.
'
' Keyboard Shortcut: Ctrl+Shift+M
'
    ActiveCell.FormulaR1C1 = "1"
    Range("A2").Select
    ActiveCell.FormulaR1C1 = "2"
    Range("A3").Select
    ActiveCell.FormulaR1C1 = "3"
    Range("A4").Select
    ActiveCell.FormulaR1C1 = "4"
    Range("A5").Select
    ActiveCell.FormulaR1C1 = "5"
    Range("A6").Select
    ActiveCell.FormulaR1C1 = "6"
    Range("A7").Select
    ActiveCell.FormulaR1C1 = "7"
    Range("A8").Select
    ActiveCell.FormulaR1C1 = "8"
    Range("A9").Select
    ActiveCell.FormulaR1C1 = "9"
    Range("A10").Select
    ActiveCell.FormulaR1C1 = "10"
End Sub
However, you may agree that the above code is not the best way to assign values to the cells. It selects a cell, assigns value as a formula, and then moves to the next cell. We can make the code more compact, readable, and dynamic using the following code:
Sub AssignRowNumber()
'
' AssignRowNumber Macro
' This procedure inserts row numbers to cells, 1 to 10.
'
' Keyboard Shortcut: Ctrl+Shift+M
'
 For i = 1 To 10
  ActiveSheet.Cells(i, 1).Value = i
 Next i

End Sub
In conclusion, the Macro Recorder is a great way to get into VBA programming. However, it can be complicated sometimes to understand the macro recorded. The good news is that recorded macros can be customized after they’re created, giving you even more control over what your program does and how it operates!
You can easily add a button to an Excel sheet and assign a macro to it. A few simple steps can do this.
For example, let’s take the running ShowHello() Sub procedure one step further by executing it on a button click.
Here are the steps:
- Click the Developer tab, then click Insert > Button (Form Control).
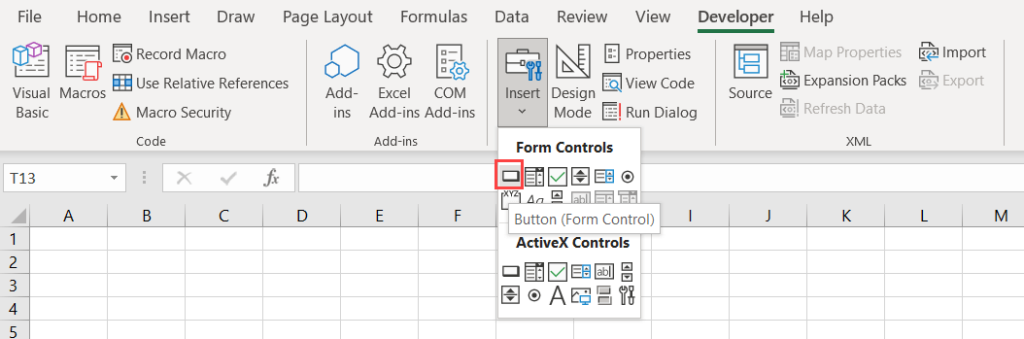
- Click and drag anywhere on the worksheet to create a button.
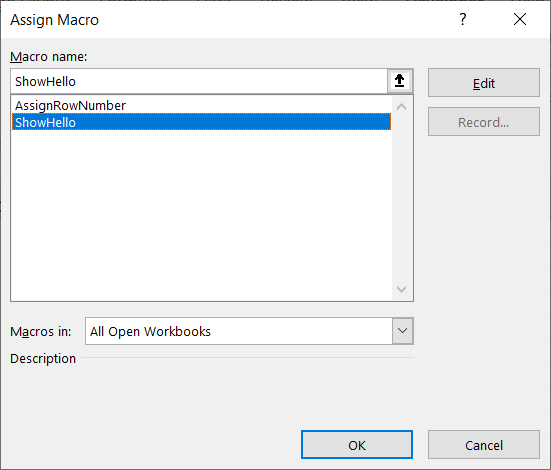
- In the Assign Macro dialog, select ShowHello, then click OK.
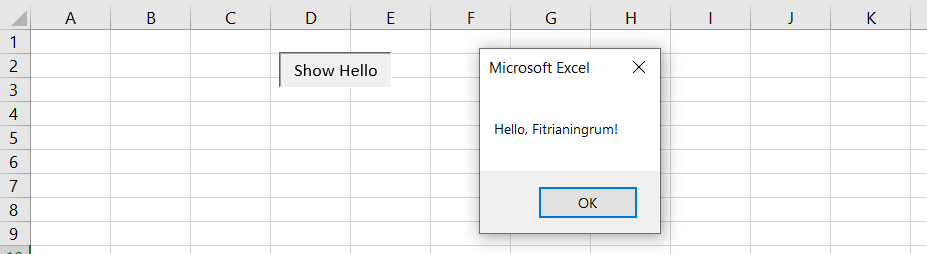
- By default, a “Button 1” is created. Click the button’s text and type “Show Hello” to rename it.
- To test the button, click on it. You’ll see a message box appear showing Hello to you ?
More VBA Excel examples
This section contains several examples that demonstrate common VBA programming concepts. You may be able to use or adapt these pieces for your own needs.
Example #1: Looping through a range of cells
Many macros operate on each cell in a range, or they perform selected actions based on each cell’s value. These macros usually include a ForEach-Next loop that processes each cell in the range.
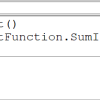
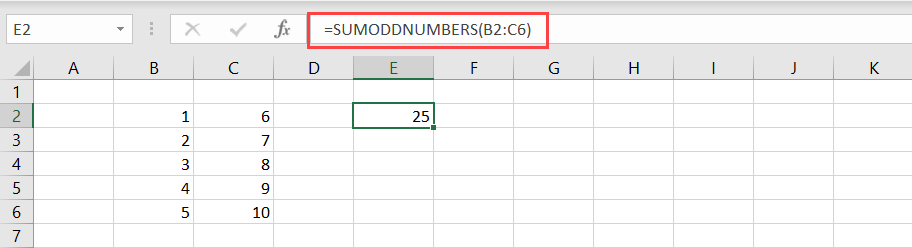
The following SUMODDNUMBERS function demonstrates how to loop through a range of cells to sum all the odd numbers.
Function SUMODDNUMBERS(range As range)
 Dim cell As range

 For Each cell In range
  If cell.Value Mod 2 = 1 Then
   SUMODDNUMBERS = SUMODDNUMBERS + cell.Value
  End If
 Next cell

End Function
To use the function, type =SUMODDNUMBERS() in a cell and input a range of cells in the parameter. See the screenshot below:
Example #2: Conditional structure
The following example shows how to use a decision structure using a Select-Case statement. Many programmers like the Select-Case structure over If-Then-Else because the code looks more readable when checking multiple conditions.
Sub ShowBudgetText()
    Dim Budget As Long
    Dim Result As String

    Budget = InputBox("Enter project budget: ")

    Select Case Budget
        Case 0 To 5000: Result = "LOW"
        Case 5001 To 10000: Result = "MEDIUM"
        Case Is > 10000: Result = "HIGH"
    End Select

    MsgBox "You have a " & Result & " budget."
End Sub
Code explanation:
The code prompts the user for a value, evaluates it, and then outputs a result. It evaluates the Budget variable and checks for three different cases (0–5000, 5001-10000, and greater than 10000). The Select-Case structure is exited as soon as VBA finds a TRUE case and executes the statements for that particular block.
Example #3: Error handling
You can’t always anticipate every error that might occur. But if possible, you should trap them to ensure your program doesn’t crash at runtime.
Below are the three methods of error handling in VBA. Each has its own benefits and drawbacks, so it’s important to choose the right one for your needs.
- On Error Resume Next ignores any encountered errors and prevents the code from stopping.
- On Error GoTo 0 stops the code on the line that causes the error and shows a message box describing the error.
- On Error GoTo [Label] allows you to specify what you want to do with the errors.
Let’s see an example. We’ll add an On Error GoTo [Label] error handling method to our previous ShowBudgetText Sub. This will trap any type of runtime error and then display the error in a warning message box.
Sub ShowBudgetText()
    Dim Budget As Long
    Dim Result As String

    On Error GoTo ErrorHandler

    Budget = InputBox("Enter project budget: ")

    Select Case Budget
        Case 0 To 5000: Result = "LOW"
        Case 5001 To 10000: Result = "MEDIUM"
        Case Is > 10000: Result = "HIGH"
    End Select

    MsgBox "You have a " & Result & " budget."

ErrorHandler:
    MsgBox "Please enter a valid input.", vbExclamation

End Sub
5 Tips for mastering Excel VBA programming
Learning any new programming language can be daunting at first, but we hope this article has given you a good start in learning Excel VBA.
In this last section, we’ve included five of our top tips that will help you on your journey to mastering the language:
- Start by learning the basics of programming. If you’re new to programming, it’s important to start with understanding what a variable is, various data types in VBA, how to use loops and conditions, etc.
- Make use of online resources. Fortunately, there are plenty of resources available to help you learn the basics. Once you have a good understanding of programming fundamentals, you’ll be able to start taking advantage of Excel VBA’s more advanced features.
- Familiarize yourself with common Excel VBA objects and methods. Some of the most commonly used Excel VBA objects include Range, Worksheet, and Workbook.
- Experiment with the Record Macro feature. This is a great way to get a feel for Excel VBA without having to write any code yourself. Simply record a macro and then edit the resulting code to customize it to your needs.
- Don’t forget to have fun! Excel VBA can be a powerful tool, but it’s also meant to be enjoyable. So relax and enjoy the process of learning something new.
Finally, thanks for reading, and have fun! ?
