Pipedrive is excellent at organizing sales data into a single place. Many choose to feed such data to other apps they use, be it for analytical processes or to streamline their workflows. Whether you want to set up internal automation, export data, or build apps for Pipedrive Marketplace, you’ll have a pleasant time doing so with Pipedrive API.
In this article, we’ll explain the basics of using the API. We’ll show you how to build your first apps or integrations and explain various concepts. We’ll also share a ready Pipedrive API integration capable of automating various API operations.
Getting started with Pipedrive REST API
Pipedrive offers a RESTful API suitable for building apps and integrations around Pipedrive – both for your use and for external users. With the available endpoints, you can manipulate all sorts of entities available in Pipedrive: deals, leads, organizations, activities, notes, and many others.
The first step to getting started is securing a sandbox account at the Pipedrive Developers site. It’s a requirement if you plan to build a public app for the Pipedrive Marketplace. Shortly after you’ve signed up, you’ll be granted access to the Marketplace Manager you can later use to fine-tune and publish your app.
You can use the sandbox for testing purposes too. It’s useful when experimenting with internal integrations or just getting started with Pipedrive API. The obvious benefit is that you get to work on dummy data without the risk of affecting the live data on Pipedrive.
Note: You’ll need to be on a paid Pipedrive plan to access the sandbox for testing. However, you can publish apps to the marketplace even from a free tier.
You’ll find all available endpoints on the API reference page.
Pipedrive API token
To validate your Pipedrive API requests, you need to use an individual API token. The token is required when building integrations with Pipedrive and guarantees that only authorized users can access the information on your account.
To generate and/or copy your API token, open the Pipedrive web app. Click on your profile icon in the top-right corner and choose Company settings. Then, select Personal preferences and switch to the API tab.
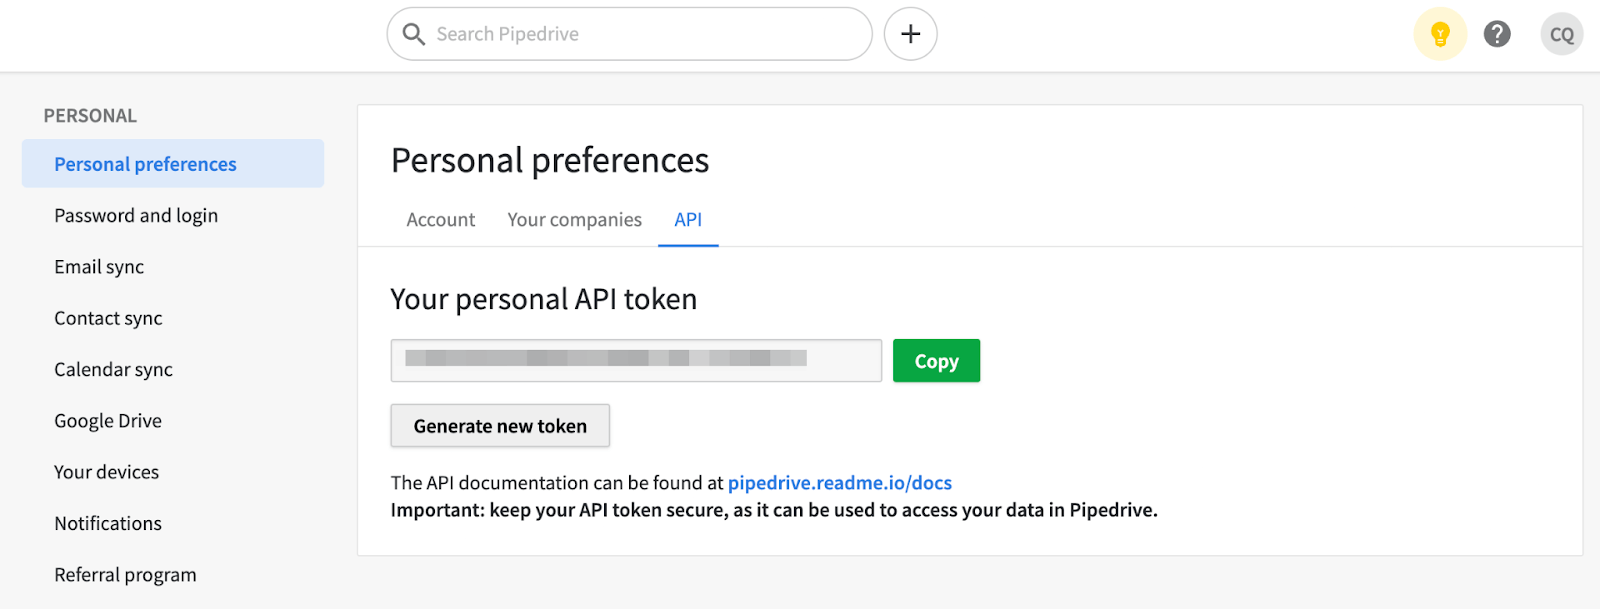
If you don’t see the API tab, you don’t have sufficient permissions to access the API token. Contact your company administrator and ask them to upgrade your access.
You can only have one value API token at a time. Generating a new one will invalidate the previous token. As a result, integrations using the old token will stop working, and you’ll need to update them with new authentication data.
Note that you’ll need a separate API token for each company you’re added to.
API Pipedrive – other basic concepts
As discussed above, API requests and integrations built around Pipedrive are authenticated with the use of an API token.
On the other hand, you must validate private and public apps via the OAuth 2.0 flow. This is very well explained in this video from Pipedrive’s YouTube channel:
Speaking of apps, there are three types you can have:
- Public apps are available for everyone on the Pipedrive Marketplace and can also be found via search engines. Each app needs to go through Pipedrive’s app review process to become public.
- Unlisted apps are suitable if you want to provide a Pipedrive integration to only some users. They can access an app via a direct link. An unlisted app still needs to go through the app review process.
- Private apps (also referred to as internal apps) can only be used by the users of the same company as an account that hosts an app. They don’t need to go through the app review process.
Note that apps aren’t company-wide. Each user needs to install an app or an integration manually to use it. If they have multiple companies, they have to install an app for each. A user doesn’t need access to the API to install an app, though.
Explore our list of sales APIs.
Pipedrive API integration – how to create an app
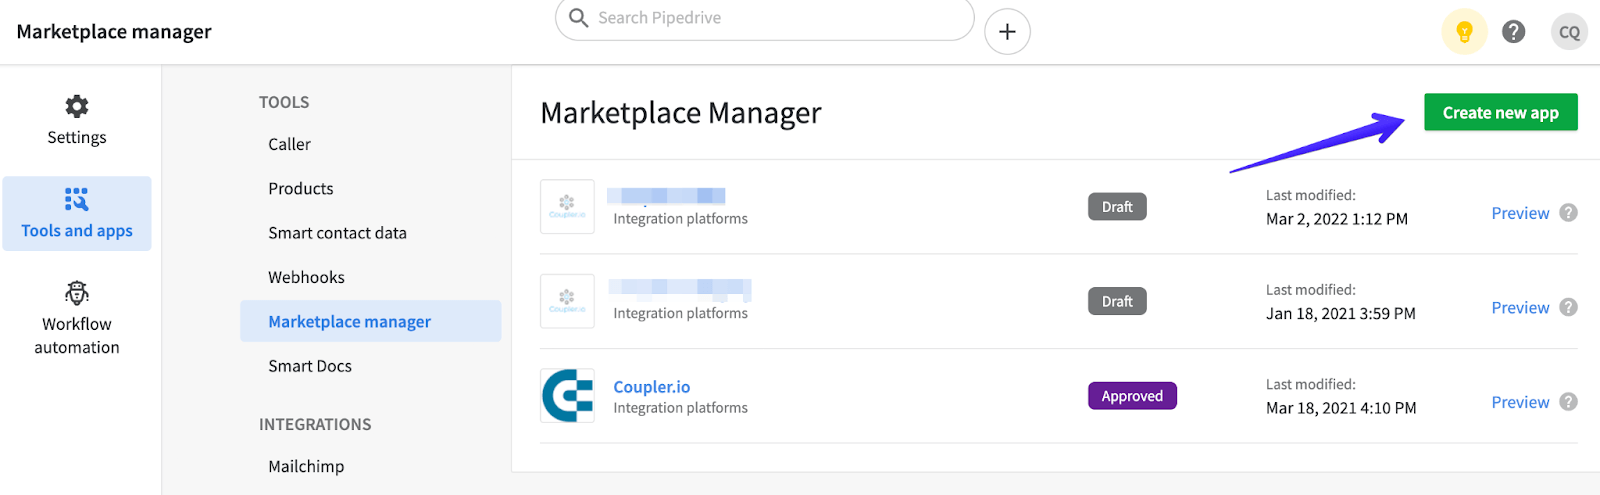
The app creation process is pretty straightforward. Once you secure a sandbox account, you can jump to the Marketplace Manager tab. You’ll find it in the Tools and apps menu. Click Create new app to get started.
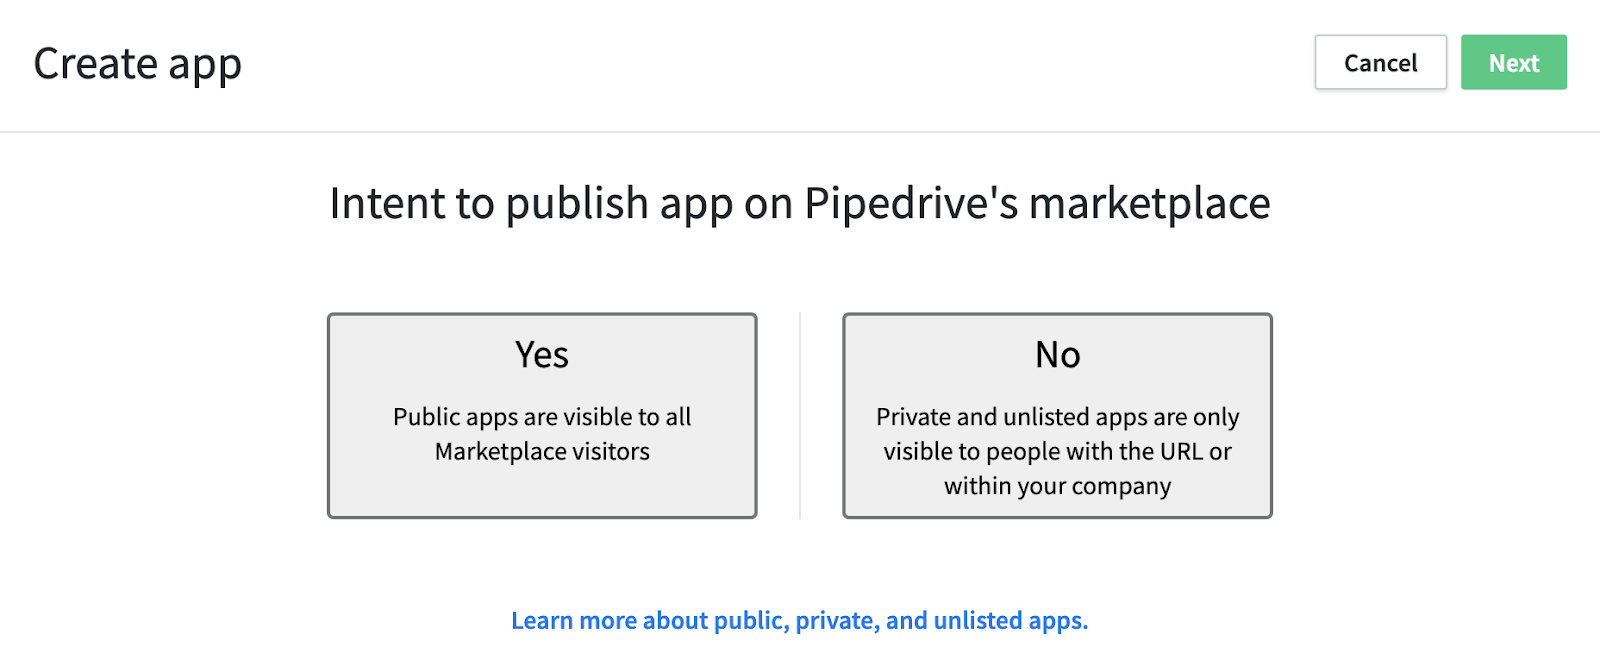
Choose whether you wish to publish an app on Pipedrive Marketplace once it’s finished and approved, and then click Next.
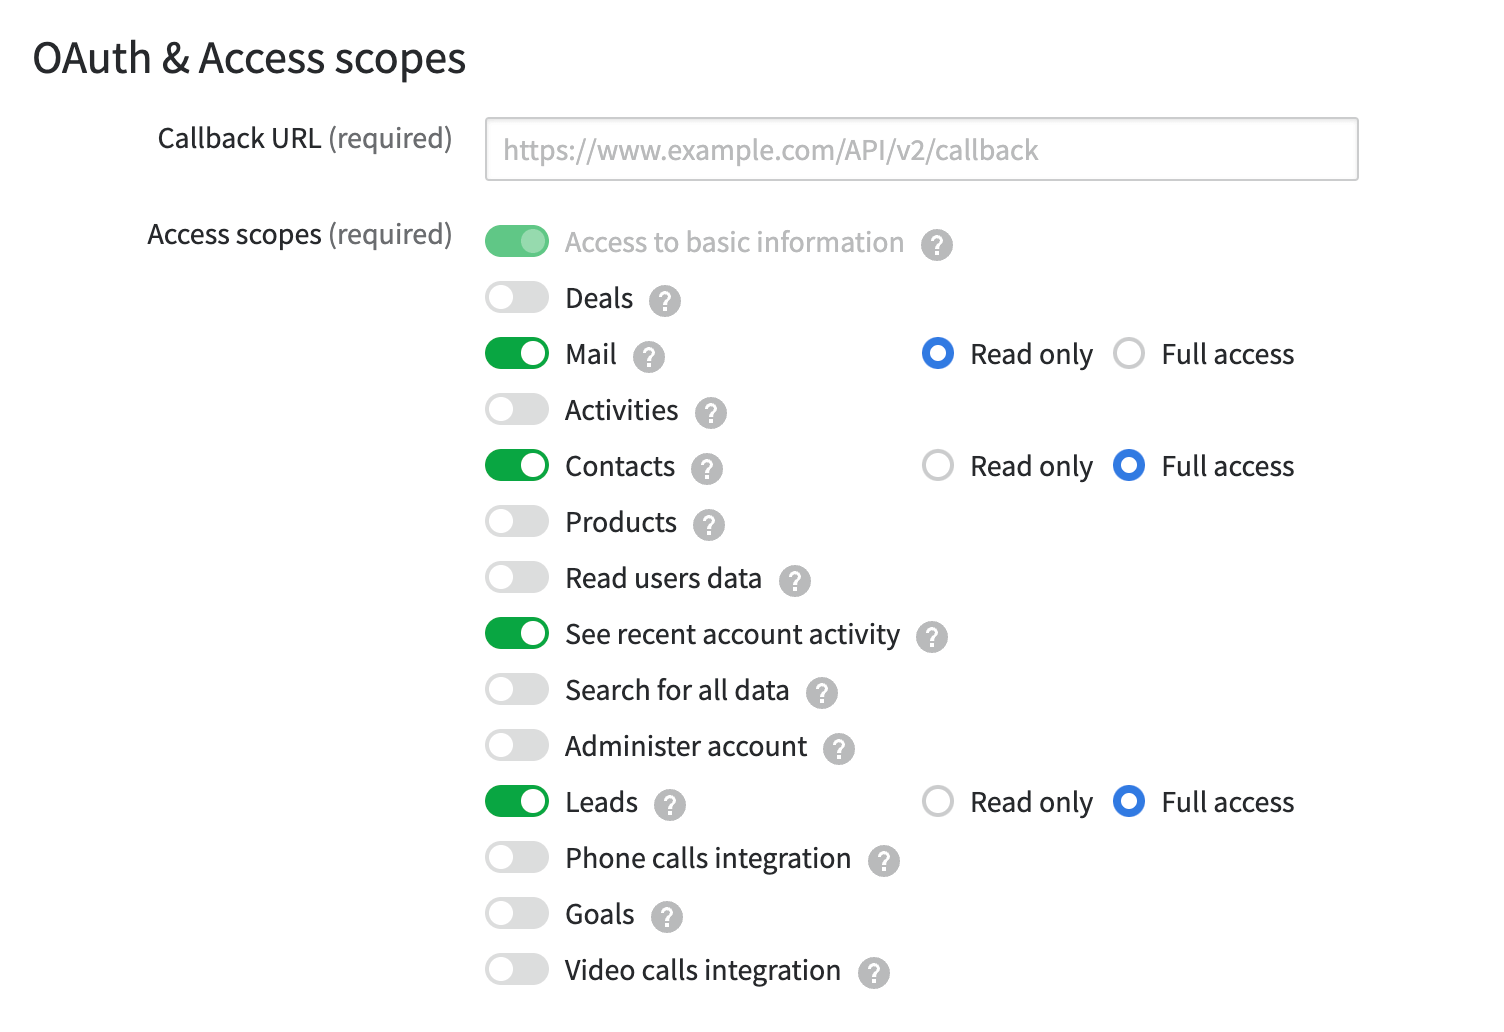
In the next stage, you’ll have a chance to fill in various app details. As the help text indicates, it’s enough to fill just a name and OAuth Callback URL for now. You’ll be able to edit them any time later, too, if you wish.
In the OAuth & Access scopes section, you can choose the access levels an app should have to the user’s data. By default, it can only access the basic info of the authorized users. For most other entities, you can choose read-only or full access.
Once you’ve saved an app, it will appear as a draft on your list in the Marketplace Manager. What’s left to do is:
- Add the OAuth 2.0 authentication and the proper installation flows.
- Review the app review process checklist.
- Populate all the required fields in the app settings and submit the app for review.
Pipedrive API limits
Pipedrive limits the frequency of API requests you can send. The capacity depends very much on your company’s subscription plan – the higher the plan, the more requests you can send.
The limits are expressed as the number of requests sent in any 2-second window and are per token, not per company. This applies both to API tokens (for requests and integrations) and access tokens (for OAuth 2.0).
The limits are as follows:
| Plan | Requests per 2 seconds per API token | Requests per 2 seconds per access token |
| Essential | 20 | 80 |
| Advanced | 40 | 160 |
| Professional | 80 | 320 |
| Enterprise | 120 | 480 |
What’s more, Pipedrive also puts a limit on the number of POST and PUT requests you can send. Currently, the limit stands at 10,000 requests sent every 24 hours, resetting every night at midnight UTC. Once again, the limit is per token, not per company or per integration.
While the limitation is not strictly enforced, Pipedrive reserves the right to start blocking POST/PUT requests if you repeatedly exceed the limit.
You can check where things stand at any given moment by looking up the x-daily-requests-left row from the most recent request response header.
Pipedrive API custom fields
With custom fields, you can add additional information to deals, people, organizations, and products within your Pipedrive account. You can do so manually via Settings -> Company -> Data fields or programmatically via API.
When working with API, you can use either of the following POST requests to add a new custom field to the respective entity:
- /dealFields for a Deal field
- /organizationFields for an Organisation field
- /personFields for a Person field
- /productFields for a Product field
Note: Each custom field added for Leads is also inherited by Deals.
You can’t duplicate Pipedrive API custom fields and those added via the interface onto other Pipedrive accounts. You’ll need to add them manually for each account. Technically, you could add identical custom fields for each account you use. However, the fields will still differ by the key parameter that they’re referenced by in the API.
How to find a Pipedrive API key of a custom field
The said key is a 40-character string visible in the API requests and their responses. It can’t be modified at any time.
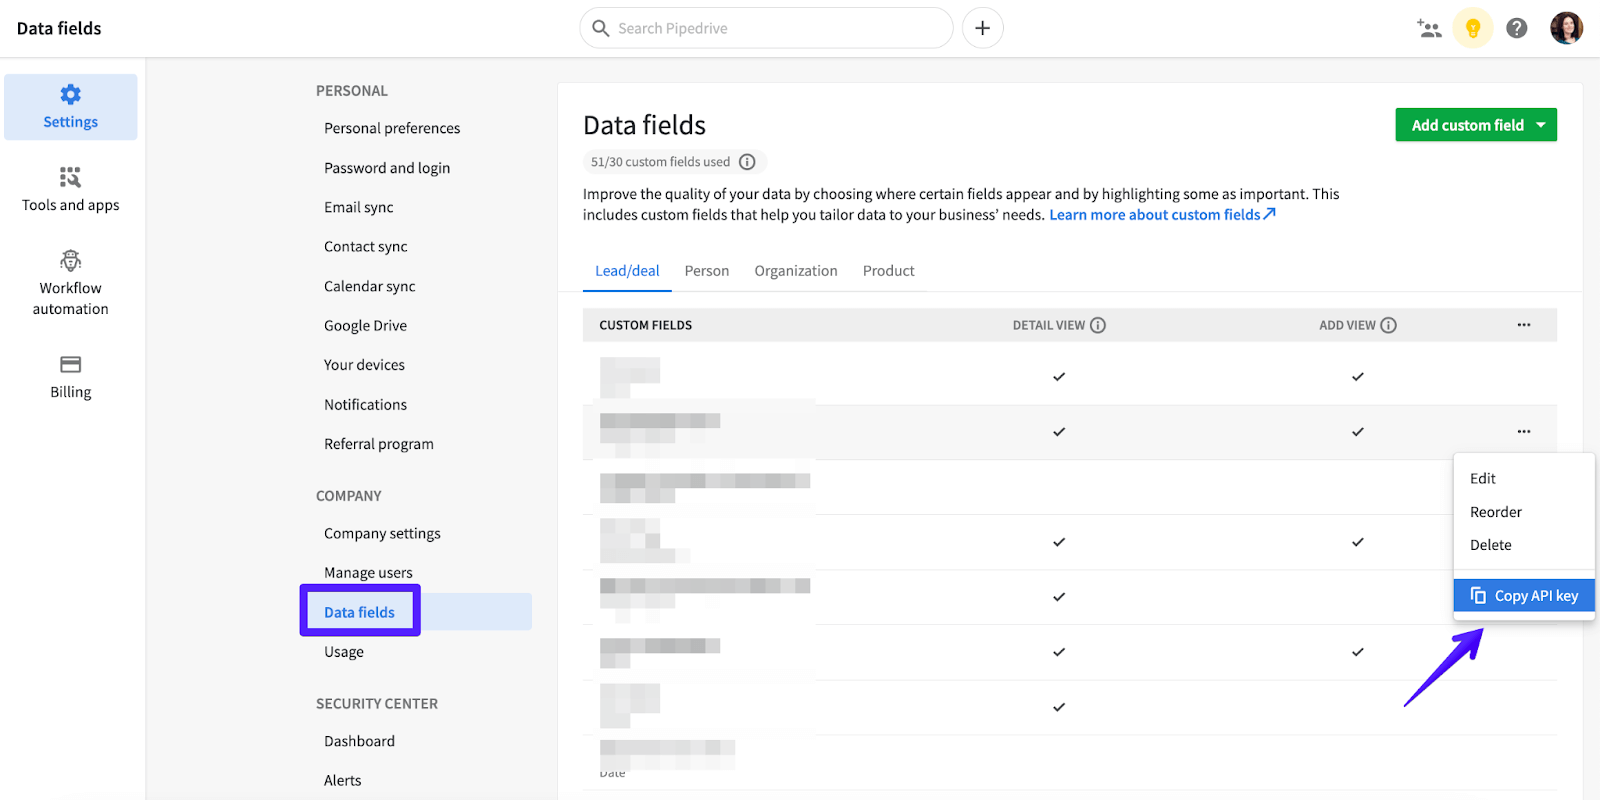
If you need to look up the API key, you can do so in the Pipedrive interface. Go to Settings and Select Data fields under the Company tab. Find the custom field you’re looking for, click the three-dots menu to the right, and choose Copy API key.
Exporting data with Pipedrive API
You can export virtually any data available in Pipedrive via the interface or API. The latter offers more customization and can also be automated, but it requires a certain amount of time and knowledge to set up.
An alternative can be various apps built on top of the Pipedrive Rest API. One example is Coupler.io – a no-code data integration tool that fetches data automatically from apps such as Pipedrive, Hubspot, Airtable, or QuickBooks. All imports can run according to a custom schedule, and you can bring data to a spreadsheet (Google Sheets, Excel) or a data warehouse (BigQuery).
We’ll show you how to fetch various data entities from your Pipedrive account in the following chapters.


Pipedrive API – deals export
To get started, create a free Coupler.io account. Then, click the Add importer button.
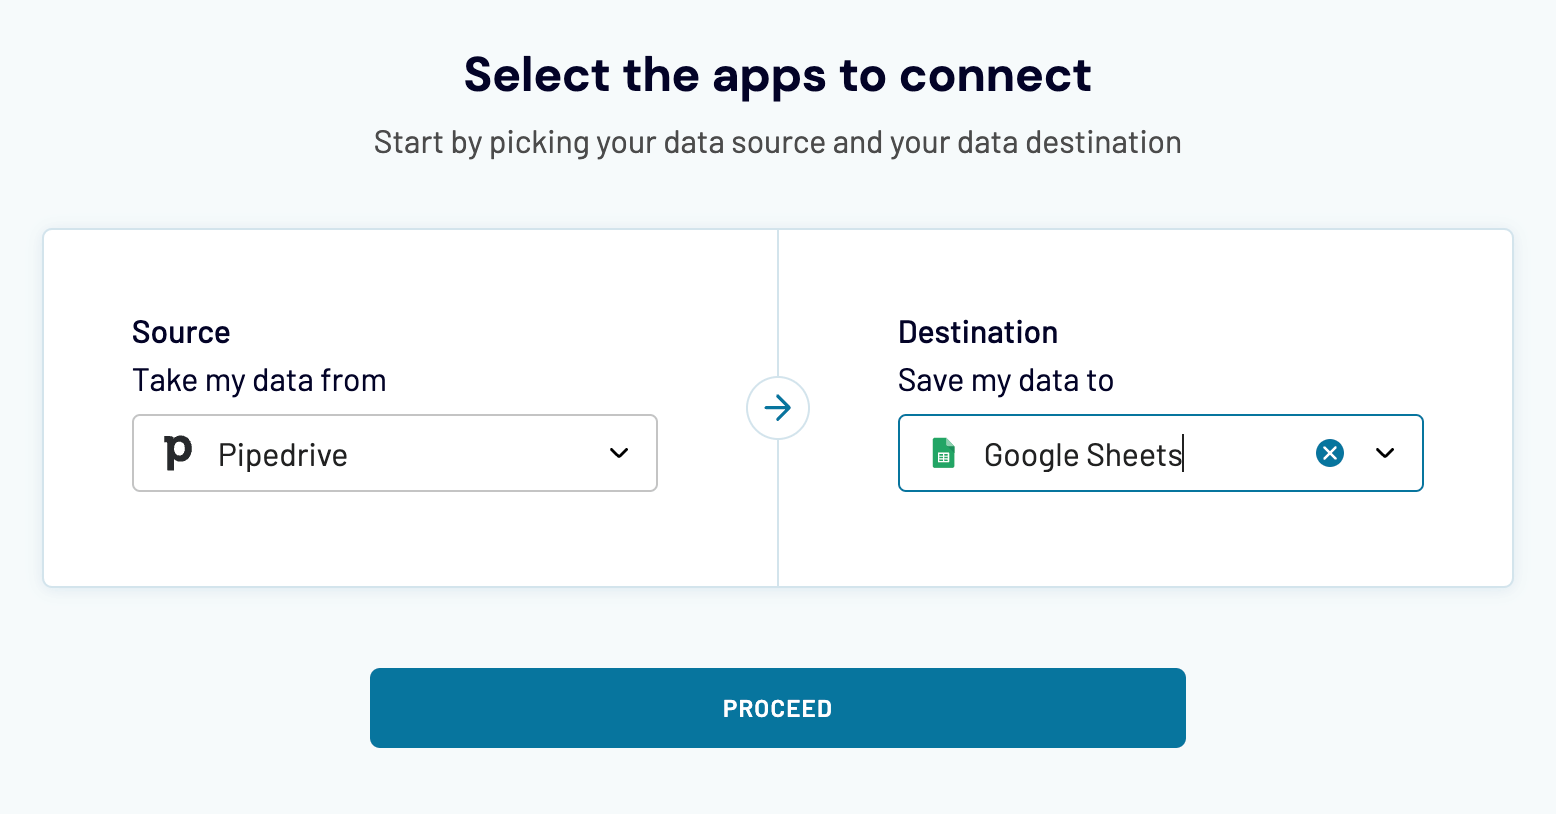
Select Pipedrive as a source app. Then, pick the destination that works best for you. We’ll go with Google Sheets but a Pipedrive to Excel example would look very similar.
Click the Connect button. Log in to your Pipedrive account and authorize Coupler.io to import the data on your behalf.
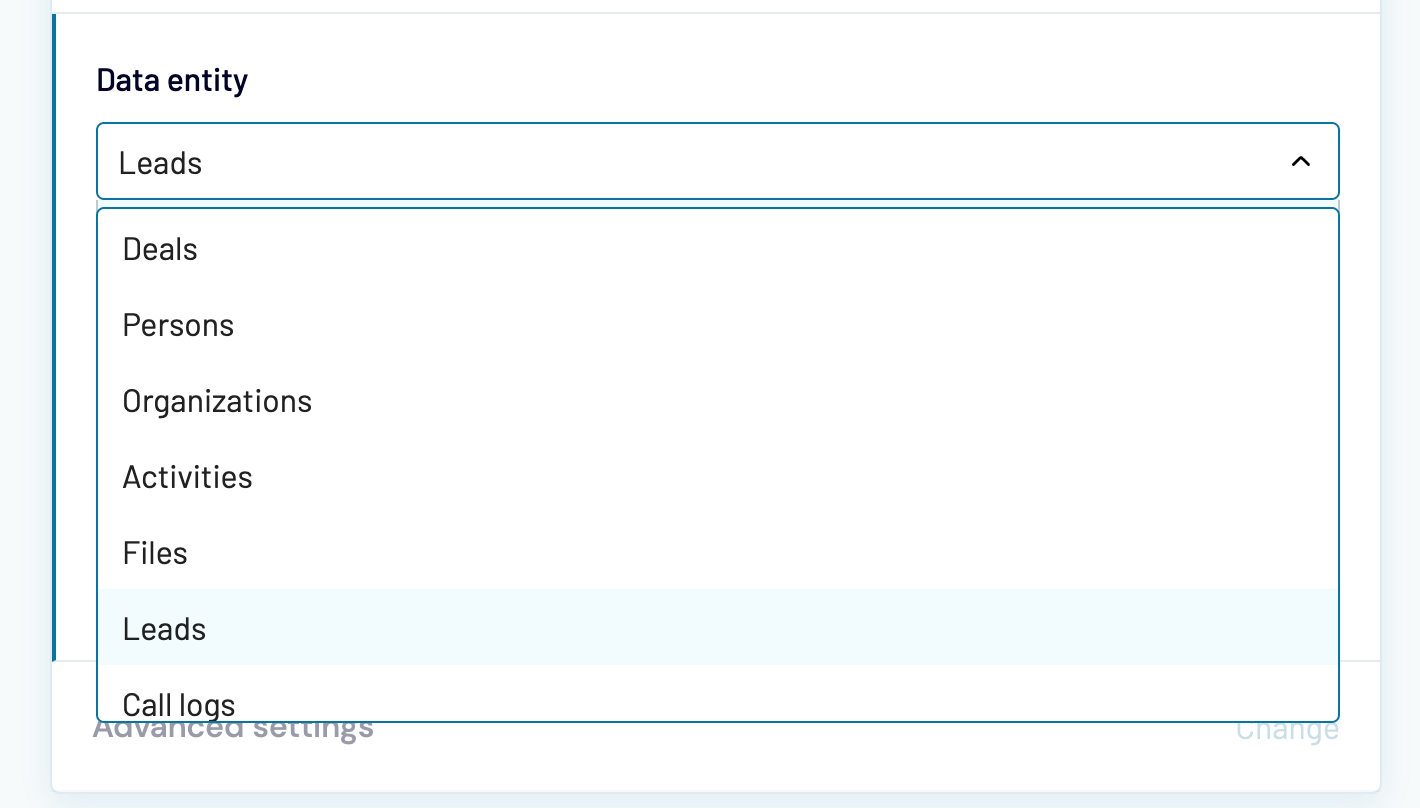
Then, choose the data entity you want to export. We’ll go with Deals.

The rest of the fields are optional so we can skip them. In the destination section, connect your Google or Microsoft account. Choose also where to import the data.
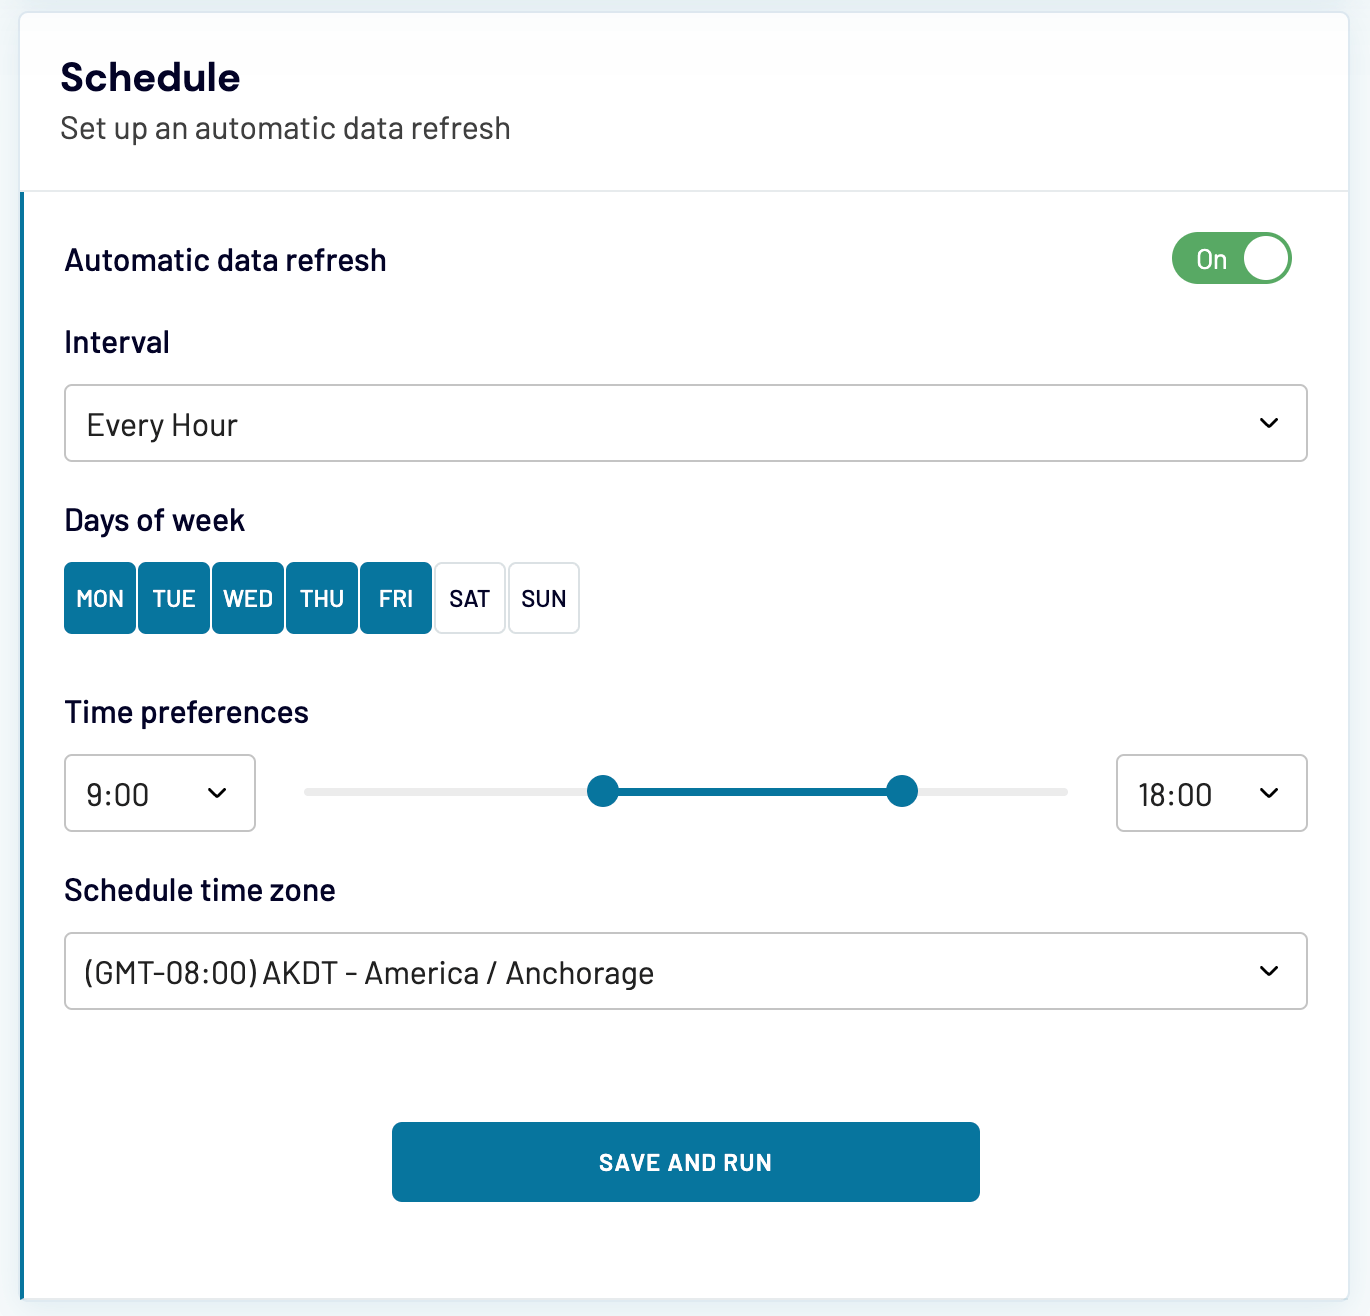
Last, decide on the schedule that data imports should follow. For example, you can choose to refresh the data every hour on weekdays to keep your reports up-to-date.
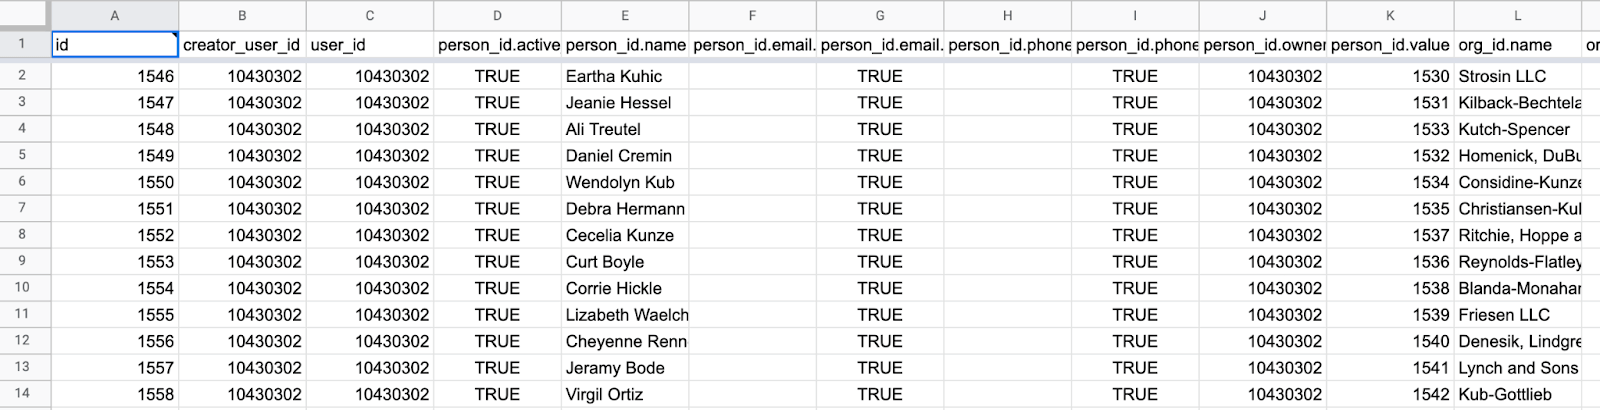
Finally, hit the Save and Run button. Once the import has finished, click the View Results button to see the complete set of deals imported from your Pipedrive account. Here’s a piece of our Pipedrive API deals import:
Pipedrive API – leads export
Continuing the example, we can export other data entities from Pipedrive – for example, Leads – without repeating the entire process.
Jump to your list of importers and click on the three dots to the right of the existing Pipedrive importer. Choose Copy. There are just three things to change:
- Name the importer accordingly, not to confuse it with the previous one.
- Change the data entity to Leads.
- Amend the sheet or table to which the data is supposed to be imported. Otherwise, the new import will override the previous Deals data.
Then, click the Save and Run button.
Pipedrive API – email export
Coupler.io doesn’t support Pipedrive email API export at this point, but there’s plenty you can achieve with the API itself. In the API reference, look for the Mailbox object. You’ll find several endpoints that allow you to fetch a particular message, thread, or all messages in a thread.
To get all threads from a particular email folder (e.g., inbox, sent), you can use the /v1/mailbox/mailThreads endpoint, supplying it with the folder name, start (for pagination), and limit parameters.
By default, the endpoint returns the first 50 threads and lots of information about senders, recipients, CC/BCC addresses, subject, message snippet (no full body), ID of an associated deal (if any), message count, timestamps, and more.
The thing is—for messages with a count > 1, this response alone isn’t enough to understand who the original sender or recipient was, when each message in a thread was sent, or what it was about.
To get such details, you’ll need to grab the thread_id from the response and for each id separately, query another endpoint—/v1/mailbox/mailThreads/{id}/mailMessages. This gives you clear information about each email, its from/to/cc/bcc fields, timestamps, and body_url, along with the rest of the details.
Optimizing Pipedrive API requests
Iterating through each email thread can quickly add up, potentially leading to hundreds—if not thousands—of requests sent concurrently, depending on the size of your inbox. If you don’t follow the API limits I mentioned earlier, Pipedrive will likely respond with 429 Too Many Requests errors.
To mitigate this, I recommend:
- Adding short pauses (0.1–0.2 seconds) between requests to give the API some breathing room.
- Querying the API concurrently, but with a controlled number of workers (in our tests, 5 turned out to be the sweet spot—Pipedrive had no issues with it).
- Adjusting the limit parameter of the
mailThreadsendpoint. Smaller batches mean fewermailMessagesrequests will be triggered before a pause. But don’t overdo it—batches that are too small may lead to your function timing out instead.
If you’re curious how this can be implemented, here’s the Python script on GitHub—a version of which we use internally. The goal was to retrieve the first message in every thread in the ‘sent’ folder to analyze which emails perform better. Even though the script sends about 1.5k requests to the Pipedrive API, it completes successfully in just over two minutes.
How to check Pipedrive API status
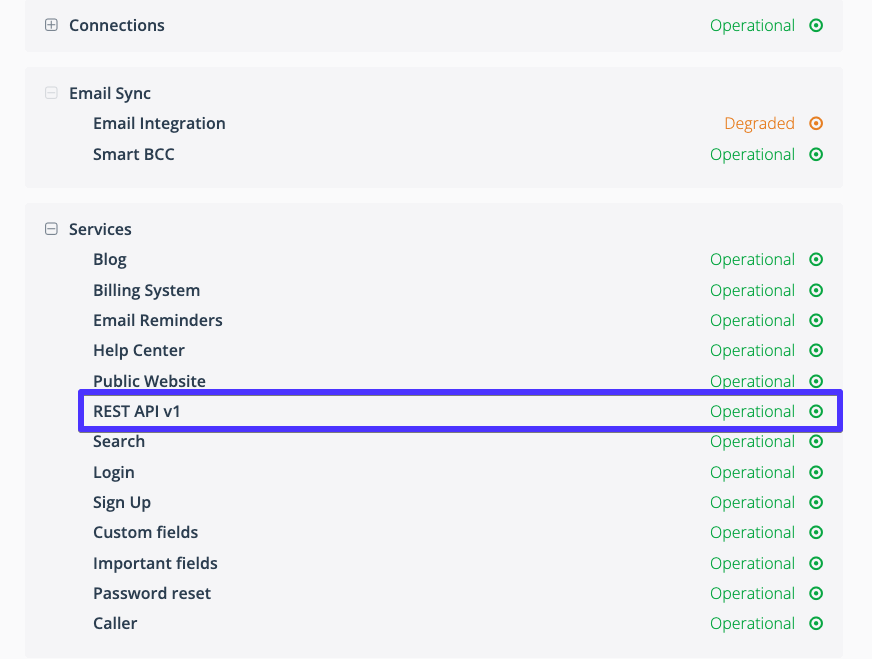
The best place to monitor the status of Pipedrive API is https://status.pipedrive.com/. In the Services tab, look for REST API v1 and its status.
Pipedrive API – recap
Pipedrive provides an easy and well-documented API so that building apps around it is both fast and pleasant. Whether you wish to enhance simple Pipedrive workflow automation or build a profitable business, you’ll have a fun time doing so.
If exporting data is on your mind, give Coupler.io a try. Thousands of Pipedrive users use it daily to fetch their Pipedrive API leads, deals, organization, and much more. It simplifies their reporting and keeps their data fresh at any time.
Thanks for reading!